Mobile app investors get a plethora of offers in their inboxes every day. Understanding how to create an app and how to prototype your mobile app can help differentiate your startup and give you a competitive edge when pitching your app to potential investors.
Marc Andreessen of Andreessen Horowitz, the venture capital firm behind Box and Foursquare, says in his Pmarca Blog Archives eBook that poor pitch quality is why so many investors use source startup recommendations:
Reading: How to create an app after prototype
One of the reasons VCs only meet with startups through their networks is because too many of the hundreds of other startups they might meet with are considered amateurish and uninformed and therefore unfundable appear when you meet them.
Obviously, entrepreneurs who go well prepared to their meetings have an advantage. The most common question we get from founders is what exactly you should bring to the pitch. A deck is great, but an actual working prototype is better. Andreessen agrees:
The best you can get is a working product. Or, if you can’t get a working product without raising venture capital, then at least get a beta or prototype of some form — a website that works but hasn’t launched, or a software model with partial functionality, or something.
So how do you make a lasting impression with a prototype?
In this blog post, we draw on our experience of launching apps and creating of mobile app blueprints to share six steps to creating a mobile app prototype.
BONUS: We recently released Mobile Midas Touch: A Free Guide covering some of the best mobile highlights investors in the industry. Download it today!
Step 1: Understand the problem
One of the first steps in creating a quality app is to make sure that You have a problem worth solving. The problem could range from a business need if you’re aiming for the B2B market, to something as simple as boredom (see games).
You might think this step sounds pretty simple. It is.
But you’d be surprised how many people come to us with ideas just because they seemed “cool”.
“Cool” is no reason to build one apartment You create an app because you wish there was an easier way to communicate with your friends. You build an app because you think the dating process is broken. You create an app because you have identified a problem in the world and it is your mission to fix this problem.
When we work with clients, we always take them through a process that allows us to uncover the purpose of the app. We want to better understand the industry as a whole, the competition, business goals, audience goals and dive deep into the features of the app that really matter to their audience. Once we clearly identify the audience and the problems this app solves, we start designing the user’s journey between problem and solution.
All of this takes time. It’s one of the most overlooked steps in this process, and as a result, we see millions of apps in the App Store graveyard.
Step 2: Identify key feature requirements
See also: Making a dependent (cascading) drop down list in Excel
Once you’ve identified the problem, start brainstorming the product requirements. It’s easy and fun to list the hundreds of different features your app should have. And that’s exactly what you should do!
Before creating your iOS app or Android app, make a list of the features that would make up your ideal app. From there, prioritize these items based on what is most important to your audience versus what would be desirable.
Here is an example of what such a list might look like for Instagram users:
1) Photo Capture2) Photo Feed3) Social Accounts 4) Photo Filters 5) Comments + Likes6) Search Function7) Private Accounts8) Account Detection9) Online Advertisement10) Video Stories
Today, Instagram puts all of these features at your fingertips. But when the app first launched, it was much simpler and included the minimum functionality needed to test the idea. As the app gained traction, Instagram began to tackle the rest of its feature wish list and over the years has expanded the app’s functionality.
Get the top 3-4 features on your priority list and design your app for them. You can add more features once you show that you have an idea that resonates and your app is something that people actually want.
Step 3: Create Sketches of the Primary Screens
Once you’ve identified the top priority features, start thinking about the user experience. One of the best ways to design the user experience is to start with a few rough sketches of how the primary screens should look and feel.
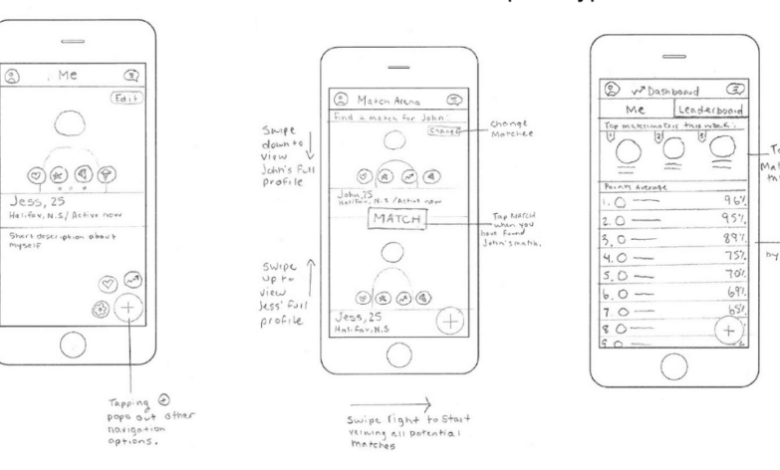
Check out these sketches we made for the Glue prototype:

We have divided the app into three main screen features: profiles, games and the dashboard . Once we had these sketches, we could flesh out the screens we had in mind in more detail.
Step 4: Convert your sketches to wireframe

Once you’ve sketched your primary screens, you’re ready to start wireframing.
A wireframe is a simplified, low-fidelity outline of your product made up of boxes, words, lines, and sometimes descriptions. It’s meant to set the framework for where your app will go, not the final look of the app.
Step 5: Turn wireframes into a prototype
Wireframes that can be put into the hands of people who want to test your product work well excellent for feedback . You can turn low fidelity wireframes into a simple prototype and share it with your target audience, friends, colleagues, managers and bosses to help them understand the app and give feedback.
We have used a number of mobile prototyping tools over the years to go from initial concept to interactive prototype. InvisionApp is one of the most used prototyping tools and is very accessible for simple prototypes. Recently, Xcode has become our go-to place for bringing wireframes to life. It’s more complex, but also a much more powerful tool than Invision. Xcode lets you create a prototype that looks and feels like a real app by using fake data and placeholder content.
See also: 10 Tips for Creating a Profitable App
Prototyping not only makes your product more real to investors, it also empowers your testers to get a real feel of what it would be like to use the app and arm your developers with a better sense of the intended UX before finalizing the design.
Step 6: Translate wireframes into final designs
Finally, it’s time to move from gray wireframes to pixel-perfect designs. If you don’t have the skills to do the design yourself, you can find a co-founder, hire an app agency, or hire a freelancer.
In each scenario, you should spend time talking to these people about your vision and assessing their ability to execute by reviewing their past work. Some designers use Sketch to create their app designs; others use Illustrator. Once you have the final files, update your Invision or Xcode prototype to look and feel like it’s live.
Share your prototype with investors
After all the hard work, you need to be ready for the big presentation.
Landing one Meeting with an investor is the first step. As Andreessen says, the best way to land an investor meeting is with a recommendation. If you don’t have a referral, contacting an investor through a cold email is one of your better options. Elizabeth Yin of 500 Startups, a venture capital fund, offers 7 tips for sending cold emails to investors:
1) Keep your email short2) Use bullet points to highlight the best parts of your business3) Make the email scannable4) Don’t include a deck in the first email5) Use an email tracker6) Your call to action is to land a meeting7) Don’t be afraid to follow up
Once you land a meeting, you should be prepared with a few key things:
- A clear story about your app and why it’s a great investment
- A pitch deck showing the problem, the solution, and the business case
- A short one-pager that investors can leave behind
- Your prototype, with that you can guide the investors through the app
It is important to be transparent if your prototype is an actual, working Pr oduct is or not. You can share the link to your prototype before the meeting, but it’s often better to walk potential investors through the prototype during the meeting or call and share the link afterwards.
Conclusion
Sounds like a lot of work?
It is. It’s not easy to go from app idea to functional requirements to sketches to mockups to prototypes. The process takes time, and when you’re building an app for the first time, it can take months to get something ready. That’s why we created the Mobile App Blueprint:
MindSea App Blueprint from MindSea on Vimeo.
Our blueprints guide founders and teams through the planning stages for all the steps outlined in this blog post be highlighted, and more. The blueprint process can take as little as four weeks and will arm you with everything you need to make a lasting impression on investors and managers.
If you’d like to learn more about the blueprint process, click here and schedule some time today to speak with one of our experienced app strategists it happens.
Wondering which investors would be a perfect match for your mobile app?
Download our latest study:
See also: How to Start a Nonprofit Blog
The Mobile Midas Touch : The 10 investors who helped turn mobile apps into gold…
.