Want to add a navigation menu to your WordPress site?
WordPress features a drag-and-drop menu interface that you can use to create header menus, menus with dropdown options, and more.
Reading: How to create a wordpress website for beginners primary menu
In this step-by-step guide we will show you how to easily add a navigation menu in WordPress.

What is a navigation menu?
A navigation menu is a list of links that point to important areas of a website. They typically appear as a horizontal bar of links at the top of every page on a WordPress site.
Navigation menus add structure to your site and help visitors find what they’re looking for. This is what the navigation menu looks like on WPBeginner:
WordPress makes it really easy to add menus and submenus. You can add links to your most important pages, categories or topics, WordPress blog posts, and even custom links like your social media profile.
The exact location of your menu depends on your WordPress theme. Most themes have multiple options, allowing you to create different menus that can appear in different places.
For example, most WordPress themes have a primary menu that appears at the top. Some themes may also include a secondary menu, footer menu or mobile navigation menu.
However, let’s see how to create a custom navigation menu in WordPress.
Video Tutorial
If you prefer written instructions, just read on
Creating your first custom navigation menu
To make a navigation menu you need You visit the Appearance » Menus page in your WordPress admin dashboard.

First you need to provide a name for your menu, e.g. B. “Top Navigation”. Menu” and then click the “Create Menu” button.
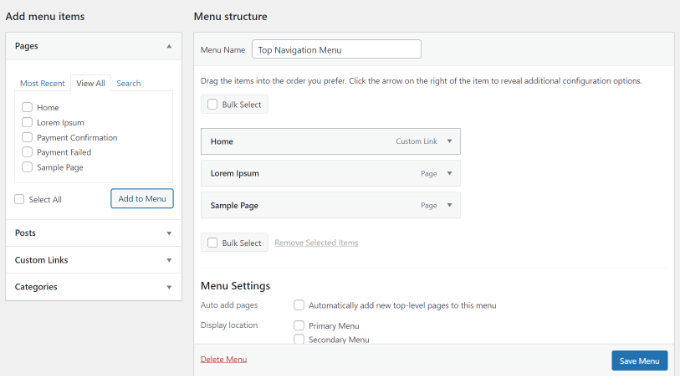
This will expand the menu area and look like this:

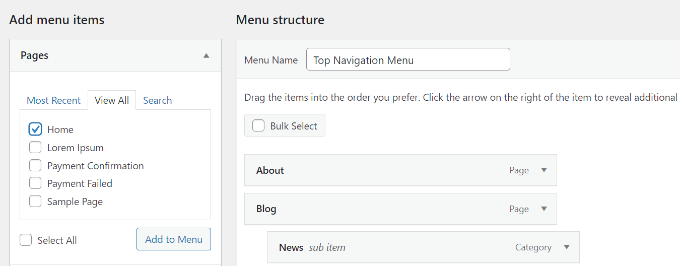
Next you can select the pages you want to add to the menu. You can either automatically add all new top-level pages or select specific pages from the left column.
First, click the View All tab to view all pages on your site. After that, check the box next to each page you want to add to your menu, then click the Add to Menu button.

Once your pages have been added, you can move them around by dragging and dropping them.
This way you can change their order and rearrange them.
Note: All menus have their items in a vertical (top to bottom) list in the menu editor. When you place the menu live on your site, it will appear either vertically or horizontally (left to right) depending on the position you choose.
Most themes have several different positions where you can place menus. In this example we are using the Astra theme which has 5 different locations.
After adding pages to the menu, select the location where you want the menu to appear and click ” save menu”. Button.
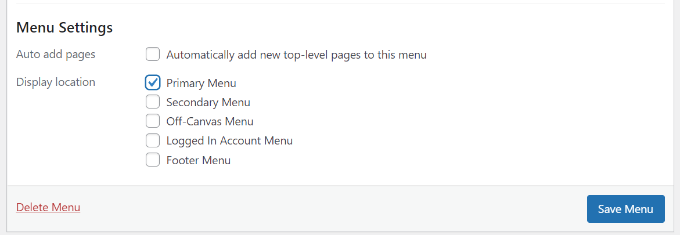
Tip: If you’re not sure where each location is, try saving the menu in different locations, then visit your website to see how it looks. You probably don’t want to use all of the locations, but you might want to use more than one.
Here is our finished menu on the site:

Create dropdown menus in WordPress
Dropdown Menus, sometimes called nested menus, are navigational menus with parent and child menu items. When you hover over a parent item, all the child items below it appear in a submenu.
To create a submenu, drag an item under the parent item and then slightly to the right. We did this with 3 sub-items under “Services” in our menu:

See also: How to create a Mobile Data Collection App
You can even add multiple dropdown levels, so your submenu can contain a submenu. This can end up looking a bit confusing, and many themes don’t support multi-level dropdown menus.
Here is the submenu live on our demo site:

Adding Categories to WordPress Menus
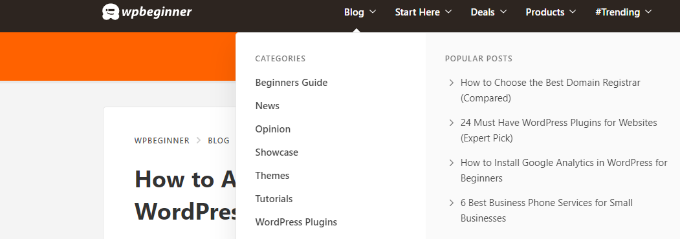
If you use WordPress to run a blog, then you might want to add your blog categories as a drop down menu in your WordPress menu.
We do this on WPBeginner and we have several categories like News, Themes, Tutorials and more.
You can easily add categories to your menu by clicking on the Categories tab on the left side of the menu screen. You may also need to click the “View All” tab to see all your categories.
Just select the categories you want to add to the menu and then click the “Go to Menu” button add”.
p>
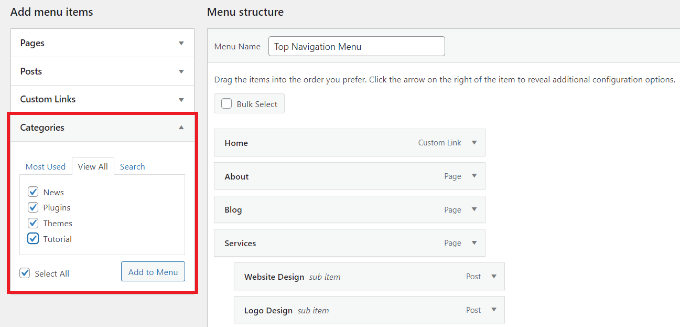
The categories appear as normal menu items at the bottom of your menu.
Next you can drag and drop them into position. For example, we will place all of these categories under the Blog menu item.

Would you like to have a separate blog page on your website from your homepage? If so, check out our tutorial on creating a separate page for blog posts in WordPress.
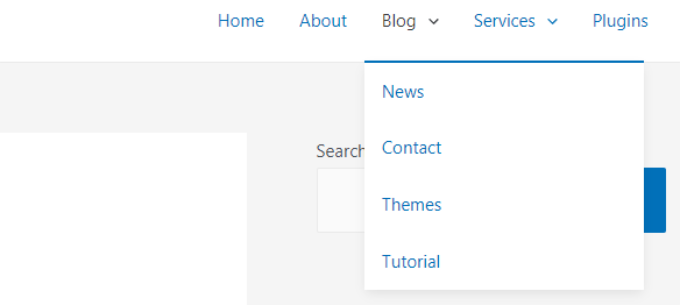
This is how different categories appear in the navigation menu on our demo site:
Adding Custom Links to Your WordPress Navigation Menus
Aside from categories and pages, WordPress also makes it super easy to add custom links to your menu. You can use it to link to your social media profiles, online store and other websites you own.
You must use the Custom Links tab on the menu screen. Just add the link along with the text you want to use in your menu and click the Add to Menu button.

You can even get creative and add social media icons into your menu or a call to action buttons to get more conversions.
Edit or remove a menu item in WordPress navigation menus
When you add pages or categories to your custom navigation menu, WordPress uses the page title or category name as the link text. You can change this if you wish.
Each menu item can be edited by clicking the down arrow next to it.

You can change the name of the menu item here. Here you can also click “Remove” to completely remove the link from your menu.
If you are having trouble with the drag-and-drop interface, you can also move the menu item by typing click on the corresponding ‘Move’ link.
Add navigation menus in Full Site Editor (FSE)
The new full site editor allows you to edit your WordPress themes to customize using the block editor. Released in WordPress 5.9, it allows you to add different blocks to your templates to create a unique design.
However, the full website editor is still in beta and is limited to specific themes that support it. For this tutorial we will use the default Twenty Twenty-Two theme. Check out our article on the best WordPress themes for full website editing for more details.
To add a navigation menu using the full website editor, you must first go to the Appearance » Editor from your WordPress dashboard. You can also click the Customize button in the Twenty Twenty-Two theme to open the full site editor.

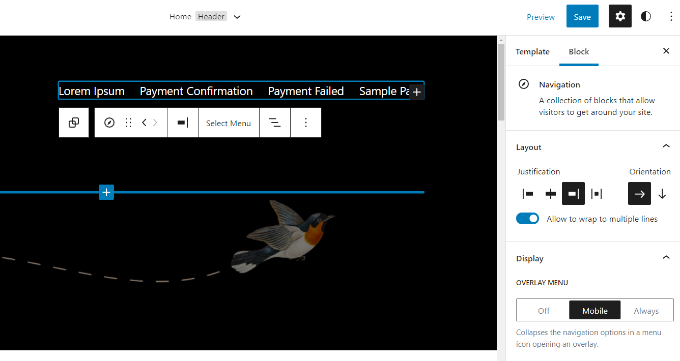
Once in the editor, click on the navigation menu that appears at the top of the website header.
Next you will see various options for customizing the navigation menu block on the right.
For example, you can change the layout, edit the display settings, show a submenu on click, change the color of the text, background and submenus, and adjust the font size.
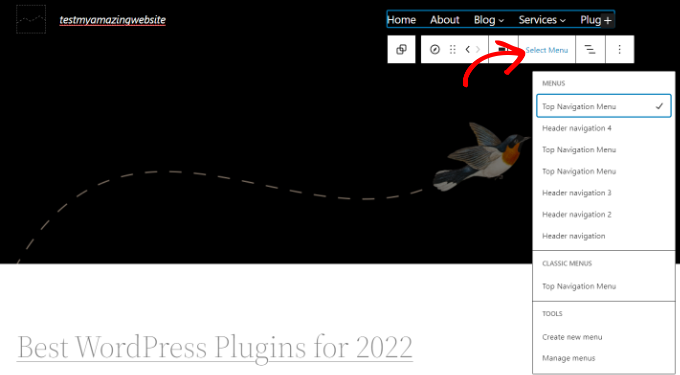
For more options like changing the menu or creating a new one, you can click the “Choose menu” option to open a drop-down menu.
See also: How to Create an MLM Website to Increase Sales
For example, you can select any menu that you previously created in the “Classic Menus” section.
Once you’ve selected a menu, you can add more pages, blog posts, website logos, social icons, or a search option to your menu.
Just click the ” ” sign to add a block to your navigation menu, then select an option that appears in the drop-down menu.

The best part about using the full site editor is that you can add a navigation menu block anywhere on your site.
When you’re done, you can preview the changes to see how the menu looks in real time. Then don’t forget to click the save button at the top.

Adding WordPress menus in sidebars and footers
You don’t have to stick to just the View locations for your topic. You can add navigation menus in any area that uses widgets, such as your sidebar or footer.
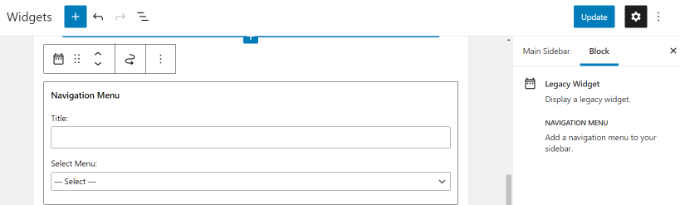
Just go to Appearance » Widgets and then click the ” ” sign at the top and add the “Navigation Menu” widget block into your sidebar.

Next, add a title for the widget and choose the correct menu from the “Choose a menu” drop-down list.
When you’re done, just click ” To update”. Button.
Here is an example of a custom WordPress footer menu created on Syed Balkhi’s site.

More progress with navigation menus
If you want to create a really epic menu with lots of links, we have a tutorial on how to create a mega menu in WordPress.
Use this to create a dropdown menu with many items including images.

Mega Menus are a great option if you have a large website, e.g. B. an online shop or a news site. This type of menu is used by sites like Reuters, Buzzfeed, Starbucks, etc.
WordPress Menu FAQs
Here are some of the most common questions we hear about WordPress navigation menus Beginner.
1. How do I add a homepage link to a WordPress menu?
To add your homepage to a navigation menu, you need to click the “See All” tab under “Pages”. From there you should see your homepage.
Check the box next to Home and click Add to Menu. Don’t forget to save your changes.
2. How do I add multiple navigation menus in WordPress?
You can create as many menus as you like in WordPress. To place a menu on your website, you need to add it to one of your theme’s menu locations or to a widget area, as we showed above.
To add multiple navigation menus to your WordPress site, create first the menus as per our tutorial above.
To place them on your site, click on the “Manage Sites” tab.

Here you can choose which menu you want to add to the View menu items available in your theme.
If you want to add a new menu item to your site, check out our tutorial on adding custom navigation menus to WordPress themes.
We hope to that this article helped you learn how to add a navigation menu in WordPress. You might also want to check out our guides on how to design navigation menus in WordPress and how to create a floating navigation menu in WordPress.
If you enjoyed this article, please subscribe to our YouTube channel for WordPress video tutorials . You can also find us on Twitter and Facebook.
See also: Frequently Asked Questions
.