Looking for a way to create a membership and user login website?
Membership sites are very popular these days because they allow you to build your own community. Instead of relying on social media for your audience, you can create your own group of members on your own platform (and maybe even charge for membership if you want to make some money).
Reading: How to create a website with membership login
The Best of all, creating a membership site isn’t that difficult…as long as you have the right tools. In fact, you can set everything up without any technical knowledge required.
In this post, we are going to tell you what these tools are. Then we will show you step by step how to create a membership website and user registration.
Let’s go!
What you need to create a membership website and user registration
Before we get to the tutorial, let’s talk about the tools you need to create a user-friendly website with membership and login features.
First you’ll need WordPress for the base your site. If you’re unfamiliar, WordPress is by far the most popular way to build a website – it powers over 42.5% of all websites on the internet.
WordPress does however support user registration in the core software , it’s quite limited and not very user-friendly – so you should extend it with one or more plugins.
Add membership functionality with paid membership subscriptions
To extend the membership functionality of your website, you can use the Paid Member Subscriptions plugin.
Paid Member Subscriptions is a complete WordPress membership solution. It helps you:
- Create unlimited membership tiers.
- Offer custom registration and login forms for your members.
- Limit the content of your Website based on your membership tiers.
- Take one-time or recurring payments for membership (you can also offer free membership tiers).
- Manage all your members from your WordPress dashboard.
Basically, paid membership subscriptions are all you need to build a membership site and user login in WordPress.
Extend registration and user profiles with Profile Builder
If you want even more control over registration/login behavior and user profile management, you can also pair paid member subscriptions with the Profile Builder plugin.
Profile Builder is a full ige solution for registration and users of WordPress profiles. Basically, Profile Builder allows you to create and customize three main forms:
- Registration – You can create a custom registration form to display anywhere on your website. You can also control the fields that appear on the form, including collecting custom information from new registrants.
- Signup – You can create your own user signup form, replacing the default WordPress one -Login system.
- Edit profile – once users have registered, you can allow them to edit some or all of their profile details from the front end of your website.
It also gives you more control over registration and login behavior in general, such as For example, setting up automatic redirects after login/registration or requiring manual admin approval for some types of users.
How to create a website with membership and user login
Let’s now start with the step-by-step guide on how to create a membership and user login website.
For this tutorial, the only thing we’re assuming is that you already have your basic WordPress site set up have. Once you have a working WordPress site, we’ll show you everything you need to do to set up membership and user login functionality.
For core functionality, all you need is the paid membership subscription plugin. However, we will also show you how to extend your registration and edit profile features using the Profile Builder if you wish.
First, make sure you install and activate the Paid Member Subscriptions plugin. You can use the free version on WordPress.org for much of what we cover, but we’ll also point out some areas where you might want the paid version.
1. Follow the Setup Wizard for Paid Member Subscriptions
Once you activate the Paid Member Subscriptions plugin, the setup wizard should launch automatically to help you configure some important basics.
If not, you can start the setup wizard manually by going to the Paid Member Subscriptions section in your WordPress dashboard and clicking the Open setup wizard button.
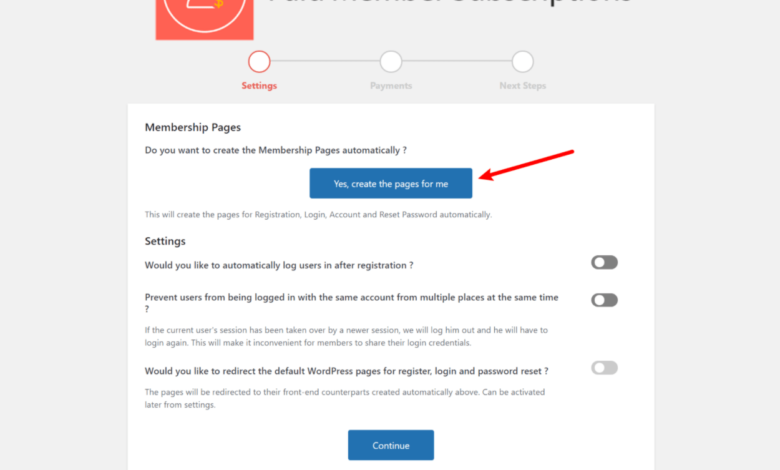
In the first step of the setup wizard, click the button to have the plugin create important membership pages for you, e.g. B. Registration, Login and Account Management. Then you can also configure a basic login/registration behavior:

The next step is to configure the payment methods you want to accept if you plan to charge some/all of your members for access your website (more on that later) If you’re not sure about this, you can always set this up later, so don’t stress too much:

And that’s it for the wizard!
2.Set up your membership tiers (subscription plans)
Next you want to create your membership tiers, which the plugin calls “subscription plans” membership tiers to control how much access different types of members have on your website.
For example, some members may be granted access to all Ih re content, while other members may have limited access.
Paid member subscriptions allow you to create both free and paid membership tiers to have a limited free tier and then one or more paid tiers. For the paid tiers, you can charge people one-time fees or recurring payments.
Create a membership tier
To create your first membership tier, go to Paid Subscriptions Members → Subscription Plans → Add New.
First you can give it a name. This is the name that will appear when people select the plan. If you’re not sure how to name it, you can read our guide to naming your membership tiers.
Set up pricing and access
See also: How To Create A Multi-user Website On WordPress
Below this, you can enter the duration and price of the Plans.
With the free version of paid membership subscriptions, you can offer free membership plans or charge a one-time price. Just set the price to zero if you want to make the subscription free:

Paid Member Subscriptions Pro also lets you top up auto-recurring subscriptions, along with things like free trials or one-time signup fees.
When you’re done, click Save Subscription to save your subscription.
Set up additional subscriptions if needed
Now you can set up additional membership plans if needed.
If your plans are not connected, you can simply go to Subscription Plans → Add New again to create a new plan.
However, you may have a tiered set of plans where the plans are hierarchical and have members on one plan upgrade to a higher tier or downgrade to a lower tier plan.
In this case you should add your plans as upgrades or downgrades.
Let’s sa y You want to upgrade the plan you just created. Go to the Subscription Plans section and hover over the existing plan. Then click the Add an upgrade option:

Then you will get the same screen where you can configure the name, prices, access duration, etc.
When you return to the Subscription Plans section, you can see the hierarchy of your plans and use the arrows to rearrange them if needed:

3. Customize your key pages (registration, account, etc.)
During the setup wizard, Paid Member Subscriptions automatically created four key pages for your membership page. These pages are:
- Account
- Login
- Reset Password
- Register
These pages are ready to use. However, you may want to add some of your own unique content to them to personalize them for your website. For example, you might want to add some text to the registration page.
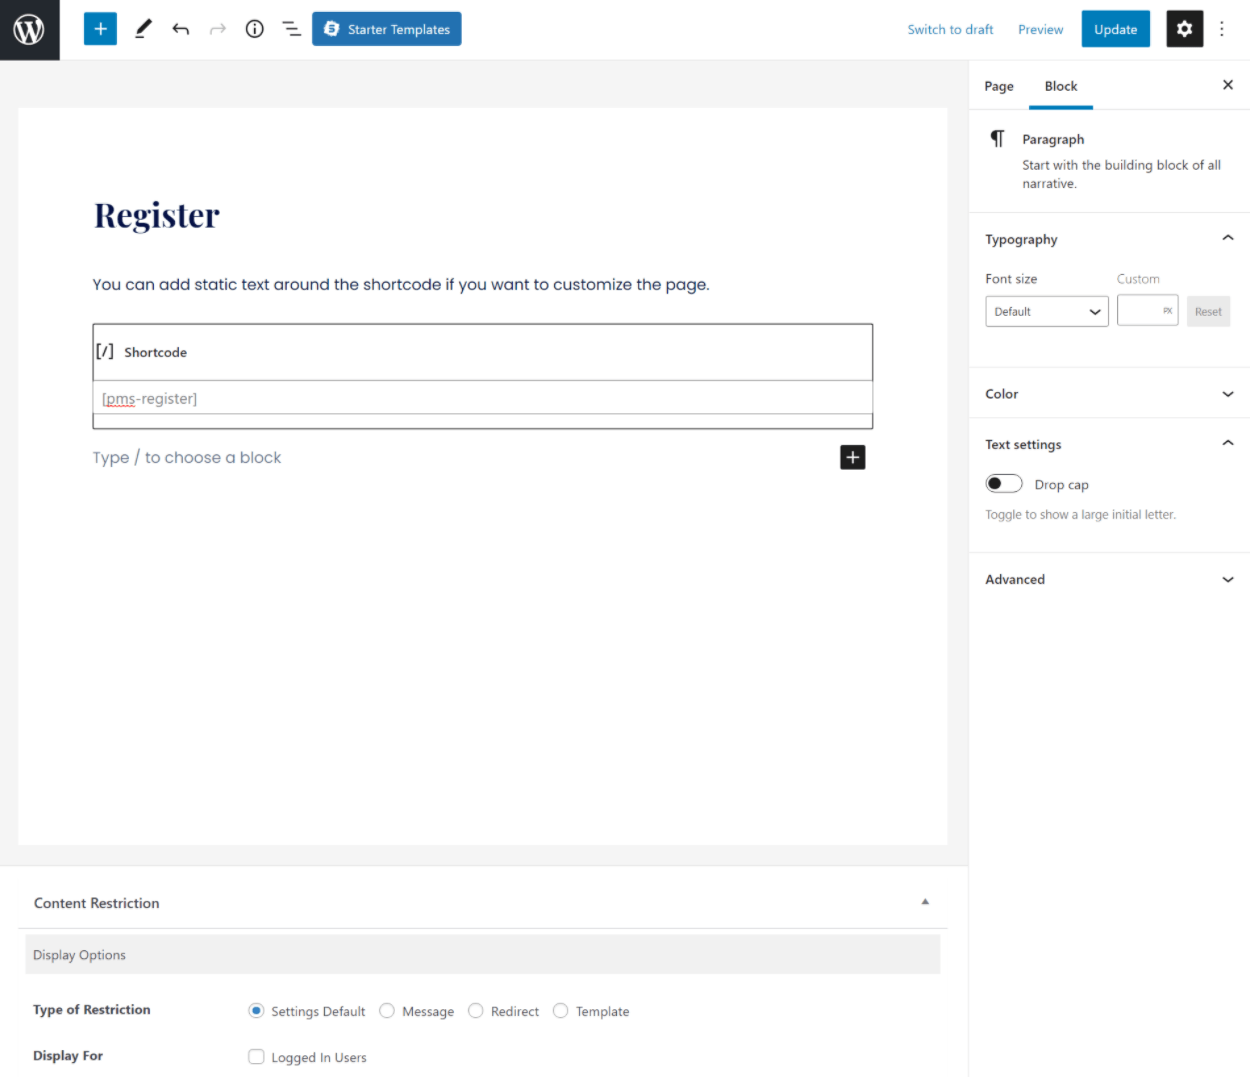
To make these changes, go to the Pages section of your WordPress dashboard and edit one of the pages. You can add as much content as you like – just don’t remove the shortcode that is there.
For example, the registration form appears on the registration page where the shortcode [pms-register] is located.
Later we will show you how to use the Profile Builder plugin to have even more control over your registration page.
4. Restrict Members Only Content
At this point, you’ve created your membership tiers and set it up for people to sign up for free or paid plans through your signup page.
For the finishing touches you need to restrict the content that should only be available to members.
There are two ways to restrict content – chunk or bulk restriction.Let’s go through both…
How to restrict individual content
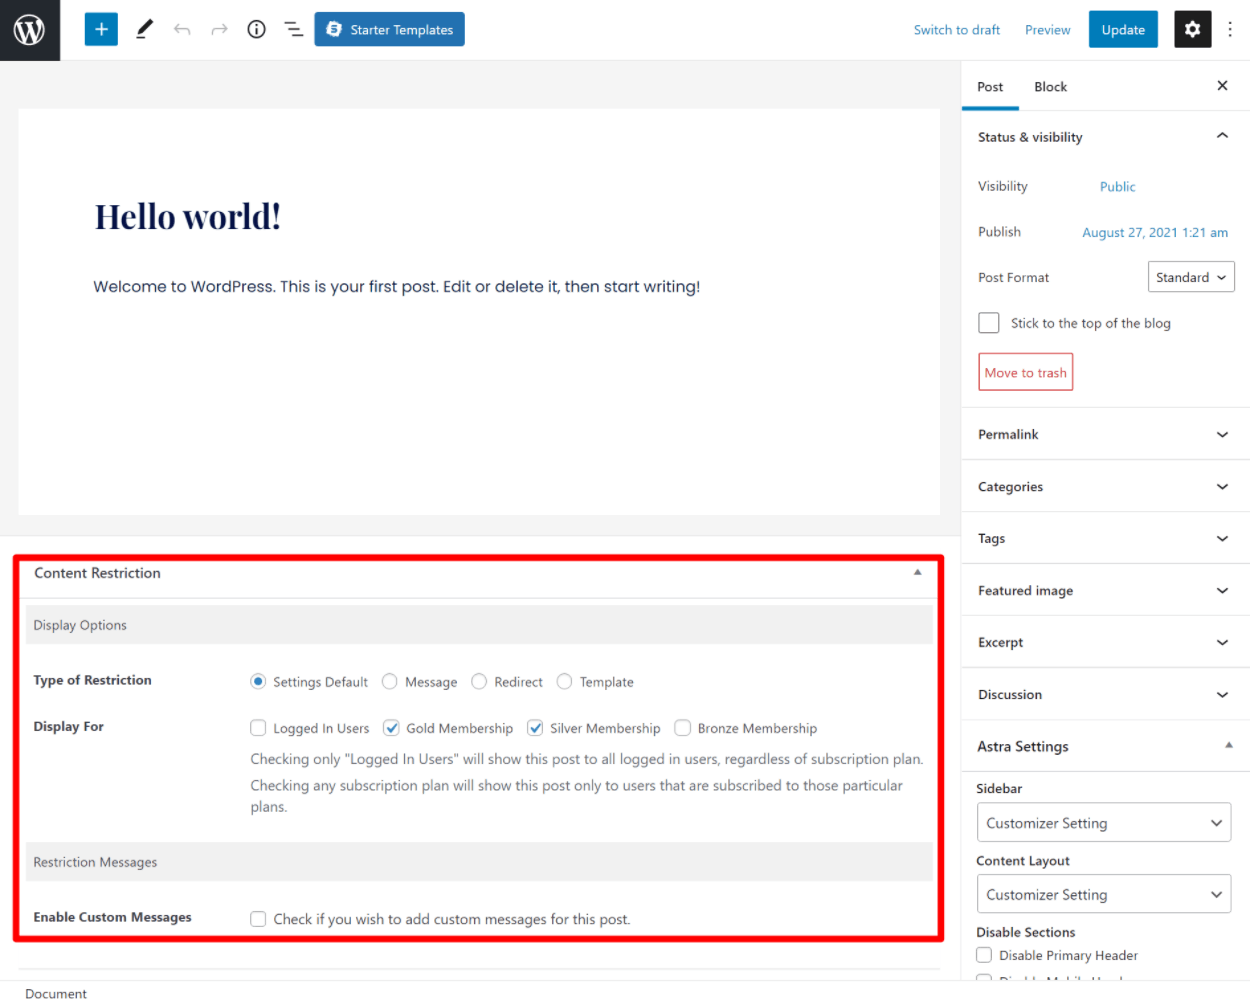
To restrict a single piece of content, open the editor for that piece of content. Then scroll down to the new Content Restriction field.
Here you can restrict the content for all logged in users (regardless of subscription) or for specific subscriptions:
How to restrict content in bulk
Paid Member Subscriptions Pro also gives you the option to restrict content in bulk. For example, you can restrict all posts in a certain category or post type.
To get started, make sure you purchase at least the Hobbyist license and then install that Add-on Global Content Restriction.
Then you can restrict content in bulk by going to Paid Member Subscriptions → Subscription Plans and edit the plan for which you want to restrict content in bulk for.
You will get a new field Global Content Restriction where you can set up rules. For example, if you restrict the “Gold Member Content” category in bulk, you can automatically restrict access to all posts within that category:
See also: How to host your own static website using AWS S3 bucket

How to delete content over time
Instead of providing all content to members immediately, many member communities prefer to “drop” content over time. For example, you could give members access to new content each week during their membership. This encourages them to stay and keep subscribing.
With the Pro for paid membership subscriptions, you can add support for content dripping via the Content Dripping add-on.
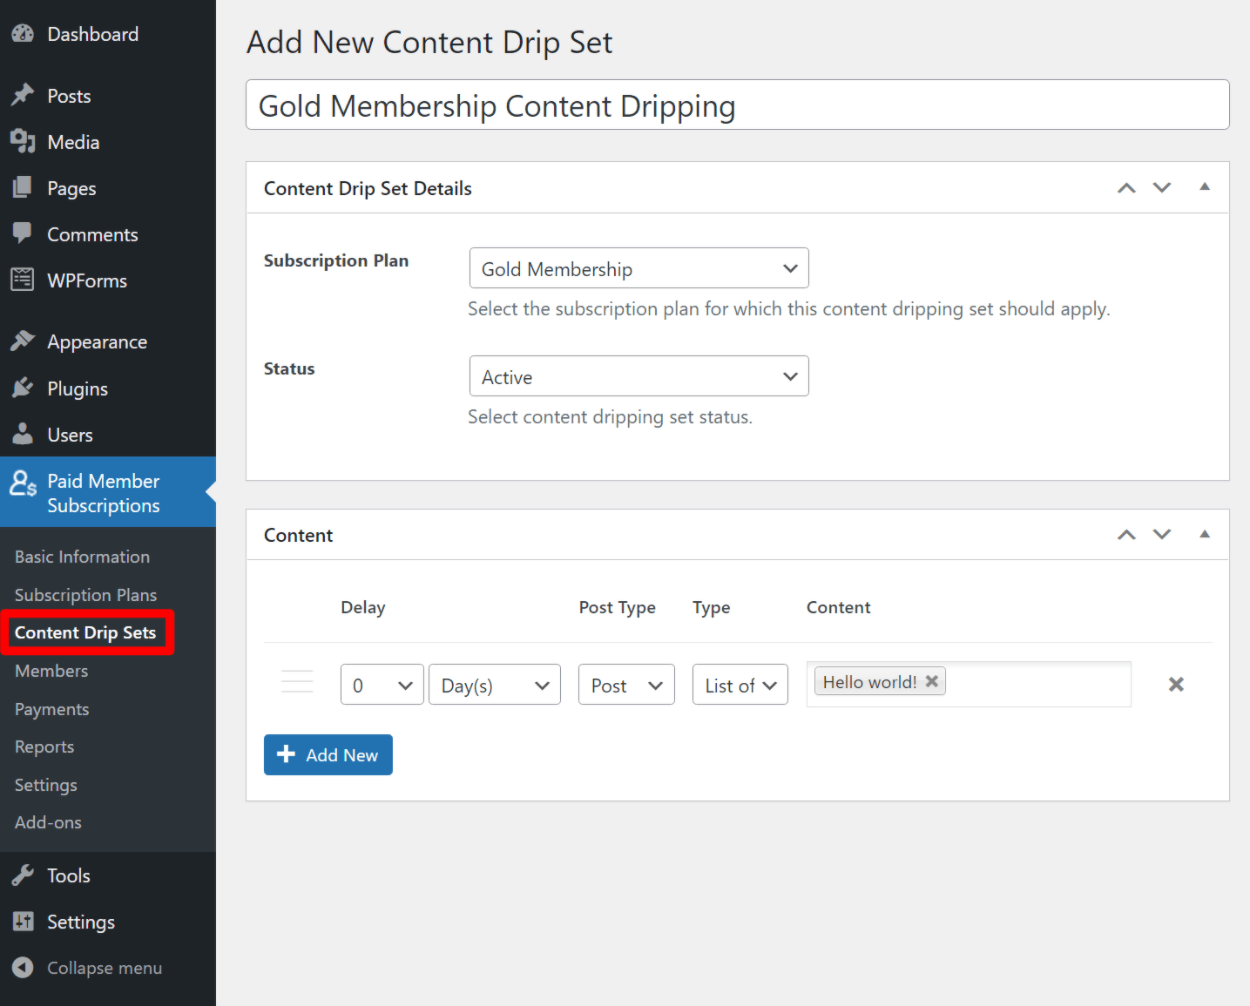
With the add-on If active, you can go to Paid Member Subscriptions → Content Drip Sets to set up content drip sequences for different subscription plans:
5 . Explore other settings for paid membership subscriptions
At this point in our tutorial on creating a website with membership and user sign-up, you’re almost done. That means your member community is fully functional.
However, you may want to examine the settings for paid member subscriptions to see if there are any minor options that you would like to optimize for your site.
You can access these settings by going to Paid Member Subscriptions → Settings. You get five different tabs:
- General – a set of general settings for login behavior, core pages, account sharing and more.
- Payments – configure everything related to payments on your website.
- Content restriction – configure the behavior of content restriction, including the default message that when a visitor does not have access to content.
- Emails – configure the emails your website sends to users.
- Miscellaneous– some different settings for things like GDPR compliance and anti-spam protection.

You can also browse all available add-ons by typing you to food For a fee go Member Subscriptions → Add-ons.
To extend registration and profile functionality (optional)
This section is t entirely optional. However, if you want more control over your member site’s registration and user profile features, you can combine paid membership subscriptions with the Profile Builder plugin.
Like paid membership subscriptions, Profile Builder comes in both a free version and a also in a paid version:
- The free version is fine if you only need the standard WordPress user profile fields – e.g. Name, Email, Bio etc.
- In the Pro version you can add your own custom fields. You’ll need this if you want to collect custom information from people when they register for your membership site.
We’re using the paid version for this example so we can show the custom fields , but the basic interface is the same for the free version.
Customize your registration form
First, make sure to install and activate the plugin. Then go to Profiling → Form Fields to control the fields in your registration form. In this interface you can…
- Use the drop down menu above to add new form fields.
- Drag and drop form fields to change their order by Click the number in the leftmost column.
- Edit the details for each form field by clicking the Edit button.
- Delete any of the default form fields if needed.

You can customize the registration form as you wish. If you have the Pro version, you can also add unlimited custom fields to collect as much information as you need from your members.
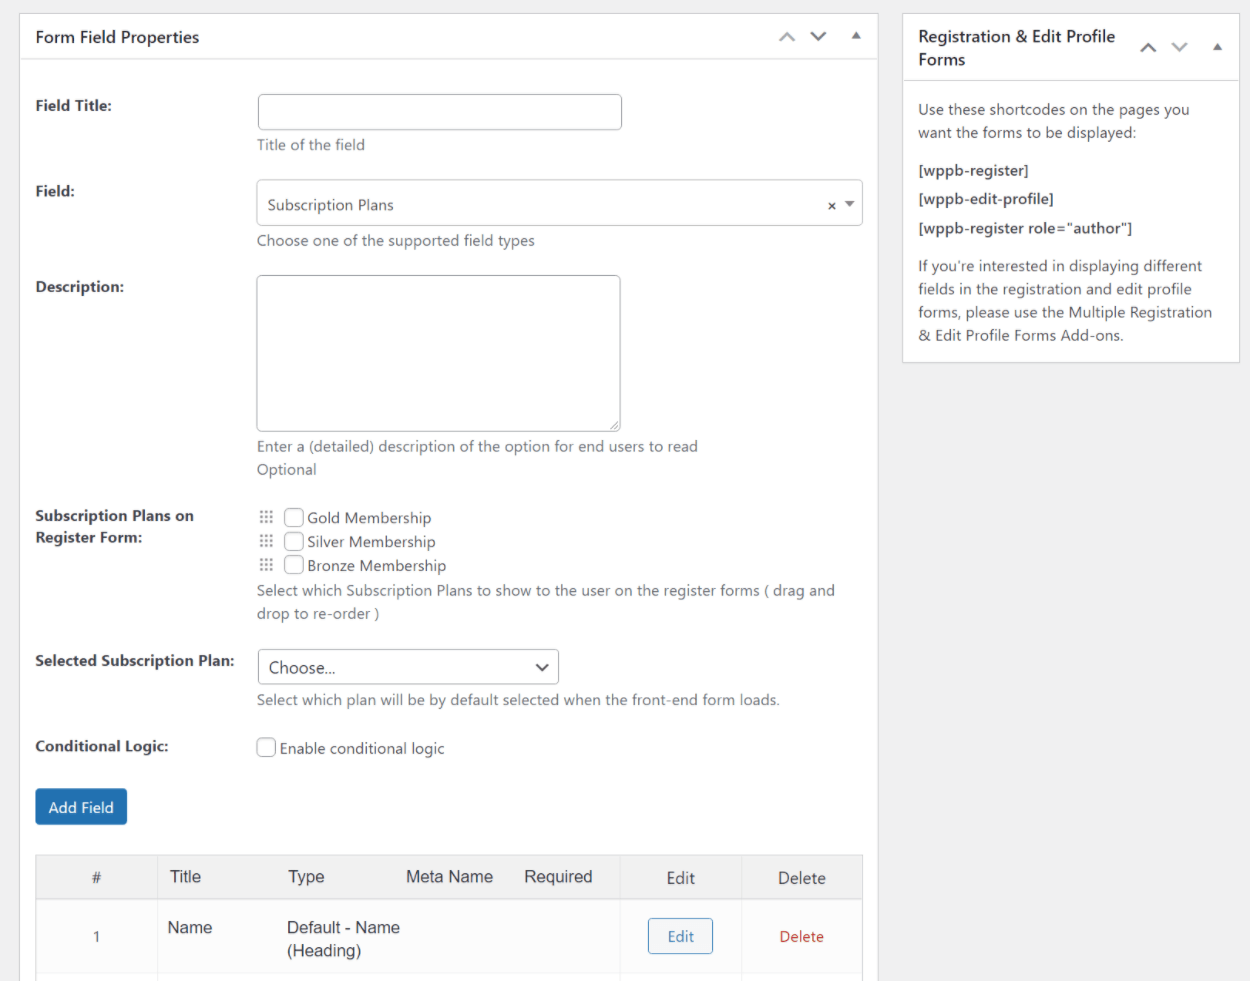
In addition to the basic profile fields like email and password, the only field What you need to add is the Subscription Plans field. This field allows you to connect your registration form to the subscription plans you have created with paid member subscriptions.
By customizing the field, you can choose which plans new users can opt into:
If required, you can also create multiple unique registration forms, each associated with a different subscription level. For example, you could create one registration form for free members and another for paying members (to do this, make sure you enable the premium Multiple Registration Forms add-on by going to Profiling → Add-ons).
View your registration form
When you are done customizing the fields in your registration form, you can use the shortcode to view it. p>
In most situations you will want to replace the registration shortcode of paid member subscriptions with the new Profile Builder shortcode:
[wppb-register]
Create a custom edit profile form
In addition to customizing your site’s registration form, Profile Builder can also help you customize the edit profile form that appears in the member’s account area of paid subscription nnements.
For your profile edit form, you can either give members access to the exact same fields from the registration form, or create a custom set of fields using the premium add-on Multiple Edit Profile Forms.
Once you have created your custom edit profile form, go to Paid Member Subscriptions → Settings and locate the Edit Profile Form on the General tab.
Change the dropdown menu to Default Profiling. strong>(or the name of your custom edit profile form if you created one):

Build your membership website today
With the right tools, it doesn’t need to be difficult be able to build a membership site with user signup.
Paid membership subscriptions give you all the features you need to turn WordPress into a membership site. Then, if you want even more control over your registration and user login behavior, you can pair paid member subscriptions with the Profile Builder plugin.
To get started with your website, you can download the free version of the paid try membership subscriptions on WordPress.org. Once you discover how easy it is to create a membership and user sign-up site, you can upgrade to paid membership subscriptions Pro to access great new features like automatic recurring payments, content dropping and more:
Still have questions about creating a website with membership and user login? Let us know in the comments and we’ll try to help!
See also: How to Create Your Master Resumé
- Share:
.