If you’re curious about how to create a simple web-based chat application in Java for your users, but not sure where to start, this is the article for you.
In this Tutorial I want to guide you through the whole process of creating a web chat app in simple steps. In this guide, I’ll use a plain text editor to create our web app and add the chat functionality using MirrorFly’s Chat SDKs. Additionally
Reading: How to create an chatting web app
I have recommended compatible versions of web browsers that will be able to run our build chat app.
Recommended browser versions
- Edge 13 or higher
- Chrome 16 or higher
- Firefox 11 or higher
- Safari 7 or above
Next you will learn:
How to create a web-based chat application (simple steps)
- Load Download the Chat SDKs
- Add the chat functionality to the app
- Connect the Chat SDKs to the server
- Send and receive messages via Your own web chat app
Sound good? Let’s get started!
1. SDK Authentication
The first step in building a web chat app using third-party APIs is to ensure that the server can authenticate the SDKs.
See also: How to Create a Facebook Business Page (and Grow It) in 2023
So that authentication can take place , we need a license key that will help the MirrorFly server to know that your app can be trusted to integrate the SDKs.
Let’s get the license key by following these steps:
- Go to the MirrorFly console page – https://console.mirrorfly.com/register
- In this page we need to create a MirrorFly account by registering as a user register.
- We need to fill in the required details such as name, contact details and organization details and click the Sign In button to complete the registration process
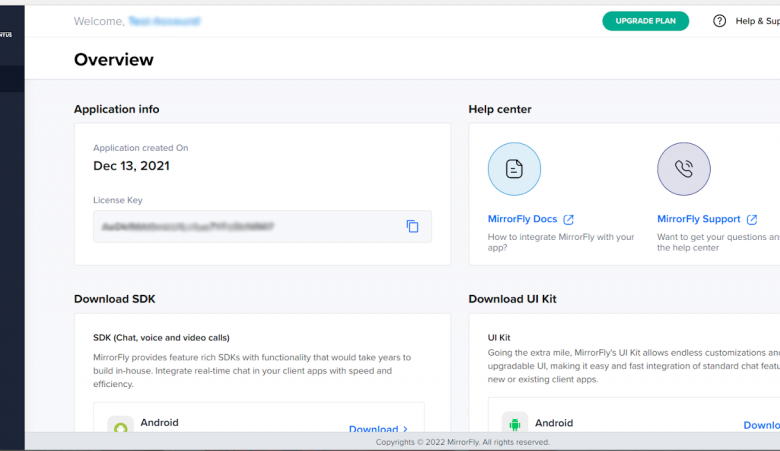
- Well, we’ You will be redirected to our MirrorFly account page where we have the overview page of our P rofils.
- In the “Application Info” section we find the “License Key” needed for the integration process

2. SDK integration
Once we have acquired the license key, we will start the SDK integration process.
For the SDK integration, download the Javascript SDK in the Download SDK section of the MirrorFly account.

Next we need to extract the files and import the SDK files into your development environment.
After importing the SDK files, add the script file to your index . html
const initializeObj = { apiBaseUrl: `API_URL`, licenseKey: `LICENSE_KEY`, isTrialLicenseKey: `TRIAL_MODE`, callbackListeners : { }, }; wait for SDK.initializeSDK(initializeObj);
Sandbox Details
function connectionListener(response) { if (response.status === “CONNECTED”) { console.log(“Connection Established”); } Else if (response.status === “DISCONNECTED”) { console.log (“Disconnected”); } } const initializeObj = { apiBaseUrl: “https://api-preprod-sandbox.mirrorfly.com/api/v1”, licenseKey: “XXXXXXXXXXXXXXXXX”, isTrialLicenseKey: true, callbackListeners: { connectionListener }, }; wait for SDK.initializeSDK(initializeObj);
Sample Response
{ “statusCode”: 200, “message”: “Success” }
To send or receive messages through the app, we need to connect users to the server. Obtain a username and password and proceed with the following method:
4. User Registration
await SDK.register(`USER_IDENTIFIER`);
Sample Response:
{ statusCode: 200, message: “Success”, data: { username: ” 123456789″ , Password: “987654321” } }
Connect SDK to MirrorFly server
Use the credentials you received during the above user registration process
See also: How To Build a Hotel Booking Site Like Trivago?
If the connection is successful , a response message: statusCode of 200 is displayed. Otherwise an execution error message is displayed
await SDK.connect(`USERNAME`, `PASSWORD`);
5. Send message from your web chat app
Use the following method to send a message to another user via our chat app
await SDK.sendTextMessage(`TO_USER_JID` , `MESSAGE_BODY`) ;
6. Receive messages from your web chat app
Implement the messageListener function that will be triggered when a new message is received in our web app. To execute receiving messages we need to call the following method
function messageListener(response) { console.log(“Message Listener”, response); }
Conclusion
If you got to the end of this article – I must appreciate your perseverance to learn how to build a web chat application. We came across the complete process of adding chat functionality to a web app that works on all compatible browsers. This will indeed create an engaging experience for your users and multiply your brand’s conversion rate.
As exciting as I made writing this article, I hope you also had fun learning all the details of creating one simple web-based chat application project. Since we’ve only covered the basic communication features in this article, I urge you to check out some other interesting features here.
I look forward to meeting you soon with more great insights. Until then, I wish you the best!
Getting started is easy. Sign up for free.
Create your account or contact us
See also: Creating Email Buckets In Salesforce
Frequently Asked Questions
.