There are tons of website builders out there. Some of them promise that they are so easy to use that you don’t even need any programming knowledge. Your pulse quickens with excitement because you haven’t heard the budget for hiring a web designer.
They sign up for their tutorials, and in fact, they look pretty easy. That is until you try using one of them. That’s when you realize how challenging that can be. There are so many steps to follow and it can get quite confusing.
Reading: How to create a website template in powerpoint
Even if you complete some of the steps, you may still end up needing a web designer’s input.
But there is a much easier way to design your website. The magic is in using PowerPoint templates to design your website.
You probably use PowerPoint for your presentations. It is convenient and easy to use. You can customize your slides as you like to make them more engaging. They also allow for flexibility, meaning you can use them for educational or even business presentations.
Now comes the exciting part. You can turn your PowerPoint slides into a fully functional website. Forget about programming or learning design tools.
Sounds incredible, right? Well, allow us to show you how in our article below. You won’t believe how easy it is.
Website Design Using PowerPoint Templates
Using PowerPoint template slides to create presentations is very popular. It enables the visual and written presentation of information. You can also embed links, which will lead to a website with multiple pages.
By exporting the slides to web pages, you can create virtual slideshows. But now you can also use the slides to create a website. We’ll show you how.
Recommended for you:
1. Start with a theme and layout
The theme and layout attract people to your site. There are countless themes available to you in PowerPoint templates. It makes it easy because you don’t have to spend time using editing tools to create the layout. Here’s what you need to do.
Start your PowerPoint. >> Go to the Home tab. >> Click on “Layout” in the slides below. >> Select title and content.
Now it’s time to enter the relevant information.
While clicking to add the title, type the name of your website.
When clicking to add the title, type the word HOME. This shows that it is your home page and your site name. Without this, PowerPoint will export it as a link.
Note that PowerPoint lists all items by default to create lists. You want to turn this off in the formatting pane.
You should have something that looks like this.
Now it’s time to choose the theme you want. Remember that the theme represents the final look and feel of your website. The Design tab has tons of options.
2. Set up different pages
See also: How to Add PHP in WordPress: 4 Easy Methods
The next step is to set up different websites. You can set it up from scratch or just duplicate the first page. The latter option is easier. Determine the number of pages you want and copy and paste as many times as needed.
It’s as simple as right-clicking on the first slide and clicking duplicate. This saves time and you don’t have to worry about the whole formatting process.
Now edit each of the pages to change the header. It helps to know which sections you want on your website. The most common are:
- About us.
- Our products or services – have a list of each of them. Remember to list them.
- Contact pages.
- Media/Gallery.
- Blog pages, etc.
You have freedom in the number of pages, you want. At this point, your PowerPoint slides should look something like this.
You might like:
3. Adding Hyperlinks to Slides
Hyperlinks help connect specific parts of your presentation to other slides. You can also link to other sources outside of your presentation. This includes saved files, web pages, emails, or even another PowerPoint presentation.
Here’s what you need to do.
Highlight the object or text to which you want to create a hyperlink. >> Right-click and select the hyperlink. >> Select the target for the hyperlink in the left side panel. You will see something that looks like this.
Browse your computer for the website or existing files. >> For the Place in this document option, select the slide where you want the hyperlink to appear. >> For the Email Address option, enter the recipient’s email address and subject line. >> Click OK and you’re good to go.
The other option is to use action buttons. They offer the same functionality as hyperlinks. But you can also play sounds and insert videos. Here’s what you need to do:
Select the object or text you want to link to. >> Go to Insert > Links group > Action > Hyperlink to Radio/Video.>> A button will appear allowing you to play and listen to the audio.
4. Saving the Web File
Once you’re happy with the slides, it’s time to save them as a web page.
Click the File menu (located in the top left of the PowerPoint window). >> Go to Save As – the dialog box will appear. Click the Save As drop-down arrow. A list of formats is displayed. >> Click the Web Pages option to associate the filename with the HTML file.
Make sure the extension is included. Otherwise the web server will not interpret the file correctly. You also have the option to change the name of the website if you wish. Just click on the Change Title field and type in the new one.
5. Publish the web page
You are nearing the end of the process.
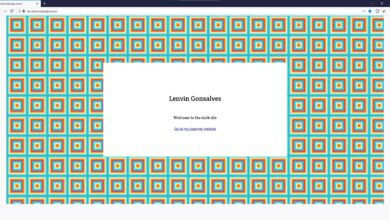
Click the Publish button. What appears on your screen is a web page window. >> Select full presentation. >> Your screen should look something like this.
But before you click publish, you’ll want the website to be accessible in all web browsers. Under Browser Support, click the third option, which is all of the browsers listed above. It enables extensive browser compatibility.
You will also find that you have options to change the homepage title. Only do this if you’re not happy with what you originally had.
More customization options
See also: How To Create A Blog Logo That Looks Professional – Easily, Quickly And On Budget!
Before you leave this page, take the opportunity to give your site a little to further optimize. Click Web Options. You get access to files, images, fonts, browser and encoding.
You can use any of the buttons to make the desired changes. For example, if you want a website on older browsers, you need to choose the right option.
If you click on the browser, you get something that looks like this.
Play with fonts and images to make your website more attractive. When you’re happy with how it looks, it’s time to publish the site. All you have to do is select the “Publish” button. Your default browser will launch your new website.
There you have it; You are now the proud new owner of a website. It’s now accessible to anyone who wants to view it.
You can also use PowerPoint for Android to view your website on Android devices, including smartphones. These can be useful if you don’t have access to a computer. It’s also great if you’re always on the go, as you’ll always have your smartphone with you.
You get all the features of a website. Best of all: You save money. You don’t spend a cent to hire someone to do this for you. You also don’t need a web hosting provider, which saves you more.
All you have to do is spend enough time to put together the perfect presentation.
Important Notes
h2>
Your contact page is one of the most important on your website. You must be careful of the information you enter. Also, please include as much detail as possible so that you can be easily found or reached.
This includes mailing address, phone number, physical location, and email address.
Once you have all the information, take the time to review the slides. Focus on things like grammar, sentence structure, and messages.
Remember that you will not use the slides for a personal presentation. In such a case, you can easily explain what is not clear. Once on the site, the audience will interact with it as is.
Errors, inaccuracies, or incomplete information will affect the message. It is important that you do not miss this step for any reason.
You may also like:
Final Thoughts
We have Dive deep into designing a website using PowerPoint templates. We have also attached step-by-step images to make the tutorial easy to understand. The main advantage is that there are so many templates that you can use. It saves you from developing one from scratch.
Using slides to create a website is pretty easy. The only thing you can be sure of is that you don’t need any programming or technical knowledge. However, it helps to have a basic understanding of how to use PowerPoint.
The benefit of using templates is that you have an almost finished product. All you have to do is customize it according to your needs. For example, you can change the fonts. You also have the option to include images, videos or audio.
Be careful of the content you have. Make sure it’s relevant to the audience you’re targeting.
See also: How to Create Your Own Server at Home for Web Hosting
This article was written by Dan Martin of SlideHunter. Dan has hands-on experience in digital marketing since 2007. He has built teams and coached others to drive innovation and solve real-time problems. Dan also enjoys photography and travelling.