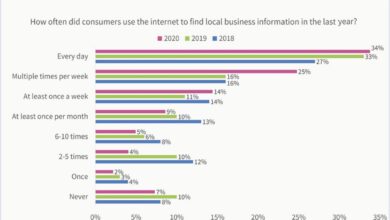
With all the recent focus on new social networks like TikTok, excitement around the first social platform to become popular with businesses, Facebook, has waned. But with 2.91 billion monthly users – 79% of whom are active daily – you still need to be there.
Don’t worry, it’s easy and free to create a Facebook Business Page. Aside from audience growth, your Facebook Page connects you to many opportunities including linking an Instagram Shop and of course running Facebook Ads.
Reading: How to create a facebook website
Read on to learn how to create a Facebook Business Page set up properly. Or, if you’re a visual learner, start with this video that explains the process in 10 minutes:
What is a Facebook Business Page?
A Facebook Business Page is public Profile on Facebook intended for companies, organizations and public figures to promote themselves.
Customers can follow (or “like”) Facebook business pages to share posts, photos and videos to see and connect with their favorite brands, businesses, and creators.
You need a Facebook Business Page to run Facebook Ads, open a Facebook Shop, and other Facebook commerce and promotional tools.
Build a Facebook Business Page in 7 steps
Step 1: Choose or create a personal Facebook account
Facebook Business Pages are not the same as Facebook profiles or users. These are assets managed by a personal account known as a Page admin. A site can have more than one administrator; more on that later.
You can either use your personal Facebook account or create a new account with your work email address if you want to completely separate your personal and work life. (Remember last year’s Christmas party? If not, be sure to unlink your accounts.)
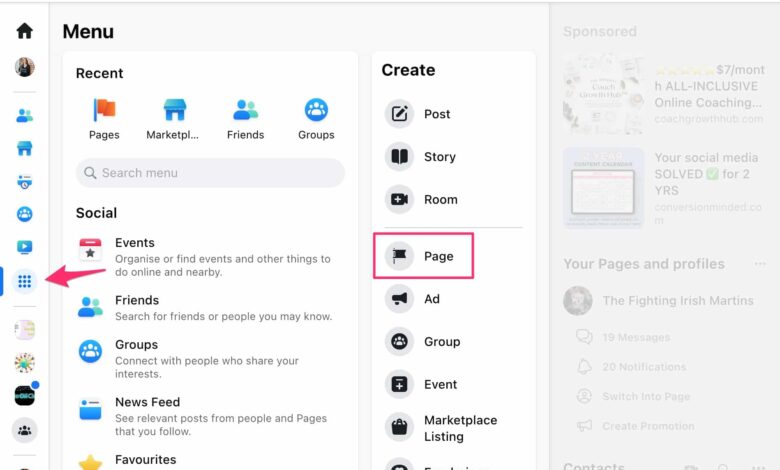
Log into your Facebook account, then create a Facebook Page. You can also click the menu icon on the left and then click Page in the Create section.

See also: How to Make a Logo in Photoshop – Easy and Advanced Examples
Source: Facebook
Step 2 : Enter your basic information
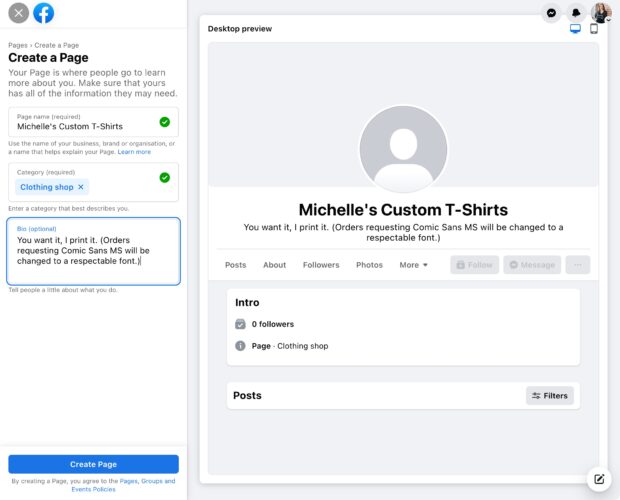
Enter your business information. You can add more business details later, but you only need 3 things to create a Facebook Business Page:
- Name: This is your public name and title book page. In most cases, your company name alone will suffice. If there’s another popular Facebook business page or business with the same name as you, you might want to add a descriptor to make it easier for people to find you, e.g. For example, “Michelle’s Restaurant” instead of just “Michelle’s”.
- Category: Start typing a word to describe your business and Facebook will suggest options. Choose what fits best.
- Description/Bio: Your elevator pitch. Write a summary of your business in a sentence or two.
Then tap Create Page.

Congratulations Congratulations, you’ve created a Facebook Page! Now comes the fun.
Step 3: Complete your Facebook business page information
Follow the prompts to fill in more details like your business hours, website, phone number and all that good stuff.
All of these fields are optional, so if you don’t want to include your phone number or address, leave them blank.

Step 4: Profile and cover photo add
Besides adding style to your Facebook Page, your profile and cover photos should have recognizable branding so your customers know they’re in the right place.
Your profile photo should contain your logo. Get creative: add a background color to make it stand out.
Your cover photo can be something general about your business or customized to reflect current promotions or events.
See also: How to Make a Logo in Photoshop – Easy and Advanced Examples
Source: Facebook
Picture sizes on social media change occasionally, but here’s what you need for 2023:
- Profile picture: Square format, at least 170 x 170 pixels
- Cover photo: 851 x 315 pixels
Grab our free templates for cover photos for Facebook pages, to spice up your new page.
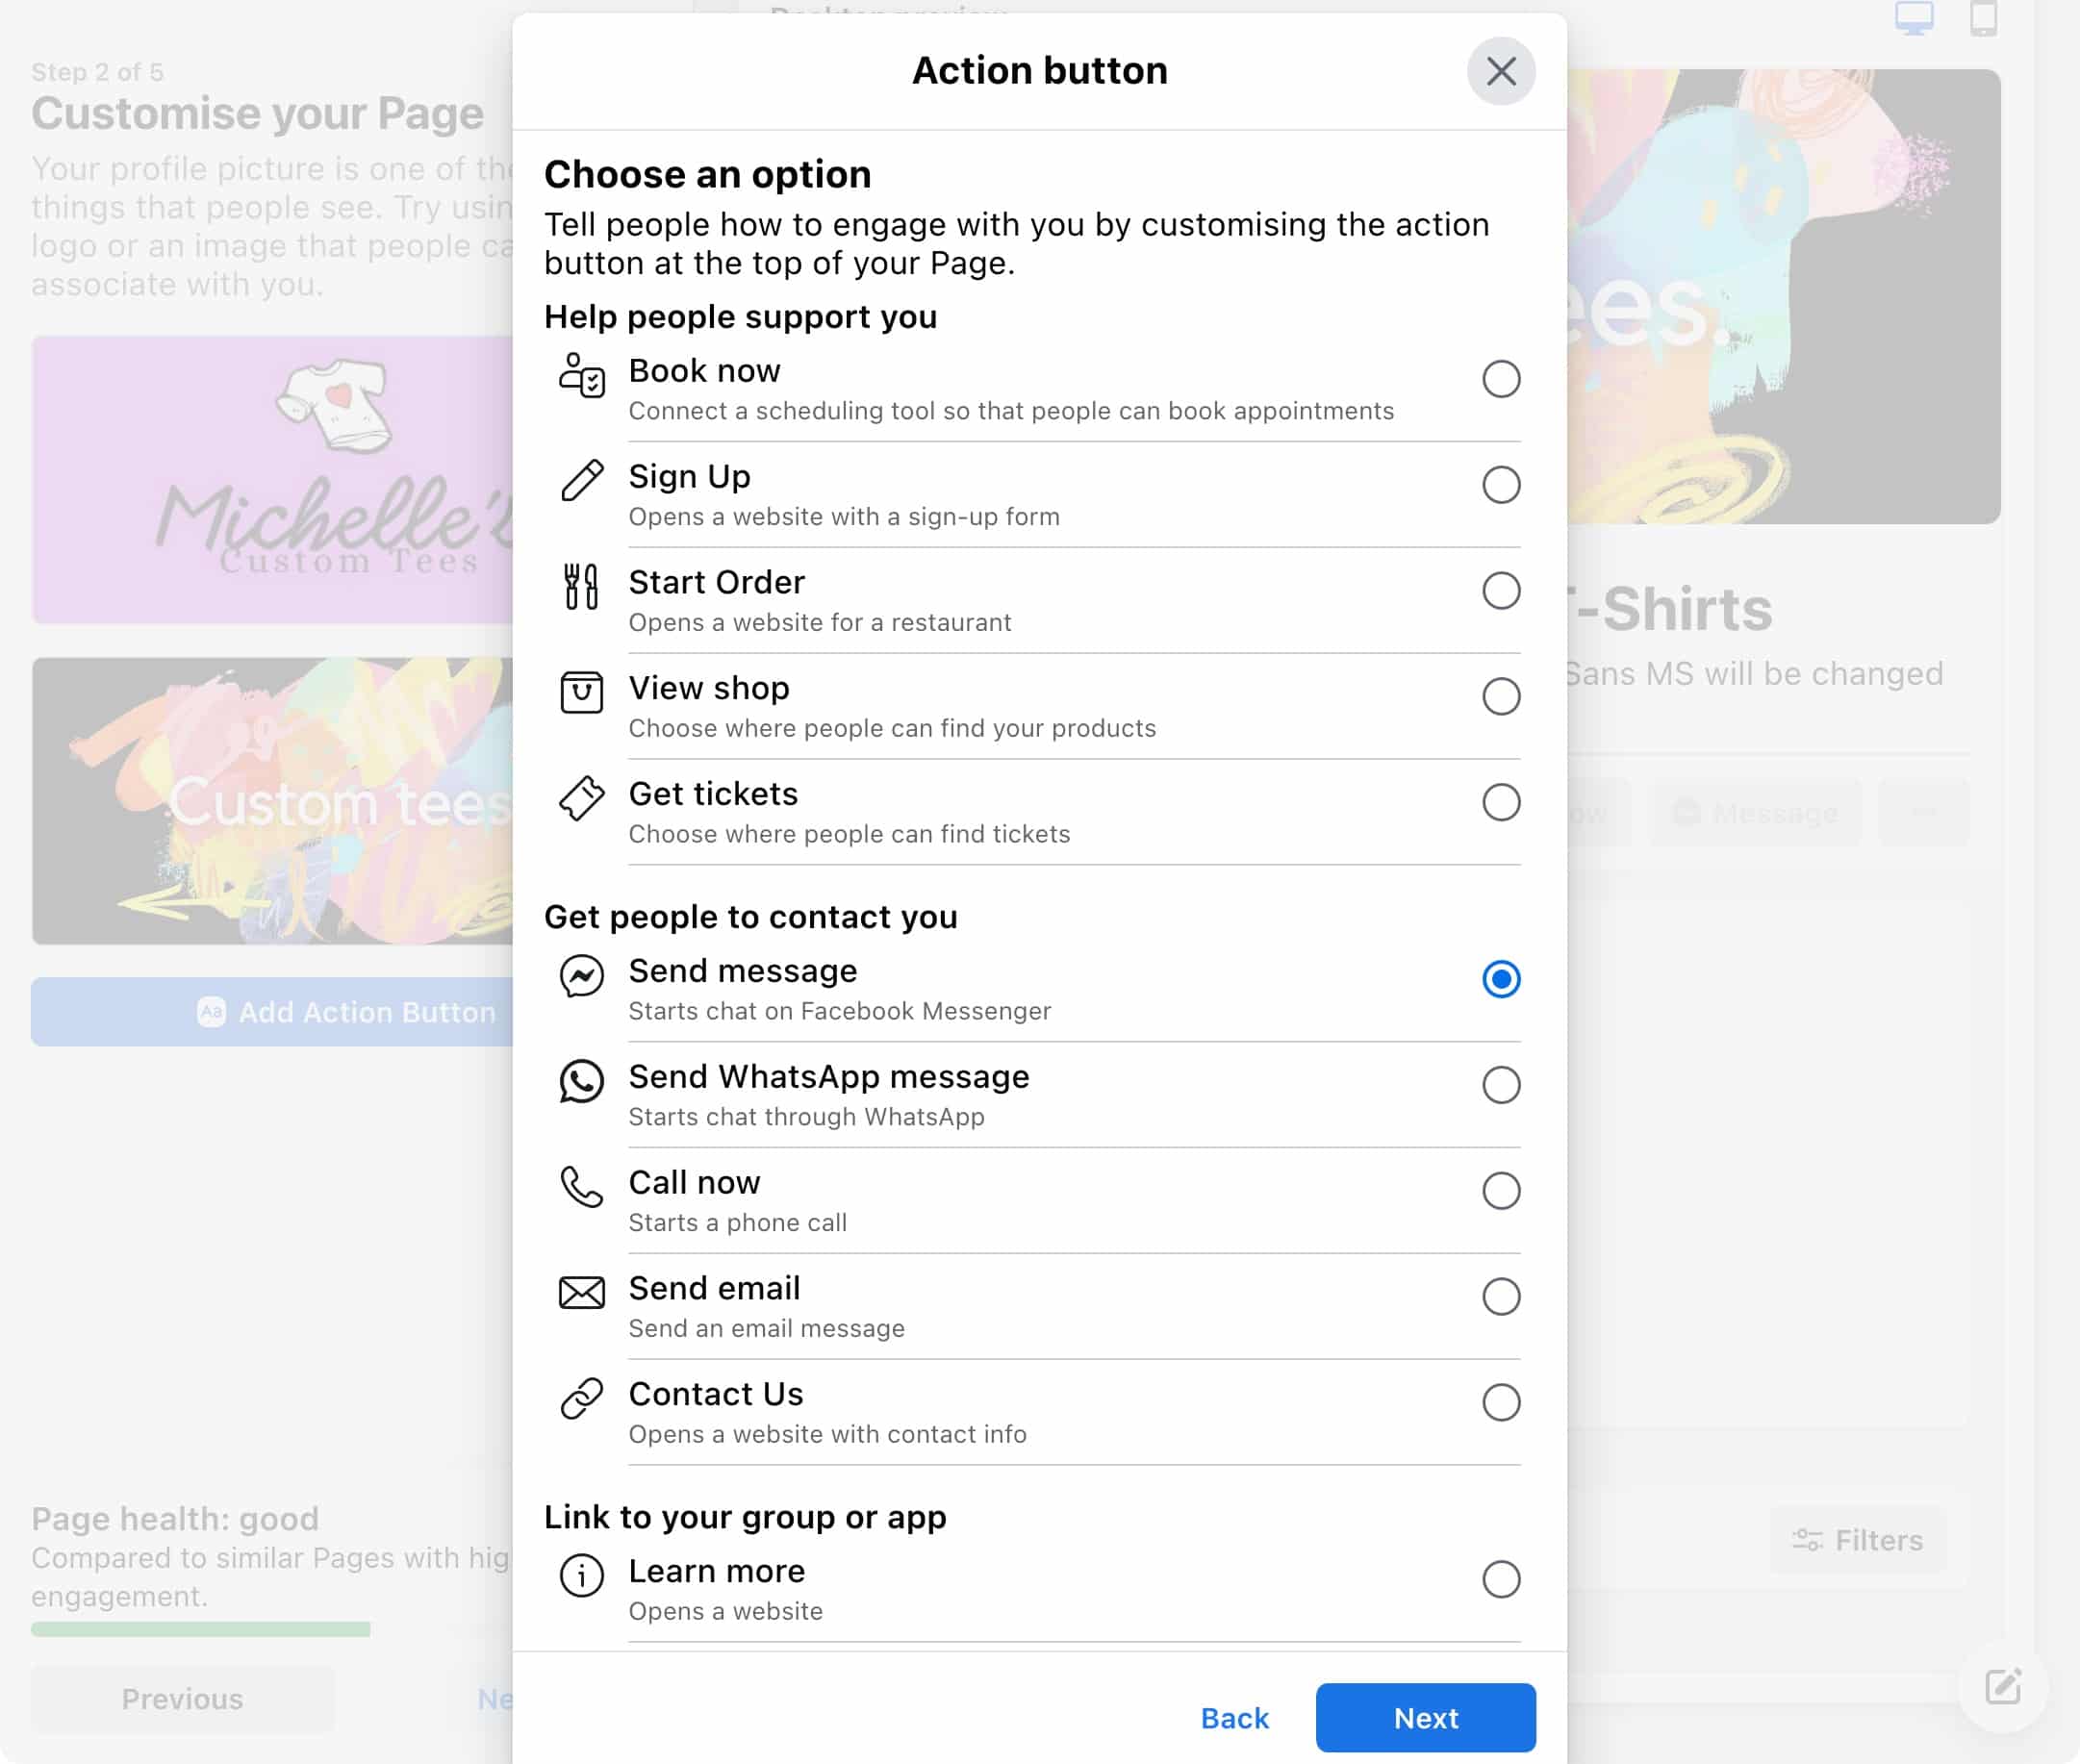
Step 5: Add an action button
The action button at the top of your page serves as the main call to action. You can link to your website, a specific landing page or offer, or connect to business-specific services such as takes you to our plan page.

See also: How to Make a Logo in Photoshop – Easy and Advanced Examples
Source: Facebook
Tap on Add an action button.

Then choose what you want to promote: link to a website or app, get people to contact you, or connect one specific action, e.g. buying tickets or booking an appointment.

Step 6: Optimize your Facebook page
You could stop here and start posting content on your new page begin, but for best results, take time to do the following:
- Add your website: Ste ll make sure your website URL is there and enter a short Info description.

- Connect WhatsApp: Have customers contact WhatsApp directly instead of Facebook Messenger by connecting your page to WhatsApp Business.
- Add your location and hours of operation: If you have a physical business location, add your address and hours of operation in the About section.

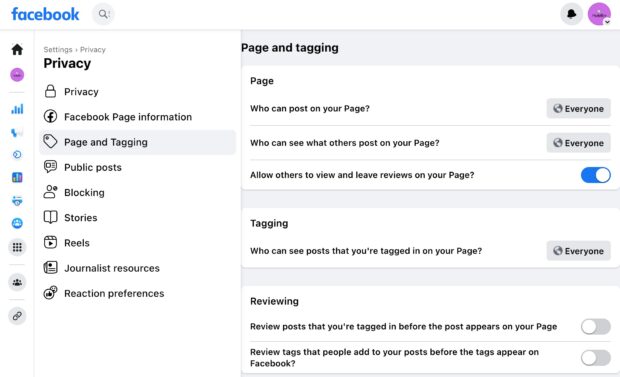
- Enable reviews. Build trust with new visitors by posting ratings and reviews on your Facebook page. If you use this feature, be sure to keep an eye on the reviews to make sure they’re from real customers and not spammers trying to ruin your reputation. And if customers are unhappy, make sure you speak up to make it right. Enable ratings under Settings -> Privacy -> Page and Tagging.

See also: How to Make a Logo in Photoshop – Easy and Advanced Examples
Source: Facebook
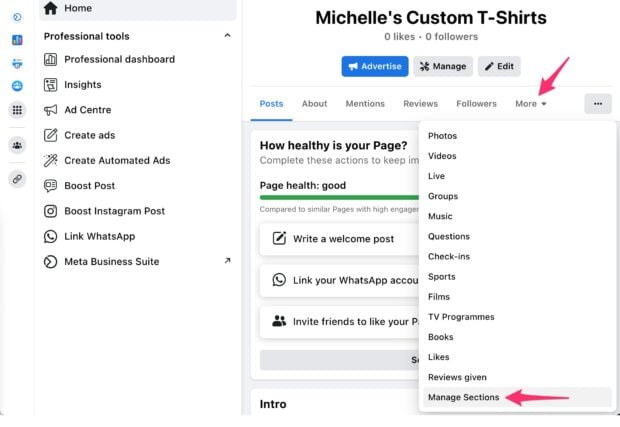
- Edit your Page tabs: You can hide your likes or reviews, as well as irrelevant sections like music, sports, books, and more. From your site management dashboard, tap More, then tap Manage Sections.

- Create a custom URL : Aside from being easier to link to, a custom Facebook Page URL or username makes your page appear more legitimate to customers. Set yours in Settings -> General Site Settings, then tap Edit next to the Username field.
- Create a pinned post (optional): Add a new post to offer something exclusive to your Facebook Page’s fans, e.g. B. a voucher. Or use it to link to your other offers, profiles and more. It’s a good little introduction to your site and your business.

See also: How to Make a Logo in Photoshop – Easy and Advanced Examples
Source: Facebook
Looking for more optimization tips? Try these lesser-known Facebook Page hacks.
Step 7: Create a post
People will first discover your Facebook Page or have a reason to follow it until you post Some great content.
Any ideas? Here are 20+ social media post ideas and how to develop a content creation process.
How to add an admin to a Facebook Page
Step 1 : Sign in as your page
Sign in to Facebook, then switch to using Facebook as your page. Click your profile photo in the top right, then click the circle icon to go to the most recently used page, or click Show All Profiles if you manage more than one page.
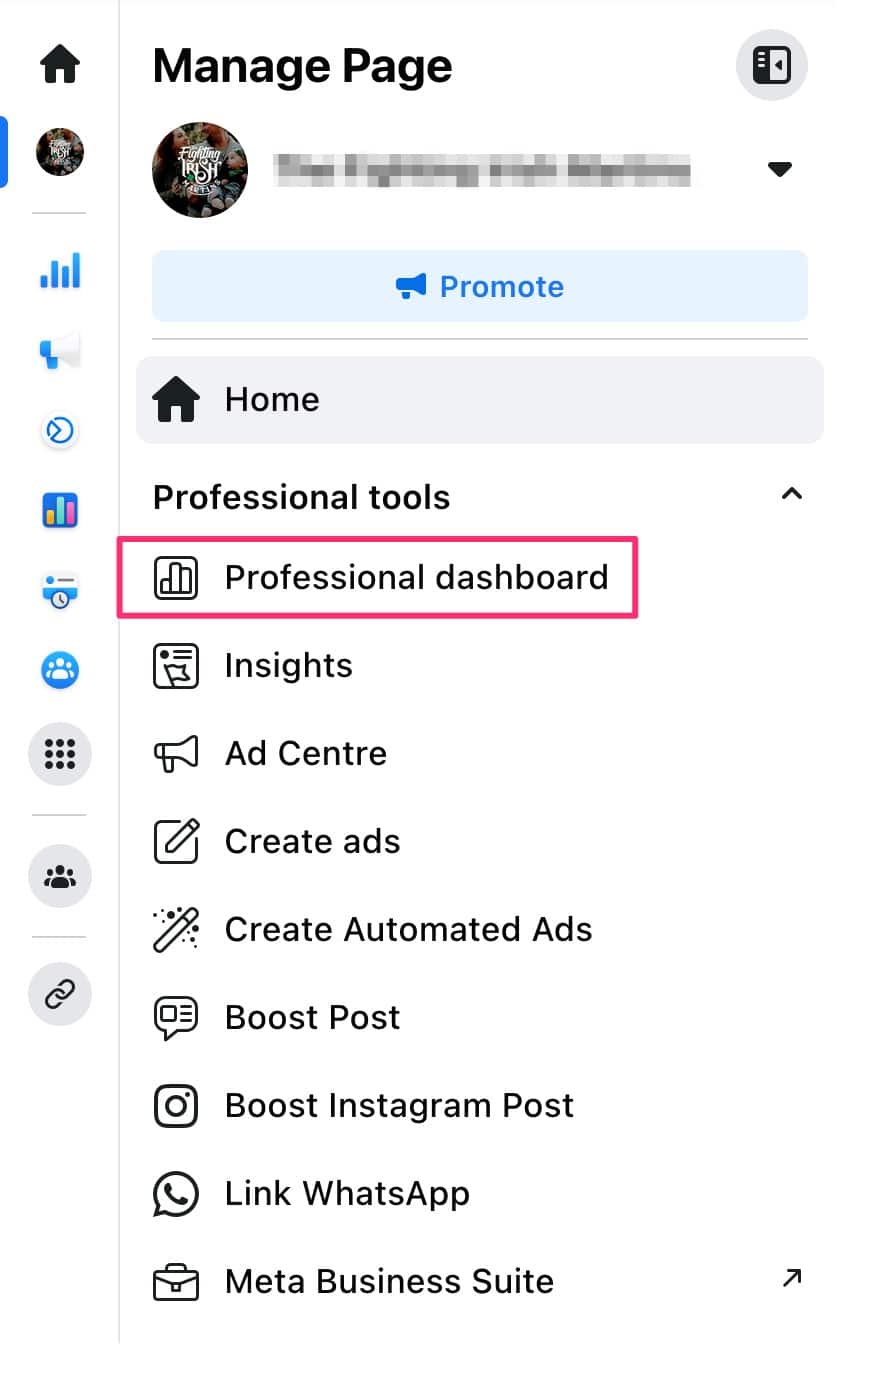
Step 2: Go to your access settings
On your Facebook page, click Professional Dashboard in the left menu.
Step 3: Go to Page Access
You can grant 5 types of access:
- Person Access: Personal Facebook Profiles who can sign in as your Page with full access to manage it.
- Task Access: Personal Facebook Profiles who cannot sign in as your Page but can access it have a specific task or set of tasks to do for your Page.
- Community Manager: Pers Public Facebook profiles that can moderate comments and live chat discussions and ban or remove Page fans.You can’t change your Facebook Page settings or post content.
- Business Account Access: Grant access to a Meta Business Suite account to fully manage your Page, add admins or to remove and even delete your site. Learn more about when to use the Meta Business Suite.
- Partner access: Business Manager accounts with access to specific assets or tasks, e.g. B. Help running page ads or analytics.
li>
Step 4: Add a Facebook admin
From your Page’s Professional Dashboard, click Add New next to the type of page access you want to grant. For example, to add a collaborator to post content for you, select either the People option (for full access) or the Task option (for specific access).
You can search by name or enter an email address to invite them. Inviting by email is more secure, so you don’t accidentally click on the fake ‘Mary Smith’ Facebook profile and suddenly your 70-year-old aunt has to manage your page.
She can access your page afterwards Click the email confirmation link.

Step 5: Add a partner to your Meta Business Suite
This will add a person to your entire Meta Business Suite account, not just your Facebook page. This is useful for giving your employees access to all of your meta assets, including Facebook and Instagram profiles, analytics, ad accounts, and more.
Log in to Meta Business Suite and go to Settings. strong> and then click Add people.

You must invite business partners by email address. Then select which roles you want this person to have.

On the next screen, choose what this person has access to. If you only want them to have access to your Facebook page, check that.

You’ll see a summary of who you can assign what to and what you can do . Click on Send request. After accepting the email invitation, they are in your Meta Business Suite account.

How to delete a Facebook page
You can delete your page either temporarily deactivate or delete it by clicking your profile photo in the top right corner and then going to Settings & Privacy -> Settings -> Privacy -> Facebook Page Information -> Deactivation and Deletion.
Option 1: Temporarily disable your Facebook page
I recommend this for most users. Whether you’re taking a long break or just hiding want search results reached the past subsequent deactivation has the same goal – nobody can find your page – but it will still be possible in reverse.
You must enter your Facebook password to continue.

You must also select a reason for deactivation. The first option – “This is temporary.” – provides the ability to automatically reactivate your page after a specified period of time. This is helpful, for example, to really switch off on vacation. (Although it would be better to leave your page open and instead just delete Facebook from your phone for a week.)
Choose a reason and click Deactivate to finish. To reactivate it, follow the same steps as above to go to your Settings & Privacy section and you will see an option to reactivate there.
Option 2: Permanently delete your Facebook page
I have to stress: don’t do it! There aren’t many good reasons to permanently delete your Facebook page, unless you’re going out of business.
Once you’ve decided, select Delete Page under Settings & Privacy – > Settings -> Privacy -> Facebook Page Information -> Deactivation and Deletion.
Before deleting, download or transfer your data. There’s no way to get it back if you change your mind later (which is why you should disable it instead of deleting it, friend).
See also: The structure of an HTML document

If you click Next, you will be asked to enter your password and then you will see this warning message. This is it! If you click Next here, your page will be deleted. (!!!)
Unlike everyone who got a tramp tattoo in 1999, Facebook is giving you 30 days to change your mind and reactivate your page.

How to manage Facebook Pages easily
Meta, owner of Facebook and Instagram, has two native solutions to manage one or more Facebook Pages: Meta Business Suite and Creator Studio.
You need the Meta Business Suite to run ads, use Facebook Commerce, and connect your Facebook and Instagram business accounts.
Creator Studio enables Page managers , create and schedule content and view analytics, either on the web or via mobile app. It includes the ability to go live on your Page or post to multiple Facebook Pages at once.
There’s a much better way: Hootsuite.
Optimized planning with best publication time
Don’t leave your presence to chance. Schedule your posts on Facebook Pages – and all your other social media content – with Hootsuite. Save time by creating your content in batches and stick to a consistent posting schedule.
Okay, but when should you post? The best time to post Facebook is 8am to 12pm on Tuesdays and Thursdays.
Ready, right? No.
Besides the convenience, scheduling your posts with Hootsuite increases your audience faster thanks to the Best Publish Time feature. It analyzes the last 30 days of engagement for each platform to automatically schedule content for your personal best time to post. It’s like having a super-intelligent algorithm-busting robot in your pocket.

Try it for free
All your social accounts in one place
Hootsuite makes it easy to manage Facebook, Instagram, TikTok, Twitter, LinkedIn, YouTube and Pinterest from one dashboard – and all your published and scheduled content in Show a clean content calendar.
One inbox for comments and messages (from all networks)
Efficient management of direct messages from all platforms in Hootsuite Inbox, tool included s to avoid duplication of work, save time with reply templates, and make sure customers don’t miss messages.
Your employees can reply to messages and comments from anywhere in their Hootsuite dashboard.

Simple, actionable analytics
Forget spreadsheets and piles of numbers with no context. Hootsuite Analytics gives your team the information they need to determine if a campaign is working while it’s still running—and if it’s not, enough time to fix the damage.
See You cover all the basics like reach, impressions, and followers along with advanced analytics, e.g. when your audience is online, individual post performance versus your average performance, and more.
View stats for all your social profiles together so you can see if everything is growing at the same pace, or when you need a strategic hub.

Start 30-day free trial
Updated daily, your Social Score is a personalized comparison of your performance – including follower growth, engagement, clicks, activity and more – across all your social media to other businesses so you always know how your marketing is performing.
Low engagement? Start planning content that will get your audience talking. Plus, get personalized tips to further improve your social presence.

Social Listening with Streams
Streams are customizable data feeds that show you what’s happening on one page is most important. For example, you can see recent posts from each platform so you can quickly jump in and reply to comments to increase engagement.
Or set up streams to monitor specific keywords or competitors and lead Perform advanced searches, such as filtering by location.Streams can increase your engagement and let you know what people are saying about your business online in real-time.

Facebook Business Page FAQs
Is there a difference between a Facebook Page and a Business Page?
Facebook Page and Facebook Business Page are two names for the same thing: a Facebook profile for your business.
Is a Facebook Business Page free?
Yes, creating a Facebook business page is completely free. Paid services such as Facebook Ads and Boosted Posts are optional.
Can I unlink my Business Page from my personal account on Facebook?
Yes. Your personal Facebook account and your Facebook business page are not affiliated with Facebook and are not publicly listed on each other. You need a personal account to create and manage a Facebook Business Page, but you can always create a separate personal profile with your work email address if you wish.
What is the recommended size Facebook Page Cover Photo?
The best size for a Facebook Page cover photo in 2023 is 851 x 315 pixels. Platforms change frequently, so check our social media image size guide for the latest information.
Manage and grow your Facebook Page along with all your social media -Profiles with Hootsuite. Plan and schedule content, engage your audience, measure and improve performance, encourage posts, and more—all from one dashboard. Try it for free today.
Get started
See also: How to Build a School Website Using WordPress
.