If you are still unsure whether or not to create a YouTube channel for your business, let me tell you one thing: don’t hesitate any more.
But if you already use this platform to promote use your brand, your project or your company: Congratulations! You already belong to that small group of privileged people that Google will treat with love and reward with a little more exposure in the future.
Reading: How to create a business youtube channel 2016
What will you find in this guide to creating a YouTube channel?
Here are three important pieces of information:
- A step-by-step guide to creating your YouTube channel
- A guide to setting up your YouTube Channel
- Relevant Information and Warnings on Aspects You Shouldn’t Ignore
Our goal is to help you create your channel quickly.
If you need reasons to read this article and learn how to create a YouTube channel for your business, here are three reasons:
- This post brings it straight to the point
- You will be you can create your channel in less than 15 minutes
- You don’t even have to post a video to use your channel
You can find dozens of tutorials on how to create a YouTube channel. Why should you choose this guide and not another?
It’s simple! For the following reasons:
- This is an updated guide
- We’ll get to the point step by step.
- Yours Time is money so the guide is short and streamlined to help you build your channel in minutes.
How to create a YouTube channel from scratch for your business
These are the 12 steps you need to follow to create your new channel.
1.- Go to YouTube.com
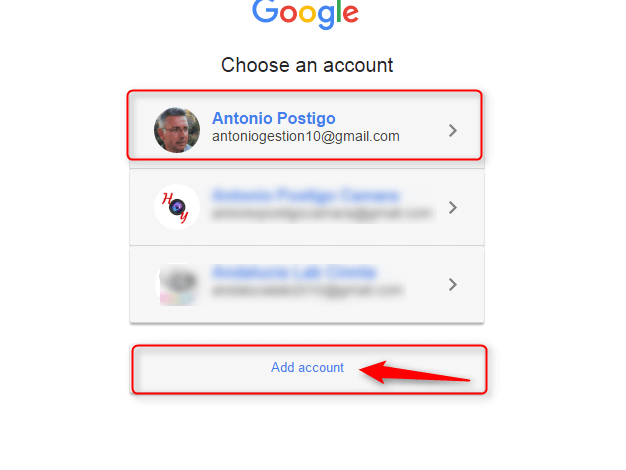
Report Sign in to your Gmail account or create a new one.

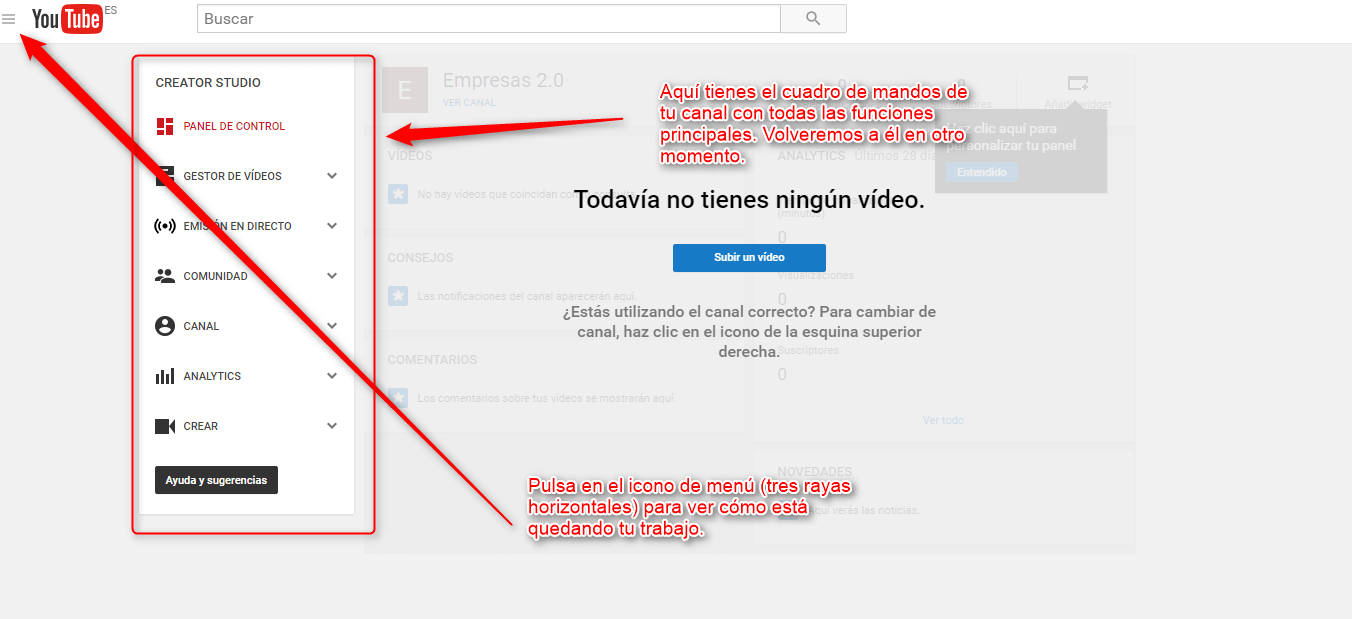
2.- Open the YouTube settings menu

3.- Configure the main parameters
You will see a new window in which you can configure the parameters of your channel.
You should take some time to fill in all the fields in this window correctly. Keep in mind that any information you add here is vital to improving your channel reputation.
The first section is “Overview.“. In the lower right corner you will find a link where you can view your existing channels or create a new one.
 4.- Create your channel
You can click on the first option to create a new channel.

5.- Choose your channel name
If If you’re not sure what name you want to use, don’t worry, you can change it later.
In this section, you should also select a category to classify your channel. Choose the one you think best describes your project and its goals.

You should now accept the Google Terms of Service. Completed! You have already created your YouTube channel.
6.- You have just created a YouTube channel
Do you want to make sure the process is complete? Go to the My Channel menu and you will see that it has already been created.

7.- My Channel Menu
If you click on this menu, you will see an image similar to this one. Among other things, you can see the name you chose for your business channel.
Now that you’ve created your channel, let’s look at some other information.

The next step is to customize your channel, improve its appearance and do some SEO-related retouching to get the most out of your work.
8.- Return to Control Panel
See also: How to Make Beautiful Blog Thumbnails Easily in Less Than 2 Minutes
Click on the “Video Manager” tab.
 9.- Verify your channel
This step is very important because for Google the term “ownership” is crucial. You must confirm that you own this channel.
Although you can appoint administrators or managers, remember that the owner will always be the one who registered and verified the channel.
10.- You have to follow two steps to confirm it
This process is very simple, but you should pay attention to a few things:
- Choose the country you are actually in: you cannot create a channel with another country
- Enter your phone number WITHOUT the country code
- Choose whether to use the YouTube want confirmation code via voice message or SMS
- If this number has been used to create other channels (Google allows a maximum of two per year per number), you will need to enter a different phone number
- Always enter a number that you can use again later. Google may request this number in the future and it will be used to recover the account or similar used to rescan the channel (if necessary).
11.- You just changed your channel Warning
Your channel has already been verified by YouTube. You can create administrators if you want, but the owner is always you.

12.- You just opened a digital window on YouTube
Now that you have your channel, you should take some time to start promoting your brand. To do this, open the Channel section and go to the tab. “Advanced options.”

In the screen on the right, select your country. Here you can change your location in the future.
Then select the keywords that you want to rank for. I recommend you only use the keywords that define your brand, project or business. This field will help you a lot to get your branding on Youtube.
Now link your channel to your website by entering the address in the “Linked website.” field
Enter
Well. With this action you have just received a quality link from YouTube to your website. You already have an advantage and you haven’t posted a single video yet!
Now that you know how to create a YouTube channel, let’s talk a little about the steps you need to follow to optimize it it.
Your business channel should be a new ally in your marketing strategy.
You already have your channel and your first relevant link. Now it’s time to improve the odds of success in this endeavor. To help you, I’ll give you some tips for the next steps.
As you will see, we left many fields blank. You’ll need to add this information later, especially if you decide to upload videos or start using your channel regularly.
But don’t worry, we only fill in the basic information so you can have your channel in minutes works.
Now it’s time to change the channel design and I promise this process will also be quick and easy.
1.- Let’s get started Improve your channel’s theme
Click the icon in the top left (three horizontal bars) and click the “My Channel” tab. In the picture you will find the menu.

2.- Changing the channel layout
You must understand that the first image that appears on your channel is yours be a business card on youtube. Add your logo first. You should create an 800 x 800 square logo. Here’s some advice I’d like to give you: if you use a square image and put a circle in it, with your logo inside that circle, that would be visually perfect.
To give you an idea, you could use a Logo like this will work:

Another recommendation: Make your brand attractive by adding a beautiful image to your channel header. This image should be descriptive and related to your product, brand, or project.
Here are two tricks to create a professional image for your business channel:
- The ideal size is 2560 x 1440 pixels. This size is ideal for different devices as it will also display correctly on a Smart TV.
- Place the main element in the center of the image. Your product shouldn’t take up more than 25% of the space, as you should create a visually appealing piece that displays correctly on smaller screens like smartphones.
The description is a point you note should not forget. Use your keywords, but be direct. Remember that this text will help Google classify your channel.

3.- You have already set the channel header, logo and description so that your brand is already present on YouTube
See also: How to Create a Photo Editing App: Onix Experts Tips
This is a picture of my channel after adding the settings we saw in this guide:

The image shows “Hoy Streaming”, centered and es is displayed correctly on all screen sizes.
It also describes my work with live event broadcasting services.
4.- Make your channel a little more social
You can add links for your website and profiles on social media platforms by clicking on the settings menu (the gear icon on the right under your channel picture)

Here you must activate the customization of your channel.

With this action you have just activated other options. Some are immediately visible, others are a bit hidden.
But don’t worry: I’ll guide you so you can find them easily.
Now click the “More” button Information” where you can edit everything that is shown to your visitors.
This is one of those areas that are semi-hidden on Youtube.
Pay attention this step because if you hover over this part of the screen you will see an icon to edit each section.

You can now add the link to your website and the social media you want to use. The icons will appear in the header image when you save changes.
What did you achieve by following this tutorial on how to create a YouTube channel?
It’s time to review everything after following this guide on how to create a YouTube channel for your business.
These are some of the benefits of this tutorial:
- From now on users will discover information about your brand on YouTube, the second most used search engine after Google.
- You are already part of that 10% of projects represented on the world’s most used video platform. Yes. That’s right, the remaining 90% haven’t taken the step you just took.
- You also have a new relevant link to your website.
- And one new option to publish your work.
- As if all of this wasn’t enough, show Google that you care about your project. You’ve spent some time setting up your channel, which means you’re going about your business, and Google will reward you for your work.
One more thing : Did you notice that? Haven’t uploaded any videos yet?
Being on YouTube doesn’t always mean uploading videos. It’s also not difficult to create original material that adds value to your brand.
A clear example is my HoyStreaming project, where I publish interviews and video conferences to promote my brand and my work advertise.
Do you think I spend a lot of money to produce this type of content? I don’t need a big budget to record these videos!
It’s a cheap and easy idea. It’s just a matter of consistency and betting on your work, using essential elements to promote your brand.
The same strategy any good entrepreneur should know could be used by you too .
I would love to read about your experiences in this wonderful world.
Have you already created a YouTube channel?
After creating your first YouTube channel, there is one more step you should take: start monetizing your channel.

See also: Tips for creating an HTML email signature for Mac Mail
.