If you build applications with Angular (with or without Angular material), did you know that you have a very handy way to make your layout responsive without having to write media queries yourself?
Yes, that’s right, no media requests. 😉
Reading: How to create a responsive website with angular 4
Not that there’s anything fundamentally wrong with writing our own media queries, I just find that it can quickly become messy, impractical and difficult to maintain.
So if I I prefer to avoid it, or at least minimize the number of media queries I need to write, and Angular allows us to do just that.
So how do we make an Angular component or application responsive ?
Follow these steps to implement a responsive design with Angular:
- Use the Angular BreakpointObserver to measure the size of the current device
- Set member variables in your component that allow you to show or hide certain elements depending on the screen size
- Set responsive CSS classes in your component like is-phone-portrait depending on the screen size
- Use these special classes to make your component’s CSS responsive , without writing media queries
For the full details on exactly how to do this, read the rest of the post.
Table of Contents
In this post, we cover the following topics:
- The BreakpointObserver Service
- Using layout-related flags to toggle responsive elements on or off sfade
- Write CSS that only applies to certain screen sizes (without media queries)
- Summary
So without further ado, let’s learn everything what we need to know to make your Angular application responsive!
The BreakpointObserver service
The key to make our application responsive without having to write our own media queries, is the Angular CDK BreakpointObserver service.
This service provides us with an observable-based API that notifies its subscribers of the current dimensions of the screen and any changes in screen orientation caused by switching the device from landscape to portrait.
This service also returns new values when we simulate different screen sizes with the development tools, which is ideal for testing multiple layouts during development.
Note that the This service is part of the Angular Component Development Kit and not part of Angular Material directly.
You can use it with Angular Material, but you can also use it without it.
The usage This service doesn’t mean that you have to import a lot of code into your application, because the CDK is very modular.
And how does this service work?
The BreakpointObserver service contains a number pre-built CSS breakpoints that identify different device types and screen form factors:
Each of these breakpoints corresponds to a CSS media query that has been carefully written and researched to accurately match a very wide range of devices.
This is a complete list but I find that most of the time TabletPortrait, TabletLandscape, HandsetPortrait and HandsetLandscape is all we need for most use cases.
If you want to know exactly what ch CSS -Media query e If you match, you can just print them out on the screen because the breakpoints are just strings containing the text of the media query.
See also: 15 Tips for Creating a Great Website Footer
Here is the result you get in the console.
The good news is that you don’t have to worry about these media queries at all.
You never have to maintain these CSS media queries yourself:
Web (min. width: 840px) and (orientation: portrait), (min. width: 1280px) and (orientation: landscape) WebLandscape (min. width: 1280px) and (orientation: landscape) WebPortrait (min. width: 840px) and (orientation: Portrait) Tablet (min. width: 600px) and (max. width: 839.98px) and (orientation: portrait), (min. width: 960px) and (max. width: 1279.98px) and (orientation: landscape) TabletPortrait (min. width: 600 pixels) and (max. width: 839.98 pixels) and (orientation: portrait) TabletLandscape (min. width: 960 pixels) and (max. width: 1279.98 pixels) and (orientation: Landscape) Handset (max. width: 599.98 pixels) and (orientation: portrait), (max. width: 959.98 pixels) and (orientation: landscape) HandsetLandscape (max. width: 959.98 pixels) and ( Orientation: Landscape) HandsetPortrait (Max. Width: 599.98 pixels) and (Orientation: Portrait) XS (Max. Width: 599.98 pixels) Small (Min. Width: 600 pixels) and (Max. Width: 959.98 pixels) Medium (Min. width: 960 pixels l) and (max. Width: 1279.98 pixels) Large (Min Width: 1280 pixels) and (Max Width: 1919.98 pixels) XLarge (Min Width: 1920 pixels)
For example, TabletLandscape and TabletPortrait perfectly match an iPad screen in standard size.
And the Hanset breakpoints correspond to mobile phones such as iPhone or Android phones.
How does the BreakpointObserver service work?
The BreakpointObserver provides us with an observable API that allows us to be notified when any of these breakpoints match the current device.
For example, we subscribe to the service to be notified when the screen matches the HandsetLandscape breakpoint:
If you launch the application on a normal-sized desktop, you won’t see anything is output to the console and this is normal.
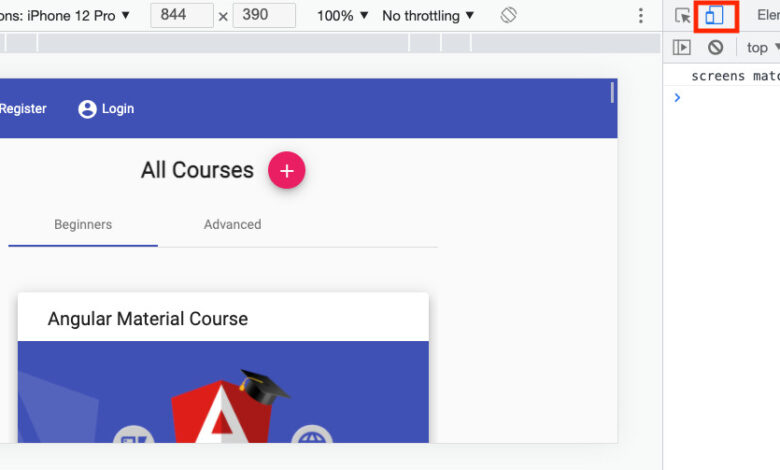
But you can simulate mobile devices with Chrome Dev Tools using the device toolbar:

The button highlighted in red turns on the device toolbar, which allows you to select the size of the screen.
I In this case we set the screen to the same dimensions as a landscape iPhone.
And as we can see in the console, this time the breakpoint was triggered as expected.
If you turn Chrome development tools on and off or change the screen size from the device toolbar, you will see a new value being emitted by the breakpoint observer.
You can also use the breakpoint observer to view multiple Subscribe to breakpoints simultaneously:
Note that there is a breakpoint map emitted by the BreakpointObserver service that contains all the currently matching breakpoints, and we can test for each breakpoint separately.
As we can see, this service provides the basic building blocks to make our Angular components responsive.
But how do we use it in practice? There are a few ways.
Use layout-related flags to show or hide responsive elements
One of the simplest things we can do is adjust certain member variables our component according to the matching responsive breakpoints.
For example, suppose we have a component that needs to hide a side menu when the device is a phone or tablet in portrait mode.
See also: How to Use WordPress: Ultimate Guide to Building a WordPress Website
We could customize the UI by setting the value of a boolean member variable of hideSideMenu to match the current breakpoints:
Notice how we need to reset the value of hideSideMenu when we add a new set of matching breakpoints receive. We need to reset this value to its default value in case the device no longer matches any of the breakpoints.
We can then use the hideSideMenu flag to show or hide the side menu in the component template ngIf:
Instead of a boolean flag, we can also set a variable that defines the number of columns in a grid, the height of an element, or whatever we need.
But what if we Want to customize component styling to the device?
Write CSS that only applies to specific screen sizes (without media queries)
Often we still want to be able to customize our component behavior with simple CSS.
For example, due to lack of space, we would like to be able to remove certain margins and padding on a mobile device.
We can still do this without writing media queries in our components having to, by doing a few layout create specific boolean member variables in our component.
For example, suppose we want our component to apply certain CSS styles only when the screen is in phone portrait mode (usually the most restrictive format ).
We would start by adding an isPhonePortrait boolean flag to our component:
Then we can use this flag to apply a special is-phone-portrait to a container div , which wraps all the content of our component using ngClass:
With this special CSS class it is now very easy to add responsive styles to our component’s CSS without having to write media queries:
Summary
As we could see, Angular Cdk’s BreakpointObserver service makes it super easy to make our Angular components respond without writing a single media query.
Also here is Nothing inherently wrong with adding media queries directly to your component CSS, it’s just that I find this approach easier to read and maintain in the long run.
For example, if you’re after any specific styles in your application that target a portrait phone, you can simply search for is-phone-portrait instead of searching for a media query where it’s easy to match certain styles based on formatting, spacing, indentation, etc overlooked.
I also find that when each component’s responsive CSS is written this way, it’s just easier to read and understand, which helps keep the codebase maintainable over time .
I hope you enjoyed this post, if you want to learn more about Angular Material, we recommend you to take the Angular Material In Depth course, which covers responsive design in depth.
If you have any questions or comments, please let me know in the comments below and I’ll get back to you.
To be notified of upcoming posts on Angular, I invite you to subscribe to our newsletter:
And if you are just starting to learn Angular, check out the Angular for Beginners course:
See also: How to Build an App without Coding – Step-by-Step Guide
 .
.