Would you like to open your own online shop? We know that building an online store can be a daunting thought, especially if you’re not a techie.
Well, you’re not alone. After helping hundreds of users to start their online store, we decided to share the most comprehensive guide on how to create your online store with WordPress (step by step)
Reading: How to create a online shopping website

What do you need to start an online store?
There has never been a better time to start an online business than today.
Everyone with one Computer can acquire special abilities in minutes and without starting.
The three things you need to start an online store are:
- An idea for a domain name (this will be the company name of your online store i.e. wpbeginner.com)
- A web hosting account (this is where your website lives on the internet)
- Your undivided attention for 30 minutes.
Yes, it’s really that simple ch.
You can set up your own online store with WordPress in less than 30 minutes. We’ll walk you through each step of the process.
In this tutorial we’ll cover:
- How to register a domain name for free
- How to choose the best WooCommerce hosting
- How to get an SSL certificate for free (required to accept payments)
- How to install WordPress
- How How to create a WooCommerce store
- How to add products to your online store
- How you choose and customize your theme
- How to extend your online store with plugins
- Learn WordPress and grow your business
Ready? Let’s get started.
Video Tutorial
If you don’t like the video or need more instructions, keep reading.
Step 1: Set up your online -Store Platform
The biggest mistake most users make is not choosing the right platform for their online store.
Luckily you are here, so you will Don’t make that mistake.
There are two popular ecommerce platforms that we recommend: Shopify or WordPress + WooCommerce.
Shopify is a fully hosted ecommerce solution that starts at $29/ Month starts (monthly or yearly prepayment). receive a discount). It’s a hassle-free solution where you just sign up and start selling. The downside of Shopify is that it gets pretty expensive and your payment options are limited unless you pay extra fees.
That’s why most users choose WordPress + WooCommerce for the flexibility it offers . It requires some setup, but it’s worth it in the long run. WordPress is the most popular website builder and WooCommerce is the world’s largest ecommerce platform (see: Shopify vs WooCommerce comparison).
In this tutorial, we will walk you through setting up an online store in WordPress WooCommerce.
To set up your ecommerce store, you need a domain name, web hosting, and an SSL certificate.
A domain name is your address the website on the Internet. It’s what users type into their browser to reach your website (eg: google.com or wpbeginner.com).
Web hosting is where your eCommerce website resides located on the internet. It is the home of your website on the internet. Every website on the internet needs web hosting.
How do I add SSL in WordPress?” href=”https://www.wpbeginner.com/glossary/ssl/”>SSL Certificate adds a special Add a layer of security so you can accept sensitive information like credit card numbers and other personal information. This is required so that you can accept credit card payments on your e-commerce site.
Typically, a domain name costs around $14.99/year, web hosting costs around $7.99/month, and an SSL Certificate costs around $69.99/year.
That’s a steep startup cost.
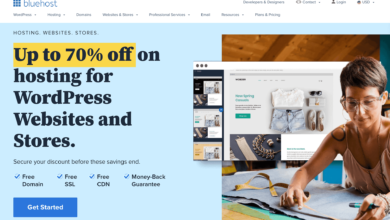
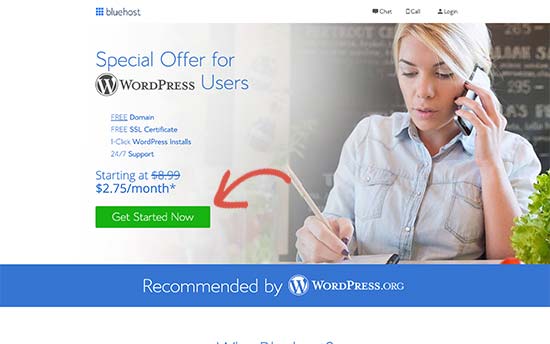
Fortunately, Bluehost, an official WordPress and WooCommerce recommended hosting provider, has agreed to offer our users offering a free domain name, free SSL certificate and a discount on web hosting.
Basically, you can get started for $2.75/month.
→ Click Here To Claim This Exclusive Bluehost Offer ←
Bluehost is one of the oldest web hosting companies, founded in 1996 (that was before Google). They are also the biggest brand name when it comes to WordPress hosting as they host millions of websites.
NOTE: At WPBeginner we believe in transparency. If you sign up with Bluehost through our referral link, we’ll earn a small commission at no additional cost to you (in fact, you’ll save money and get a free domain). We would earn this commission for recommending almost any WordPress hosting company, but we only recommend products that we personally use and that we feel add value to our readers.
Let’s go ahead and buy your domain + hosting + SSL.
Open Bluehost in a new window from this link and follow the instructions.
First you need to click the green “Start Now” button to get started.
p>
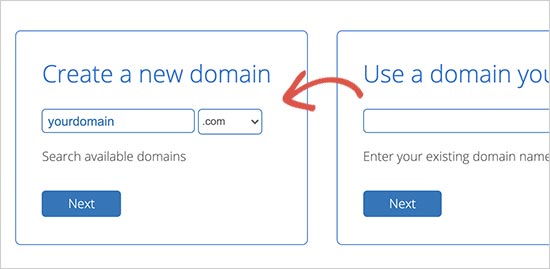
On the next screen, select the plan you need (Basic and Plus are the most popular).

You will then be prompted to enter the domain name for your website.
Lastly, you need to add your account information and complete the package information to complete the process. On this screen you will see optional extras that you can purchase.
It is entirely up to you whether you purchase these or not, but we generally do not recommend purchasing them. You can always add them later if you decide you need them.

Once finished, you will receive an email with details on how to log into your web hosting control panel (cPanel). This is where you manage everything from support, emails, among other things.
Once you are logged into the cPanel, you will find that Bluehost has WordPress already installed for you and you simply click on the ‘Log in to the WordPress button.
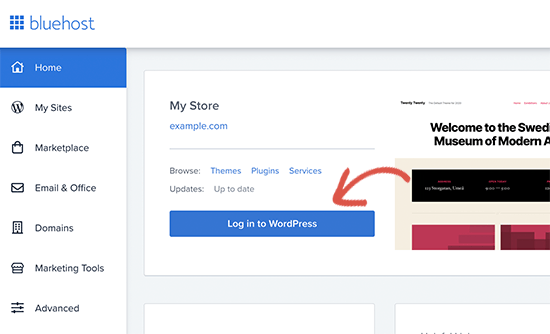
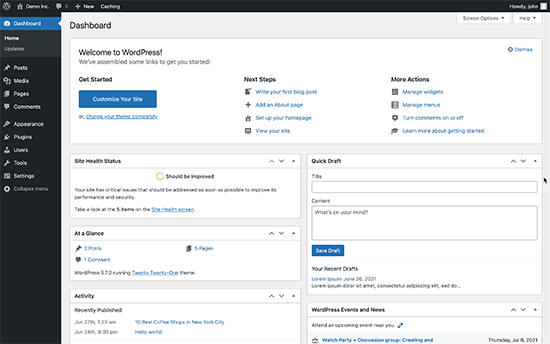
All you have to do is click the “Login to WordPress” button and you’ll be taken to your WordPress site’s dashboard. It looks something like this:
Congratulations, you have finished setting up the hosting and domain part.
The next step is to set up WordPress and your online shop.
Step 2 Setting Up WordPress
The first time you log into your WordPress site, Bluehost may offer to help you set up your site.
Go ahead and click ‘I don’t need help’ shortcut. Don’t worry, we’ll walk you through all the necessary steps.
Let’s set up your WordPress website.
First you need to go to the Settings » General page to set up the title and description of your WordPress site.

You can use your store’s name as the page title and provide a memorable description for your business. The description part is optional, so don’t worry if you can’t bring something right away.
Setting up HTTPS to use SSL
Your WordPress Hosting package came with free SSL certificate. This certificate is preinstalled for your domain name. However, your WordPress site must be configured to load as https vs. http.
On the Settings » General page, you must enter your WordPress address and site address in change Use https instead of http.
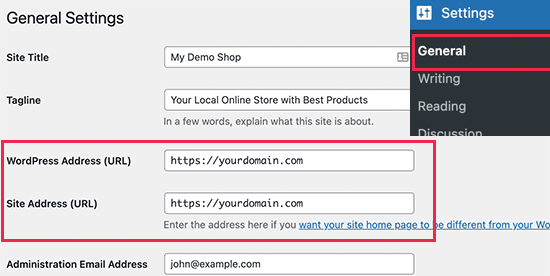
Don’t forget to scroll to the bottom of the page and click the “Save Changes” button to save your settings.
Your basic WordPress setup is complete. Now it’s time to set up your online store.
Step 3. Set up your WooCommerce store
WooCommerce is the best online store builder out there. It is based on WordPress, which offers the flexibility of WordPress with the freedom to sell any type of product you want.
First you need to install and activate the WooCommerce plugin. For more details, see our step-by-step guide to installing a WordPress plugin.
See also: 12 Tips to Create a Compelling YouTube Channel Trailer (Examples)
Just go to the Plugins » Add New page and search for WooCommerce. In the search results, click the Install Now button next to the WooCommerce listing.

WordPress will now fetch and install the WooCommerce plugin for you. Wait for it and finish downloading the plugin and then click the “Activate” button to continue.

Once activated, WooCommerce will start the setup wizard and you will see the “Welcome to WooCommerce” screen. This setup wizard will guide you through important WooCommerce settings.
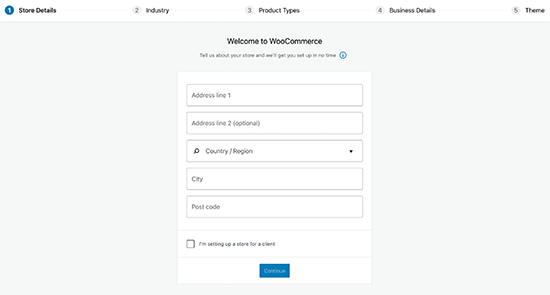
First you need to provide basic information for your online store like address, country and region. If you are a retailer, you can add your retailer location information as address .
After that, click the Next button to continue to the next step.
Next you will be prompted to select a business branch you can select a branch that corresponds to the type of shop, you want to create.

Click the Next button to continue.
You will then be prompted to select the types of products that you prefer to sell in your store. If For example, if your products need to be shipped, you can select physical products.

You can also select multiple product types. For example ple also allows you to select both physical products and downloads. Don’t worry about selling different types of products. For each product you can choose what type of product you are adding.
Click the “Next” button.
Next you will be asked to enter some business details such as the number of products state you are planning to sell and if you are selling elsewhere. You can select I don’t have any products yet and select “No” for the other option.

Now you need to go to the Free Features tab. You will see a pre-checked box to install free features for your site.

You must disable this option as it installs several other WooCommerce extensions that you may not need. If you need them later, you can always install them yourself.
Click the Next button to go to the next step.
Next, you will be prompted to create a select theme for your online store. You can continue with your current default theme, choose Storefront or one of the free options listed on the page.

Don’t worry about choosing the perfect theme right away. We’ll show you how to choose the best theme for your online store later in this article.
That’s all, you’ve successfully completed the basic WooCommerce setup.
Step 4 Setting up payments for your online store
Next you need to set up payment methods to accept online payments in your store. WooCommerce offers a number of payment gateways that you can easily set up.
Just go to the WooCommerce » Settings page and switch to the “Payments” tab. By default you can choose between PayPal standard, cash on delivery, checks and bank transfers.

If you scroll down, you will also see the option to install Stripe, PayPal Checkout and WooCommerce Payments. We recommend choosing Stripe and PayPal Standard as payment options.

For each payment gateway, you can click the Setup button and provide the required information. For example, you can enable Stripe and enter your API keys (you can find this information under your Stripe account).

Don’t forget to click the Save Changes button to save your payment settings.
Step 5. Adding products to your online store
Let’s start by adding the first product to your online store.
You need to add Products » New Visit page to add a new product.
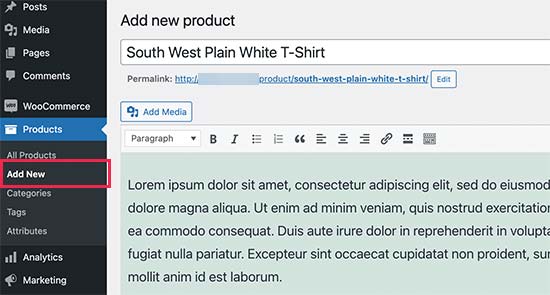
First enter a title for your product and then a detailed description.
In the right column you will see the “Product categories” field. Click +Add new product category to create a category for this product. This allows you and your customers to easily sort and search products.

Scroll down a bit and you’ll notice the Product Data field. This is where you provide product-related information such as pricing, inventory, shipping, etc.

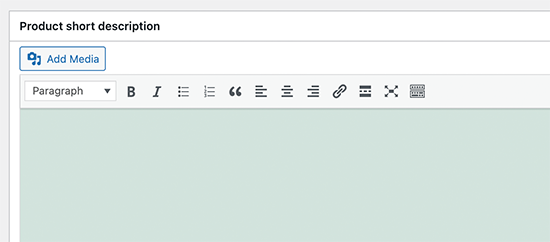
Below the product data field you will see a field to add a short product description. These product descriptions are used when users view multiple products on a page.
Finally see checkboxes in your right column to add a main product image and a product gallery.

Once you are happy with all the product information added, you can click the Publish button to make it live on your website.
Repeat the process to add more products as needed.
Step 6. Select and customize WordPress theme
Theme controls like your WordPre ss sites look to users when they visit them. With a WooCommerce store, they also control how your products are displayed a back.
There are thousands of paid and free WordPress themes that you can use create an impressive online presence.
However, not all WordPress themes are specifically designed for ecommerce stores. We have selected some of the best WooCommerce themes for you to choose from.
If you need help choosing a theme, please see our guide to 9 things to consider when choosing a perfect WordPress should consider themes.
Once you have a WooCommerce theme installed, you can customize its look to suit your own needs.
Just go to the Appearance » Customize. This will launch the Theme Customizer, where you can change various theme settings.

Most modern WooCommerce themes have various customization options and work well with desktop and mobile devices.
Step 7 Extend your online store with plugins
Now that your store is almost ready, you might want to add more features to create a successful online store. For example, you can add a customer support form or promote your new business on social media to make your first sale.
This is where plugins come in.
Both WooCommerce and WordPress allow you to easily add new functionality to your website by using plugins or extensions.
Plugins are like apps for your WordPress website. There are thousands of them you can use, both free and premium. The WordPress.org plugin directory alone has more than 59,000 plugins.
But this abundance of selection makes it difficult even for beginners to decide on the right plugins. How do you know which plugin to choose?
Here are some of our top picks for essential plugins that every online store should install.
1. OptinMonster
OptinMonster helps you easily convert website visitors into paying customers. It includes tools like lightbox popups, sticky header and footer banners, countdown timer, spin to win and more.
All of them help to improve conversions, increase sales, Grow your email list and reduce shopping cart abandonment.
Note: You can get a free version of OptinMonster by signing up within the OptinMonster WordPress plugin.
2. WPForms

WPForms is the best form builder plugin for WordPress. You can easily create any type of form for your business, including contact forms, surveys, sign-up forms, gift card order forms, and more.
It features an intuitive drag-and-drop form builder that lets you do this can do just point and click to create forms. For detailed instructions, see our guide to creating a contact form in WordPress easily.
See also: Virtual Book Club: How to Start an Engaged, Online Club From Your Couch
Note: WPForms also has a free version called WPForms Lite that you can use if you don’t need the Pro features.
/ p>
3. AffiliateWP

AffiliateWP helps you easily add an affiliate program to your online store. This allows you to work with affiliate marketers to promote your products for a commission.
It offers powerful affiliate tracking, no transaction fees, fraud detection, 1-click payouts and an affiliate dashboard for your partners . See our guide to creating a referral program for your online store for more details.
4. Advanced Coupons
Advanced Coupons is the best coupon code plugin for WooCommerce.It allows you to extend the standard WooCommerce coupon functionality and create highly effective coupons to grow your business.
Advanced Coupons allows you to use Loyalty Programs, Scheduled Coupons, Buy 1 Get 1 Free offers, Shipping Coupons and more create . See our guide to creating smart coupons for your ecommerce store for more details.
5. SeedProd

SeedProd is the best page builder plugin for WordPress and WooCommerce. You can use it to create custom landing pages for your online store easily.
It comes with ready-to-use templates designed for conversions and sales. It also includes WooCommerce Blocks that you can simply drag and drop to create custom product pages, custom homepages, checkout pages, thank you pages, and more. Plus, you can connect it to your email marketing service so you can grow your email list.
Note: You can try the free version of SeedProd directly on WordPress.org
6. PushEngage
 PushEngage is the best push notification software for WordPress and WooCommerce. It allows you to easily send web push notifications to your website visitors on their computers and mobile phones.
With PushEngage, you can send personalized messages to your target audience, e.g. B. New product announcements, abandoned cart reminders and back in stock notifications, welcome messages and more.
7. All-in-One SEO for WordPress
All-in-One SEO for WordPress is the best SEO plugin for WooCommerce. It allows you to easily optimize your online store for SEO without any knowledge of search engine optimization.
It offers full ecommerce support, schema markup, sitemaps, breadcrumbs and more. This will help you drive more traffic to your online store. Check out our complete WooCommerce SEO guide for beginners for details.
Note: there is also a free version of AIOSEO, which is still pretty powerful for those just starting out.
8. MonsterInsights
MonsterInsights is the best Google Analytics plugin for WordPress. It helps you see where your customers are coming from and what they are doing on your website.
MonsterInsights comes with WooCommerce tracking so you can see the conversions and sales data on your website. This will help you adjust your marketing strategy and grow your small business with data-driven decisions.
9. HubSpot

HubSpot is the best CRM plugin for WordPress and WooCommerce. It allows you to automatically sync your forms, manage contacts, segment them into lists and see every interaction your visitors have with your website. It also has a free email marketing feature built-in.
It also allows you to add live chat to your website pages and get analytics on the performance of your entire marketing program.
10. FunnelKit
FunnelKit is the most powerful sales funnel building and marketing automation platform for WordPress. It helps you create high converting checkouts, order boosts, one-click upsells and other automations that will help you increase your online store profits.
They also have a marketing automation plugin for WordPress ecommerce websites that lets you follow up on time, send broadcasts, create email drip campaigns, and more.
For more plugin recommendations, check out our Expert selection of essential WooCommerce plugins for an ecommerce business.
Learn WordPress to grow your online business
WordPress is incredibly powerful and flexible, but sometimes it can be difficult for beginners It can be difficult to set it up the way you want.
At WPBeginner, our main goal is to provide cutting-edge, helpful WordPress tutorials that are easy to understand even for non-technical WordPress site owners (see more about us).
WPBeginner is the largest free WordPress resource site for beginners. We offer many resources including:
- WPBeginner Blog – The central location for all of our WordPress tutorials.
- WPBeginner Videos – New to WordPress? Check out these 23 videos to master WordPress.
- WPBeginner Dictionary – Your one-stop shop for learning common WordPress terms and jargon.
- WPBeginner Engage Facebook Group – Get free expert support in the largest WordPress group on Facebook.
You can also subscribe to WPBeginner’s YouTube channel, on we regularly share video tutorials to help you learn WordPress.
We also have a guide showing users how to get the most out of WPBeginner’s free resources.
Many of our users type their question into google and just add wpbeginner at the end of it. This will show you related articles from WPBeginner.
FAQs for starting an online store
Many of our users regularly contact us with questions about starting their own business with an online store. Below we have tried to answer some of the most frequently asked questions:
1. Where can I find products to sell in my shop?
There are several ways that shopkeepers source products. Some sell products such as software, digital art, music, and other downloadable products.
Others source products from local or overseas suppliers through online marketplaces such as Alibaba or AliExpress. If you don’t want to worry about your own inventory or shipping, you can also start a print-on-demand shop or dropship.
See our article on choosing which products to sell online for more details.
2. Can I open an online store for free?
Yes, some ecommerce platforms offer limited free trials, so you can start your online store for free but have after the trial expires you pay the opportunity. While WooCommerce itself is free, you need a domain name and web hosting account to run it, which costs money.
3. How much does it cost to open an online store?
The cost of opening an online store depends on your business plan and budget. You can start with Bluehost for $2.75 per month and rely on free plugins and themes to cap your costs. We recommend a business model where you start small and then spend as your business grows.
For a detailed cost analysis, read our article on how much it costs to build an ecommerce website .
4. Can I create an online store without shipping products?
Yes, it is possible. For example, you can create an online store using dropshipping plugins, create an Amazon affiliate store, or create an eBay-like marketplace. You can also use the same online store to sell external products as well as your own products.
5. How do I manage shipping costs and taxes for my online store?
Depending on your region, you may need to add sales tax, VAT, or other taxes. WooCommerce allows you to add taxes by enabling them on the WooCommerce » Settings page.

From here you can also go to the Shipping tab and create different shipping zones, add shipping rates, Set flat shipping costs and more.
We hope this tutorial helped you build an online store. You might also want to see these actionable tips for driving traffic to your new WordPress site, or check out our comparison of the best live chat software and the best business phone services for small businesses.
If you If you liked this article, please subscribe to our YouTube channel for WordPress video tutorials. You can also find us on Twitter and Facebook.
See also: How to Create a Website for Free Using Amazon Web Services
.