
Today we’re getting started To show you how to use the Android App Inventor tool to create your own Android app without having to write a lot of complicated code. It’s a really simple process that just requires some drag and drop.
Reading: How to create an app soundboard
Soundboards are one of the easiest apps to create with App Inventor, so today we’re going to show you how to get started creating your own application can.
Soundboards are one of the easiest apps to create with App Inventor.
p>
This guest article was written by Mitch Bartlett from Technipages, where he shares a lot of in-depth tips about smartphones .
Install and use App Inventor to create an app
First, you need to make sure you have Java 1.6 or higher installed. You can download it from http://www.java.com. When you’re done, install App Inventor according to the instructions for your operating system.
- Mac OS X
- GNU/Linux
- Windows
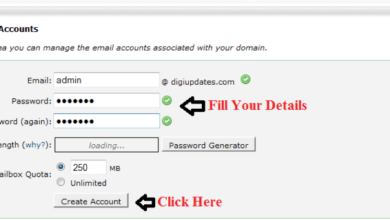
Visit the My Projects section of the App Inventor website. Sign in and agree to the Terms of Service when prompted. Select the New button to start a new app.
Give your app a unique name, then click OK.
See also: Dublin City
The App Inventor Viewer will appear. This screen shows what your app will look like as you build it. First let’s create a title for this screen. Over in the components pane, Screen1 should be selected. Under the Properties section, we can change the title field to our app’s name.
Now we can start arranging elements on the screen. We’re going to create columns and rows for our soundboard buttons. We can do this by selecting Screen Arrangement in the palette and dragging the TableArrangement element into the viewer.
Set the properties for the TableArrangement1 component in the properties pane. Here we change it to 3 columns and 3 rows.
We need a component to play our sounds. Select media in the palette and drag the player component into the viewer. It will appear as Player1 in the Hidden Components section.
Let’s add some sounds to our project. App Inventor supports MP3 or WAV files under 3MB in size. We add them to our project by selecting the Player1 component and then selecting the Source field. Click the Add… button and select Browse… to upload sound files from your PC. Repeat these steps to add multiple sounds.
Add a button for each sound by selecting the base palette and dragging it into the TableArrangement1 box in the viewer. You can place each button in a specific row and column.
Select each button in the components panel and change the text boxes to represent the sounds they will play.
We are done with the viewer screen. This is what our app currently looks like.
See also: How To Start A Blog For Free In The UK: Create A Blog In 5 Steps
It’s time to control the behavior of the elements on the screen. Click Open Block Editor to begin. Choose whether to open the file or grant access when prompted.
Click the My Blocks tab. Select Button1 and drag the Button1.Click box to the right side of the screen. Do this for each button you added to your app (Button2, Button3, etc.).
Select Player1 in the “My Blocks” tab and drag out the “Player1.Source” block the “Button1.Click” block. Block. The block should connect. Also add a “Player1.Source” block to each of the other button click blocks (Button2.Click, Button3.Click, etc.).
Click on the “Integrated” tab and select “Text”. Drag a “Text” block to the right and connect it to the “Player1.Source” block.
The “Text” field controls which sound is played. Click on the text in the block and change it to match the name of the sound file for Button1. In our example, Button1 is “Punch” so we’ll set the text to Punch.mp3.
Drag a “Text” field onto each “Player1.Source” block and change each one to be it matches the name of the sound for each button.
Now that the sounds are set for each button, all we have to do is tell our app to play the sound when we click the button. To do this, click on the My Blocks tab and select Player1. Drag the Player1.Start block onto the Button1.Click. Repeat these steps for each of the button click event blocks.
Done! You have created a fully functional soundboard app. See the app in action by doing one of the following:
- Test the app on your Android device by enabling USB debugging on the device under Settingsgif” alt=”” />
There are many apps you can create with this tool – what will you do?
See also: How to Start a Finance Blog in 5 Steps
.