Websites have gotten bigger and more complex in recent years, and users expect them to load instantly, even on mobile devices. The smallest drop in performance can have a big impact; Just a 100ms reduction in page load time can reduce conversions by 7%. With the competition just a click away, businesses looking to attract and retain customers must make web performance a priority. A relatively easy way to do this is using Content Delivery Networks (CDNs).
In this article, we explain how CDNs help improve web performance. We explain what they are, how they work and how to implement them in your websites.
Reading: How to create a cdn for your website
What is a CDN?
A CDN is a distributed network and storage service that hosts Web content in different geographical regions around the world. This content can include HTML pages, scripts, style sheets, multimedia files, and more. This allows you to serve content from the CDN instead of your own servers, reducing the traffic processed by your servers.
CDNs can also act as a proxy between you and your users, offering services such as load balancing, firewalls , automatic HTTPS, and even redundancy in case your origin servers go offline (e.g. Cloudflare Always Online).
Why should I use a CDN?
CDNs offload your traffic servers, reducing your overall load. They are also optimized for speed and in many cases offer faster performance which can improve your SEO rankings. Because CDNs host data in centers around the world, they literally bring your content closer to your users. This can significantly reduce latency for some users and avoid downtime caused by data center failures or dropped routes.
How do CDNs work?
A CDN consists of multiple data centers named around the world Points of Presence (PoPs). Each PoP can host and deliver content to users. CDNs direct users to specific PoPs based on a number of factors, including distance, PoP availability, and connection speed.
A PoP acts as a proxy between your users and your origin server. When a user requests a resource from your site, e.g. B. an image or a script, it is forwarded to the PoP. The PoP then delivers the resource to the user if he has cached it.
But how do you get the content to your PoP? Use one of two methods: push or pull. When pushing, you need to send your content to the CDN beforehand. This gives you more control over what content is served from the CDN, but errors can occur if a user requests content that you haven’t already pushed.
Pulling is a much more automated method that uses the CDN automatically fetches content that it hasn’t already cached. When a user requests content that isn’t already cached, the CDN pulls the latest version of the content from your origin server. After a period of time, the cached content will expire and the CDN will update it on the next request from the origin.
How do I choose a CDN?
While CDNs work the same way differ it fundamentally depends on a number of factors including:
Price
Most CDNs charge based on the amount of bandwidth used. Some may also charge based on the number of cache hits (files served from cache), cache misses (fetches from origin), and updates. Others charge a fixed fee and allow a certain amount of bandwidth over a certain period of time. When comparing CDNs, you should estimate your bandwidth needs and expected growth to find the best deal.
Availability and Reliability
See also: How to Create a Website
CDNs strive for 100% Uptime, however, perfect uptime is never guaranteed. Consider your uptime requirements and how each CDN supports them. Also, compare CDNs based on their PoP availability rather than their overall availability, especially in the regions you expect to serve. If possible, check if your CDN offers fallback options like routing around failed PoPs.
PoP locations (served regions)
Depending, where your users are located, certain PoPs can serve your users more effectively. Choose a CDN that manages PoPs close to your users or you will miss out on many of the performance benefits that CDNs offer.
How do I add a CDN to my website?
The process Adding a CDN to your website depends on where and how your website is hosted. We’ll cover some of the more common methods below.
Web Hosting Providers
If your website is hosted by a provider like inMotion Hosting, HostGator, or 1For WordPress, Jetpack automatically provides support for its own CDN. Others like W3TC, WP Super Cache, and WP Fastest Cache let you choose which CDN to direct users to.
Self-hosted
Sites that you host yourself provide the greatest flexibility selecting a CDN. However, they also require more setup. As an example, let’s enable Google Cloud CDN for a website hosted on Google Cloud Platform (GCP).
This example assumes you have a GCP account, one registered with a registrar Have a domain and a website hosted on Compute Engine, App Engine, or another GCP service. If you don’t already have a GCP account, create one and sign in to the Google Cloud Console.
Step 1: Configure your DNS records
Traditionally, the way to direct your users to a CDN was to change the resource URLs on your website to point to URLs served by the CDN. Most modern CDNs avoid this by managing your DNS records for you, allowing you to redirect users without requiring any changes to your website.
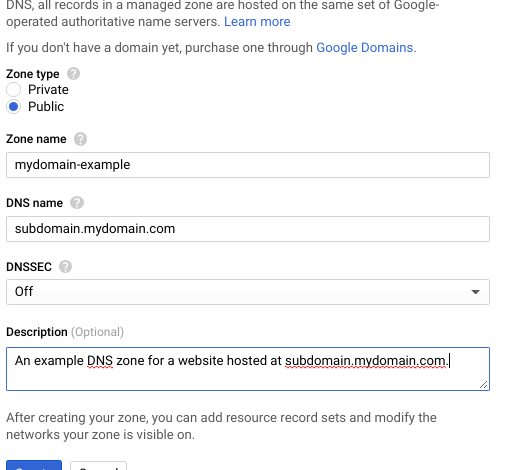
To configure Cloud DNS, see the Cloud DNS quickstart document and follow the instructions to create a managed public zone. Don’t create a new record or CNAME record just yet, as we don’t have an IP address for the DNS record to point to yet. In the screenshot below we have created a new zone called mydomain-example for the domain subdomain.mydomain.com.

After creating the zone, update your registrar’s domain settings to point to the Cloud DNS nameservers. This allows you to manage your domain records through Cloud DNS instead of through your registrar. For more information, see the Cloud DNS documentation page on updating your domain’s nameservers or your registrar’s documentation.
Step 2: Enable Cloud CDN
With DNS configured, we now need to enable the CDN itself. With Cloud CDN, a load balancer must be selected as the origin. If you don’t already have a load balancer, you can follow these instructions to create one. For a standard HTTP/S website, follow these instructions for specific instructions.
With the load balancer created, follow these instructions to enable Cloud CDN for an existing backend service. Once your new origin is created, select it from the origin list. You need the IP address shown in the Frontend table to configure Cloud DNS. So make sure you copy them or leave this window open. The following screenshot shows an example cloud CDN origin:

See also: How to Create an AdSense Account (For Newbie Bloggers)
After retrieving your frontend IP address, return to Cloud DNS and select your zone. Create a new A record to point the domain to your origin IP address. For instructions, see Creating a New Record on the Cloud DNS quickstart documentation page. This is shown in the screenshot below. Optionally, you can also create a CNAME record to redirect users from a subdomain like www.yourdomain.com.

Step 3: Configure your web server
To ensure your content is properly cached, make sure that your web server responds to requests with the correct HTTP headers. Cloud CDN only caches responses that meet certain requirements, some of which are specific to Cloud CDN. You’ll need to read your web server’s documentation to learn how to set these headers. Apache and Nginx provide best practice guides for configuring caching.
Step 4: Upload content to the CDN
For most website owners, this is this does not require doing anything to upload content. That’s because the CDN automatically caches resources from your server when people access your website. This is also known as the “pull method”. Alternatively, Google allows you to manually push specific content that you want to host.
How does a CDN affect performance?
To demonstrate the performance benefits of CDNs, we ran a performance test on a website hosted on Google Cloud Platform. The website is a static one-page website built with Bootstrap and the Full Width Pics template, and consists of seven high-resolution images, courtesy NASA/JPL-Caltech. The server is a Google Compute Engine instance in the us-east1-b region running Nginx 1.10.3.
We configured the instance to allow direct inbound HTTP traffic. We also set up Google Cloud CDN for the instance.You can see a screenshot of the website’s web page and network timing using a waterfall chart below.

We then ran a performance test using SolarWinds® Pingdom®. Pingdom offers a page speed test that measures the time it takes to fetch and render each element of a webpage. We created two separate checks to test the origin and CDN separately, and then compared the results to see which method was faster. To maximize latency, we ran both checks from Pingdom’s East Asia site.
Origin Results
A speed test on the origin server returned a page load time of 3.68 seconds. The time to download the first byte from the server (shown as a blue line) was 318 milliseconds, meaning users had to wait a third of a second before their device even started receiving content. Rendering the page (indicated by the orange line) took an additional 679 ms, meaning users had to wait almost a full second to see anything on their screen. When the page finished rendering (green line), users had been waiting more than 3.5 seconds.
Most of this delay was due to the downloading of the high-resolution images, but a lot of time was spent connecting with the server and waiting for the content transfer to begin.

CDN results
With a CDN, we immediately saw a significant improvement in load time. The entire page loaded in just 1.04 seconds, more than two seconds faster than the origin server. The most significant change concerns the time to first byte (blue line), which has dropped to just 7 ms. This means that our users started receiving content almost immediately after connecting to the CDN.

Although there is no significant improvement in loading time of the DOM content (orange line), connection and latency times decreased significantly. We also saw that content appeared on the page as early as 0.5 seconds after the page load time. We can confirm this by looking at the filmstrip, which shows screenshots of the page at various points in the loading process. This is compared to the 1.5 seconds it took the origin server to start rendering content.

Conclusion
CDNs offer a significant increase in performance without much effort on the part of the organization. The biggest challenge is figuring out which CDN provider to choose. If you’re not sure which provider will benefit you the most, we’ve compared four of the most popular providers (Cloudflare, Fastly, AWS CloudFront, and Google CDN). While performance plays an important role in the viability of any provider, we also encourage you to consider additional features, security, and integrations that the CDN offers.
Once you’ve set up your CDN, you can see the difference in performance check with SolarWinds pingdom. In addition to one-off testing, Pingdom lets you schedule regular checks to ensure your site is always performing optimally. In addition, Pingdom allows you to constantly monitor the uptime and usability of your website. Sign up for a 14-day free trial of Pingdom.
See also: Creating a drop-down list in a cell
.