Yes, there are many guides out there that explain how to create a WordPress website.
But the more you read them, the more confused you become.
Reading: How to create a wordpress website for beginners ll find
Don’t worry.
We’ve put together an easy-to-follow, step-by-step WordPress tutorial for beginners.
Just follow along and your brand new WordPress website will be up and running before you even know it!
Scroll down and enjoy, or jump straight to the section you want to explore:
- Step 1: Choose the right WordPress for your website
- Step 2: Get your domain and hosting
- Step 3: Install WordPress
- Step 4: Get to know your dashboard
- Step 5: Choose your WordPress theme
- Step 6: Produce You content
- Step 7: Upload media
- Step 8: Customize your website
- Step 9: Get plugins for your WordPress
- Step 10: Add users
- Step 11: Set up your tools
- Step 12: Start a WordPress blog
- Tips and Tricks
- Frequently Asked Questions
Check these out if you want to learn more about WordPress:
- 9 WordPress Alternatives in 2022
- 15 Best WordPress Ecommerce Plugins
- 50 Best Free Minimalist WordPress Themes
Let’s answer the basic questions first—
How does WordPress work? And what exactly is it?
WordPress is a content management system (CMS), which is a software application that allows users to create and manage digital content. You don’t need to be a programmer to use WordPress professionally, it just takes some time to get used to it.
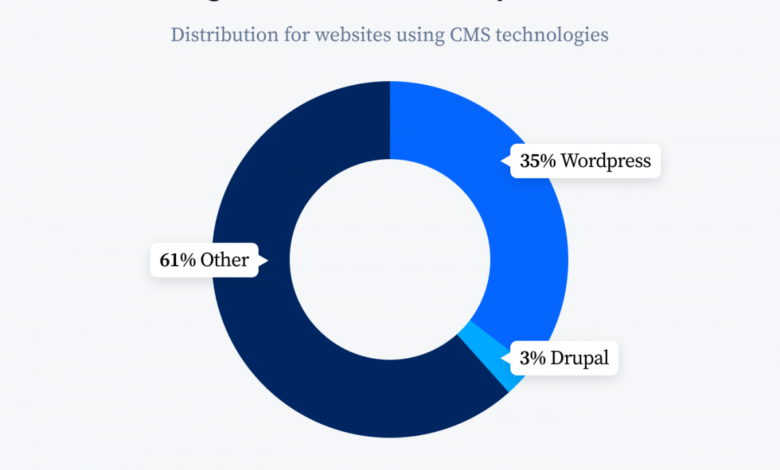
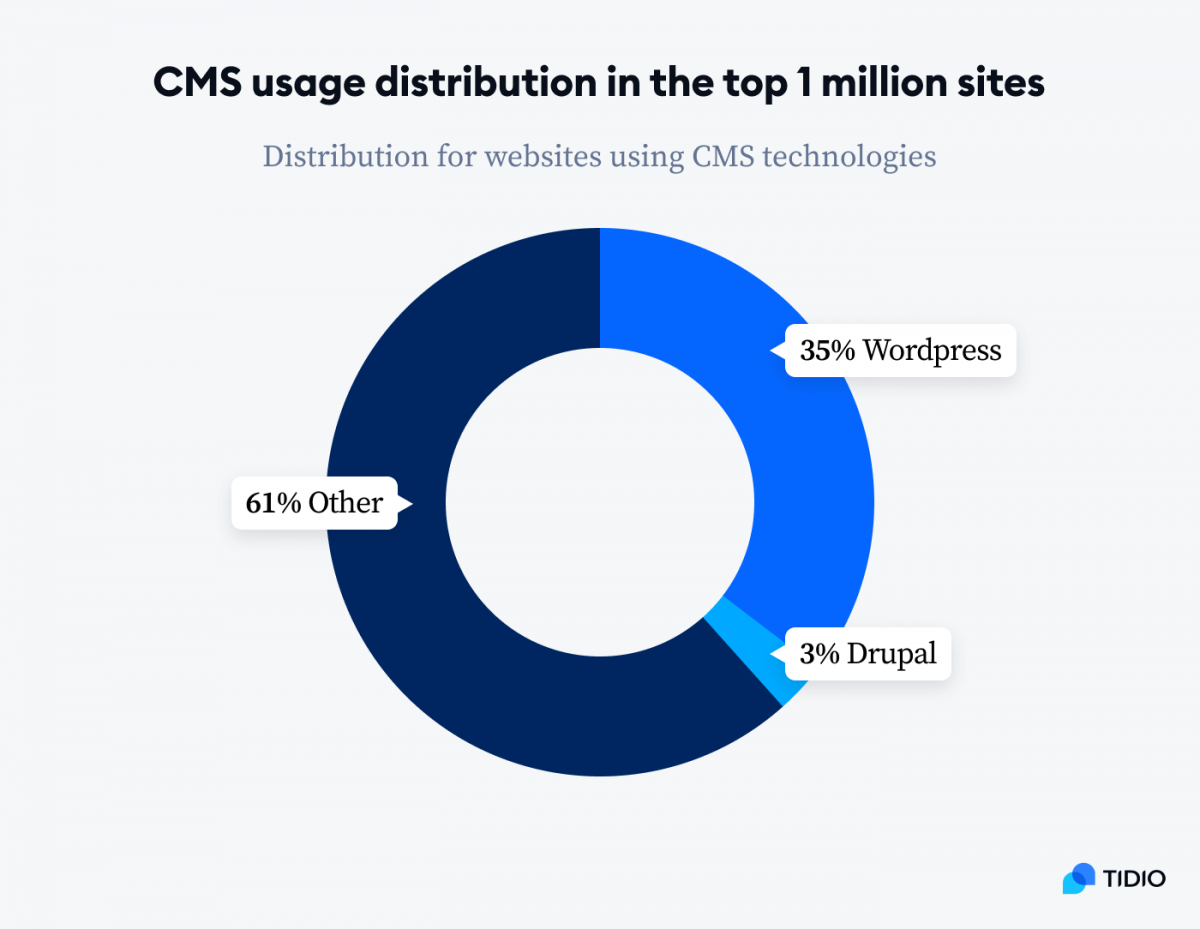
WordPress is the largest of its kind on the web. A whopping 35% of all websites on the internet use it. At the time of writing, there were 66,490,408 downloads of the latest version of WordPress.
That number is growing every hour, and there’s a good reason for that.
WordPress is very user-friendly and intuitive.
WordPress is a great tool to easily build your website. It has a wide range of themes, templates, and other items that you can click through to help you build your WordPress website. You can also use it to build your online store. It’s up and running in no time with just a few plugins.
One second – but which WordPress are we talking about?
1. Choose the Right WordPress Type for Your Website
Here’s the thing:
WordPress comes in two flavors: WordPress.com and WordPress.org
And before you even start using WordPress, you need to decide which one you need.
Let’s see the difference between the two.
WordPress.com vs. WordPress.org
The most significant difference between WordPress.com and WordPress.org is that the former is a hosting service and the latter is a system software.
Okay. But what does that mean? Let’s see them one by one.
What is WordPress.com?
It is a blog hosting provider. It’s not directly related to WordPress.org, but uses it at its core. It has a basic free platform and paid plans. WordPress.com gives you a domain name and is your hosting provider, so you get everything as a package.
WordPress.com does not allow you to customize as much as WordPress.org, and there are many limitations. But if you’re just playing around and starting your blog, then this is for you. It’s also a good choice if you don’t want to worry about upfront costs.
Then what is WordPress.org?
WordPress.org is a System software that allows you to create your website. It’s free to use, but you need your own domain and hosting provider. You have complete control over how your website looks and performs. WordPress.org allows you to customize your website as much as you like, placing ads and plugins on it so that it best serves your desired purpose.
It’s the right place for anyone who is serious about building their website or blog online. It also gives you more control over setting up a WordPress site as it offers better options and possible personalization.
Before you learn how to start a WordPress site, check out the infographics below. It’s a brief introduction to WordPress.org and WordPress.com.

In this tutorial we will focus on using WordPress .org So if you choose WordPress.com, follow the instructions on their website for an easy setup.
So—
Before you begin installing WordPress, you must have a Domain obtained and hospitality. So let’s see which are the best choices for you.
2.Get your domain and hosting
Let’s get the definitions right:
The domain is the name of your website. It’s your website’s URL. The domain is what people type into the browser to find you.
Web hosting service allows you to store your website on a web server. Hosting is how your website can be published and viewed.
Let’s assume the domain is your online home address and the web hosting server is the condominium.
There are many web host providers out there so you might feel a bit overwhelmed. GoDaddy, Bluehost, and SiteGround are the top players in this space. Each of them has their own page where you can find more information about their WordPress solutions. If you want to explore all the pros and cons of these providers, check out this in-depth comparison between them.
For our purposes, we’ve created a nifty comparison chart of the pricing and features of each of the web host offerings:
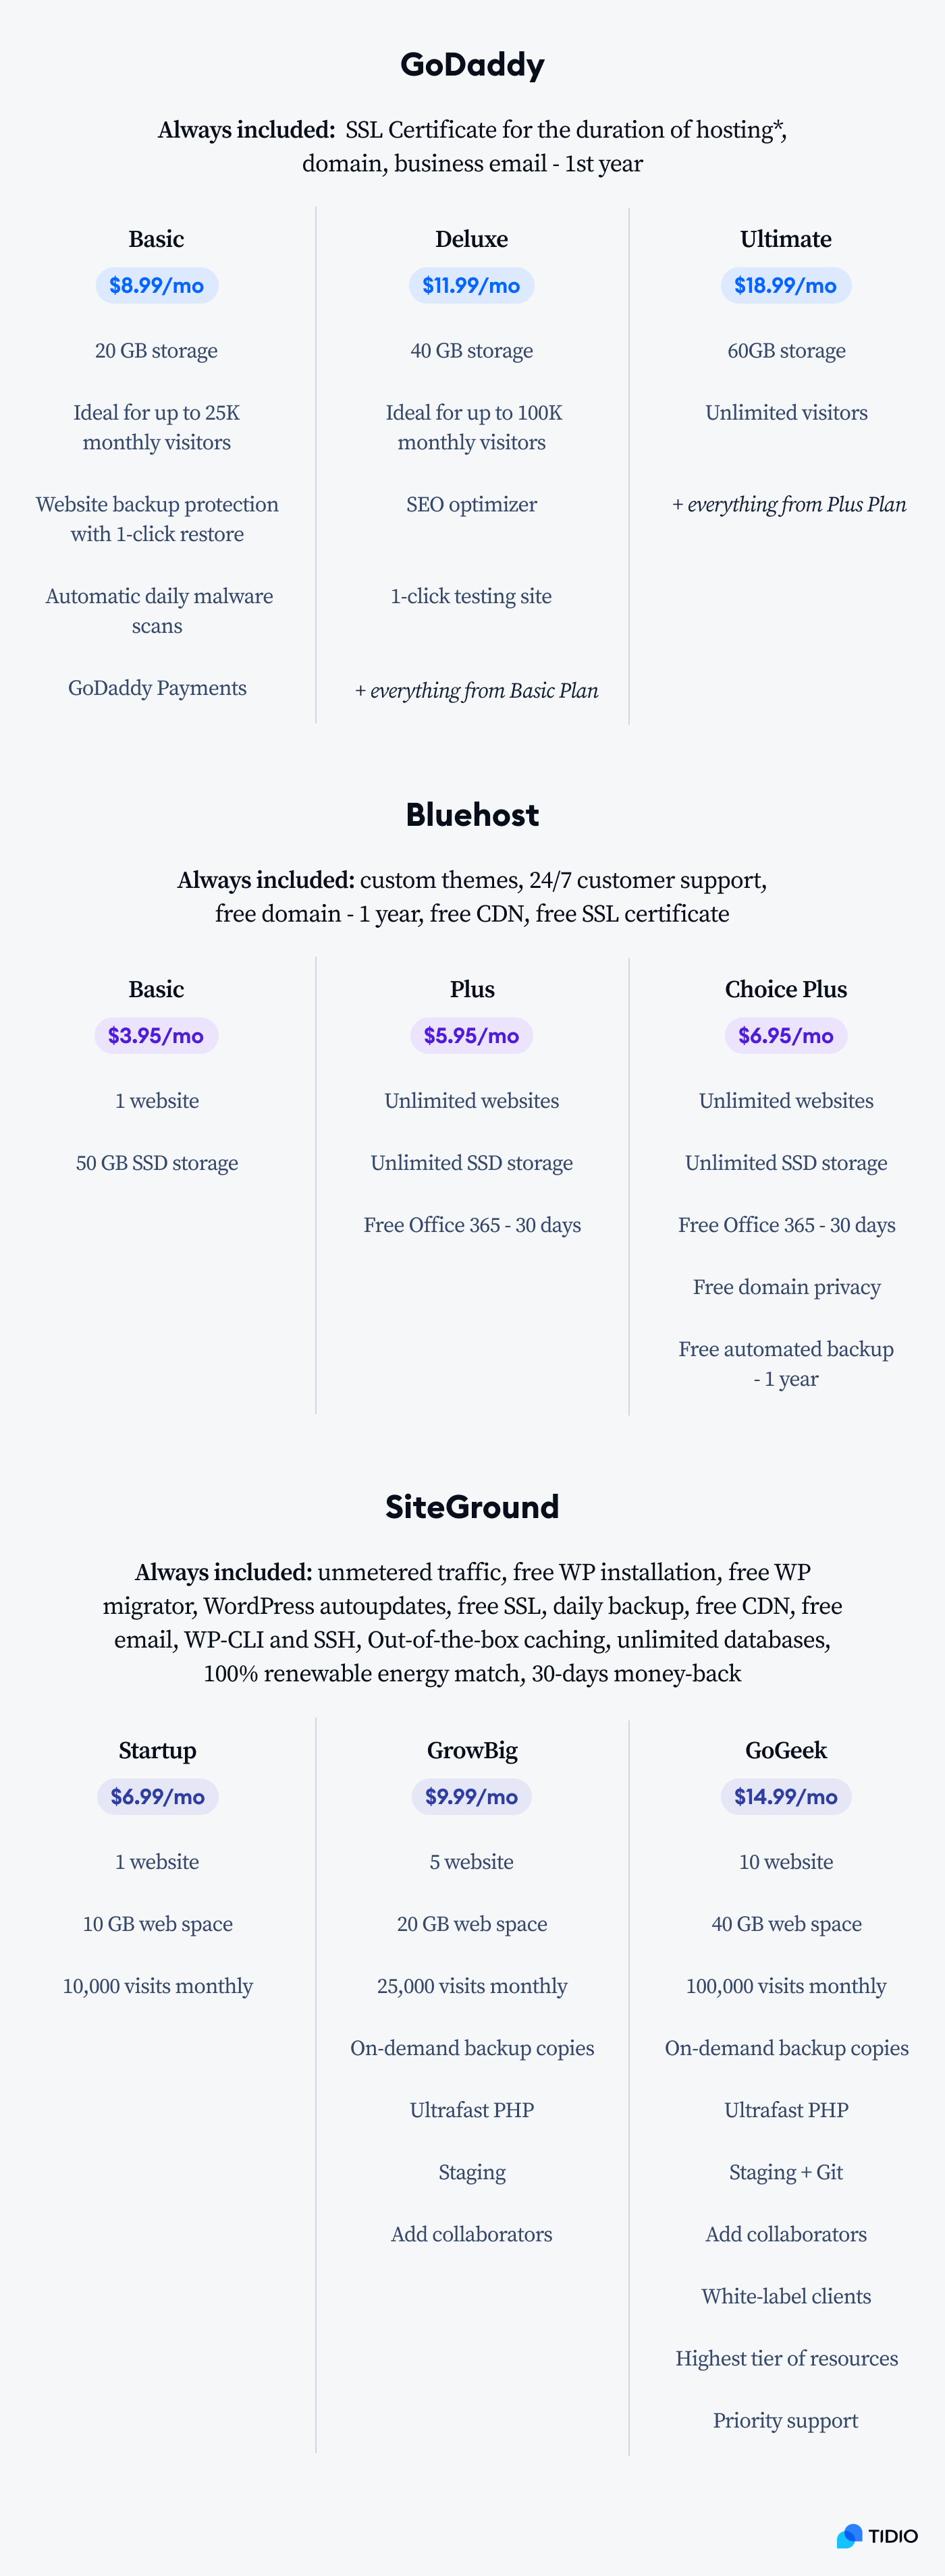
There are many more options available to you on the internet, and if you want to explore some of them, check out this list of the best web hosting options.
Bluehost is a WordPress recommended hosting provider and hosts most WordPress websites. SiteGround is the top rated hosting provider by WordPress users. And GoDaddy is the largest domain registrar in the world, it ranks right behind Google as the largest hosting provider, and it’s really easy to set up.
That’s why we’re going to be featuring in this article GoDaddy. However, you should choose a hosting provider that best suits your needs.
How to use WordPress with GoDaddy?
So once you’ve decided on this web hosting, follow these three steps to sign up for it:
- Go to GoDaddy WordPress Hosting
- Decide on the plan and duration. You get a domain name included in your hosting package.
- Go to the checkout page, complete the transaction and you have a hosting and domain name ready
Follow this little domain checklist to get the Choosing a name for your website:
- Choose more than one name for your website, just in case the first one is taken. At the time of writing, there were over 1.9 billion websites and the number is constantly growing. So you may need to get creative.
- Consider possible misspellings your customers might make when typing your domain name. Simplify your name if possible.
- Decide whether your website will be based on .com (most commonly used; for commercial and personal use), .net (suitable for internet infrastructure) or . net” should end with “.org” (used mostly for nonprofits).
- Consider the length of your name. Some browsers do not allow anything over 26 characters.
Check if your dream domain name is free with this tool.
If it’s free, great! Let’s move on 🙂
If not, try different variants or find synonyms until you find the perfect match.
Alternatively, you can try finding domains for sale. But beware! Sometimes the prices are very high.
Time to get things started! Now that you have your name and a place to put your website, let’s continue with our WordPress.org tutorial.
3. Install WordPress
There are two ways to install WordPress. The first is to go through your hosting account. The latter consists of downloading and installing WordPress directly from their website. Let’s explore both options in more detail.
About your hosting provider
If you decide to use your GoDaddy account to install WordPress, follow this step-by-step video guide:
And if you choose a different web host, check out these guides. They walk you through installing WordPress for beginners:
- Bluehost
- GoDaddy
- SiteGround
Directly via WordPress
It will take no longer than 5 minutes. Just follow these simple steps:
- Download the latest version of WordPress
- Unzip the file
- Create MySQL and a database your web server.
What is MySQL?
MySQL is a database system for storing and restoring your information. A complete guide to MySQL databases can be helpful if you want to know the details. You can also check the MySQL company’s website for complete information on what they do. Most hosting providers give you free basic MySQL with your hosting. GoDaddy hosting includes a MySQL database which you can find in your account.
You can now upload WordPress files to the location of your choice.
Remember to save your files in upload the appropriate directory. Which folder you upload them to depends on whether you want WordPress on your root domain or a subdomain.
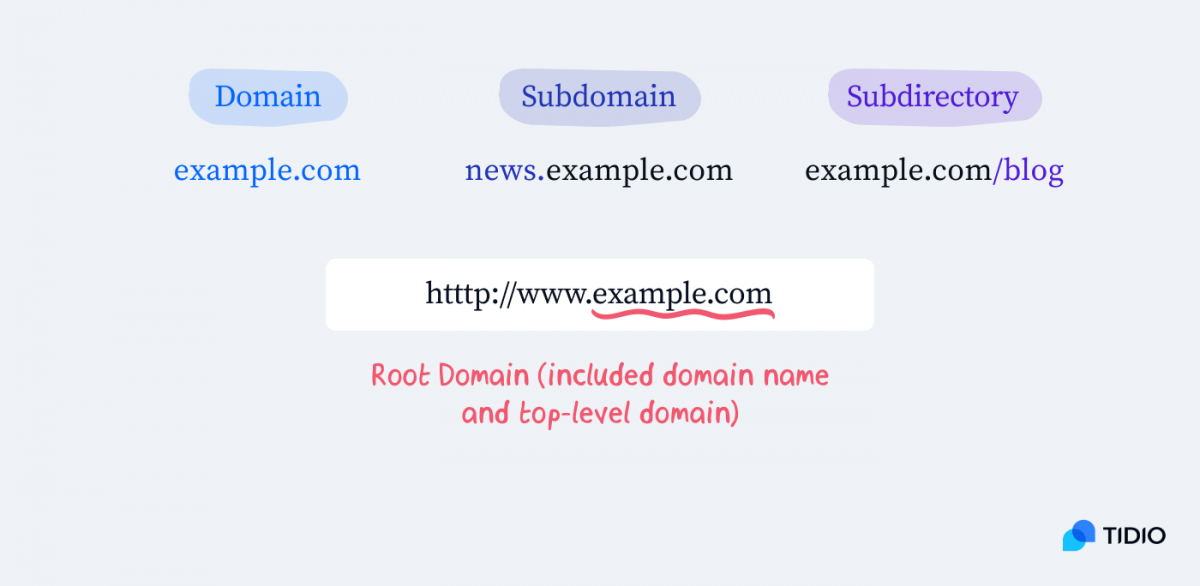
If it’s your main domain , then move or upload all files from your unzipped WordPress directory to the root of your website.
If you want to place it in a subdirectory of a website, just create one on your server and upload it FTP your unzipped WordPress.
Okay – after you’ve installed it, let’s learn how to make your website live.
How to make your WordPress website live and public ?
See also: How to Create a Blog Content Strategy – What 4 Years of Experience Have Taught Me
Once having completed all previous steps, access the URL in a web browser to run the WordPress installation script.
To access your admin panel, add Add “/wp-admin” to the end of your URL, so it should look something like this:
Remember that this is a e is the default web address, but your hosting provider can change it. So if this URL doesn’t work, contact your web hosting provider for more information.
p>
Create a WordPress account by logging in. To do this, enter your details and create a password.
Once you have filled it in, you will see a login page. This means your website is live and public and you can start playing around with it.
So, let’s get down to it and see how to build a website with WordPress.
4. Get to Know Your WordPress Dashboard
Once you sign up, the fun begins!
Fun? So is WordPress easy to use?
Not really. But we’ll show you everything you need to know to make the process as easy as possible. Let’s start with the WordPress basics by going through your dashboard.

- Dashboard. Current status of your website (health, comments, posts, activity). You can also see what actions WordPress recommends to get you started on your site.
- Posts. Create, edit and manage blog posts
- Media. Upload, manage, remove images and other media.
- Pages. Create, edit and manage websites.
- Comments. Monitor comments.
- Appearance. Change the theme, customize how elements are displayed.
- Plugins. Install or uninstall plugins.
- Users. Manage user accounts.
- Tools. Check website health, import and export posts or comments from other systems.
- Settings. Change the settings for your website. This includes general settings as well as reading, discussions, media size, permalink and privacy.
If there is an area that interests you, click on it in the list and teleport to it.
So let’s start this website building tutorial by first choosing and installing your theme.
5. Choose your WordPress theme
WordPress themes define the look of your WordPress site.
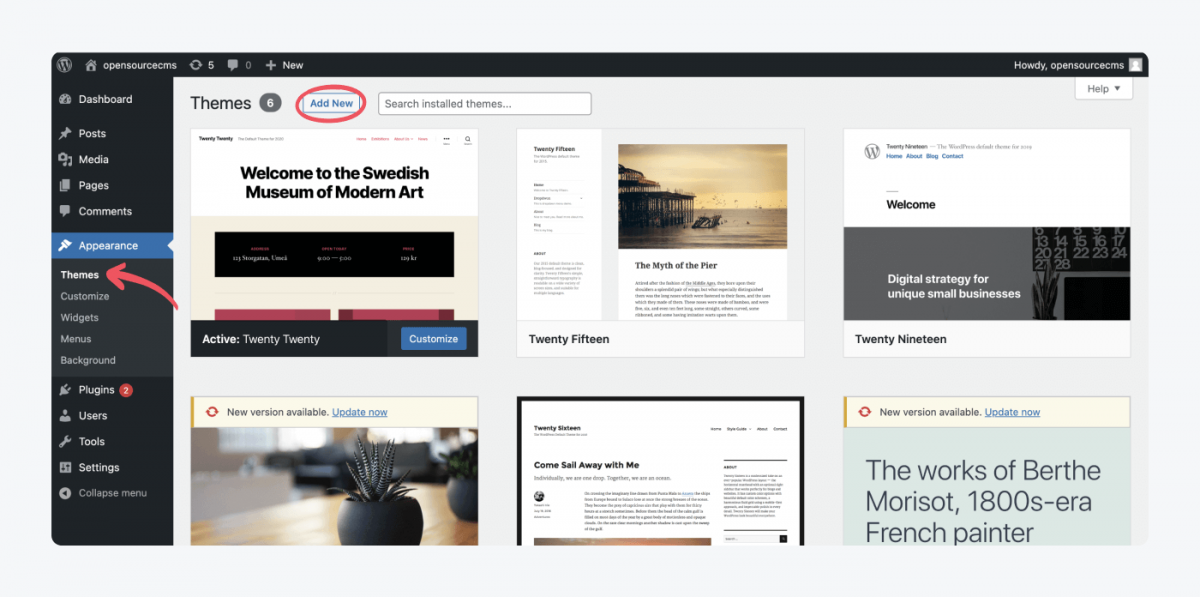
You can find them under the Appearance tab on your dashboard. There are many free themes and premium themes available so you can browse around until you find your perfect one.
After clicking through to this tab you can browse and browse all the available themes or start a new one Add theme by clicking Add new.
Install your theme
Once you’ve found a theme that suits your type of website, install it with just one Click on the “Install” button. Yes, that’s obvious.
But—
What if you don’t like any of the themes WordPress stocks? Go to themeforest.net, elegantthemes.com or mythemeshop.com. You can browse through thousands of WordPress themes there and find the perfect theme for your website.
You can also add your own theme if you want. To do this, go to the Themes tab and click the Add New button, then click Upload Theme.

Customize the WordPress theme
To start customizing and making To begin making changes to your theme, click the pencil icon next to the item you want to edit.
This will take you to the appropriate menu section.

- Site Identity. Change your title and tagline.
- Colors. Change the color scheme of your website.
- Header media. Manage the image/video that people see directly at the top of your page.
- Menus tab. Set up a top menu for your website and a “social links” menu for linking to social media. You can also choose where to display them.
- Widgets. Add widgets to your pages and decide where to place them.
- Homepage Settings. Choose which page you want to use as your home page.
- Additional CSS. Add your own CSS code to customize your website even more.
Edit the elements and make the site your own. Make sure you set up a navigation menu bar for your site visitors to click through to their desired destination.
And once you’re happy with how your site looks, let’s go ahead and take a look throw it on the Widgets page.
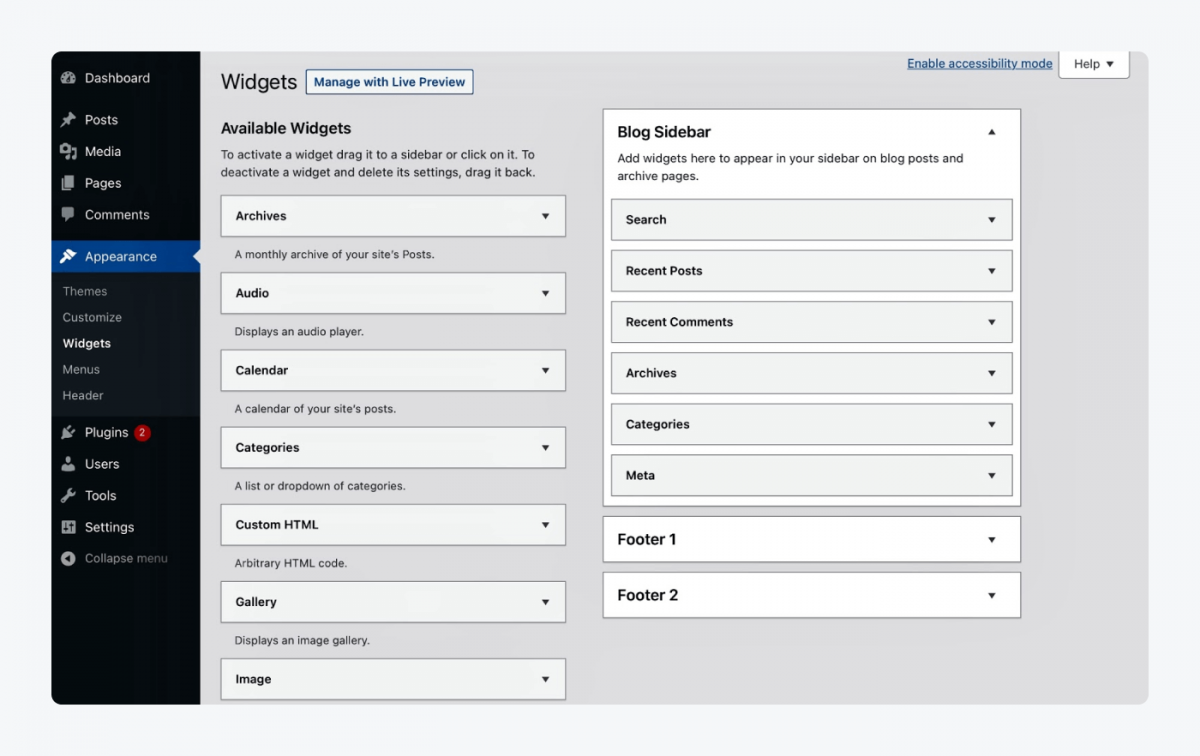
You can see the available widgets as well as your blog sidebar here.
What are the widgets on a WordPress website?
You know those little screen elements on your phone that give you a quick view of the app? Those are the widgets, and they work similarly on WordPress. They are like gadgets to add functionality to your website. Learn more about WordPress widgets, how to install, display and use them.
You can add various widgets to your sidebar. The sidebar is placed next to your article and contains additional information or functionality. Learn more about sidebar features and how to register them.
Okay – since you have a background for your website, let’s learn how to fill it with content.
6. Creating content
There are two main types of content in WordPress: pages and posts.
The difference between pages and posts is that posts are specific to your blog posts. Pages refers to any static pages on your site, such as For example, the contact or home page.
To add content to your web pages:
- Go to the Pages tab
- Click on Add New
This will take you to a blank sheet that you can paste into the home page, product page or even your contact form. It comes with a sidebar where you can change elements of your page and block settings. You can add more blocks by clicking the plus sign.
This is how it looks in practice:

Blocks are elements on your website, e.g. E.g. text, media , or buttons.
In the page settings you can choose whether the page is public or private. You can also manage permalinks, images, and discussions. Blocks give you a choice of font, color scheme, and text.
If you click on the plus sign you will see different blocks that you can add to your page. This includes paragraphs, media lists, shortcodes and much more.
The blocks in your page builder make it easy to customize every part of your page. Blocks are categorized into:
- Text
- Media
- Design
- Widgets
- Embeds
You can move your blocks around the page after you create them. This gives you total creative freedom to design your WordPress site exactly how you want it.
When creating pages, consider using the Default Base Pages on your place website.
- Home
- Product
- Blog
- About us
- Contact
This is a standard website menu layout. People expect it, so you should stick with what they know. Don’t confuse your readers, because confusing them often means losing them. Just like Donald Miller wrote in his book Building a StoryBrand, “If you confuse, you lose.”
How do I create blog posts in WordPress?
Creating blog posts is very easy. Go to your Posts tab and follow the exact same instructions as setting up Pages. We talk about setting up a WordPress blog a little further down.
WordPress Categories Guide:
- A drop down menu will show you the categories you currently have and an option to add a new category.
- After clicking this option, choose a name and parent category.
- Click the “Add New Category” button and there you have it!
Now you can divide and organize your blog posts into different categories for the convenience of your readers and the clutter of your website.
How to use shortcode in WordPress
A shortcode is a website version of a shortcut. It allows you to easily add functionality to your website that would normally require programming knowledge.

To show you how to use shortcodes in WordPress, let’s go to a new page.
- Click the plus sign and browse all. This will show you blocking options to choose from.
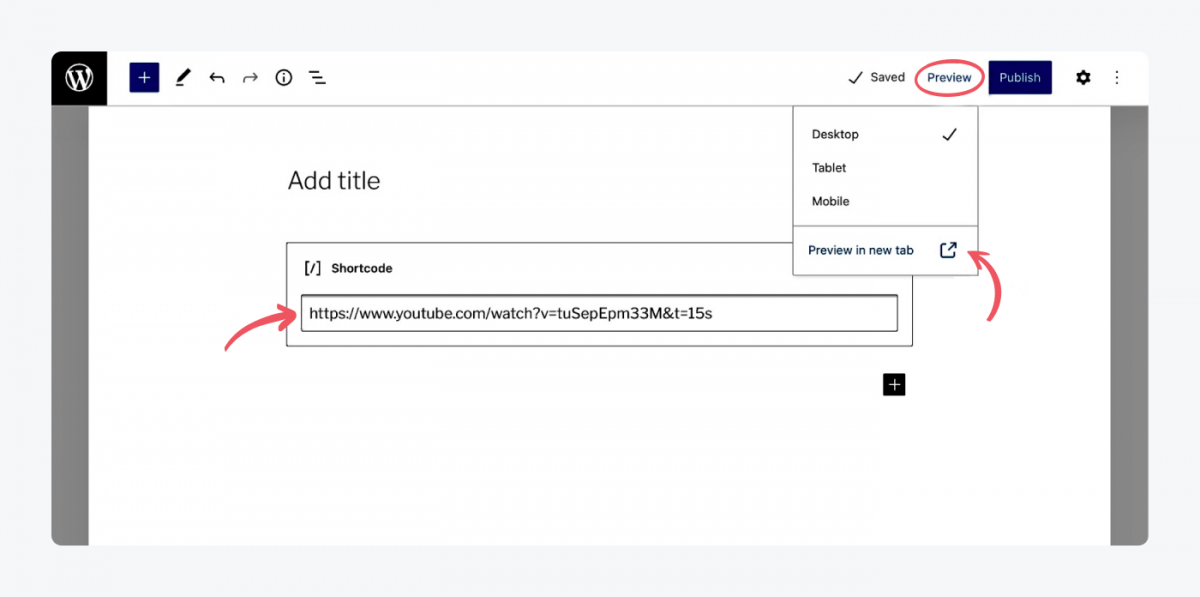
- Scroll down to Widgets and click on the shortcode icon. A box will open.
- In the shortcode area, paste the element you want to include on your page. This can be a gallery, slideshow, playlist, or in our case, a YouTube video.
- After entering the shortcode you want, click Preview.
- Select Preview in new tab from the drop-down menu.This shows what your shortcode will look like to your readers.
Check out this list of shortcodes you can use in WordPress.
If your shortcode type WordPress, it should look something like this:
In the shortcode area, paste the element you want to include on your page. This can be a gallery, slideshow, playlist, or in our case, a YouTube video.
After entering the shortcode you want, click Preview. Then select Preview in New Tab from the drop-down menu. This shows what your shortcode will look like to your readers.
To make your website more engaging and interesting for your audience, add media. This includes photos, videos and other interactive elements. How does it work? Scroll down to find out.
7. Upload Media
OK—
Let’s assume you’ve written your text and added the elements you want. Now your page or blog post needs images (or other media).
Go to the Media tab. This tab is empty for now. Once you start building a WordPress website and uploading images and videos, you can view them all here.
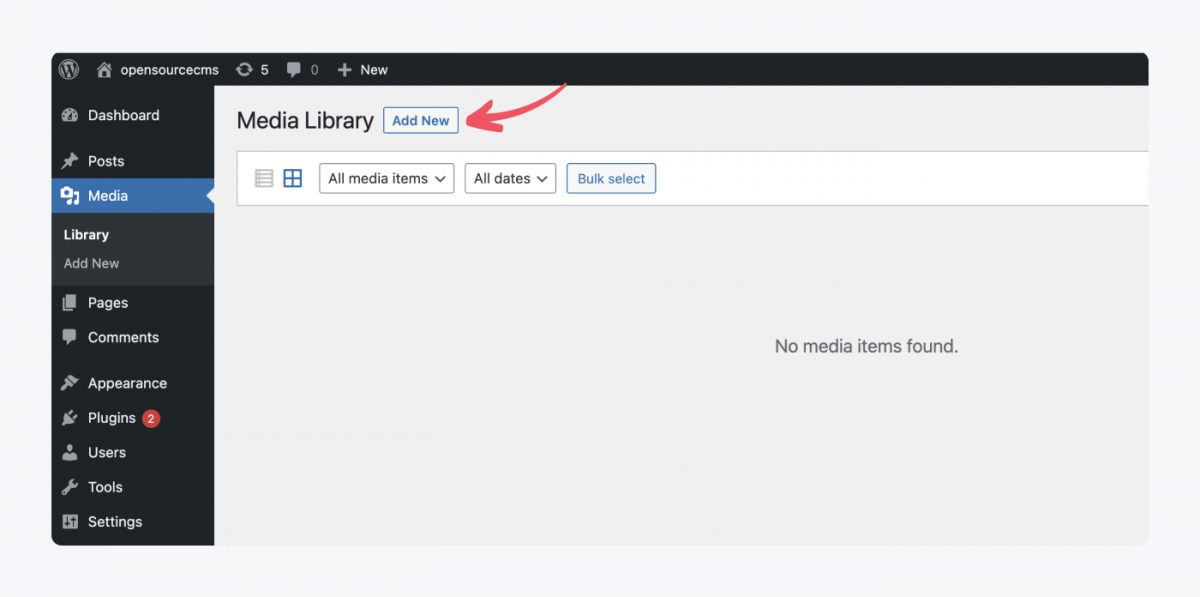
Let’s add your first media file:
- Click Add New.
- A box will open. You can drop files here or select files from your device.
The theme is selected. Visual available. Content is here too.
Next: backstage of your website. In other words, how to set up a WordPress website.
8. Customize Your Website
Right –
Let’s take a look behind the scenes at your website. The Settings section lets you change how you see your site and what readers can do on it.
General Settings
See also: How to create a YouTube channel for personal use or for your brand
Here you can manage your site’s title, tagline, and URL. You can also view and change your email address, role, and language.
Set a time zone where you operate. Scroll down to the Time Zone field and select the correct one.

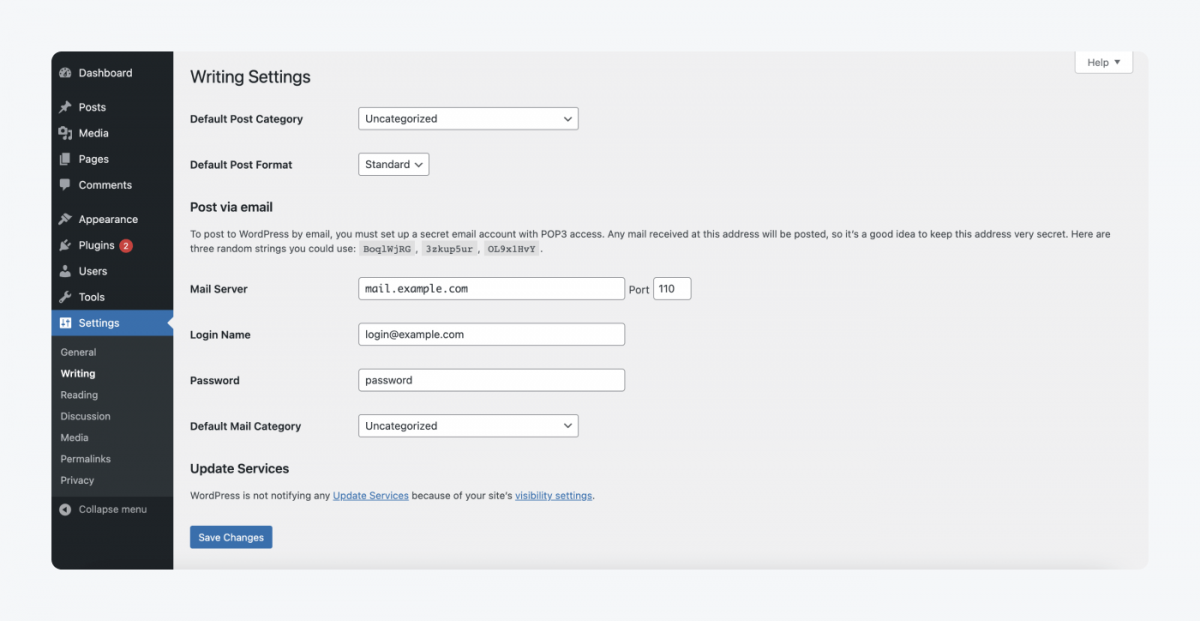
Writing Settings
In the writing area, you can set your default post category and format. You can also publish your blog posts via email. To do this, choose your email server, login name, and password.
Before you can set a default post category, you need to create it, and we’ve shown you how to do that in the section about that Creating content.
Reading Settings
Check out the reading settings and make sure everything is the way you want your readers to see your page. You can choose how many posts the Blog Page displays, what goes in the feed, and how much text you want to put in a feed.

Talk
To change the default post and comment settings together with your email notifications, go to the Discussion tab.
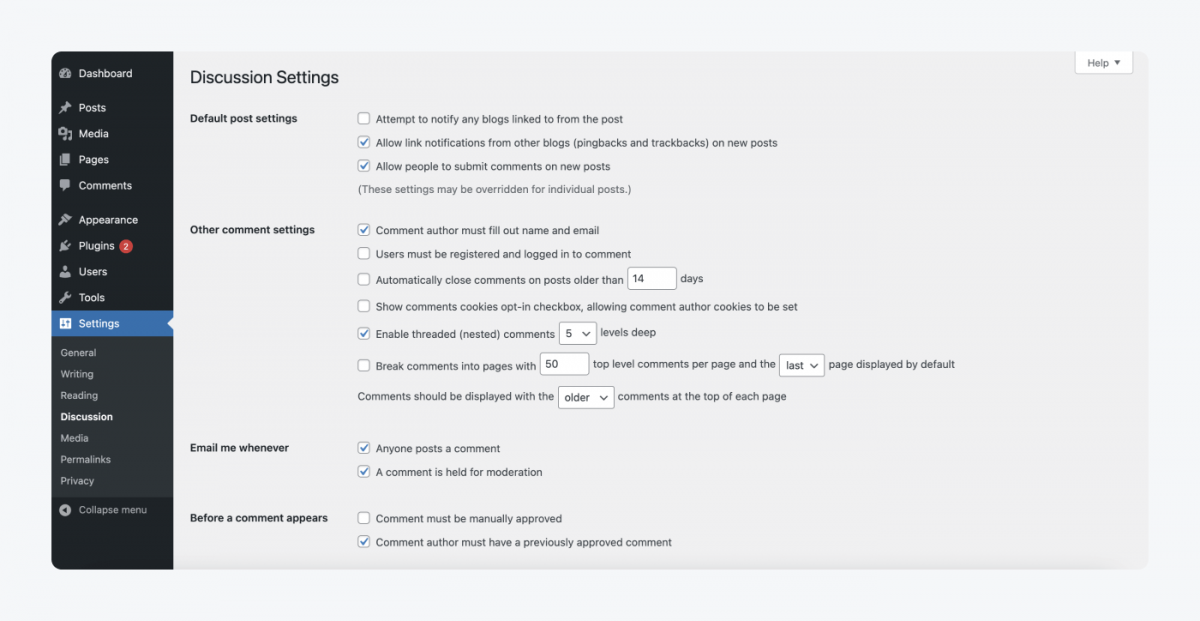
There you can change what people have to do before they can comment on your site. For example, you can choose how many days after a post is published people can leave comments. You can also decide whether you want to show older or newer comments first.
To moderate the comments your readers leave on your site, you need to go to the Comments tab in the main menu. There you can filter them and mark them as spam.
You can also change your email notification preferences and other post preferences in the discussion area. Pingbacks and trackbacks are a way to notify other blogs when you link to them. You will also get a notification when other blogs link to you. This WordPress tutorial explains pingbacks and trackbacks in more detail if you’re interested in how it all works.
Media Settings
This is where you decide the size of your images and how you organize your files .
Recommended image sizes for WordPress are:
- Blog posts: 1200 x 630px
- Hero images (full screen images): 2880 x 1500 pixels
- Landscape feature image: 900 x 1200 pixels
- Portrait feature image: 1200 x 900 pixels
- Full screen slideshow: 2800 x 1500 pixels
- Gallery images: 1500 pixels x auto-width
For more information on image size and quality, see this WordPress guide.
Setting up the permalink
When you get your first introduction to creating a WordPress website, you have everything to think about. Just like on the first date. The big elements, small details, and everything in between matters.
Permalink is one of those small elements that can make a big difference. It’s the URL of the page and you can choose how you want it to look like. You can choose from a plain option, a time stamped option, or a post name option. We recommend you to choose the post name for a more SEO friendly structure and easier updating.

Make your site mobile-friendly. Nowadays, most people use their mobile devices to surf the Internet. If you ignore this fact, you risk losing a lot of potential customers. You do not want that! Choose the right theme, plugins and media files wisely. Check out some top mobile commerce stats to learn what to look out for.
How can you make your website even better? Install some plugins that add functionalities to your WordPress site. Let’s find out which ones and how.
9. Get Plugins for Your WordPress Website
To add additional functionality and get help running your website, consider purchasing plugins. You can access them by going to the Plugins tab in your website menu.
What are WordPress plugins?
Plugins are add-on software to customize your website. They can help you improve security, optimize your SEO, integrate live chat and much more.

We recommend you get some plugins to optimize security and website view speed. You should also consider Yoast SEO to improve your website’s search engine optimization.
One thing I would say, less is more. The beauty of WordPress is the ability to add new features in the form of plugins. Often people overdo it and download a million plugins. This slows down the website and makes it clunky. A few solid plugins like Beaver Builder, Gravity Forms and others are all you really need.
If your website is business, consider adding free plugins like WooCommerce to make an e-mail faster. to create a commerce website. Then add some chatbot plugins and other ecommerce plugins. They can help you engage your customers more.
Suggested readingLearn how to add Tidio chat to your WordPress website.
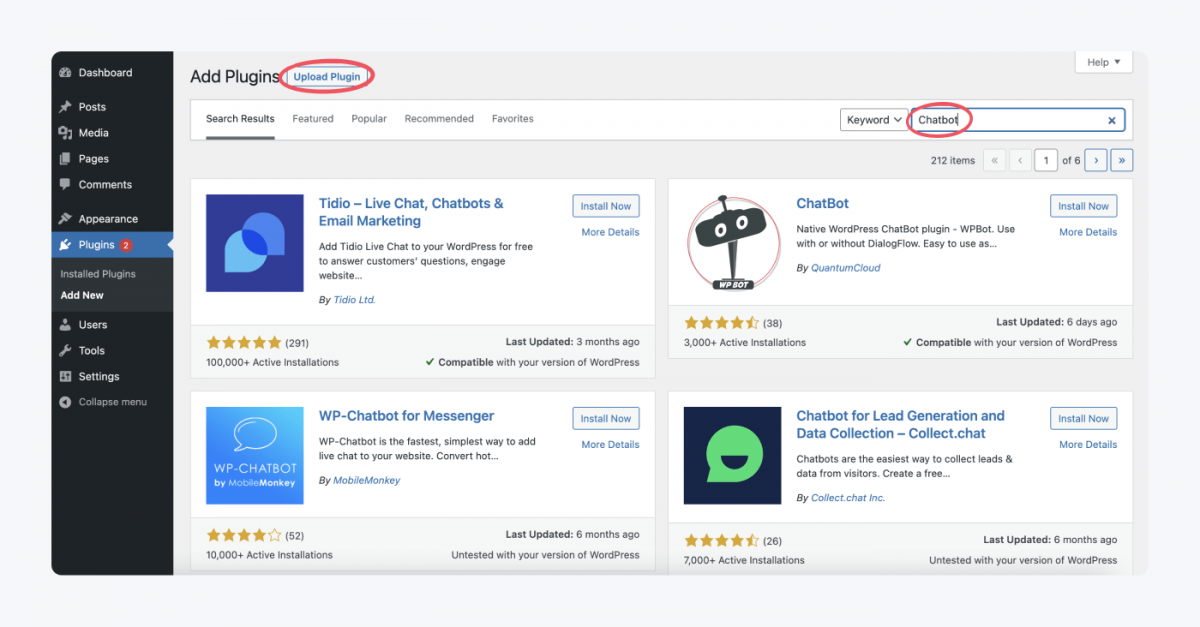
You can search for plugins by typing a keyword. This will give you all the options for that particular feature. The number of items you’ll find can be intimidating at times, but a look at the ratings, a number of active installs, and compatibility information will help you separate the wheat from the chaff.
You can also make your own Upload plugins by clicking Upload plugin. Just upload a “.zip” file and you have your own plugin on your website.
You may need more information about plugins than we’ve provided in this WordPress beginner’s guide. If that’s the case, check out the WordPress page for managing plugins.
Would you like to add more users so others can help you with the site? This is a fairly quick and easy task.
10. Add user
Will you be the only person using this website? If so, then skip this step.
If you would like someone to help you create a WordPress website and run it with you, then go to the Users tab. Here you can manage who has access to your website.
By default, your website only contains your name. To add a new user, click Add New. You will be taken to a website to add your details. They must provide their username and email address. The other fields are optional.
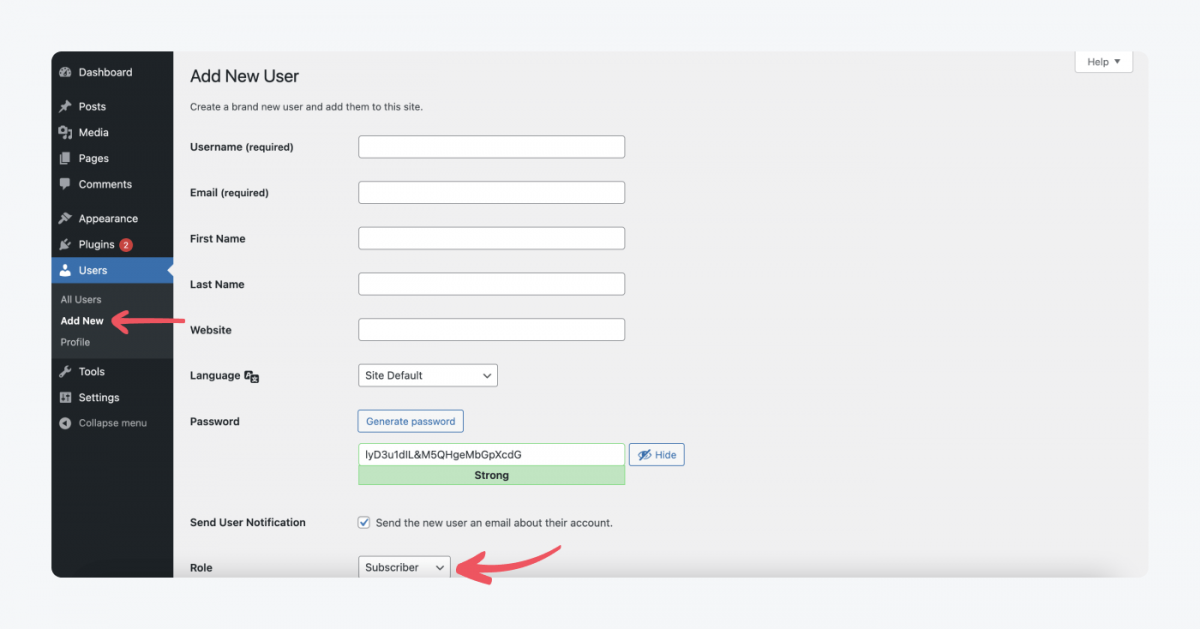
Remember to customize the role you assign them. You can choose between a Subscriber, Contributor, Author, Editor and Admin. Check what all roles mean to make the right decision.
Ready? Not quite. First, let’s look at the tools at your disposal.
11. Set up your tools
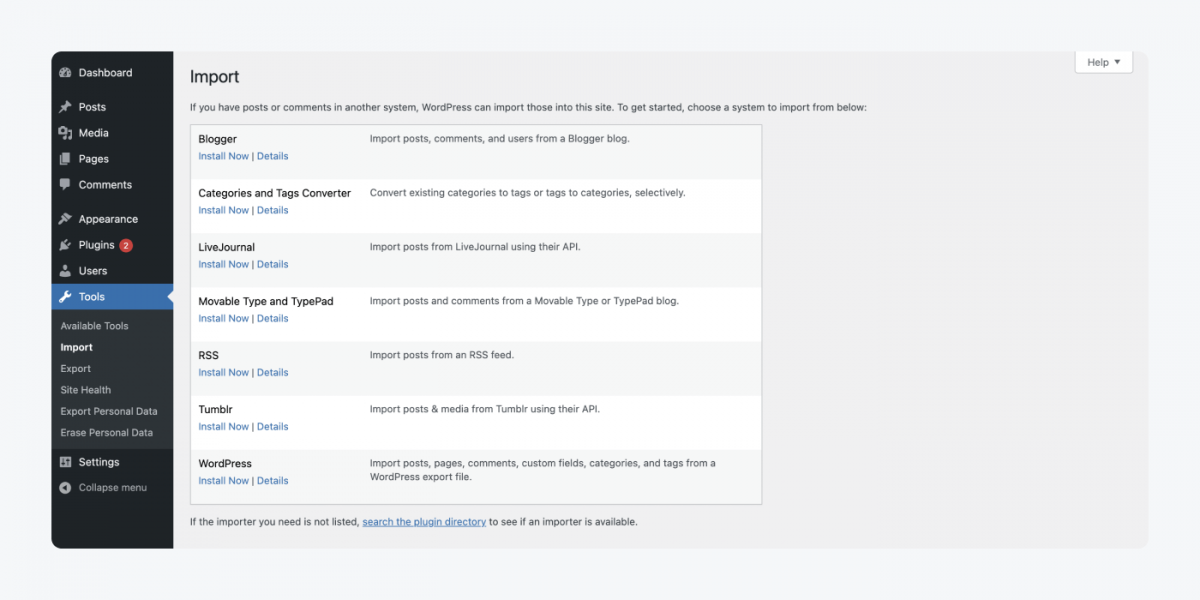
The Tools tab allows you to import/export posts and comments from another system to your WordPress website.
Let’s say you have Blogger, Tumblr or any other WordPress website, click the Install Now button below the platform.This will trigger a popup with the connection information. You’ll need to enter your other web server’s hostname, FTP/SSH username, and FTP/SSH password for WordPress to access it.
Check out this complete guide to importing content to your website if you’re interested.
If you want to export your content, click Export. Choose what you want to export and click Download Export File. This creates an XML file that you can save to your computer. After you save the file, you can import the content to another site.
You can also check the health of your site and manage personal information on the Tools tab.
The Site Health section provides you with site health and recommendations for improvement.
In the “Export personal data” section, you can send a request to a specific user to export their known data to a “.zip” file. This can come in handy when you need to comply with local laws and regulations.
You can delete or anonymize known data for a specific user on the Delete Personal Data tab. You must provide a username or email address to send the request. This is also helpful for complying with local laws and regulations.
Okay –
We’ve gone through all the tabs and you now have everything you need to start building your WordPress site. However, there is one additional thing that might interest you. Want to know how to use the WordPress blog? Let’s find out!
12. Start a WordPress Blog
Running a blog is useful if you want to establish yourself as an expert. You can use a blog to help your customers with their problems before they are ready to buy from you. This puts you ahead of your competitors when the buyer is ready to buy.
Blogging can also improve your search engine visibility and ranking on the search engine results page.
However, if you are creating a website for yourself and not for your business, you may not want to blog. That’s perfectly fine. You can create a website on WordPress without starting a blog – if that’s the case, move on to the next section!
So, here’s how to start a WordPress blog:
- Go to the Posts tab. Here you can view all your published blog posts.
- To start a WordPress blog, create a new blog post. Click the “Add New” button.
- Start typing and creating
When you start a blog, publish it on a set schedule – at least one post per blog week. Let your personality shine through in your writing. Don’t be a boring author who sounds like everyone else! Finally, remember to add links to your old articles so readers can find more of your content.

Well what we’re going to show you here is some technical basics. But blogging can be serious business and become your main source of customer acquisition. Take a look at these guides to learn more about the ins and outs of blogging seriously:
- How to Start a Blog – Easy-to-follow Beginner’s Guide
- How to Write a Blog Post: The Definitive Guide
- How to Outline a Blog Post Super Fast
How to Build a Website with WordPress: Tips and Tricks
In a guide to creating a WordPress site, we couldn’t forget to give you something special! So let’s look at some tips and tricks to keep in mind when building your WordPress website.
- Play around before you get down to business
Before you start using WordPress in earnest, play around with this demo. You can see how it all works in practice.
- Make your website instantly visible to Google
When you start setting up your WordPress website finished , uncheck the checkbox for visibility from search engines in the reading settings. Then go to Google Search Console to tell Google it’s ready for indexing.
- Consider user experience
Build a WordPress website that passes usability testing. Good questions to ask yourself as you review your site are: Is it consistent in color/style/tone and typography? Is it easy to navigate? Is it hierarchical? Don’t present your history to the user before showing them what you’re doing. Is it mobile responsive?
- Use Google Analytics
Use Google Analytics to track your website’s performance. You can find bounce rate, number of visitors and other useful metrics. Keep an eye on them month after month to see if your site is performing well.
FAQs
If you still can’t find the answer to your question, try the WordPress forum and see if the people there can help. The WordPress community is large and supportive of one another, so you’re in good hands.
That’s all from our guide.If you prefer video tutorials, we’ve found this great step-by-step guide to building a WordPress website created by Tyler Moore. We think you might like it 🙂
Keys to take home
Creating a WordPress website can be a bit time-consuming, but it’s certainly worth the effort!
You have your website ready for you now. We’ve covered all the basics, and you have additional material to refer to if needed. Here’s a quick reminder on how to build a WordPress website from scratch:
- Step 1: Choose the right WordPress for your website
- Step 2: Get Get your domain and hosting
- Step 3: Install WordPress
- Step 4: Get to know your dashboard
- Step 5: Choose your WordPress Theme
- Step 6: Produce content
- Step 7: Upload media
- Step 8: Customize your website
- Step 9: Get plugins for your WordPress
- Step 10: Add users
- Step 11: Set up your tools
- Step 12: Start a WordPress blog
- Tips and tricks
If you missed something, click on the step you want to repeat.
Good luck and have fun with WordPress! It will be an exciting journey for you and your company.
See also: How To Create A Blog Logo That Looks Professional – Easily, Quickly And On Budget!
.