There are many misconceptions surrounding the Dark Web, and most people think that it is not possible to create your own website on the Dark Web (The Onion Network). Today we’re going to launch a website on the Onion/Tor network for free.

Reading: How to create a deep web website
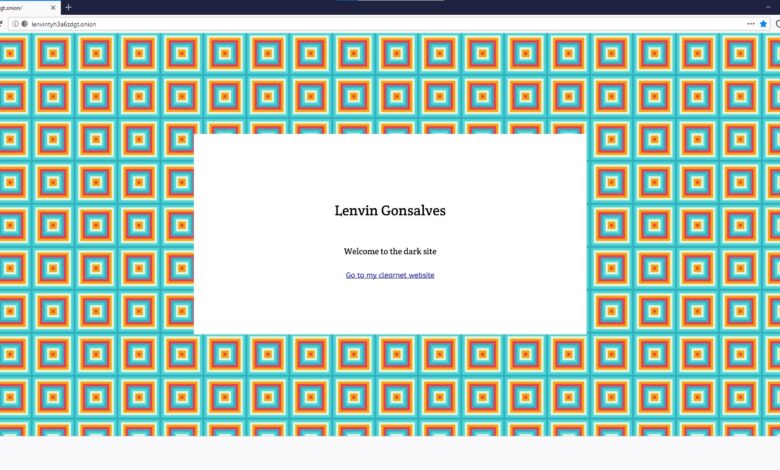
As you can see above, I created my own website on the Tor network and accessed it through the Tor browser.
This tutorial exists three steps
- Prepare your computer (no step)
- Install nginx
- Install Tor
- Tor server setup
Ingredients
- An old computer 💻
- A stable internet connection 🌐
- 2 hours ⌚
- Convenience with Terminal ⌨
Instructions
Find a free computer that can be used as a server. Unlike regular internet, you don’t need a static IP. You must install a Linux-based operating system on the server. I have tested the following steps on Ubuntu 18.04 Server LTS and recommend that you use the same.
It is also recommended to use SSH to connect to your to set up servers as there will be no GUI. You cannot open this article on the server and copy and paste the commands. Typing the commands is time-consuming and also very error-prone.
I won’t explain how to use and configure SSH in this article, but you can refer to the following to understand and use SSH.
Using SSH to connect to a remote server on Linux or Windows
Also make sure you are running as root throughout the tutorial.
sudo su
Let’s get our hands dark 😎
Installing nginx
nginx serves the HTML files and assets (acts as a web server).
apt update apt install nginx
The above commands will update and install nginx. To start the nginx server
service nginx start
See also: How to Make Money With a Travel Blog in 2023 (12 Tips)
To check the status of the nginx server
service nginx status
To confirm if the nginx server is working. We will send a GET request to the server using curl. Before that you need to know your IP address.
ifconfig
The output looks something like this
lo: flags=73 mtu 65536 inet 127.0 .0.1 netmask 255.0. 0.0 inet6 ::1 prefixlen 128 scopeid 0x10 loop txqueuelen 1000 (local loopback) RX packets 134 bytes 21230 (21.2 KB) RX error 0 dropped 0 overruns 0 frame 0 TX packets 134 bytes 21230 (21, 2 KB ) TX error 0 failed 0 overflows 0 carriers 0 collisions 0 wlp9s0: flags=4163 mtu 1500 inet your-ip-address netmask 255.255.255.0 broadcast ###.###. #.# ## inet6 ####::####:####:####:#### prefixlen 64 scopeid 0x20 ether ##:##:##:## :## :## txqueuelen 1000 (Ethernet) RX packets 6379 bytes 8574482 (8.5 MB) RX error 0 Dropped 0 Overruns 0 Frame 0 TX packets 3518 bytes 506008 (506.0 KB) TX error 0 Dropped 0 Overruns 0 Carriers 0 Collisions 0
Your IP address is the inet your IP address. Make a note of it and now make a curl request.
curl your-IP-address:80
The console should print out the HTML of the default Nginx page. To add your custom page, follow the steps in the official documentation. You can also verify that nginx is working by typing the server’s IP address into your browser.
Beginner’s Guide – nginx
Installing Tor
Install of Tor (not just the browser) allows your computer to communicate with the Tor network. Before installing Tor, we need to install apt-transport-https so that we can use source lines with https://
apt install apt-transport-https
Important: The following commands only apply to Ubuntu 18.04. If you’re using a different operating system, you can find the commands here on Tor’s official site. We will now add the Tor sources to the sources file.
Touch /etc/apt/sources.list.d/ nano /etc/apt/sources.list.d/
Once the editor is open, add Add the following to the file
deb https://deb.torproject.org/torproject.org bionic main deb-src https://deb.torproject.org/torproject.org bionic main
After exiting & Save, type the following into the terminal. This is for adding the gpg key used to sign the Tor packages.
curl https://deb.torproject.org/torproject.org/A3C4F0F979CAA22CDBA8F512EE8CBC9E886DDD89.asc | gpg -import gpg -export A3C4F0F979CAA22CDBA8F512EE8CBC9E886DDD89 | apt-key add –
Finally, we now install Tor and also a package to help keep the signing key up to date.
apt update apt install tor deb.torproject.org-keyring
Similar to nginx , Tor can be started and checked with the following commands
service nginx start service nginx status
Setting up the Tor server
See also: How to save an email signature as HTML
Now that we have nginx & Tor up and running, we will do it to configure Tor so that our server acts as a Tor server (your server will not be used as a relay node)
We need to edit the torrc file.
nano /etc/tor/torrc
In the torrc file, go to the middle section and look for the line
############### This Section is for location hidden services only ###
And comment out the following lines.
HiddenServiceDir /var/lib/tor/hidden_service/ HiddenServicePort 80 127.0.0.1:80
In these lines
- HiddenServiceDir tells Tor where to store your Tor website’s private_key and hostname (this is information about your dark website). The stored private key is very important and could be used to impersonate you.
- HiddenServicePort allows you to create a virtual port (i.e. which port users accessing the website think they are using ) and specify an IP address and port to redirect connections to this virtual port.
To apply this new configuration, stop and restart the Tor service by typing the type the following commands.
service tor stop service tor start
Now check the Tor service status to see if the changes are working and valid.
service tor status
If things look fine, continue to the next step, otherwise you may have made a mistake editing the .torrc file.
At this point, your dark website needs to be running. But we don’t know what the url is, to get it run the following command
cat /var/lib/tor/hidden_service/hostname
The url to your brand new dark website will be printed in the console . To test if it works
curl -v -socks5-hostname localhost:9050 http://your-onion-domain.onion
The URL is actually your-public-RSA-key.onion. Tor has a different way of identifying websites using their RSA public key.
You may notice that the generated URL is very long and you may be wondering how to create custom domain names (eg. B. custom RSA public key). . I will make an article about it very soon.
Now let’s party on your first dark website 🎉. Please also share your thoughts in the comments 😁
See also: How to Create a Facebook Event on iPhone and iPad
.