You’ve confirmed the date, secured the venue and even recruited volunteers – but the COVID-19 crisis has shaken your plans. Of course you want to protect your team and supporters from the virus. At the same time, how will you keep your business afloat in these tough economic times? Here’s a solution: Hold a virtual fundraiser.
Whether it’s a walkathon or a concert, almost any event can become a virtual event where you raise money online through a fundraising site.
Reading: How to create a peer to peer donation website
We live in one, after all increasingly digital world. In 2019, total online fundraising revenue increased 23% year over year. It’s clear that more and more people are preferring to donate online, so give them an easy way to do it!
Don’t worry – the website doesn’t have to be fancy, and the process doesn’t have to be complicated . Below we will walk you through the steps to create a basic fundraiser microsite.
What is a microsite?
As the name might suggest, a microsite is a small website, usually part a larger one consisting of a single page or multiple pages dedicated to promoting a specific event or product. A microsite can be:
- an own domain (example: myevent.com)
- a subdomain of your existing website (example: myevent.mywebsite.com)
- or even a single page of your existing website (mywebsite.com/myevent)
In the context of fundraising, a microsite can be a separate event website for a charity.
Prepare to create a fundraiser page
To prepare you for your fundraiser, we will show you how to use Charitable to create a fundraiser website on WordPress.
Goals
- Have a unique URL that supporters can visit to learn more about your event.
- Peer-to-Peer Fundraising: A place where people can team up and campaign, and donors can give online
What you need to get started
- Domain
- Hosting
- WordPress
- Plugin for charity donations (free!)
- Ambassadors 2.0 Extension
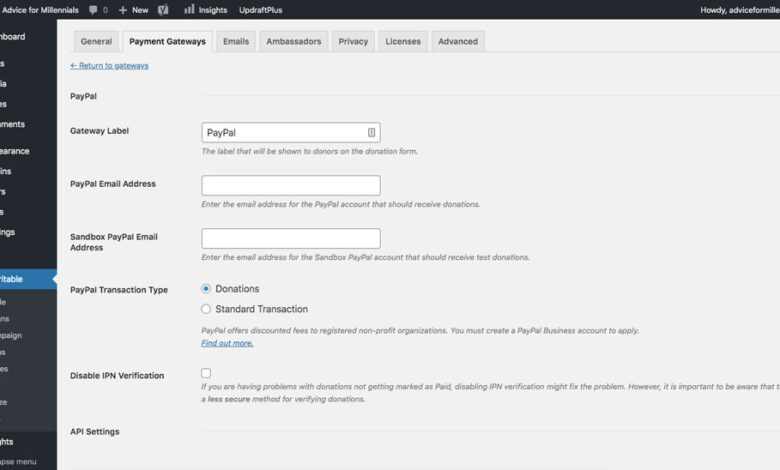
- Optional: Other Payment Gateways, Recurring Donations, Fee Relief, Newsletter Connect
3 Steps to Build Your Fundraiser Website
Step 1 : Install Charitable
See also: How to Make Money From Mobile Apps
Our popular WordPress donation plugin is completely free and never charges transaction fees (although it’s worth noting that whatever payment gateway you choose – like PayPal or Stripe – will charge fees. Unfortunately, we have on that no impact.
The easy way to install Charitable
To make the installation as easy as possible, simply enter the URL of your WordPress website (including ht tps://) below and submit the form:
On the following screen, simply click “Install Now” for the Charitable plugin, followed by “Activate” once the installation is complete.
The slightly less easy way to install Charitable
If the form above didn’t work for you, don’t worry! You can still get started with Charitable from your WordPress. You can usually find these at [yoursite].com/wp-admin.
Navigate to Plugins on the left
To create your profile page, go to Pages
How your ambassadors can leverage peer-to-peer fundraising by creating child campaigns under your parent campaign
So you just created a parent campaign on the backend in WordPress . Well, here’s how a donor would create a campaign on the front end of your website.
Step 1: Give them the URL to your Submit Campaign page.
See also: How to create beautiful picture quotes
Option A: For most, this will be [yoursite.com/profile/submit-campaign. But it could be different. For this example, I created my own campaign page at [mysite].com/create-a-campaign.
Option B: Use the “Fundraise” button shortcode, to give visitors a prominent, easy way to submit a campaign. Copy and paste the following: [charitable_fundraise_button]. You can create a new page to add this, or you can add this to your home page (or both!).
When your visitor clicks the link or button, they see this:
Next, click Save.hosts an annual Heart of Illinois CHD Walk to raise funds and raise awareness that people affected by congenital heart disease can be empowered. They host their fundraiser microsite on a completely separate domain: T.O.U.C.H’s domain is touchhearts.org, while Heart of Illinois CHD Walk’s domain is hoichdwalk.org.

Visitors to the microsite will find all the information they need about the walk. And thanks to Charitable, visitors can donate, create a team, join a team, or create a custom campaign.
Ready to create your fundraising event microsite?
Of course we do ‘ We only shared the basic steps to create a fundraiser website. There are so many ways to customize your microsite from here, but these steps will take you to a simple, working page where your supporters can recruit their friends and family to help raise money for your event’s cause. No need to overcomplicate things!
If you already have a website for your nonprofit organization, start by installing our free charity plugin. From there, it’s just two more steps until you have a donation page ready to go. In summary, these steps are:
- Install Charitable
- Complete the basic Charitable configurations
- Install and configure the Ambassadors extension
If you don’t already have a website for your nonprofit organization, check out our guide to creating a nonprofit website with a free WordPress theme.
See also: How Long Does It Take To Design A Logo?
.