Thanks to user-friendly platforms like WordPress, creating a website has never been easier. However, at some point you may want to be compensated for all your hard work.
This is where membership sites come in. By putting your best content behind a paywall, you should have no trouble covering your mileage expenses and maybe even profits.
Reading: How to create a membership website app
In this post, we discuss what membership sites are and why they hold the secret to increasing conversions, retention rates and your bottom line. Then we’ll show you how to plan and create the perfect membership site. Let’s get started!
An introduction to membership sites
A membership site is a website where you place content behind a registration form. This is different from selling subscriptions. A subscription gives customers access to a product or service for some time, while a membership gives users access to closed content.

Each member site is unique. However, there are some features that you will find on the most effective membership sites. This includes a registration form for new visitors to sign up.

You must provide a signup form for people signing up have already taken the time to register with your website. This allows members to access restricted parts of your site, edit their user profiles, and perform other members-only activities.

Many member pages offer exclusive content. This can take many forms, including online courses, premium support forums, and webinars.

Other memberships Grant access to additional perks. This can include discount codes for your ecommerce store or even entry into a members-only raffle.

You could even offer access to special occasions. For example, many clubs and earnings run membership websites.
A membership website could be the secret ingredient you need to increase conversions, engagement rates and your bottom line 📈 Learn more here! 🤝Click to Tweet
Why you might want to create a membership page
Membership pages are a great way to monetize your content. After completing the initial setup, a good membership plugin or platform should handle many of the day-to-day membership tasks automatically.
This includes creating new accounts, processing payments, and distributing exclusive members-only resources. Therefore, a membership site can help you make a profit without adding lots of tasks to your to-do list.
Alternatively, you could offer your membership for free. For example, you can use protected content to generate leads by requiring the person’s email address as part of the signup process.

Registering with a website takes time and effort. After going through all these troubles, your members probably feel compelled to visit your site regularly to get a good return on their investment. You can even use your members’ contact details in your email marketing campaigns to increase engagement.
If your membership feature increases your traffic and engagement, then it sends positive signals to the search engines. This means that a membership site can indirectly improve your search engine rankings.
While many membership sites operate exclusively online, some physical businesses use memberships to improve the customer experience. For example, if you own a gym, you can allow new customers to register online. It’s much more convenient than forcing them to visit you in person.
How to Create a Membership Page (In 5 Steps)
Now that we’ve covered the benefits, let’s look at how to monetize your content, generate leads, and improve traffic can experience. How to create a membership site in five steps.
Step 1: Identify your target audience
When starting a new business, it’s tempting to reach out to as many people as possible. This seems like the ideal way to maximize your winnings. However, if you try to target everyone, you often end up targeting no one.
By focusing on a specific niche, you can create highly engaging content for that audience. You can also customize any part of your membership site to align with that niche. This includes everything from the design of your website to the pricing and type of content you offer.
If you have a limited audience, you can often market your membership site more effectively. This includes tailoring your message to speak to the deep, specific needs of your customers. Depending on your target audience, there may even be niche communities and platforms where you can promote your membership site. All of this is great for your conversion rates.
When deciding who to target, it’s important to find a niche big enough to sustain your growing membership site. Here you can use Google Trends to measure how many people are searching for keywords related to your target audience. This can help you estimate the size of your potential customer base.

Other membership websites may also be helpful to identify those who target the same demographic. If these sites seem to be thriving, it may prove to be a profitable niche.
Step 2: Decide on a membership model
Before creating your website, you need to decide for decide on a membership model. That means identifying the content you will offer your customers. Your exclusive members-only content can include anything from online courses to informative webinars, exclusive blog posts, product samples, reward points or free shipping on all orders.
Then it’s time to decide , whether you I offer single membership or create multiple tiers. If you choose the latter, your audience will typically unlock more content and benefits as they purchase higher tiers of membership.
Next, create a pricing model. Some sites only use memberships to collect contact information and encourage engagement. If these are your goals, you might want to offer a free membership.
If you decide to charge a fee, it can be either a one-time payment or a recurring cost. One-off payments are great for generating a sudden influx of cash. Meanwhile, recurring payments are often the key to a steady and reliable income that your membership site can sustain over the long term.
If you decide to charge a fee, it can be helpful to identify several membership sites that do do are active in your industry and offer similar content. You can then check their pricing and use that to inform your membership model.
Step 3: Select a platform
When selecting a platform, you have several options. For example, you could purchase a ready-made solution to pay for a subscription to upload your content, such as For example, the Teachable Platform.

This can be a great way to quickly launch a membership site. However, there is often limited scope to customize a standard platform.
Alternatively, you can opt for a content management system (CMS) such as WordPress. You can then extend this platform with plugins that add the required membership features.
This approach allows you to bring your creative vision to life and tailor the standard platform to your exact needs. However, this process may require you to research various third-party solutions and spend time configuring and maintaining these additional plugins.
Once you have chosen your platform, you may need to consider web hosting. Choosing the right hosting plan is crucial for any website. However, this is particularly important for membership sites as they tend to contain a lot of personalized content. Your site may also need to serve this content to a large number of users.
This can put a significant load on your site. Because of this, you need to choose a hosting plan that will keep your membership site running smoothly no matter the pressure. At Kinsta, we offer performance-oriented hosting that can easily support resource-hungry membership sites.

Ideally, you should choose the right hosting provider first However, if you need to upgrade your provider, our team of experts can help you migrate your dynamic membership site to one of our hosting plans.
Step 4: Create members-only content
To drive conversions To promote this, your membership site should provide value to your audience. That value can lie in the uniqueness and quality of your content.
Alternatively, you can offer a more convenient experience. For example, you could give your customers the opportunity to register online Join your club, and if your competitors are requiring members to complete the joining process over the phone, you’re immediately the more attractive option.

See also: How to Start a Nutrition Blog, for Dietitians
Wherever possible, it’s a good idea to create your membership content and benefits before accepting registrations. This ensures that new signups can start enjoying your exclusive members-only content and benefits immediately.
By preparing content in advance, you can also enhance the membership experience. When a visitor claims membership and is greeted by a blank website with no content, it can damage your brand image and reputation. Some people may complain and some may even ask for a refund.
Step 5: Monitor your membership site performance
Your membership site performance can have a big impact on conversion rates. If your site loads slowly or lagging, visitors are unlikely to take the plunge and become paying members.
Even if you manage to convince visitors to convert, if your site is underperforming, customers can quickly cancel their membership. This churn rate can have a huge impact on your bottom line.
Harvard Business School estimates that if you reduce your churn rate by just 5 percent, you could increase your profits by as much as 95%. If you can convince members to stay here, it could result in a lot of additional revenue for your business.
As a membership site, you usually provide a lot of dynamic content. This is already putting significant pressure on your server, which means you should do everything in your power to optimize your site’s speed.
This is where access to a good performance monitoring tool is crucial. Kinsta clients can monitor the performance of their membership sites using Kinsta APM. This bespoke tool is specifically designed to diagnose WordPress website issues.

By signing up for Kinsta APM By opting over a generic performance monitoring tool, you can pinpoint the specific issues affecting this popular CMS. This puts you in a strong position to wow visitors with your blazing fast page speeds.
Best Platforms for Membership Websites
The right platform can make your membership website a success. You can either opt for a dedicated members website builder or a multipurpose CMS. Let’s look at some options.
YourMembership
YourMembership is a dedicated website builder for members. It offers everything you need to create a membership site, plus a few extras you might not find in a generic website builder:

Using YourMembership, you can set up automated workflows for common membership tasks. This includes scheduling renewals, confirmation messages, and thank you emails. You can also create and send invoices automatically.
To ensure you’re providing a good experience for your members, it’s important to closely monitor their behavior. You could track your audience with a generic tool like Google Analytics or even an activity log plugin.
However, YourMembership provides a more detailed insight into your customers. Specifically, it allows you to track the entire membership lifecycle from non-member to retired member. This puts you in a strong position to identify customers who are slacking off and possibly canceling their membership.
YourMembership has not published its prices publicly. However, you can contact the team to discuss your requirements or arrange a demo.
Squarespace
This popular drag-and-drop editor makes it easy to create a row to create websites. It also provides you with a selection of professionally designed templates.

The core of Squarespace’s platform costs $12 per month when billed annually. However, Squarespace doesn’t offer membership-specific features upfront. If you want to host members-only pages from the backend of your Squarespace site, then you may need to invest in members’ areas.
If you’re looking to do email marketing, Members Areas can be connected to Squarespace Email Campaigns and Profiles so you can manage your email list from one place.
The main downside is that the members’ areas require a separate subscription, with prices starting at $9 billed annually.This tool also charges a four percent transaction fee per member.
It’s well worth it Note that members areas are only p Pages on your Squarespace site can protect, and not necessarily the content on those pages. Each file you put on your Squarespace site will have its own link. These links are not secure, so members could potentially share these URLs with non-members, giving them free access to your content.
If you create members-only resources like videos and audio, this could be a major limitation . The good news is that member areas aren’t your only option. There are several third-party services that integrate with Squarespace, including the MemberSpace add-on.

You can use this third-party software to restrict access to any page or resource on your Squarespace site. This should prevent non-members from accessing the direct link to your members-only resources.
WordPress
There are many generic website builders on the market, but their one- Size- The fits-all approach rarely delivers the best membership site. To make your site a success, consider going for a customizable, extensible platform like WordPress.

By choosing WordPress as your CMS, you get access to a wide range of free and premium membership plugins. That way, you can shop around and find the plugins that meet all of the needs on your membership wish list.
Running a successful website isn’t just about implementing core membership functionality. For example, your position in the search engine rankings will determine the amount of traffic you get.
With 60,000 plugins in the official WordPress repository alone, you shouldn’t have any trouble finding plugins that help fine-tune each individual can help element of your membership page. For example, Yoast SEO is a popular plugin that promises to improve your search engine rankings.

The downside is, that you need to spend time finding and configuring these plugins. This is in stark contrast to dedicated membership platforms, which typically provide everything you need out of the box.
Top Membership Website Plugins
While there is no shortage of dedicated ones membership platforms out there, we believe WordPress offers the flexibility and extensibility you need to build a world’s best membership site. When you decide to go with WordPress, the next step is choosing the right plugin. With that in mind, here are our top three WordPress membership plugins.
Members
You can use this free WordPress plugin to create a membership site without writing a single line of code must. The Members plugin features an advanced permissions-based system that makes it easy to restrict your content based on the visitor’s membership level.
You can even deny features for specific membership levels. This gives you more flexibility in building your permissions-based system:

The Member Plugin also has a special login form widget. You can add this to your site’s recurring elements, e.g. B. the sidebar. Then members can log into their accounts from any page on your site, which is great for user experience.
You can even use members to create a fully private site. This can be an easy way to monetize your entire content catalogue. You can also use members to create a specialized website, e.g. B. a private employee portal.
What sets Members apart from other plugins, however, is the fact that it’s free. Members can be an attractive option if you’re on a budget or want to experiment with monetizing your content before committing to a paid plugin.
MemberPress
You can advanced use membership plugin to create multiple membership tiers, limit access to your content and accept payments. Despite its advanced functionality, MemberPress is designed to be easy to use.

As part of the setup process, MemberPress can automatically generate all the necessary pages to provide a working membership page. This includes pricing, signup, account, and thank you pages.
MemberPress also supports content dripping. This is a process where you gradually release content over days, weeks, or even months. By creating drip campaigns, you can encourage members to keep coming back to your site and keep them interested over the long term.
If you’re looking to create an educational membership site, you’ll be interested in using this MemberPress you can create and sell digital courses. It also integrates with a number of popular marketing software, including the email automation platform Mailchimp.
See also: 7 Steps to Create a Successful Donation Website for Your Nonprofit 8 Great Examples
MemberPress licenses start at $179 per year. The company also offers a 14-day money-back guarantee.
LearnDash
If you’re looking to sell online courses, check out the LearnDash Learning Management System (LMS). . LearnDash has everything you would expect from an LMS, including the ability to create and distribute digital learning materials.

LearnDash also has membership modules so that It can sell access to your resources. You can then restrict access to content based on the learner’s membership level.
Additionally, LearnDash offers full support for deleting content. This allows you to introduce new modules, levels and even entire courses while members successfully work their way through your learning materials.
In particular, you can use the tool’s membership features to encourage learning. For example, you could reward your members with badges and certificates. You can even create course-specific forums to encourage a sense of community.
If you don’t plan to sell content, you may find LearnDash limiting as many of the features are designed specifically for educational membership sites. However, if you want to sell your courses on a membership basis, this tool might be the perfect solution. LearnDash licenses range from $189 to $369 with one year of support and updates.
How to Build a Membership Website Using WordPress and MemberPress (In 5 Steps)
There are many different ways to create a membership site. The right solution depends on factors like your target audience and the content you want to sell. However, WordPress and the MemberPress plugin are a powerful combination.
With that in mind, let’s look at how you can use these two popular pieces of software to create a membership site.
Step 1 : Create a simple membership page
First, we recommend installing a professionally designed membership theme. There are many options, but the OceanWP theme is a popular choice.

This multi-purpose theme includes a selection of demo pages with membership functionality integrated. For example, the Gym demo offers customers a choice of membership levels.

Alternatively, if you wish to sell learning materials, Bartender grants members Access to a range of courses. After choosing your theme, you can install and activate the MemberPress plugin.
Next, navigate to MemberPress > Settings. This screen allows you to enter your MemberPress license key. Once you have successfully activated this plugin, select the Pages tab.

MemberPress can automatically generate all the pages you need to provide a working membership site.To create these pages, make sure Auto-create new page is selected in all Reserved Pages drop-down menus. Then just click Update Options and MemberPress will create a login, account and thank you page.
Step 2: Add your payment gateways
Sometimes you can just use memberships as a lead generation tool. However, if you want to charge a fee, you need to set up at least one payment gateway. To do this, click the Payments tab and then click the + button.

Next, open the Gateway dropdown menu and select the payment method you want to add. MemberPress supports Stripe, PayPal Express Checkout, PayPal Standard and Authorize.net. It also supports offline payments.
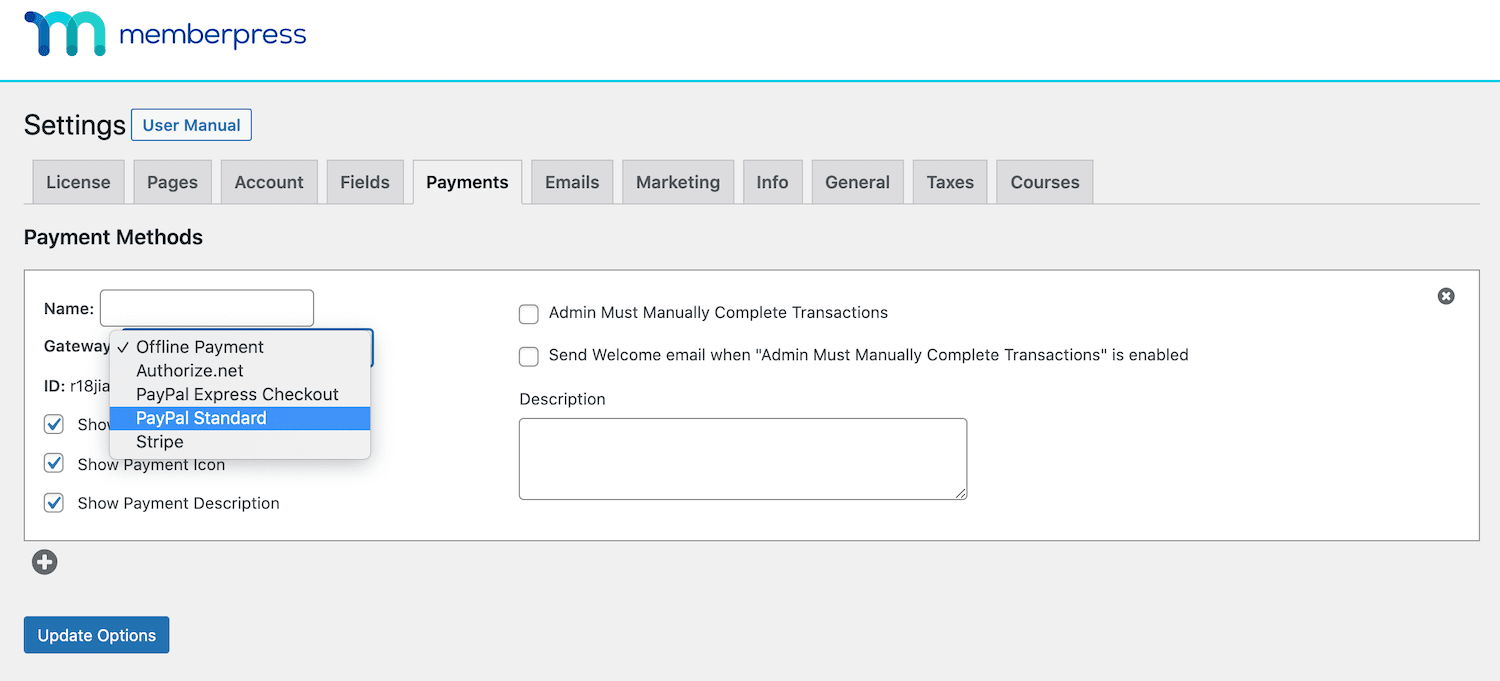
MemberPress will now display all the settings you used to set up your selected payment gateway require . For example, if you select PayPal Standard, MemberPress will ask for the email address associated with your PayPal account.
To encourage conversions, it’s a good idea to make a choice offer payment options. You can add multiple gateways to your website by clicking the small + button.
Once you have set up all your payment gateways, click Update Options. strong>. Customers can now register using any of the payment methods you chose.
Step 3: Create your membership tiers
Next, it’s time to create your membership tiers. This can be a single membership granting access to all your content, or multiple tiers. From your dashboard, navigate to MemberPress > Memberships > Add New.

You can now configure this membership. This includes entering a title, setting the price, and setting the billing type.

Once you’re happy with that, click After the information you entered, click Publish. If you wish to offer a choice of membership levels, simply repeat the steps above.
The next step is to define what content is accessible for each membership level. To do this you need to create rules, so navigate to MemberPress > Rules > Add New.

You can configure them now your rule. For example, you could specify that all content assigned a specific tag should only be accessible to Bronze level members:

Once done are all fields, save your rule. Rinse and repeat the process to create multiple rules for your membership site.
Step 4: Implement your pricing plan
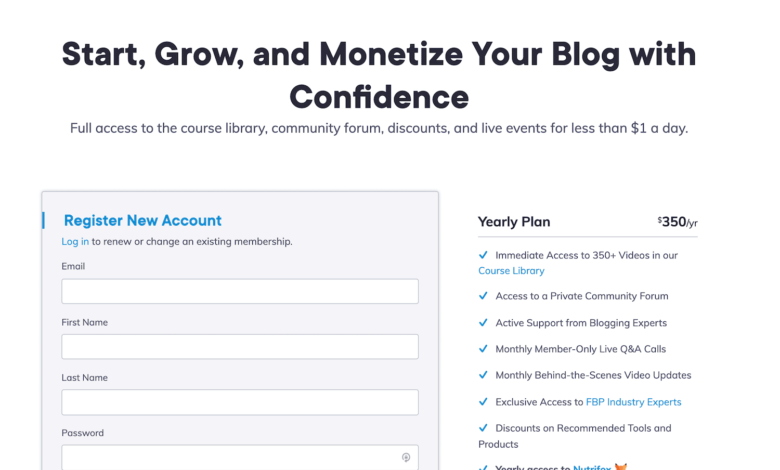
Assuming you charge for membership, you need a price create plan. This page allows potential customers to view all of your tiers and compare their prices.
A well-designed pricing page can grab the visitor’s attention and give them all the information they need to make an informed purchasing decision. This way your pricing page can improve visitor experience and your conversion rates.
To create this important page, navigate to MemberPress > Groups > Add New:

First, give this page a meaningful title, e.g. B. Price plans. Next, scroll to the Group Options section and add any memberships you want to display on this webpage. You can then choose your pricing page theme.
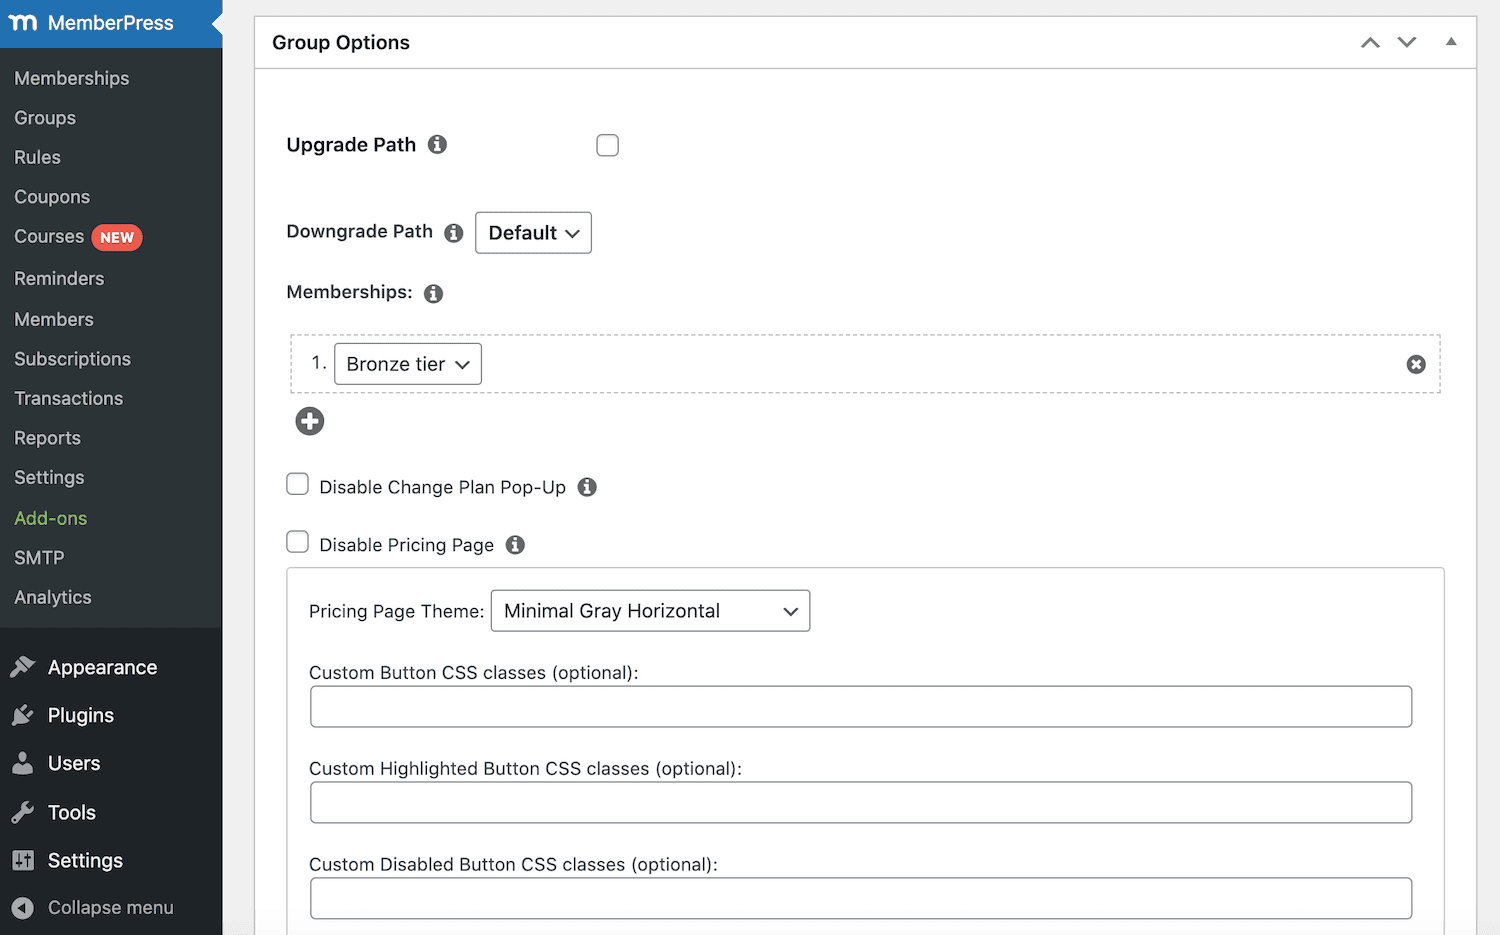
Once you have configured all the options, click the Publish button. Your pricing page is now online.
Step 5: Add a registration form
Each membership site requires a registration form. Since it’s such an important element of your membership site, make sure you keep this form handy.
MemberPress gives you the ability to add a user signup form via a widget. This is perfect for adding this form to your website’s recurring elements such as: the footer or sidebar.
To add the login widget to your website, navigate to Appearance > Widgets. You can then add the MemberPress Login widget to any widget-ready area:

To drive conversions, we also recommend adding the pricing page to your main navigation menu. This ensures that interested visitors are always just a few clicks away from your pricing information.
To edit your website’s menu, navigate to View > Menus. You can then select your main navigation menu and add the pricing page you just created.
Ready to create your best members-only content? 🤐 Start here and get ready for higher conversion and engagement rates 📈Click to Tweet
Summary
One-time sales are great, but the key to a successful business is recurring revenue. By selling memberships, you can build a secure, reliable revenue stream that can sustain your business for months or even years.
Let’s quickly summarize how to create a membership website in five steps:
- Identify your target audience.
- Decide on a membership model.
- Choose a platform like WordPress.
- Create some members- content only.
- Monitor your membership site performance with a tool like Kinsta APM.
Have questions about running a successful membership site? Let us know in the comments section below!
See also: How to Create a WordPress Plugin (Beginners Guide)
.