At some point in our lives we have all loved to draw pictures, cartoons and other things.
For me it was the use of pen and paper, but these days it’s the old pen and paper through computers and Mobile devices replaced! Drawing can be especially fun on touch-based devices, as you can see from the plethora of drawing apps on the App Store.
Reading: How to create a drawing pad for an app
Want to learn how to create your own drawing app? The good news is that it’s pretty easy thanks to some great drawing APIs available through UIKit in iOS.
In this tutorial you will create an app that is very similar to Color Pad for iPhone. You will learn how to:
- Draw lines and strokes with Quartz2D.
- Use multiple colors.
- Set the brush stroke width and opacity.
- Create an eraser.
- Create a custom RGB color picker.
- Share your drawing!
Snap grab your pencils and get started; You don’t have to lengthen this introduction too much! :]
Getting Started
Use the Download Materials button at the top or bottom of this tutorial to download the starter project.
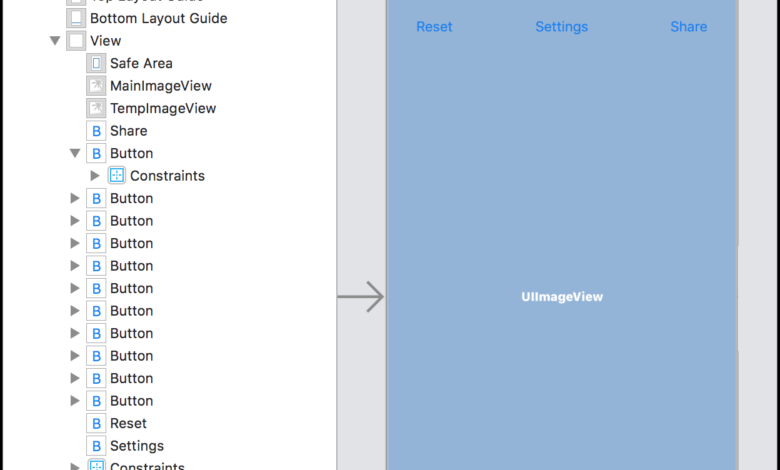
Launch Xcode, open the Starter project and take a look at the files inside. As you can see, not much work has been done for you. You have all the necessary images in the asset catalog and in the main view of the app with all the necessary restrictions. The whole project is based on the Single View Application template.
Open Main.storyboard and look at the interface. The initial ViewController scene has three buttons at the top. As the titles suggest, use these to reset or share a drawing and bring up a settings screen. Below are more buttons with pencil images and an eraser. You will use these to select predefined colors.
Finally there are two image views called MainImageView and TempImageView – you will see later why you need two image views when using them to allow users to draw different ones Brush opacity levels.

Im View Controller windows, the actions and outputs are set as expected: each button at the top has an action, the pencil colors are all associated with the same action – they have different tags to distinguish them – and there are sockets for the two image views.
To let your inner artist shine, you need to add some code!
Quick Draw
You start with a simple drawing function, using your finger can swipe across the screen to display plain black to draw lines. Hey, even Picasso started with the basics!
Open ViewController.swift and add the following properties to the class:
var lastPoint = CGPoint.zero var color = UIColor.black var brushWidth: CGFloat = 10.0 var opacity: CGFloat = 1.0 var swiped = false
Here is a brief explanation of these variables:
- lastPoint stores the last drawn point on the canvas. You need this when your user draws a continuous brush stroke on the canvas.
- Color saves the currently selected color. The default is black.
- brushWidth stores the brush stroke width. The default value is 10.0.
- opacity stores the opacity of the brush. The default is 1.0.
- swiped indicates whether the brush stroke is continuous.
Now for the drawing part! All touch-notification methods come from the superclass UIResponder; They fire in response to a touch beginning, moving, or ending. You use these three methods to implement your drawing logic.
First add the following method:
override func touchesBegan(_ touches: Set, with event: UIEvent?) { guard let touch = touches.first else { return } swiped = false lastPoint = touch.location(in: view) }
The system calls touchesBegan(_:with:) when the user places a finger on the screen. This is the start of a draw event, so first make sure you actually got a touch. You then reset swiped to false since the touch hasn’t moved yet. They also store the touch position in lastPoint so you can track where the stroke started when the user starts drawing. Here, so to speak, the brush meets the paper. :]
Next, add the following two methods:
func drawLine(from fromPoint: CGPoint, to toPoint: CGPoint) { // 1 UIGraphicsBeginImageContext(view.frame.size) guard let context = UIGraphicsGetCurrentContext () else { return } tempImageView.image?.draw(in: view.bounds) // 2 context.move(to: fromPoint) context.addLine(to: toPoint) // 3 context.setLineCap(.round ) context. setBlendMode(.normal) context.setLineWidth(brushWidth) context.setStrokeColor(color.cgColor) // 4 context.strokePath() // 5 tempImageView.image = UIGraphicsGetImageFromCurrentImageContext() tempImageView.alpha = opacity UIGraphicsEndImageContext() } func override touchesMoved( _ touches: Set, with event: UIEvent?) { guard let touch = touches.first else { return } // 6 swiped = true let currentPoint = touch.location(in: view) drawLine(from: lastPoint, to: currentPoint) // 7 lastPoint = currentPoint }
Here is what happens in these methods:
- The first method is responsible to draw a line between two points. Remember that this app has two image views: mainImageView, which contains the “drawing so far” and tempImageView, which contains the “line you are currently drawing”. Here you want to draw in tempImageView, so you need to set up a drawing context with the image that is currently in tempImageView, which should be empty the first time.
- Next, get the current touch point and then draw a line from lastPoint to currentPoint. You might think that this approach will create a series of straight lines and the result will look like a series of jagged lines. This makes straight lines, but the touch events fire so fast that the lines are short enough and the result looks like a nice smooth curve.
- Here you put a character parameter for brush size and stroke color. If you’re interested in learning more about this, check out the Apple documentation for CGContext.
- This is where the magic happens and you actually draw the path!
- Next you need it You to wrap the drawing context to render the new line into the temporary image view. You get the image representation of the context and set it to the image property of tempImageView.
- The system calls touchesMoved(_:with:) when the user drags a finger across the screen. Here you set swiped to true so that you can track whether a swipe is in progress. Since this is touchesMoved, the answer is yes, it’s being wiped! You then call the helper method you just wrote to draw the line.
- Finally, update lastPoint so that the next touch event will continue where you just left off.
Next, add the final touch handler:
override func touchesEnded(_ touches: Set, with event: UIEvent?) { if !swiped { // Draw a single point drawLine(from: lastPoint, to: lastPoint ) } // merge tempImageView into mainImageView UIGraphicsBeginImageContext(mainImageView.frame.size) mainImageView.image?.draw(in: view.bounds, blendMode: .normal, alpha: 1.0) tempImageView?. image?.draw(in: view.bounds, blendMode: .normal, alpha: opacity) mainImageView.image = UIGraphicsGetImageFromCurrentImageContext() UIGraphicsEndImageContext() tempImageView.image = nil }
iOS calls touchesEnded(_:with:), when the user lifts their finger off the screen. Here you first check whether the user is in the middle of a swipe. If not, it means the user just tapped the screen to draw a single point. In this case, just draw a single point using the helper method written earlier.
If the user just swiped, it means you can skip drawing that single point – since touchesMoved(_: with:) has been invoked, you don’t need to draw any further.
The last step is to merge tempImageView into mainImageView. You drew the brush stroke on tempImageView and not on mainImageView. What’s the point of an additional UIImageView; can’t you just draw directly in mainImageView?
You could, but the dual image views are used to preserve opacity. Drawing on tempImageView sets the opacity to 1.0 (fully opaque). However, if you merge tempImageView into mainImageView , you can set opacity of tempImageView to configured value, giving desired opacity to brush stroke. If you drew directly on the mainImageView, it would be incredibly difficult to draw brushstrokes with different opacity values.
OK, time to draw! Build and run your app. You’ll see that you can now draw pretty black lines on your canvas!

That’s a great start! With just these touch handling methods, you have a large amount of functionality in place. Now it’s time to fill in some more options, starting with the color.
Adding Colors
It’s time to add a pop of color to the scene – line art alone is kinda monotonous.
Right now there are 10 colored buttons on the screen, but now when you tap any button, nothing happens. For this to work, you must first define all the colors.
See also: How to Save/Export a Logo in Adobe Illustrator
Open Pencil.swift. Pencil is an enumeration that represents the different color options that the user can choose from. It has a single initializer, init?(tag:), which takes a button tag and turns it into the desired pencil. Add the following calculated property to Pencil:
var color: UIColor { switch self { case .black: return .black case .grey: return UIColor(white: 105/255.0, alpha: 1.0) case .red: return UIColor (red: 1, green: 0, blue: 0, alpha: 1.0) case .darkblue: returns UIColor (red: 0, green: 0, blue: 1, alpha: 1.0) case .lightBlue: returns UIColor ( red: 51/255.0, green: 204/255.0, blue: 1, alpha: 1.0) case .darkGreen: returns UIColor (red: 102/255.0, green: 204/255.0, blue: 0, alpha: 1.0) case . lightGreen: returns UIColor (red: 102/255.0, Green: 1, Blue: 0, Alpha: 1.0) Case .Brown: Return UIColor (Red: 160/255.0, Green: 82/255.0, Blue: 45/255.0, Alpha: 1 ,0) case .orange: return UIColor ( red: 1, green: 102/255.0, blue: 0, alpha: 1,0) case .yellow: return UIColor (red: 1, green: 1, blue: 0 , alpha: 1,0) case .eraser: returning .white } }
This returns the corresponding UIColor for each selected pencil.
Next, open ViewController.swift and add the following to pencilPressed( _:) added:
// 1 guard let pencil = Pencil( tag: sender.tag) else { return } // 2 color = pencil.color // 3 if pencil == .eraser { opacity = 1.0 }
Here’s a step-by-step guide:
- First you need to know which color index the user has selected. There are many places this could go wrong, such as: B. using an incorrect tag or an unset tag to protect yourself from not having a matching pencil.
- Next, set the drawing color to the color selected by the user.
- The last color is the eraser, so something special. The eraser button sets the color to white and the opacity to 1.0. Since your background color is also white, you get a very handy eraser effect!
What? Time for more drawing? Yup – build and run, and get ready to let the colors fly. Now when you tap a color button, the brush stroke will change to use the color of that button. No more drab line drawings!

Reset to tabula rasa
All great artists have those moments where they step back and shake their heads and mutter, “No! NO! You’ll never do that!” You want to provide a way to clear the artboard and start over. You already have a reset button set up in your app for this.
In ViewController.swift, add the following to resetPressed(_:) :
mainImageView.image = nil
That’s it , believe it or not! All the code above does is null the image of the mainImageView and voila! Your canvas is erased! Remember that you drew lines in the image context of the image view. So nulling this here will reset everything.
Build your code and run it again. Draw something and then tap the Reset button to erase your drawing. There! No need to tear up canvases in frustration.
Adding the finishing touches – Settings
You now have a functional drawing app, but there’s still that second settings screen you can use
Open Main.storyboard and click on the Settings View Controller scene. The settings scene has five UISlider components for setting brush width, brush opacity, and brush RGB color values. You can also see a UIImageView showing a preview generated from all selected values.
Now open SettingsViewController.swift and add the following properties to the class:
var brush: CGFloat = 10.0 var opacity: CGFloat = 1.0 var red: CGFloat = 0.0 var green: CGFloat = 0.0 var blue: CGFloat = 0.0
This will keep track of brush size, opacity and color, that the user selects.
Next add the following method:
func drawPreview() { UIGraphicsBeginImageContext(previewImageView.frame.size) guard let context = UIGraphicsGetCurrentContext() else { return } context .setLineCap(.round) context.setLineWidth(brush) context .setStrokeColor(UIColor(red: red, green: green, blue: blue, alpha: opacity).cgColor) context.move(to: CGPoint(x: 45, y : 45)) context.addLine(to: CGPoint(x : 45, y: 45)) context.strokePath() previewImageView.image = UIGraphicsGetImageFromCurrentImageContext() UIGraphicsEndImag eContext() }
This method uses the same techniques to draw a preview of the settings that drawLine(from:to:) in ViewController uses. In this case, however, the method draws a single dot instead of a line with the appropriate line width and opacity from the slider values.
Next, add the following to brushChanged(_:):
brush = CGFloat( sender.value) labelBrush.text = String(format: “%.1f”, brush) drawPreview()
and add the following to opacityChanged(_:):
opacity = CGFloat( sender.value) labelOpacity .text = String(format: “%.1f”, opacity) drawPreview()
In the code above, if the user changes the slider values, you must set the appropriate values accordingly, and then update the preview image by calling drawPreview().
Build and run, open the settings screen and play around with the sliders. You’ll see that now the thumbnail and value labels change as you move them! The color sliders aren’t working yet, but you’ll get to that shortly.

Integrating Settings
There is one important part missing here. Did you realize what it was?
The updated opacity and width values are still not applied to the ViewController canvas! That’s because you haven’t yet passed the values specified in the settings screen to the ViewController. This is a perfect job for a delegate log.
Open SettingsViewController.swift and add the following code just below the import:
protocol SettingsViewControllerDelegate: class { func settingsViewControllerFinished(_ settingsViewController: SettingsViewController) }
This defines a class protocol with a required method. The settings screen will communicate this to any party interested in the updated settings.
Also add a property to SettingsViewController:
weak var delegate: SettingsViewControllerDelegate?
This contains the reference to the delegate. If there is a delegate, you need to notify him when the user taps the close button. Add the following to closePressed(_:):
Delegate?.settingsViewControllerFinished(self)
This calls the delegate method so that it can update the delegate with the new values.
Now open ViewController.swift and add a new protocol class extension at the end of the file:
// MARK: – SettingsViewControllerDelegate extension ViewController: SettingsViewControllerDelegate { func settingsViewControllerFinished(_ settingsViewController: SettingsViewController) { brushWidth = settingsViewController.brush opacity = settingsViewController.opacity dismissed(animated: true) } }
This declares the class conforming to SettingsViewControllerDelegate and implements its only method. The implementation simply requires setting the current brush width and opacity to the values from the settings view sliders.
See also: General Resume Examples That Arent Generic: 11 Templates
When the user switches from the drawing screen to the settings screen, you want the sliders to display the currently selected values for brush size and brush show opacity. That means you have to propagate them when you open preferences.
Add the following method override to the ViewController class:
override func Prepare(for segue: UIStoryboardSegue, sender: Any? ) {guard let navController = segue.destination as? UINavigationController, leave settingsController = navController.topViewController as ? SettingsViewController else { return } settingsController.delegate = self settingsController.brush = brushWidth settingsController.opacity = opacity }
If the user triggers the transition by tapping the settings button, this method configures the new SettingsViewController by sending sets itself as a delegate and passes the current brush and opacity values through.
Create and run. At this stage you will see that the brush and opacity values are now updated after you changed them in the settings screen. Now you can draw with many colors of different brush sizes and opacity levels!
Add the final touch – a custom color picker
Currently you have 10 color buttons on your artboard screen. However, with the custom RGB color picker, the sophisticated artists using your app have the ability to select any available color from the RGB range.
There are a number of RGB color sliders in the settings screen that you will implement next.
Since you provided a preview of the brush size and opacity, you might as well include a preview of the new brush color!
In SettingsViewController.swift , add Add the following to colorChanged(_:):
red = CGFloat(sliderRed.value / 255.0) labelRed.text = Int(sliderRed.value).description green = CGFloat(sliderGreen.value / 255.0) labelGreen.text = Int (sliderGreen.value).description blue = CGFloat(sliderBlue.value / 255.0) labelBlue.text = Int(sliderBlue.value).description drawPreview()
iOS calls colorChanged(_:) when you move one of the RGB -Sliders. Note that in the code above you’re just updating the property values and the labels.
Now that you’ve drawn the brush and opacity examples with all the correct settings, you should display them correctly when the Settings screen appears. Add the following to the end of viewDidLoad():
sliderBrush.value = Float(brush) labelBrush.text = String(format: “%.1f”, brush) sliderOpacity.value = Float(opacity) labelOpacity.text = String(Format: “%.1f”, Opacity) sliderRed.value = Float(red * 255.0) labelRed.text = Int(sliderRed.value).description sliderGreen.value = Float(green * 255.0) labelGreen.text = Int (sliderGreen.value).description sliderBlue.value = Float(blue * 255.0) labelBlue.text = Int(sliderBlue.value).description drawPreview()
As you can see, this just fills in all the labels and sliders with the correct ones preset values. Calling drawPreview() ensures that the preview image view shows the right thing.
Finally, open ViewController.swift. As before, you need to make sure the current color is showing on the settings screen. Therefore, add the following lines at the end of “prepare(for:sender:)”:
var red: CGFloat = 0 var green : CGFloat = 0 var blue: CGFloat = 0 color.getRed(&red, green: &green, blue: &blue, alpha: nil) settingsController.red = red settingsController.green = green settingsController.blue = blue
This will pass the current red, green and blue values so that the RGB sliders are set correctly. This syntax might look strange, but don’t worry – it’s a holdover from the old Objective-C days.When you call getRed(_:green:blue:alpha:) it sets the passed variables with the component values of color.
Finally find settingsViewControllerFinished(_:) in the class extension and add the following Lines just before calling unlock(animated: true):
color = UIColor(red: settingsViewController.red, green: settingsViewController.green, blue: settingsViewController.blue, alpha: opacity)
This will update the Color with the new RGB values.
Build and rerun and put the color sliders through their paces. Also see how the specified RGB color shown in the preview is now the brush stroke color on the artboard!

But what’s the use of all these wonderful works of art if you can’t share them with the world? Since you can’t stick the images to your fridge, in the last step of this tutorial you will share them with the world!
Add Share
In this last step you will use the iOS share -Sheet to send your artwork out into the world!
There are two parts to this: first, you need to get the drawing as a UIImage object; then just pipe it to UIActivityViewController to decide which sharing options work best based on what accounts and services are available.
In ViewController.swift add the following to sharePressed(_:). :
guard let image = mainImageView.image else { return } let activity = UIActivityViewController(activityItems: [image], applicationActivities: nil) present(activity, animation: true)
This method is pretty simple. First it checks whether mainImageView actually has an image. Then UIActivityViewController does most of the heavy lifting! All you have to do is hand him a bunch of things to share. in this case it’s just the single image.
The second parameter of the applicationActivities initializer allows you to restrict the activities, so passing nil means that iOS provides as many sharing options as possible. Your drawing deserves nothing less!
Create and launch the app and create your masterpiece. You can now let the world know about your talents by tapping share.

What’s next?
You can download the finished version of the project using the Download Materials button above or at the end of this tutorial.
You can play around with the brush strokes a bit more and also explore drawing arcs and rectangles with Quartz2D. A good place to start is the Quartz 2D Programming Guide. There are a number of beginner and intermediate concepts that you can experiment with to create awesome shapes and patterns.
If you want to learn how to draw even smoother lines, check out these too see smooth line drawing article by Krzysztof Zablocki. It’s based on Cocos2D, but you can use the same technique in UIKit.
As a final challenge, try adding undo-redo functions. Check out the UndoManager tutorial: How to Implement With Swift Value Types posted on this site by RW team member Lyndsey Scott.
Post your questions and comments on the forum – and share yours Masterpieces created with others using your new app! :]
See also: How To Create Fake Email Address Within Seconds
.