PHP is a server-side scripting language and MySQL is an open-source relational database management system. When used together, these two frameworks are able to provide very unique solutions such as: B. creating a registration form.
In this tutorial you’ll look at a simple login system using PHP and MySQL.
Reading: How to create a website login database
Before we get into the code-related aspects of PHP, let’s take a look at the requirements for a login form
Requirements:
- Knowledge of HTML, CSS, PHP and MySQL
- Microsoft Visual Studio (For writing the code)
- Installing XAMPP
Let’s start with the first topic, i. H. creating a PHP subscription form.
Step 1 – Create an HTML PHP subscription form
To create a subscription form, follow the steps below:
- Open Microsoft Visual Studio -> create a new file and name it SL file
- Now on one page write the code mentioned in the example below
- The HTML program creates a web page form that allows users to register themselves
The code consists of HTML elements. The basic elements are:
LOGIN
Step 2: Create a CSS code for the website design
Next comes the CSS sheet. Now the goal is to create a CSS (Cascading Style Sheet) file to improve the design of the web page.
The code for the .css file is below:
body {
background: #91a716;
display: flex;
justify-content: center;
align-items: center ;
Height: 100vh;
Flex direction: Column;
}
*{
Font family : Italics;
Boxsize: padding-box;
}
Shape {
Width: 1000px;
Frame: 3 pixels solid RGB(177, 142, 142);
Padding: 20 pixels;
Background: rgb(85, 54, 54);
Margin Radius: 20 pixels;
}
h2 {
Text Alignment: Center;
Bottom Margin: 40 pixels;
}
Input {
Display: Block;
Border: 2px solid #ccc;
Width : 95%;
padding: 10px;
margin: 10px auto;
border-radius: 5px;
}
label {
color: #888;
font-size: 18px;
padding: 10px;
}
Button {
float: right;
background: rgb(35, 174, 202);
padding: 10px 15px;
See also: 10 excellent platforms for building mobile apps
color: #fff;
border-radius: 5px;
Border right: 10 pixels;
Border: none ;
}
Button: Hover{
Opacity: .10;
}
.Error {
Background: #F2DEDE;
Color: #0c0101;
padding: 10px;
width: 95%;
border-radius: 5px;
margin: 20px auto;
}
h1 {
text alignment: center;
Color: rgb(134, 3, 3);
}
a {
float: right;
background: rgb(183, 225, 233);
padding: 10px 15px;
See also: 10 excellent platforms for building mobile apps
color: #fff;
border radius: 10px;
Margin right: 10px;
Margin: none;
Text decoration: none;
}
a:hover{
Opacity: 0.7;
}
Save the filename as “Style.css” in Microsoft Visual Studio.
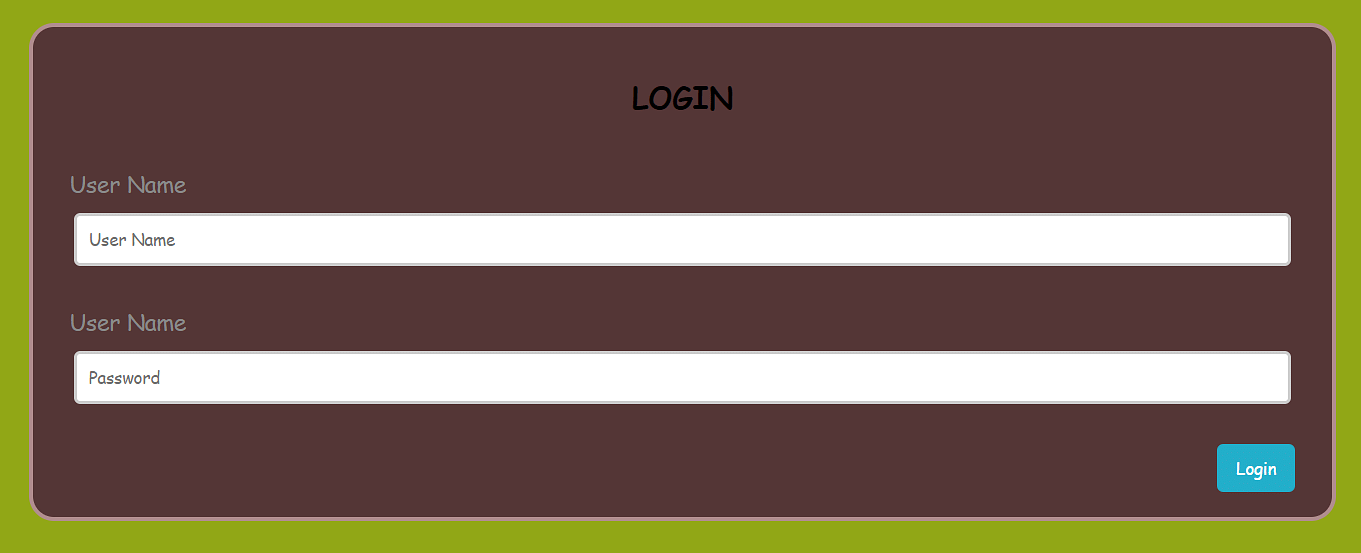
The output for the code looks like this:

When the user submits the input values, they are validated against the credentials stored in the database. If the username and password match here, the user will be redirected to the next webpage. Otherwise the login attempt will be rejected.
Well, to login it is important to add the credentials to the database.
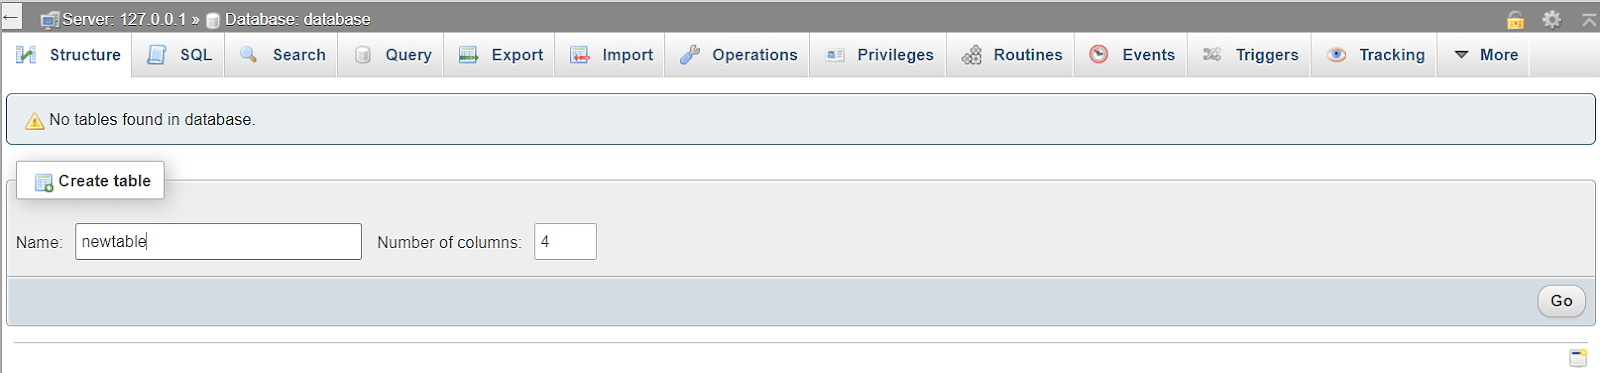
Step 3: Create a database table using MySQL
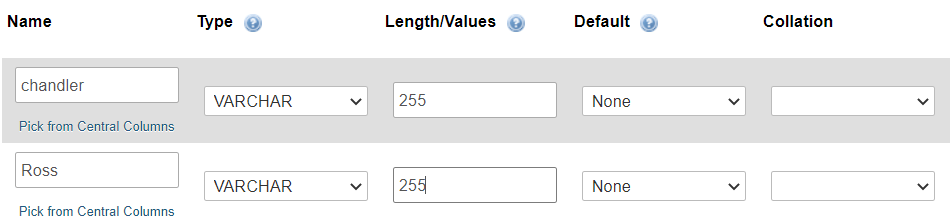
When creating a database, create a structure like this:
Name
Password
Chandler
Monika@123
Ross
Rachel@123
Now start yours SQL Xampp server and select admin. This will redirect you to the phpMyAdmin website. Now log in with your username and password.
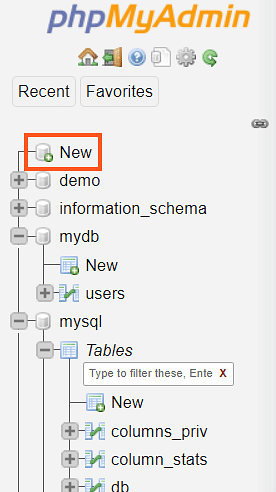
Now create a new database on MyPHPAdmin by clicking “New” on the left side of any webpage.
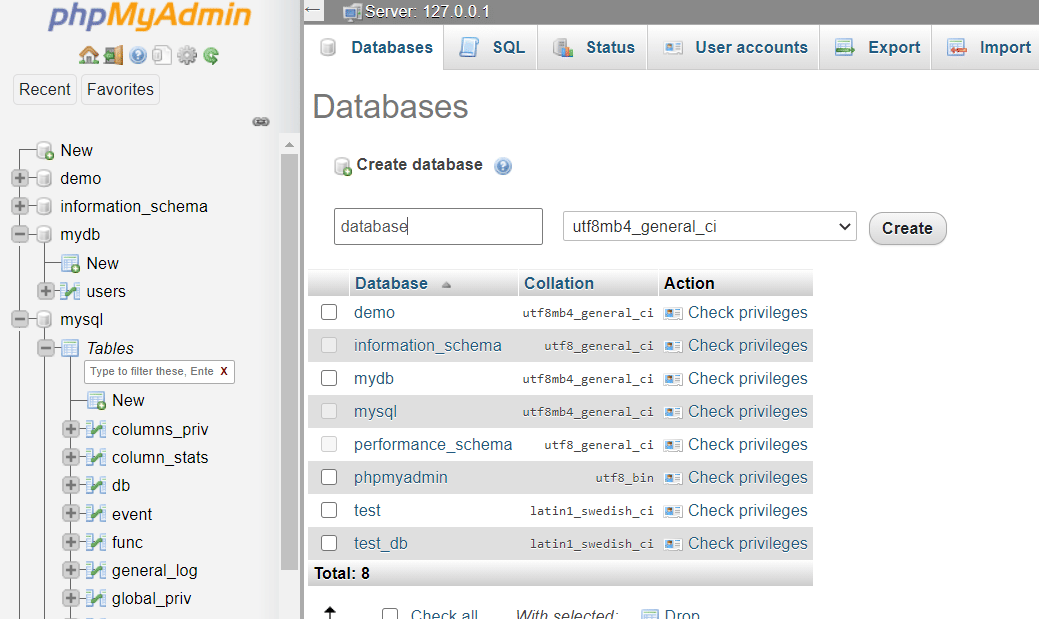
Next, enter a name for the database, where “Create database “.
Then you will be redirected to the next page where you create a new table. Now enter the desired table name.
Next you can select the one you want Type number for the Fields text box.
Note: the fields are the columns; Some of the fields are username, password, address, etc. Type the number “4” in the text box. You can also increase the number based on your requirement.
When you have completed the steps, click the Go button.
In the text space, select these options.
Next, set a primary key fixed for the ID field by selecting the dropdown list option and selecting save.
Note: Assuming you get a #1067 error in later versions of phpMyAdmin, change the default dropdown list from TimeStamp to None.
Once you have saved this you will be taken to the structure screen.
This should be the final output:
Step 4: Open a connection to a MySQL database
Once you have created a PHPMyAdmin database, your next step is to write some code in Visual Studio.
Go to Microsoft Visual Code -> create a new file and name it DB Connection.
Now in the code below you will notice the mysqli_connect( ) function. As the name suggests, it performs the same task. It connects the database to the created form.
<?php
$sname= “localhost”;
$unmae= “root”;
$password = “”;
$db_name = “test_db”;
$conn = mysqli_connect($sname, $unmae, $password, $db_name) ;
if (!$conn) {
echo “Connection failed!”;
}
This demo used an if statement, to check if the code works or not. Depending on whether the database was found, a corresponding message is printed.
See also: How to make an e-course (using MailChimp)
Now run the following SQL query to create the user table in your MySQL database.
<?php
session_start();
include “db_conn.php”;
if (isset($_POST[‘uname’]) && isset($_POST[‘password’])) {
function validate($data){
$data = trim($data);
$data = stripeslashes($data);
$ data = htmlspecialchars($data);
return $data;
}
$uname = validate($_POST[‘uname’]);
$pass = validate($_POST[‘password’]);
if (empty($uname)) {
header(“Location: index.php ?error=Username is required”);
exit();
}else if(empty($pass)){
header(“Location : index.php?error=Password required”);
exit();
}else{
$sql = “SELECT * FROM users WHERE user_name= ‘$uname’ AND password=’$pass'”;
$result = mysqli_query($conn, $sql);
if (mysqli_num_rows($result) == = 1 ) {
$row = mysqli_fetch_assoc($result);
if ($row[‘user_name’] === $uname && $row[‘password’] = == $pass) {
echo “Logged in!”;
$_SESSION[‘user_name’] = $row[‘user_name’];
$_SES SION[‘Name’] = $row[‘name’];
$_SESSION[‘id’] = $row[‘id’];
header(“Location: home.php”);
exit();
}else{
header(“Location: index.php?error=Incorect User name or password “);
exit();
}
}else{
header(“Location: index.php?error= Incorect User name or password”) ;
exit();
}
}
}else{
header(“Location: index.php”);
exit();
}
Now if you log in with the wrong credentials, you will get the following output

step 5 – Create a logout session
In this section you will create a “logout.php” file.
When a user selects the logout option, the code mentioned below automatically redirects the user back to the login page.
<?php
session_start() ;
session_unset();
session_destroy();
header(“Location: index.php”);
Step 6 – Create one Home Page Code
Next, this tutorial will show you how to get back to the home page.
The code for the start page is:
<?php
session_start();
if (isset($_SESSION[ ‘ id’]) && isset($_SESSION[‘user_name’])) {
?>
Hello,
<?php
}else{
header(“Location: index.php”);
exit();
}
?>
Conclusion
This brings us to the end of the PHP login form tutorial. Here you learned how to create a PHP login form, create a CSS sheet for the website, create a database, and create database connection code in Microsoft Visual Studio. Learn about PHP form validation in our next lesson.
Planning to take the plunge and take a PHP course? In that case, Simplilearn’s PHP course would be an excellent choice. The PHP certification covers all basic and advanced concepts in PHP and makes your path to learning PHP easy.
Have questions for us? Please don’t hesitate to put them in the comments section of this tutorial; Our experts will get back to you as soon as possible.
See also: Why You Need to Skip Gmail and Get a Professional Email Address ( Tips for Creating One Fast)
.