In today’s scenario, every form you fill out, either for your admission, a feedback form, a bank account form, etc., will ask you to provide your email id. There are many websites where you can create your email id. But the most popular or one of the best is Gmail. To generate your email ID in Gmail, you must have a Gmail account.
What is Gmail?
Gmail is Gmail that is free E-mail service offers to its users. Gmail lets you send and receive email over the Internet. Gmail gives you 15 gigabytes of server space, which is more than enough to store your emails.
Reading: How to create an email account with pictures
You can also add attachments along with the message send, which together can be 25 megabytes. Google filters all spam emails to the trash. So you don’t even have to open them. Now let’s move to our main topic and discuss the steps to create a Gmail account.
Steps to create an account in Gmail:
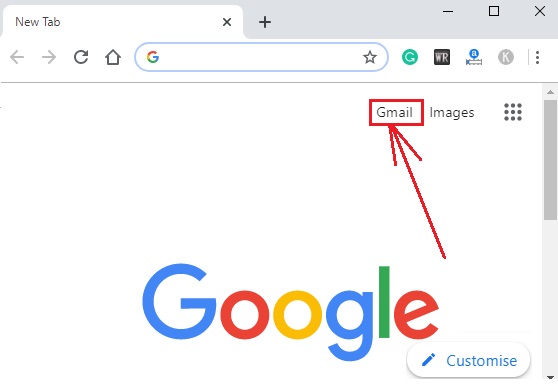
Step 1 : Open your web browser and most likely you will land on Google.com since most of us set Google as our homepage or sometimes the browser does it by default. On the far right you will find a hyperlink for Gmail. Click Gmail.

Well, you can visit gmail.com directly.
Step 2: A login page will appear, that asks for your email address or phone. Since we need to create an account, skip the above requirements, click Create an account, which will bring up two options: “For myself” and “To to manage my business”. “. Since we are talking about the regular account in this section, click For myself.

Step 3: First fill in your first name, last name and then carefully fill in username. If the username you entered is already taken by someone, the message “This username is taken. Try another” and also view some of the available options you can choose for your username.
Finally, enter your password and Confirm it again. Remember, it should be 8 or more characters and it can be a mix of letters, numbers and symbols.
See also: How to Create a YouTube Channel (Step-by-Step Tutorial)
After filling in all the details, click Next .

Step 4: Now, for security reasons, Google will ensure that you are an authorized individual. And for that, you will be asked for your phone number, to which a 6-digit verification code will be sent. Enter your phone number and click Next.

Step 5: Immediately within a few seconds you will receive a 6-digit verification code for your registered mobile number .
Enter this verification code in the text field and click Confirm.

Step 6: A welcome page will open , which prompts you for your phone number, a recovery email address to use in case you don’t remember your password. Finally, you will be asked for your date of birth and gender. After filling out all the information, click Next.

Step 7: Google Privacy Policy and Terms of Service will be on your screen displayed. Click the down arrow to read all.
See also: How to Create a New Gmail Account

At the bottom of the Privacy Policy and Terms, you must agree to their terms in order to create an account. So click I agree.

Step 8: A Welcome message from Google will appear. Just click Next.

Step 9: Here you will be asked to choose a view. Three options are available: Standard, Comfortable and Compact. If you click on the views one after the other, their appearance is shown in the background. Select one of your kind and click OK.

Step 10: Finally your account is created and in the inbox you will find a welcome email from Google.

So this is about how to create an account in Gmail. I hope the content is useful. Thank you, read on.
See also: How To Create A YouTube Channel Right From Your iPad
.