This long-awaited guide is finally here. You will learn how to create a blog application using Learn PHP Online and MySQL. As you may know, a blog is an application that allows admins to create, edit, publish and remove articles for public viewing and commenting. Both users and the public have access to a list of articles. Users can click on each article to learn more and leave comments.
Functions
Reading: How to create a blog with php and html
Two types of users can be managed by the user registration system: Normal and Admin.
There will be two areas for the blog: an admin area and a public one.
Only logged in admin users have access to the admin area and the public one Area is available to regular users and members of the general public.
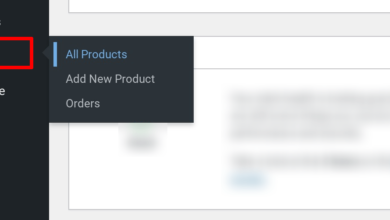
There are two types of admins in the admin area:
Admin:
You can view ANYPost , create, edit, post/publish and delete.
You can also view, edit, delete and create topics.
Only an admin user can create authors or admin users.
Other admin users can be viewed, updated and deleted
Author:
Can only view, create, update posts and delete those created by the authors
TheyWe are not to publishA post has been published. The admin user is responsible for publishing all posts.
The public area is for published posts only.
Each post has a specific topic
There is a many-to-many relationship between topics and posts.
The public page displays posts. Each post is highlighted with a featured photo, author and creation date.
Click on the topic to view all posts on that topic.
Click on One post opens the entire post. Users can also comment below.
Disqus allows users to leave comments through their social media accounts on platforms like Facebook, GooglePlus, and Twitter.
Recommendation: PHP Beginner To Master – CMS project
Implementation
Let’s start programming.
The project is called complete-blog-php. In your server directory (htdocs, www) create a folder called complete-blog-php. This folder can be opened in any text editor, e.g. B. Sublime Text. You need to create the following subfolders in it: admin.
The following contents are in the three folders:
admin Files for the admin backend. Files related to creating, editing, deleting and viewing topics, posts or users.
Contains: files with pieces of code to be added to other pages. Error display files, e.g. error display files
StaticYou can store static files such as images, CSS stylesheets and javascript.
Copy the code below.
Home
LifeBlog
Home
News
Contact
More about
Current Articles
MyViewers (c);?php echo date(‘Y’);?>
Between We have also included links to Google Fonts in our tags. We’ll also link to public_styling.css in a moment.
Also check out the
Element with a class set as a container to wrap our entire app, including the navigation bar and the page content.
As mentioned earlier, the static folder contains, among other things, the design of your website. In the static folder, create 3 subfolders: css and images. Create a file named public_styling.css in the CSS folder you just created.
Add this styling code to public_styling.css by placing it in a new Open tab:
/****************
** * DEFAULTS
****************/
* { border : 0px; Padding: 0px; |* margin = 0px; padding = 0px.}
html { height: 100%; Box Size: Border Box; |html: height: 100%; Box sizing: border box;}
body
See also: How To Create A Blog Logo That Looks Professional – Easily, Quickly And On Budget!
relative position
Margin: 0
padding-bottom 6rem
min-height is 100%
}|}
/* HEADING DEFAULT */
h1, h2, h3, h4, h5, h6 {color: #444; Font Family: ‘Averia Serif Libre’, Italic; |H1, h2,, h3, h4 and h5, h6}
a { text-decoration: none; |a text decoration; none;}
ul, ol { margin-left: 40px; |ul, ol; margin-left 40px}
hr { margin: 10px 0px; Opacity: 0.25; |hr: border: 10px 0px; Opacity:.25}
/* FORM PRESETS //
Form h2
Border: 25px auto
Text alignment: centered
Font family: “Averia Serif Libre”, italics
}|}
Form input
Width: 100%
Display: Block
Padding: 13px13px
Font -Size: 1em
Border: 5px Auto 10px
Border Radius: 3px
Box Size: border box
Background: transparent
Border: 1px solid #E606F
}|}
Form Input: Focus
Outline : None
}|}
/* BUTTON DEFAULT //
.btn
Color: White
Background: #E 6166
Text alignment: centered
Border: None
Border radius : 5px
Display: Block
Letter spacing: .1em
Border: 10px 0px
Padding: 13px x 20px
Text decoration: None
}|}
.container
Width: 80%
Border: 0 pixels automatically
}|}
/* NAVBAR
.navbar
Margin: 0 auto
See also: How to create a secure login form with an SSL certificate
Overflow: Hidden
Background Color: #3E606F
Border Radius: 0px, 0px 6,px 6px 6px
}|}
.navbar ul
List-style-type is none
Right;
}|}
.navbar Ul Li
Left; float
Font family: “Noto Serif”, serif
}|}
.navbar Ul Lia A?
Display: Block
Color: White
Text Alignment: Center
Padding: 20px 28px
Text Decoration: None
}|}
.navbar Ul Li a:hover
Color: #B9E6F2
Background color: #334F5C
}|}
/* LOGO */
.navbar.logo_div
Links; float
Padding above: 5px
Padding left: 40px
}|}
.navbar.logo_div H1
Color: #B9E6F2
Font size: 3em
Letter spacing: 5px
Font weight: 100
Font family: “Tangerine”, italics;
}|}
/* FOOTER /
.footer
absolute position
Right:
Bottom: 0
Left: 0
Color: White
Background color: #73707D
Text alignment: Center
Width: 80 %
Border: 20px auto 0.0px
Padding : 20px 0px
}|}
For more information about PHP, learn online >< Oilab Learning
See also: A top recruiter on what anyone can see after 30 seconds with your resume
.