In this five-part tutorial series, you’ll learn how to create a Zendesk app from start to finish. The app you will create is called Requester X-ray.
This tutorial covers the first steps to create the app:
Reading: How to create an app within zendesk
- What you need
- Planning the app
- Installing ZCLI
- Creating the app files
See the other tutorials in the series to learn how to create a App creates and installs the app:
- Part 2 – Designing the user interface
- Part 3 – Creating and inserting templates
- Part 4 – Retrieving data
- Part 5 – Installing the app in Zendesk Support
As the tutorials build on each other, go through them in order and complete each tutorial before moving on to the next continue.
To download the full source code of the app in this tutorial, click xr_app.zip. You can browse the code as you go or review your work.
Disclaimer: Zendesk provides this article for educational purposes only. Zendesk does not provide support for the content. Please post any issue to the Zendesk Apps Framework (ZAF) community or search for a solution online.
What you need
To create and upload a private support app , you must have the Zendesk Suite Growth plan or higher, or the Support Professional plan or higher. If you’re on the Team plan, Zendesk offers developers a free sponsored Enterprise account for testing and debugging apps. We only ask that you do not use it to provide actual support. See Requesting a sponsored trial account.
You can also try apps in the trial account, which gives you access to all Enterprise features.
Planning the app
See also: High School Student Resume Template & 20 Examples
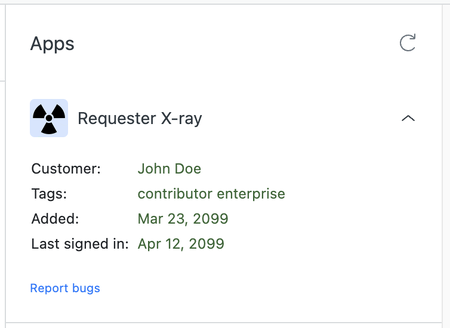
You should have a good idea of how your app will look and function before you start working on it. The requester’s X-ray app displays the following information about the requester:
- Requester’s name
- All user tags assigned to the requester in Zendesk Support
- Date the requester was added to Zendesk Support
- Time the requester last logged into Zendesk Support
The App displays this information in the Apps pane on the right. The agent opens a ticket in the Zendesk Support agent interface.
The app includes a “Report a bug” link, which the agent uses to report a bug in an email to the author of the app.
Here is a mockup of the user interface:

Install ZCLI
In this section, you will install the Zendesk CLI (ZCLI). With ZCLI you can:
- Automatically create all necessary files and folders for a new app
- Test your app locally in a browser
- Validate your app
- Package your app for upload
Installing ZCLI is a one-time task. Once installed, you can use ZCLI for all your Zendesk app projects. Follow the instructions in Installing and Updating ZCLI. You also need to authenticate ZCLI with your Zendesk account. See authentication in the ZCLI documentation. When you’re done, come back here to continue the tutorial.
Note: ZCLI replaces the Zendesk Apps Tools (ZAT), which is in maintenance mode. To use ZAT instead, see Installing and Using ZAT.
Creating the App Files
Once ZCLI is installed, you can start building the app. The first step is to create the startup files for a new app called Requester X-ray in a folder called xr_app. You can use ZCLI to perform this task.
Create the app files
-
See also: How to Make Your WordPress Blog Completely Private (4 Ways)
In your command line interface (the command prompt in Windows or Terminal in macOS), navigate to the folder where you want the app files to be stored in a subfolder.
Use the cd command (for directory exchange). in a subfolder. For example:
-
Run:
-
At the prompts, enter the following values:
- Folder name: xr_app
- Author name: Your name
- Author email: Your email address
- Authors -Website: Leave blank and press Enter.
- App Name: Requester X-ray
ZCLI creates app starter files in the xr_app folder.
-
Open your file browser and navigate to the files.
The folder contains assets and Translations folders, as well as a manifest.json and a README.md file. You can add as many files as you need when building your app, but for now it’s all you need to start building an app.
Since it’s an iframe app you can host the app in Zendesk Support or on a remote server with any technology stack you want. If you only use client-side technologies like this, you can easily host them in Zendesk Support.
Everything is there to start construction. In the next tutorial you will learn more about the HTML file to be included in Zendesk Support via iframe. You’ll add a footer, add some style sheets, and replace the logo to meet the design requirements specified in Plan the app above. Getting Started: Part 2 – Designing the User Interface.
See also: How to Build an Email List from your Gmail Account
.