If you’re already familiar with UX design vocabulary, you’ll have a rough idea of what a wireframe is and what purpose it serves. The next question is how to go about creating one. So how do you create a wireframe? Let’s find out.
I’ve divided this article into three sections. First there is a general introduction to wireframes and wireframing tools, then there is a step-by-step guide followed by some important principles to remember when wireframing.
Reading: How to create a wireframe for website
An Introduction to Wireframing
- What is a wireframe?
- Examples of wireframes
- Things to consider before you start wireframing
- The best tools for wireframes
6 steps to create a wireframe
- Perform research
- Prepare research for reference
- Make sure you map out your user flow
- Draft, don’t draw. Sketch, don’t illustrate
- Add a few details and test
- Start prototyping your wireframes
Do this Your Wireframe Well: Three Key Principles
- Maintain Clarity
- Gain User Trust
- Simplicity is Key
An Introduction to Wireframing
1. What is a wireframe?
Wireframing is a method used by UX designers that allows them to define and plan the information hierarchy of their design for a website, app or product. This process focuses on how the designer or client wants the user to process information on a website based on the user research already done by the UX design team.
If you are designing for the screen, you need to know where all the information is presented in simple black-and-white diagrams before creating anything with code—whether it’s a developer coding it or you, the designer. Wireframing is also a great way to learn how a user interacts with your UI by positioning the buttons and menus on the charts.
Without the distractions of colors, fonts, or text, wireframing Plan the layout and interaction of your user interface. A common argument for wireframing is that if a user doesn’t know where to go on a simple hand-drawn diagram of your website, it doesn’t matter what colors or fancy text ends up being used. A button or call-to-action must be clearly recognizable to the user, even if it is not colored and flashing.
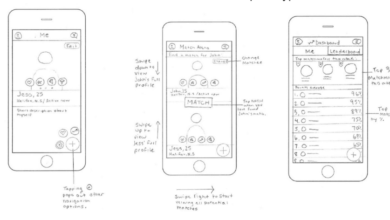
2. Wireframe Examples
Before you start designing the wireframes of your custom app or product, let’s look at some wireframe examples. This gives you inspiration for your own wireframes and gives you an idea of the many ways to create them. Some people like to draw their wireframes by hand, others feel more comfortable using software like Invision or Balsamiq to create theirs. We’ll go through some of the tools you can use to create wireframes shortly, but it’s important to emphasize that how you create yours is up to you: some people feel more creative sitting at their computer while others prefer to have a pen and paper in hand.
However, for absolute beginners, keep the following in mind when deciding on the process of creating your wireframe:
- Using paper and pencil drawn wireframes, or on a whiteboard, have the advantage of looking very easy and can be modified, which can be hugely helpful in early discussions about your website or product.
- Using paper prototypes you can test with end users at every stage of ideation and design. Changes at these stages are much easier – and therefore cheaper – than changes deemed necessary once coding has started.
- If you switch to the software later (after initially hand-drawing your wireframe), you can keep more detailed information decisions.
It’s probably an advantage if you hand-draw your wireframes before running more detailed versions with an online app or software. The following wireframes should give you a good idea of how to organize information on screen.
Wireframes by CareerFoundry student Samuel Adaramola:
See our list of for more inspiration 9 Outstanding Wireframe Examples for Websites and Apps.
3. Things to consider before you start wireframing
As mentioned above, different UX designers approach the task of wireframing in different ways. Some like to draw by hand, while others like to use apps or tools that can be found online. But in most cases, the decision to use online tools or wireframe by hand, and the process used to get from wireframe to code, depends less on the UX designer’s individual preferences and much more more of which approach that is particular situation requires. It largely depends on how much emphasis is placed on visual design in a project and how much uncertainty there is as to what is being designed.
Here are a number of ways different designers can structure the process from design to implementation:
- Wireframe > Interactive Prototype > Visual > Design
- Sketch > Code
- Sketch > Wireframe > Hi-Def Wireframe > Visual > Code
- Sketch > Wireframe > Visual > Code
If the task is very tight and the visual design is either fixed or considered unimportant (e.g. many backend management interfaces) then it makes sense to go from a sketch to coding/development while if time and resources and the business value is high, spending the time to create a high-resolution wireframe and go through a test cycle with a fully realized interactive prototype makes more sense.
4. Best Wireframe Tools
See also: How to Create a WordPress News Aggregator Website (Beginners Guide to Your Own Content Aggregator)
There are tons of free wireframe tools out there, so experiment with as many as you can to find the ones that work best for you. Don’t forget that you can also just use pen and paper! Below we have listed three online tools that we find particularly good. The examples below all have free trials, so give them a try!
UXPin: UXPin has a wide range of functionalities, but one of the best is how it builds responsive , Clickable prototypes right in your browser.
InVision: InVision allows you to get feedback directly from your team and your users through clickable mockups of your website design. It’s also totally free!
Wireframe.cc: Wireframe.cc offers you the technology to create wireframes very quickly in your browser, the online version of pen and paper create.
p>
6 steps to create a wireframe
Ok, now it’s time to get down to business. If you’d like a video introduction to get you started, watch this video as veteran UX designer Dee Scarano approaches wireframe creation for websites, products, and apps:
1. Do your research.
Remember: UX design is a process, and wireframing is not the first step in the process. Before you even think about picking up pen and paper, you must have completed the first two steps; namely, understanding through user research who your target audience is, detailing requirements, creating user personas and defining use cases, and supplementing this with further competitive and industry research. What does that mean? That means analyzing product lines similar to your own, examining prevailing UX trends and best practices, and of course reviewing your own internal design guidelines.
And if you’re designing a new feature, don’t be afraid to look outside yours research domain. Do you introduce tracking and data visualization as part of the service of your logistics company? It might be worth checking out some fitness or nutrition apps on Dribbble or Behance for some ideas. After all, creativity is often unleashed where subject areas overlap.
Not sure what user research is and why it’s very, very important? Let us explain.
2. Prepare your research for quick reference
You can imagine how much quantitative and qualitative data these different phases will produce. Well, that’s what you need to keep in mind when drawing your wireframes. If you are a mere mortal, you may have trouble remembering and remembering all of this. So I recommend writing a cheat sheet outlining your business and user goals (your requirements), your personas, use cases, and maybe some reminders of the coolest features you came across in your competitor research. A few well-chosen quotes from your audience might also help draw your attention to the user experience, which – never forget – is what you design!
3. Make sure you have planned your user flow
Your wireframing gets very messy very quickly if you have no idea how many screens you need to produce and what flow you expect users to follow. It is important to have a watertight concept of where your users are coming from (e.g. from which marketing channel and behind which message) and where you want them to end up. If you’re already familiar with UX vocabulary, your inner voice will alternately yell “user flows” and “information architecture”.
Good information architecture ensures that your users are self-sufficient (less messages to your customer service, asking you how to do something painfully simple), less user frustration (and ultimately more satisfaction and trust), and therefore lower drop-off or drop-out rates. That probably means more sales and probably happier managers – and a job well done.
Don’t know what information architecture is? We’ve got that covered for you too.
4. Design, not draw. Sketch, don’t illustrate
Ok, now we’re on to step four and you can finally start putting pen to paper.Sorry it took so long, but the previous steps were crucial: the old adage that you should look before you jump is 100% relevant to UX.
Anyway, let’s attach some wires to your frame. Remember: They outline and represent functions and formats and do not illustrate in great detail. There’s nothing worse than a blank sheet of paper, so you need to start jotting down your ideas right away – that’s the imperative for step three. Don’t think about aesthetics, don’t think about colors – the UI designer can handle that. And if you’re the only designer in your fledgling startup, just do that later.
See also: How to Start a Finance Blog in 5 Steps
A good, bold marker (a Sharpie, as our friends in the US call it) is a handy tool for these phase of wireframing. Why? Because it prevents you from drowning in the details. You focus on sketching the functional blocks that make up the skeleton of your design. As Jeff suggests in the video above, ask yourself these three questions as you sketch:
- How can you organize the content to support your users’ goals?
- Which ones Information should be most important? Where should your main message be? What do you want the user to see first when entering the page?
- What does the user expect to see in certain areas of the page?
- What buttons or touchpoints does the user need to use the ones they want Complete actions?
Once you have some variations on your first few screens, you might want to do a bit of wireframing with another designer or product manager. What does that mean? Simply. Lift your wireframes off the paper onto a whiteboard and play around with them. Ask yourself and each other; “Are we creating something useful that meets the needs of our target audience?”
5. Add some details and test them
So you have a flow and you have your screens and you have validated your ideas with some enlightened peers. The next step is to add some informational details to prepare your wireframe for the Megatron-style upgrade to prototype mode.
Add details of how you naturally process a screen or the side of a screen would book: top to bottom and left to right. Remember: your wireframe is the backbone of your website. You’re not adding the muscle just yet—the content and the copy. To extend the metaphor somewhat uncomfortably, these elements are the ligaments and tendons that will connect form and functionality. Think about the following:
- Usability conventions, such as B. placing the navigation at the top next to your logo, a search field at the top right, etc.
- Simple, instructive wording for e.g. B. Calls-to-Action
- Trust building elements: What do you need to build trust with your customers and where would you best place these elements?
- Tooltips to point out features , which could be integrated into a prototype switch
Once you’ve done all that, you’re ready for your first user tests. At this stage, your users may well be your peers. In fact, one of the joys of the humble wireframe is that it serves as a common language between designers, stakeholders, and web and app developers. You can use tools like UsabilityHub to favor test screens and collect qualitative feedback, and Prott to test and verify understanding of basic user flow. With this tool, you can easily photograph and upload your hand-drawn wireframes, and then connect them to the user button overlays. Clever stuff!
Don’t know anything about usability testing? Here is a beginner’s guide.
6. Start Prototyping Your Wireframes
Once you’ve documented and acted on your first prototype’s feedback, you can begin developing your high-fidelity prototypes. There are many nifty tools for this, from Proto.io to Adobe XD and Framer, but the most well-known are Sketch and the browser-based, new(ish) kid-on-the-block, Figma. Once you’ve developed your wireframes in Sketch, you can import them into the industry-leading prototyping tool InVision (which we created a course with, by the way) and wire your screens together for a second round of high-fidelity user testing. At this point we’ve certainly moved from wireframing to prototyping. You’ll have to read another article to learn more about that.
Let’s recap by going through three key principles to keep in mind when creating your wireframe.
How um Making Your Wireframe Good: Three Key Principles
The following points should be prioritized when creating your wireframe:
1. Clarity
Your wireframe must answer the questions of what this site page is, what the user can do there, and whether it meets their needs. Your wireframe is an aid to visualize the layout of your website page and ensure that the user’s main questions are answered and goals are achievable without being distracted by more aesthetic considerations.
2.Trust
Easy navigation through your website and clear calls-to-action increase users’ trust in your brand. If your website page is unpredictable or has buttons or boxes in unexpected places, user trust will drop. Much of this information can be organized as early as the wireframing stage. By using familiar navigation processes and placing buttons in commonly used and intuitive locations, user confidence will increase before they even start thinking about colors and styles.
3. Simplicity is key
Too much information, copying, or links can distract the user and adversely affect your users’ ability to achieve their goals. You want your users to navigate through your site to the elements that meet their most important goals in a given context, with as little extra “lint” as possible.
Your wireframe should be a visual guide to Framework of your website and how it is navigated. Attractiveness does not play a role in this phase. Once you have decided who your product or service is for, you can begin to provide the information you are looking for in an intuitive and natural way that will not only be familiar to you as a user of this type of service, but will also guide you to conversion point or otherwise helps them achieve their goals in the interaction. By presenting your information in this way, you both align the business goals of your website with the needs of the customer.
Other Resources
If you are new to the world of wireframes and the For UX designs, I strongly recommend taking a look at the following articles.
See also: 15 Effective Tips To Come Up With A Logo That Fits Your Brand
- What is the difference between a wireframe, a prototype and a mockup?
- How does wireframing work for websites and mobile apps are different?
- An Introduction to Wireframing in Sketch [Free Workshop]
.