A dynamic web application consists of one or both of the following two types of programs −
-
Server-side scripting − these are programs running a Web servers written using server-side scripting languages such as ASP (Active Server Pages) or JSP (Java Server Pages).
-
Client-side scripting − These are programs that run in the browser and written with scripting languages like JavaScript, VBScript, etc.
ASP.Net is the .Net version of ASP introduced by Microsoft for building dynamic web pages using server-side scripts. ASP.Net applications are compiled code written using the extensible and reusable components or objects that exist in the .Net framework. These codes can use the entire class hierarchy in the .Net framework.
The ASP.Net application codes can be written in any of the following languages −
-
Visual Basic .Net
-
C#
-
Jscript
-
J#
In this chapter we give a very brief introduction to writing ASP.Net applications using VB.Net. For a detailed discussion, please consult the ASP.Net Tutorial.
Built-in objects in ASP.Net
ASP.Net has some built-in objects that run on a web server. These objects have methods, properties and collections that are used in application development.
The following table lists the objects built into ASP.Net with a brief description −
Sr.No. Object & Description 1
Application
Describes the methods, properties and collections of the object that stores information related to the entire web application, including variables and objects that exist for the lifetime of the application.
You use this object to store and retrieve information to be shared by all users of an application. For example, you can use an Application object to create an e-commerce site.
2
Request
Describes the methods, properties, and collections of the object which stores information related to the HTTP request. This includes forms, cookies, server variables, and certificate data.
You use this object to access the information that is sent from a browser to the server in a request. For example, you can use a Request object to access information entered into an HTML form by a user.
3
Response
Describes the methods, properties, and collections of the object that stores information regarding the server’s response. This includes displaying content, manipulating headers, setting locales, and redirecting requests.
You use this object to send information to the browser. For example, you use a Response object to send the output of your scripts to a browser.
4
Server
Describes the methods and properties of the object, which provides methods for various server tasks. You can use these methods to run code, get error conditions, encode text strings, create objects for use by the web page, and map physical paths.
You use this object to access various helper functions on the server. For example, you can use the Server object to set a script timeout.
5
Session
Describes the methods, properties, and collections of the object , which stores information related to the user’s session, including variables and objects that exist for the lifetime of the session.
You use this object to store and retrieve information about specific user sessions. For example, you can use the Session object to store information about the user and their preferences, and to keep track of pending operations.
ASP.Net Programming Model
ASP.Net offers two types of programming models −
-
Web Forms − this allows you to create the user interface and the application logic that is applied to various components of the user interface.
-
WCF Services – this allows you to remotely access some server-side functions.
See also: Create Your Translation Website, Kick Start Your Language Business
This chapter requires you to use the free Visual Studio Web Developer. The IDE is almost the same that you used to build the Windows applications.

Web Forms
Web Forms consist of −
-
User Interface
-
Application logic
The user interface consists of static HTML or XML elements and ASP.Net server controls. When you create a web application, HTML or XML elements and server controls are stored in a file with an .aspx extension. This file is also called a paging file.
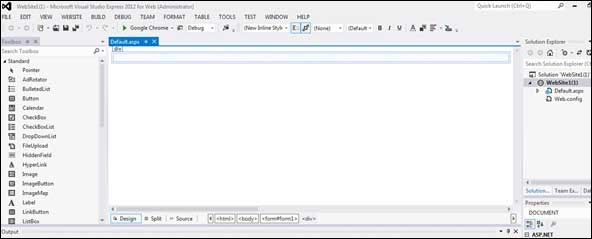
Application logic consists of code that is applied to user interface elements on the page. You write this code in any .Net language like VB.Net or C#. The following image shows a web form in Design view −
Example
Let’s create a new website with a web form that displays the current date and time when a user clicks a button using the following steps −
-
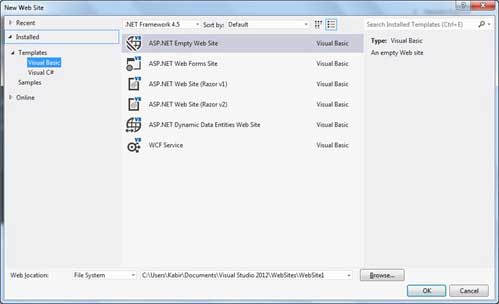
Select File → New → Website The New Website dialog box appears.
-
Choose templates for blank ASP.Net websites Enter a name for the website and choose a location to save the files.
-
You must add a default page to the website, right-click the name of the site in the Solution Explorer and select Add New Item from the context menu The Add New Item dialog box appears −

-
Select the Web form option and provide a name for the default page, we have it as Default.aspx Click the Add button.
-
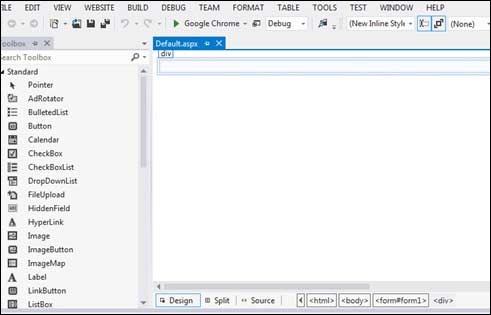
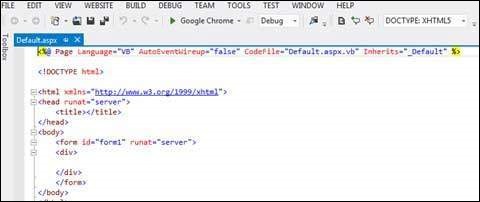
The default page is displayed in source view
-
Set the title for the default web page by typing in add a value to the page’s
tag in source view −</p> </li> <li> <p>To add controls to the web page, go to Design view and add three labels, a text box and Add a button.</p> </li> </ul> <p><img decoding="async" src="https://www.tutorialspoint.com/vb.net/images/vb.net_web_form4 .jpg" alt="Web Form Example" /></p> <ul> <li> <p>Double-click the button and add the following code to the Sc button −</p> </li> </ul> <p> Protected Sub Button1_Click(sender As Object, e As EventArgs) _ Handles Button1.Click Label2.Visible = True Label2.Text = “Welcome to tutorials point: ” + TextBox1 .Text Label3.Text = “You visited us at: ” + DateTime.Now.ToString() End Sub </p> <p>When the above code is run and run with the Start button available on the Microsoft Visual Studio toolbar , the following page opens in the browser −</p> <p> <img decoding="async" src="https://www.tutorialspoint.com/vb.net/images/vb.net_web_form5.jpg" alt="Example web form" /></p> <p>Enter your name and click the Submit button −</p> <p> <img decoding="async" src="https://www.tutorialspoint.com/vb.net/images/vb.net_web_form6.jpg" alt="Web Form Example" /></p> <h2>Web Services</h2> <p>A web service is an Internet application, which is basically a class consisting of methods that other applications could use. It also follows a code-behind architecture like the ASP.Net web pages, although it doesn’t have a user interface.</p> <p>The earlier versions of .Net Framework used this concept of ASP.Net Web Service, which had the File extension .asmx. However, starting with .Net Framework 4.0, Windows Communication Foundation (WCF) technology has emerged as a new successor to Web Services, .Net Remoting, and some other related technologies. Rather, it threw all of these technologies together. In the next section, we’ll give a brief introduction to Windows Communication Foundation (WCF).</p> <p>If you’re using earlier versions of the .Net Framework, you can continue to build traditional web services. For a detailed description, see the ASP.Net – Web Services tutorial.</p> <h2>Windows Communication Foundation</h2> <p>Windows Communication Foundation or WCF provides an API for building distributed service-oriented applications, known as WCF services .</p> <p>Like web services, WCF services enable communication between applications. Unlike web services, however, communication here is not just limited to HTTP. WCF can be configured to work over HTTP, TCP, IPC, and message queues. Another strong point in favor of WCF is that it supports duplex communication, whereas we could only achieve simplex communication with web services.</p> <p>From a beginner’s perspective, writing a WCF service is not that different from to write a web service. To keep things simple, we’ll see how to −</p> <ul> <li> <p>create a WCF service</p> </li> <li> <p>create a service contract and defines operation</p> </li> <li> <p>Implementing the contract</p> </li> <li> <p>Testing the service</p> </li> <li> <p> Using the service</p> </li> </ul> <h2>Example</h2> <p>To understand the concept, let’s create a simple service that provides stock price information. Clients can query a stock’s name and price based on the stock symbol. To keep this example simple, the values are hard-coded into a two-dimensional array. This service has two methods −</p> <ul> <li> <p>GetPrice method − it returns the price of a stock based on the provided symbol.</p> </li> <li> <p style="padding: 20px; background: #e9ebec;">See also: <a id="vnacil-3" href="https://vccidata.com.vn/en/how-to-create-a-channel-on-youtube-and-earn-money/">How to Make Money on YouTube: 7 Effective Strategies</a></p> <p> GetName method − returns the name of the stock based on the provided icon.</p> </li> </ul> <h3>Creating a WCF Service</h3> <p>Follow the following steps − </p> <ul> <li> <p>Open VS Express for Web 2012</p> </li> <li> <p>Select New Website to open the New Website dialog box. </p> </li> <li> <p>Select WCF service template from list of templates −</p> </li> </ul> <p><img decoding="async" src="https://www.tutorialspoint.com/ vb.net /images/vb.net_wcf_service1.jpg" alt="Create a WCF Service" /></p> <ul> <li> <p>Select File System from the Web Location drop-down list.</p> </li> <li> <p>Enter a Name and location for the WCF service and click OK.</p> </li> <li> <p>A new WCF service will be created.</p> </li> </ul> <h3>Creating a service contract and defining the operations</h3> <p>A service contract defines the operation that a service performs. In the WCF service application you will find two files that are automatically created in the App_Code folder in the solution explorer</p> <ul> <li> <p>IService.vb − this contains the service contract, more simply the interface for the service, with the definitions of the methods that the service exposes and that you implement in your service.</p> <p> p></li> <li> <p>Service.vb − This implements the service contract.</p> </li> </ul> <p><img decoding="async" src="https://www.tutorialspoint.com / vb.net/images/vb.net_wcf_service2.jpg" alt="WCF Service Example" /></p> <ul> <li> <p>Replace the Code of the IService.vb file by the specified code −</p> </li> </ul> <p> Public Interface IService Function GetPrice(ByVal symbol As String) As Double Function GetName(ByVal symbol As String) As String End Interface </p> <h3>Implementation of the contract </h3> <p>In the Service.vb file you will find a class called <b>Service</b> that uses the <b>IService </b> defined service contract.</p> <p>Replace the code of IService.vb with the following code −</p> <p> ‘ NOTE: You can use the “Rename” command in the context menu to change the class name ” Service” in code, SVC and configuration file together. Public Class Service implements IService Public Sub New() End Sub Dim stocks As String(,) = {{“RELIND”, “Reliance Industries”, “1060.15”}, {“ICICI”, “ICICI Bank”, “911.55”} , {“JSW”, “JSW Steel”, “1201.25”}, {“WIPRO”, “Wipro Limited”, “1194.65”}, {“SATYAM”, “Satyam Computers”, “91.10”} } Public function GetPrice( ByVal symbol As String) As Double _ Implements IService.GetPrice Dim i As Integer ‘it takes the symbol as a parameter and returns the price For i = 0 To i = stocks.GetLength(0) – 1 If (String.Compare(symbol , stocks(i, 0)) = 0) Then Return Convert.ToDouble(stocks(i, 2)) End If Next i Return 0 End Function Public function GetName(ByVal symbol As String) As String _ Implements IService.GetName ‘ Es takes the symbol as a parameter and ‘ returns the name of the stock Dim i As Integer For i = 0 To i = stocks.GetLength(0) – 1 If (String.Compare(symbol, stocks(i, 0)) = 0) Then Return stocks (i, 1) Exit if next i return stock not found. end of function. End of class For the WCF service created in this way, select Debug → Start Debugging from the menu bar. The output would be −</p> <p> <img decoding="async" src="https://www.tutorialspoint.com/vb.net/images/vb.net_wcf_service_testing1.jpg" alt="WCF Service Testing" /></p> <p>Double click to test In the service operations tree structure in the left pane, click the name of the operation. A new tab will appear on the right side.</p> <p>Enter the value of the parameters in the request area on the right side and click the “Invoke” button.</p> <p>The following diagram shows the result of testing the operation <b>GetPrice</b> −</p> <p> <img decoding="async" src="https://www.tutorialspoint.com/vb.net/images/vb.net_wcf_service_testing2.jpg" alt="WCF Test Service" /></p> <p>The following diagram shows the result of testing the operation <b>GetName</b> −</p> <p> <img decoding="async" src="https://www.tutorialspoint.com/vb.net/ images /vb.net_wcf_service_testing3.jpg" alt="WCF Service Testing" /></p> <h3>Using the service</h3> <p>Let’s add a standard page, an ASP.NET web form, in the same solution from which we are going to use the WCF service we just created.</p> <p>Perform the following steps −</p> <ul> <li> <p>Right click on the solution name in the solution tree Explorer and add a new web form to the solution. It will be named Default.aspx.</p> </li> <li> <p>Add two labels, a text box and a button to the form.</p> </li> </ul> <p><img decoding="async" src="https://www.tutorialspoint.com/vb.net/images/vb.net_wcf_service_utilization1.jpg" alt="WCF Service Utilization" /></p> <ul> <li> <p>We need to add a service reference to the WCF service we just created. Right-click the website in Solution Explorer and select Add Service Reference. This will open the Add Service Reference dialog.</p> </li> <li> <p>Enter the URL (location) of the service in the Address text box and click the Go button . It creates a service reference with the default name <b>ServiceReference1</b>. Click the OK button.</p> </li> </ul> <p><img decoding="async" src="https://www.tutorialspoint.com/vb.net/images/vb.net_wcf_service_utilization2.jpg" alt="Service Reference add " /></p> <p>Adding the reference does two jobs for your project −</p> <ul> <li> <p>Generates the address and binding for the service in the web.config.</p> <p> file </li> <li> <p>Creates a proxy class to access the service.</p> </li> <li> <p>Double-click the “Get Price” button on the form to get the enter the following code snippet on his click event −</p> </li> </ul> <p> Subclass _Default Inherits System.Web.UI.Page Protected Sub Button1_Click(Sender As Object, e As EventArgs) _ Handles Button1.Click Dim ser As ServiceReference1.ServiceClient = _ New ServiceReference1.ServiceClient Label2.Text = ser.GetPrice(TextBox1.Text).ToString() End Sub End Class </p> <ul> <li> <p>When the above code is executed and run from the Start button available on the Microsoft Visual Studio toolbar, the following page opens in the browser −</p> </li> </ul> <p><img decoding="async" src="https://www.tutorialspoint.com/vb.net/images/vb.net_wcf_service_utilization3.jpg" alt="WCF Service Utilization" /></p> <ul> <li> <p>Enter an icon and click Get Price button to get the hardcoded price −</p> <p style="padding: 20px; background: #e9ebec;">See also: <a id="vnacil-4" href="https://vccidata.com.vn/en/how-to-create-an-app-like-poshmark/">What Secondhand Fashion Brands Must Learn About Developing A Marketplace App Like Poshmark</a></p> </li> </ul> <p><img decoding="async" src="https://www.tutorialspoint.com/vb.net /images/vb.net_wcf_service_utilization4.jpg" alt="WCF Service Utilization" />.</p> <div style="clear:both; margin-top:0em; margin-bottom:1em;"><a href="https://vccidata.com.vn/en/how-to-create-an-email-with-your-domain-name/" target="_self" rel="nofollow" class="u7f9411a6670f16bb69b89d19308b2cc3"><!-- INLINE RELATED POSTS 1/3 //--><style> .u7f9411a6670f16bb69b89d19308b2cc3 { padding:0px; margin: 0; padding-top:1em!important; padding-bottom:1em!important; width:100%; display: block; font-weight:bold; background-color:inherit; border:0!important; border-left:4px solid inherit!important; text-decoration:none; } .u7f9411a6670f16bb69b89d19308b2cc3:active, .u7f9411a6670f16bb69b89d19308b2cc3:hover { opacity: 1; transition: opacity 250ms; webkit-transition: opacity 250ms; text-decoration:none; } .u7f9411a6670f16bb69b89d19308b2cc3 { transition: background-color 250ms; webkit-transition: background-color 250ms; opacity: 1; transition: opacity 250ms; webkit-transition: opacity 250ms; } .u7f9411a6670f16bb69b89d19308b2cc3 .ctaText { font-weight:bold; color:inherit; text-decoration:none; font-size: 16px; } .u7f9411a6670f16bb69b89d19308b2cc3 .postTitle { color:inherit; text-decoration: underline!important; font-size: 16px; } .u7f9411a6670f16bb69b89d19308b2cc3:hover .postTitle { text-decoration: underline!important; } </style><div style="padding-left:1em; padding-right:1em;"><span class="ctaText">See also</span> <span class="postTitle">How to Create a Business Email Address With a Custom Domain (4 Methods)</span></div></a></div><div class='code-block code-block-3' style='margin: 8px auto; text-align: center; display: block; clear: both;'> <script data-rocketlazyloadscript='https://pagead2.googlesyndication.com/pagead/js/adsbygoogle.js?client=ca-pub-2041036629885411' async crossorigin="anonymous"></script> <!-- Thich Ung (good) --> <ins class="adsbygoogle" style="display:block" data-ad-client="ca-pub-2041036629885411" data-ad-slot="9329046489" data-ad-format="auto" data-full-width-responsive="true"></ins> <script data-rocketlazyloadscript='data:text/javascript;base64,CiAgICAgKGFkc2J5Z29vZ2xlID0gd2luZG93LmFkc2J5Z29vZ2xlIHx8IFtdKS5wdXNoKHt9KTsK' ></script></div> <!-- AI CONTENT END 1 --> </div><!-- .entry-content /--> <footer class="entry-meta text-center"> <div class="danh-muc"><span class="title">CATEGORY:</span> <a href="https://vccidata.com.vn/en/uncategorized/" rel="category tag">Uncategorized</a></div> </footer><!-- .entry-meta --> <div id="post-extra-info"> <div class="theiaStickySidebar"> <div id="single-post-meta" class="post-meta clearfix"><span class="author-meta single-author with-avatars"><span class="meta-item meta-author-wrapper meta-author-1"> <span class="meta-author-avatar"> <a href="https://vccidata.com.vn/en/author/admin/"><img alt='Photo of admin' src='https://secure.gravatar.com/avatar/0c26526ab15574f639d42a15a80594f3?s=140&d=mm&r=g' srcset='https://secure.gravatar.com/avatar/0c26526ab15574f639d42a15a80594f3?s=280&d=mm&r=g 2x' class='avatar avatar-140 photo' height='140' width='140' decoding='async'/></a> </span> <span class="meta-author"><a href="https://vccidata.com.vn/en/author/admin/" class="author-name tie-icon" title="admin">admin</a></span></span></span><span class="date meta-item tie-icon">March 23, 2023</span><div class="tie-alignright"><span class="meta-comment tie-icon meta-item fa-before">0</span><span class="meta-views meta-item "><span class="tie-icon-fire" aria-hidden="true"></span> 16 </span><span class="meta-reading-time meta-item"><span class="tie-icon-bookmark" aria-hidden="true"></span> 8 minutes read</span> </div></div><!-- .post-meta --> </div> </div> <div class="clearfix"></div> <script id="tie-schema-json" type="application/ld+json">{"@context":"http:\/\/schema.org","@type":"Article","dateCreated":"2023-03-23T10:57:09+00:00","datePublished":"2023-03-23T10:57:09+00:00","dateModified":"2023-03-23T10:57:09+00:00","headline":"VB.Net – Web Programming","name":"VB.Net – Web Programming","keywords":[],"url":"https:\/\/vccidata.com.vn\/en\/how-to-create-a-website-in-vb-net-2010\/","description":"A dynamic web application consists of one or both of the following two types of programs \u2212 Server-side scripting \u2212 these are programs running a Web servers written using server-side scripting language","copyrightYear":"2023","articleSection":"Uncategorized","articleBody":"A dynamic web application consists of one or both of the following two types of programs \u2212 Server-side scripting \u2212 these are programs running a Web servers written using server-side scripting languages \u200b\u200bsuch as ASP (Active Server Pages) or JSP (Java Server Pages). Client-side scripting \u2212 These are programs that run in the browser and written with scripting languages \u200b\u200blike JavaScript, VBScript, etc. ASP.Net is the .Net version of ASP introduced by Microsoft for building dynamic web pages using server-side scripts. ASP.Net applications are compiled code written using the extensible and reusable components or objects that exist in the .Net framework. These codes can use the entire class hierarchy in the .Net framework. The ASP.Net application codes can be written in any of the following languages \u200b\u200b\u2212 Visual Basic .Net C# Jscript J# In this chapter we give a very brief introduction to writing ASP.Net applications using VB.Net. For a detailed discussion, please consult the ASP.Net Tutorial. Built-in objects in ASP.Net ASP.Net has some built-in objects that run on a web server. These objects have methods, properties and collections that are used in application development. The following table lists the objects built into ASP.Net with a brief description \u2212 Sr.No. Object & Description 1 Application Describes the methods, properties and collections of the object that stores information related to the entire web application, including variables and objects that exist for the lifetime of the application. You use this object to store and retrieve information to be shared by all users of an application. For example, you can use an Application object to create an e-commerce site. 2 Request Describes the methods, properties, and collections of the object which stores information related to the HTTP request. This includes forms, cookies, server variables, and certificate data. You use this object to access the information that is sent from a browser to the server in a request. For example, you can use a Request object to access information entered into an HTML form by a user. 3 Response Describes the methods, properties, and collections of the object that stores information regarding the server's response. This includes displaying content, manipulating headers, setting locales, and redirecting requests. You use this object to send information to the browser. For example, you use a Response object to send the output of your scripts to a browser. 4 Server Describes the methods and properties of the object, which provides methods for various server tasks. You can use these methods to run code, get error conditions, encode text strings, create objects for use by the web page, and map physical paths. You use this object to access various helper functions on the server. For example, you can use the Server object to set a script timeout. 5 Session Describes the methods, properties, and collections of the object , which stores information related to the user's session, including variables and objects that exist for the lifetime of the session. You use this object to store and retrieve information about specific user sessions. For example, you can use the Session object to store information about the user and their preferences, and to keep track of pending operations. ASP.Net Programming Model ASP.Net offers two types of programming models \u2212 Web Forms \u2212 this allows you to create the user interface and the application logic that is applied to various components of the user interface. WCF Services - this allows you to remotely access some server-side functions. This chapter requires you to use the free Visual Studio Web Developer. The IDE is almost the same that you used to build the Windows applications. Web Forms Web Forms consist of \u2212 User Interface Application logic The user interface consists of static HTML or XML elements and ASP.Net server controls. When you create a web application, HTML or XML elements and server controls are stored in a file with an .aspx extension. This file is also called a paging file. Application logic consists of code that is applied to user interface elements on the page. You write this code in any .Net language like VB.Net or C#. The following image shows a web form in Design view \u2212 Example Let's create a new website with a web form that displays the current date and time when a user clicks a button using the following steps \u2212 Select File \u2192 New \u2192 Website The New Website dialog box appears. Choose templates for blank ASP.Net websites Enter a name for the website and choose a location to save the files. You must add a default page to the website, right-click the name of the site in the Solution Explorer and select Add New Item from the context menu The Add New Item dialog box appears \u2212 Select the Web form option and provide a name for the default page, we have it as Default.aspx Click the Add button. The default page is displayed in source view Set the title for the default web page by typing in add a value to the page's tag in source view \u2212 To add controls to the web page, go to Design view and add three labels, a text box and Add a button. Double-click the button and add the following code to the Sc button \u2212 Protected Sub Button1_Click(sender As Object, e As EventArgs) _ Handles Button1.Click Label2.Visible = True Label2.Text = \"Welcome to tutorials point: \" + TextBox1 .Text Label3.Text = \"You visited us at: \" + DateTime.Now.ToString() End Sub When the above code is run and run with the Start button available on the Microsoft Visual Studio toolbar , the following page opens in the browser \u2212 Enter your name and click the Submit button \u2212 Web Services A web service is an Internet application, which is basically a class consisting of methods that other applications could use. It also follows a code-behind architecture like the ASP.Net web pages, although it doesn't have a user interface. The earlier versions of .Net Framework used this concept of ASP.Net Web Service, which had the File extension .asmx. However, starting with .Net Framework 4.0, Windows Communication Foundation (WCF) technology has emerged as a new successor to Web Services, .Net Remoting, and some other related technologies. Rather, it threw all of these technologies together. In the next section, we'll give a brief introduction to Windows Communication Foundation (WCF). If you're using earlier versions of the .Net Framework, you can continue to build traditional web services. For a detailed description, see the ASP.Net - Web Services tutorial. Windows Communication Foundation Windows Communication Foundation or WCF provides an API for building distributed service-oriented applications, known as WCF services . Like web services, WCF services enable communication between applications. Unlike web services, however, communication here is not just limited to HTTP. WCF can be configured to work over HTTP, TCP, IPC, and message queues. Another strong point in favor of WCF is that it supports duplex communication, whereas we could only achieve simplex communication with web services. From a beginner's perspective, writing a WCF service is not that different from to write a web service. To keep things simple, we'll see how to \u2212 create a WCF service create a service contract and defines operation Implementing the contract Testing the service Using the service Example To understand the concept, let's create a simple service that provides stock price information. Clients can query a stock's name and price based on the stock symbol. To keep this example simple, the values \u200b\u200bare hard-coded into a two-dimensional array. This service has two methods \u2212 GetPrice method \u2212 it returns the price of a stock based on the provided symbol. GetName method \u2212 returns the name of the stock based on the provided icon. Creating a WCF Service Follow the following steps \u2212 Open VS Express for Web 2012 Select New Website to open the New Website dialog box. Select WCF service template from list of templates \u2212 Select File System from the Web Location drop-down list. Enter a Name and location for the WCF service and click OK. A new WCF service will be created. Creating a service contract and defining the operations A service contract defines the operation that a service performs. In the WCF service application you will find two files that are automatically created in the App_Code folder in the solution explorer IService.vb \u2212 this contains the service contract, more simply the interface for the service, with the definitions of the methods that the service exposes and that you implement in your service. p> Service.vb \u2212 This implements the service contract. Replace the Code of the IService.vb file by the specified code \u2212 Public Interface IService Function GetPrice(ByVal symbol As String) As Double Function GetName(ByVal symbol As String) As String End Interface Implementation of the contract In the Service.vb file you will find a class called Service that uses the IService defined service contract. Replace the code of IService.vb with the following code \u2212 ' NOTE: You can use the \"Rename\" command in the context menu to change the class name \" Service\" in code, SVC and configuration file together. Public Class Service implements IService Public Sub New() End Sub Dim stocks As String(,) = {{\"RELIND\", \"Reliance Industries\", \"1060.15\"}, {\"ICICI\", \"ICICI Bank\", \"911.55\"} , {\"JSW\", \"JSW Steel\", \"1201.25\"}, {\"WIPRO\", \"Wipro Limited\", \"1194.65\"}, {\"SATYAM\", \"Satyam Computers\", \"91.10\"} } Public function GetPrice( ByVal symbol As String) As Double _ Implements IService.GetPrice Dim i As Integer 'it takes the symbol as a parameter and returns the price For i = 0 To i = stocks.GetLength(0) - 1 If (String.Compare(symbol , stocks(i, 0)) = 0) Then Return Convert.ToDouble(stocks(i, 2)) End If Next i Return 0 End Function Public function GetName(ByVal symbol As String) As String _ Implements IService.GetName ' Es takes the symbol as a parameter and ' returns the name of the stock Dim i As Integer For i = 0 To i = stocks.GetLength(0) - 1 If (String.Compare(symbol, stocks(i, 0)) = 0) Then Return stocks (i, 1) Exit if next i return stock not found. end of function. End of class For the WCF service created in this way, select Debug \u2192 Start Debugging from the menu bar. The output would be \u2212 Double click to test In the service operations tree structure in the left pane, click the name of the operation. A new tab will appear on the right side. Enter the value of the parameters in the request area on the right side and click the \"Invoke\" button. The following diagram shows the result of testing the operation GetPrice \u2212 The following diagram shows the result of testing the operation GetName \u2212 Using the service Let's add a standard page, an ASP.NET web form, in the same solution from which we are going to use the WCF service we just created. Perform the following steps \u2212 Right click on the solution name in the solution tree Explorer and add a new web form to the solution. It will be named Default.aspx. Add two labels, a text box and a button to the form. We need to add a service reference to the WCF service we just created. Right-click the website in Solution Explorer and select Add Service Reference. This will open the Add Service Reference dialog. Enter the URL (location) of the service in the Address text box and click the Go button . It creates a service reference with the default name ServiceReference1. Click the OK button. Adding the reference does two jobs for your project \u2212 Generates the address and binding for the service in the web.config. file Creates a proxy class to access the service. Double-click the \"Get Price\" button on the form to get the enter the following code snippet on his click event \u2212 Subclass _Default Inherits System.Web.UI.Page Protected Sub Button1_Click(Sender As Object, e As EventArgs) _ Handles Button1.Click Dim ser As ServiceReference1.ServiceClient = _ New ServiceReference1.ServiceClient Label2.Text = ser.GetPrice(TextBox1.Text).ToString() End Sub End Class When the above code is executed and run from the Start button available on the Microsoft Visual Studio toolbar, the following page opens in the browser \u2212 Enter an icon and click Get Price button to get the hardcoded price \u2212 .","publisher":{"@id":"#Publisher","@type":"Organization","name":"Vccidata_En","logo":{"@type":"ImageObject","url":"https:\/\/vccidata.com.vn\/en\/wp-content\/themes\/jannah-child\/assets\/images\/logo@2x.png"}},"sourceOrganization":{"@id":"#Publisher"},"copyrightHolder":{"@id":"#Publisher"},"mainEntityOfPage":{"@type":"WebPage","@id":"https:\/\/vccidata.com.vn\/en\/how-to-create-a-website-in-vb-net-2010\/","breadcrumb":{"@id":"#Breadcrumb"}},"author":{"@type":"Person","name":"admin","url":"https:\/\/vccidata.com.vn\/en\/author\/admin\/"},"image":{"@type":"ImageObject","url":"https:\/\/vccidata.com.vn\/en\/wp-content\/uploads\/how-to-create-a-website-in-vb-net-2010.jpg","width":1200,"height":239}}</script> <div id="share-buttons-bottom" class="share-buttons share-buttons-bottom"> <div class="share-links "> <a href="https://www.facebook.com/sharer.php?u=https://vccidata.com.vn/en/how-to-create-a-website-in-vb-net-2010/" rel="external noopener nofollow" title="Facebook" target="_blank" class="facebook-share-btn large-share-button" data-raw="https://www.facebook.com/sharer.php?u={post_link}"> <span class="share-btn-icon tie-icon-facebook"></span> <span class="social-text">Facebook</span> </a> <a href="https://twitter.com/intent/tweet?text=VB.Net%20%E2%80%93%20Web%20Programming&url=https://vccidata.com.vn/en/how-to-create-a-website-in-vb-net-2010/" rel="external noopener nofollow" title="Twitter" target="_blank" class="twitter-share-btn large-share-button" data-raw="https://twitter.com/intent/tweet?text={post_title}&url={post_link}"> <span class="share-btn-icon tie-icon-twitter"></span> <span class="social-text">Twitter</span> </a> <a href="https://www.linkedin.com/shareArticle?mini=true&url=https://vccidata.com.vn/en/how-to-create-a-website-in-vb-net-2010/&title=VB.Net%20%E2%80%93%20Web%20Programming" rel="external noopener nofollow" title="LinkedIn" target="_blank" class="linkedin-share-btn " data-raw="https://www.linkedin.com/shareArticle?mini=true&url={post_full_link}&title={post_title}"> <span class="share-btn-icon tie-icon-linkedin"></span> <span class="screen-reader-text">LinkedIn</span> </a> <a href="https://www.tumblr.com/share/link?url=https://vccidata.com.vn/en/how-to-create-a-website-in-vb-net-2010/&name=VB.Net%20%E2%80%93%20Web%20Programming" rel="external noopener nofollow" title="Tumblr" target="_blank" class="tumblr-share-btn " data-raw="https://www.tumblr.com/share/link?url={post_link}&name={post_title}"> <span class="share-btn-icon tie-icon-tumblr"></span> <span class="screen-reader-text">Tumblr</span> </a> <a href="https://pinterest.com/pin/create/button/?url=https://vccidata.com.vn/en/how-to-create-a-website-in-vb-net-2010/&description=VB.Net%20%E2%80%93%20Web%20Programming&media=https://vccidata.com.vn/en/wp-content/uploads/how-to-create-a-website-in-vb-net-2010.jpg" rel="external noopener nofollow" title="Pinterest" target="_blank" class="pinterest-share-btn " data-raw="https://pinterest.com/pin/create/button/?url={post_link}&description={post_title}&media={post_img}"> <span class="share-btn-icon tie-icon-pinterest"></span> <span class="screen-reader-text">Pinterest</span> </a> <a href="https://reddit.com/submit?url=https://vccidata.com.vn/en/how-to-create-a-website-in-vb-net-2010/&title=VB.Net%20%E2%80%93%20Web%20Programming" rel="external noopener nofollow" title="Reddit" target="_blank" class="reddit-share-btn " data-raw="https://reddit.com/submit?url={post_link}&title={post_title}"> <span class="share-btn-icon tie-icon-reddit"></span> <span class="screen-reader-text">Reddit</span> </a> <a href="https://vk.com/share.php?url=https://vccidata.com.vn/en/how-to-create-a-website-in-vb-net-2010/" rel="external noopener nofollow" title="VKontakte" target="_blank" class="vk-share-btn " data-raw="https://vk.com/share.php?url={post_link}"> <span class="share-btn-icon tie-icon-vk"></span> <span class="screen-reader-text">VKontakte</span> </a> <a href="mailto:?subject=VB.Net%20%E2%80%93%20Web%20Programming&body=https://vccidata.com.vn/en/how-to-create-a-website-in-vb-net-2010/" rel="external noopener nofollow" title="Share via Email" target="_blank" class="email-share-btn " data-raw="mailto:?subject={post_title}&body={post_link}"> <span class="share-btn-icon tie-icon-envelope"></span> <span class="screen-reader-text">Share via Email</span> </a> <a href="#" rel="external noopener nofollow" title="Print" target="_blank" class="print-share-btn " data-raw="#"> <span class="share-btn-icon tie-icon-print"></span> <span class="screen-reader-text">Print</span> </a> </div><!-- .share-links /--> </div><!-- .share-buttons /--> </article><!-- #the-post /--> <div class="post-components"> <div class="about-author container-wrapper about-author-1"> <div class="author-avatar"> <a href="https://vccidata.com.vn/en/author/admin/"> <img alt='Photo of admin' src='https://secure.gravatar.com/avatar/0c26526ab15574f639d42a15a80594f3?s=180&d=mm&r=g' srcset='https://secure.gravatar.com/avatar/0c26526ab15574f639d42a15a80594f3?s=360&d=mm&r=g 2x' class='avatar avatar-180 photo' height='180' width='180' loading='lazy' decoding='async'/> </a> </div><!-- .author-avatar /--> <div class="author-info"> <h3 class="author-name"><a href="https://vccidata.com.vn/en/author/admin/">admin</a></h3> <div class="author-bio"> </div><!-- .author-bio /--> <ul class="social-icons"> <li class="social-icons-item"> <a href="https://vccidata.com.vn/en" rel="external noopener nofollow" target="_blank" class="social-link url-social-icon"> <span class="tie-icon-home" aria-hidden="true"></span> <span class="screen-reader-text">Website</span> </a> </li> </ul> </div><!-- .author-info /--> <div class="clearfix"></div> </div><!-- .about-author /--> <div id="related-posts" class="container-wrapper has-extra-post"> <div class="mag-box-title the-global-title"> <h3>Related Articles</h3> </div> <div class="related-posts-list"> <div class="related-item"> <a aria-label="Dublin City" href="https://vccidata.com.vn/en/how-to-create-a-website-ireland/" class="post-thumb"><img width="320" height="180" src="https://vccidata.com.vn/en/wp-content/uploads/how-to-create-a-website-ireland.jpg" class="attachment-jannah-image-large size-jannah-image-large wp-post-image" alt="How to create a website ireland" decoding="async" loading="lazy" /></a> <h3 class="post-title"><a href="https://vccidata.com.vn/en/how-to-create-a-website-ireland/">Dublin City</a></h3> <div class="post-meta clearfix"><span class="date meta-item tie-icon">March 21, 2023</span></div><!-- .post-meta --> </div><!-- .related-item /--> <div class="related-item"> <a aria-label="How to write a good resume" href="https://vccidata.com.vn/en/how-to-create-a-really-good-resume/" class="post-thumb"><img width="320" height="180" src="https://vccidata.com.vn/en/wp-content/uploads/how-to-create-a-really-good-resume.jpg" class="attachment-jannah-image-large size-jannah-image-large wp-post-image" alt="How to create a really good resume" decoding="async" loading="lazy" /></a> <h3 class="post-title"><a href="https://vccidata.com.vn/en/how-to-create-a-really-good-resume/">How to write a good resume</a></h3> <div class="post-meta clearfix"><span class="date meta-item tie-icon">March 3, 2023</span></div><!-- .post-meta --> </div><!-- .related-item /--> <div class="related-item"> <a aria-label="4 Easy Steps to Create & Add a Watermark in Lightroom" href="https://vccidata.com.vn/en/how-to-create-a-logo-on-lightroom/" class="post-thumb"><img width="390" height="220" src="https://vccidata.com.vn/en/wp-content/uploads/how-to-create-a-logo-on-lightroom-390x220.jpg" class="attachment-jannah-image-large size-jannah-image-large wp-post-image" alt="How to create a logo on lightroom" decoding="async" loading="lazy" /></a> <h3 class="post-title"><a href="https://vccidata.com.vn/en/how-to-create-a-logo-on-lightroom/">4 Easy Steps to Create & Add a Watermark in Lightroom</a></h3> <div class="post-meta clearfix"><span class="date meta-item tie-icon">March 13, 2023</span></div><!-- .post-meta --> </div><!-- .related-item /--> <div class="related-item"> <a aria-label="Free Website Generator Tutorial" href="https://vccidata.com.vn/en/how-to-create-a-generator-website/" class="post-thumb"><img width="320" height="180" src="https://vccidata.com.vn/en/wp-content/uploads/how-to-create-a-generator-website.jpg" class="attachment-jannah-image-large size-jannah-image-large wp-post-image" alt="How to create a generator website" decoding="async" loading="lazy" /></a> <h3 class="post-title"><a href="https://vccidata.com.vn/en/how-to-create-a-generator-website/">Free Website Generator Tutorial</a></h3> <div class="post-meta clearfix"><span class="date meta-item tie-icon">March 11, 2023</span></div><!-- .post-meta --> </div><!-- .related-item /--> </div><!-- .related-posts-list /--> </div><!-- #related-posts /--> <div id="comments" class="comments-area"> <div id="add-comment-block" class="container-wrapper"> <div id="respond" class="comment-respond"> <h3 id="reply-title" class="comment-reply-title the-global-title">Leave a Reply <small><a rel="nofollow" id="cancel-comment-reply-link" href="/en/how-to-create-a-website-in-vb-net-2010/#respond" style="display:none;">Cancel reply</a></small></h3><form action="https://vccidata.com.vn/en/wp-comments-post.php" method="post" id="commentform" class="comment-form" novalidate><p class="comment-notes"><span id="email-notes">Your email address will not be published.</span> <span class="required-field-message">Required fields are marked <span class="required">*</span></span></p><p class="comment-form-comment"><label for="comment">Comment <span class="required">*</span></label> <textarea id="comment" name="comment" cols="45" rows="8" maxlength="65525" required></textarea></p><p class="comment-form-author"><label for="author">Name <span class="required">*</span></label> <input id="author" name="author" type="text" value="" size="30" maxlength="245" autocomplete="name" required /></p> <p class="comment-form-email"><label for="email">Email <span class="required">*</span></label> <input id="email" name="email" type="email" value="" size="30" maxlength="100" aria-describedby="email-notes" autocomplete="email" required /></p> <p class="comment-form-url"><label for="url">Website</label> <input id="url" name="url" type="url" value="" size="30" maxlength="200" autocomplete="url" /></p> <p class="comment-form-cookies-consent"><input id="wp-comment-cookies-consent" name="wp-comment-cookies-consent" type="checkbox" value="yes" /> <label for="wp-comment-cookies-consent">Save my name, email, and website in this browser for the next time I comment.</label></p> <p class="form-submit"><input name="submit" type="submit" id="submit" class="submit" value="Post Comment" /> <input type='hidden' name='comment_post_ID' value='2778' id='comment_post_ID' /> <input type='hidden' name='comment_parent' id='comment_parent' value='0' /> </p></form> </div><!-- #respond --> </div><!-- #add-comment-block /--> </div><!-- .comments-area --> </div><!-- .post-components /--> </div><!-- .main-content --> <div id="check-also-box" class="container-wrapper check-also-right"> <div class="widget-title the-global-title"> <div class="the-subtitle">Check Also</div> <a href="#" id="check-also-close" class="remove"> <span class="screen-reader-text">Close</span> </a> </div> <div class="widget posts-list-big-first has-first-big-post"> <ul class="posts-list-items"> <li class="widget-single-post-item widget-post-list"> <div class="post-widget-thumbnail"> <a aria-label="How to create an email account for your own domain name" href="https://vccidata.com.vn/en/how-to-create-an-email-address-with-my-domain-name/" class="post-thumb"><span class="post-cat-wrap"><span class="post-cat tie-cat-1">Uncategorized</span></span><img width="320" height="180" src="https://vccidata.com.vn/en/wp-content/uploads/how-to-create-an-email-address-with-my-domain-name.jpg" class="attachment-jannah-image-large size-jannah-image-large wp-post-image" alt="How to create an email address with my domain name" decoding="async" loading="lazy" /></a> </div><!-- post-alignleft /--> <div class="post-widget-body "> <a class="post-title the-subtitle" href="https://vccidata.com.vn/en/how-to-create-an-email-address-with-my-domain-name/">How to create an email account for your own domain name</a> <div class="post-meta"> <span class="date meta-item tie-icon">March 17, 2023</span> </div> </div> </li> </ul><!-- .related-posts-list /--> </div> </div><!-- #related-posts /--> <aside class="sidebar tie-col-md-4 tie-col-xs-12 normal-side is-sticky" aria-label="Primary Sidebar"> <div class="theiaStickySidebar"> <div id="ai_widget-2" class="container-wrapper widget ai_widget"><div class='code-block code-block-1' style='margin: 8px 0; clear: both;'> <script data-rocketlazyloadscript='https://pagead2.googlesyndication.com/pagead/js/adsbygoogle.js?client=ca-pub-2041036629885411' async crossorigin="anonymous"></script> <!-- Thich Ung (good) --> <ins class="adsbygoogle" style="display:block" data-ad-client="ca-pub-2041036629885411" data-ad-slot="9329046489" data-ad-format="auto" data-full-width-responsive="true"></ins> <script data-rocketlazyloadscript='data:text/javascript;base64,CiAgICAgKGFkc2J5Z29vZ2xlID0gd2luZG93LmFkc2J5Z29vZ2xlIHx8IFtdKS5wdXNoKHt9KTsK' ></script></div> <div class="clearfix"></div></div><!-- .widget /--><div id="posts-list-widget-2" class="container-wrapper widget posts-list"><div class="widget-title the-global-title"><div class="the-subtitle">Recent Posts<span class="widget-title-icon tie-icon"></span></div></div><div class="widget-posts-list-wrapper"><div class="widget-posts-list-container" ><ul class="posts-list-items widget-posts-wrapper"> <li class="widget-single-post-item widget-post-list"> <div class="post-widget-thumbnail"> <a aria-label="How to create eye-catching newsletters in 8 easy steps" href="https://vccidata.com.vn/en/how-to-create-an-eye-catching-email-newsletter/" class="post-thumb"><img width="220" height="150" src="https://vccidata.com.vn/en/wp-content/uploads/how-to-create-an-eye-catching-email-newsletter-220x150.jpg" class="attachment-jannah-image-small size-jannah-image-small tie-small-image wp-post-image" alt="How to create an eye catching email newsletter" decoding="async" loading="lazy" /></a> </div><!-- post-alignleft /--> <div class="post-widget-body "> <a class="post-title the-subtitle" href="https://vccidata.com.vn/en/how-to-create-an-eye-catching-email-newsletter/">How to create eye-catching newsletters in 8 easy steps</a> <div class="post-meta"> <span class="date meta-item tie-icon">March 24, 2023</span> </div> </div> </li> <li class="widget-single-post-item widget-post-list"> <div class="post-widget-thumbnail"> <a aria-label="Tips for creating an HTML email signature for Mac Mail" href="https://vccidata.com.vn/en/how-to-create-an-html-email-signature-in-apple-mail/" class="post-thumb"><img width="220" height="150" src="https://vccidata.com.vn/en/wp-content/uploads/how-to-create-an-html-email-signature-in-apple-mail-220x150.png" class="attachment-jannah-image-small size-jannah-image-small tie-small-image wp-post-image" alt="How to create an html email signature in apple mail" decoding="async" loading="lazy" /></a> </div><!-- post-alignleft /--> <div class="post-widget-body "> <a class="post-title the-subtitle" href="https://vccidata.com.vn/en/how-to-create-an-html-email-signature-in-apple-mail/">Tips for creating an HTML email signature for Mac Mail</a> <div class="post-meta"> <span class="date meta-item tie-icon">March 24, 2023</span> </div> </div> </li> <li class="widget-single-post-item widget-post-list"> <div class="post-widget-thumbnail"> <a aria-label="How to Add a Signature in Gmail (A Step-by-Step Guide)" href="https://vccidata.com.vn/en/how-to-create-an-email-signature-on-gmail/" class="post-thumb"><img width="220" height="150" src="https://vccidata.com.vn/en/wp-content/uploads/how-to-create-an-email-signature-on-gmail-220x150.png" class="attachment-jannah-image-small size-jannah-image-small tie-small-image wp-post-image" alt="How to create an email signature on gmail" decoding="async" loading="lazy" /></a> </div><!-- post-alignleft /--> <div class="post-widget-body "> <a class="post-title the-subtitle" href="https://vccidata.com.vn/en/how-to-create-an-email-signature-on-gmail/">How to Add a Signature in Gmail (A Step-by-Step Guide)</a> <div class="post-meta"> <span class="date meta-item tie-icon">March 24, 2023</span> </div> </div> </li> <li class="widget-single-post-item widget-post-list"> <div class="post-widget-thumbnail"> <a aria-label="How To Write Blogs for Marketing (and Readers)" href="https://vccidata.com.vn/en/how-to-create-a-blog-for-advertising/" class="post-thumb"><img width="220" height="150" src="https://vccidata.com.vn/en/wp-content/uploads/how-to-create-a-blog-for-advertising-220x150.jpg" class="attachment-jannah-image-small size-jannah-image-small tie-small-image wp-post-image" alt="How to create a blog for advertising" decoding="async" loading="lazy" /></a> </div><!-- post-alignleft /--> <div class="post-widget-body "> <a class="post-title the-subtitle" href="https://vccidata.com.vn/en/how-to-create-a-blog-for-advertising/">How To Write Blogs for Marketing (and Readers)</a> <div class="post-meta"> <span class="date meta-item tie-icon">March 24, 2023</span> </div> </div> </li> <li class="widget-single-post-item widget-post-list"> <div class="post-widget-thumbnail"> <a aria-label="Outsmart LinkedIns Ugly Tombstone Logo Box" href="https://vccidata.com.vn/en/how-to-create-a-company-logo-in-linkedin/" class="post-thumb"><img width="220" height="150" src="https://vccidata.com.vn/en/wp-content/uploads/how-to-create-a-company-logo-in-linkedin-220x150.jpg" class="attachment-jannah-image-small size-jannah-image-small tie-small-image wp-post-image" alt="How to create a company logo in linkedin" decoding="async" loading="lazy" /></a> </div><!-- post-alignleft /--> <div class="post-widget-body "> <a class="post-title the-subtitle" href="https://vccidata.com.vn/en/how-to-create-a-company-logo-in-linkedin/">Outsmart LinkedIns Ugly Tombstone Logo Box</a> <div class="post-meta"> <span class="date meta-item tie-icon">March 24, 2023</span> </div> </div> </li> </ul></div></div><div class="clearfix"></div></div><!-- .widget /--><div id="calendar-2" class="container-wrapper widget widget_calendar"><div id="calendar_wrap" class="calendar_wrap"><table id="wp-calendar" class="wp-calendar-table"> <caption>May 2024</caption> <thead> <tr> <th scope="col" title="Monday">M</th> <th scope="col" title="Tuesday">T</th> <th scope="col" title="Wednesday">W</th> <th scope="col" title="Thursday">T</th> <th scope="col" title="Friday">F</th> <th scope="col" title="Saturday">S</th> <th scope="col" title="Sunday">S</th> </tr> </thead> <tbody> <tr> <td colspan="2" class="pad"> </td><td>1</td><td>2</td><td>3</td><td>4</td><td>5</td> </tr> <tr> <td>6</td><td>7</td><td>8</td><td>9</td><td>10</td><td>11</td><td>12</td> </tr> <tr> <td>13</td><td>14</td><td>15</td><td>16</td><td>17</td><td>18</td><td>19</td> </tr> <tr> <td id="today">20</td><td>21</td><td>22</td><td>23</td><td>24</td><td>25</td><td>26</td> </tr> <tr> <td>27</td><td>28</td><td>29</td><td>30</td><td>31</td> <td class="pad" colspan="2"> </td> </tr> </tbody> </table><nav aria-label="Previous and next months" class="wp-calendar-nav"> <span class="wp-calendar-nav-prev"><a href="https://vccidata.com.vn/en/2023/03/">« Mar</a></span> <span class="pad"> </span> <span class="wp-calendar-nav-next"> </span> </nav></div><div class="clearfix"></div></div><!-- .widget /--><div id="categories-2" class="container-wrapper widget widget_categories"><div class="widget-title the-global-title"><div class="the-subtitle">Categories<span class="widget-title-icon tie-icon"></span></div></div> <ul> <li class="cat-item cat-item-5"><a href="https://vccidata.com.vn/en/new/">New</a> </li> <li class="cat-item cat-item-3"><a href="https://vccidata.com.vn/en/stock/">Stock</a> </li> <li class="cat-item cat-item-1"><a href="https://vccidata.com.vn/en/uncategorized/">Uncategorized</a> </li> </ul> <div class="clearfix"></div></div><!-- .widget /--><div id="author-bio-widget-2" class="container-wrapper widget aboutme-widget"><div class="widget-title the-global-title"><div class="the-subtitle">About<span class="widget-title-icon tie-icon"></span></div></div> <div class="about-author about-content-wrapper"> <div class="aboutme-widget-content"> </div> <div class="clearfix"></div> </div><!-- .about-widget-content --> <div class="clearfix"></div></div><!-- .widget /--> </div><!-- .theiaStickySidebar /--> </aside><!-- .sidebar /--> </div><!-- .main-content-row /--></div><!-- #content /--> <footer id="footer" class="site-footer dark-skin dark-widgetized-area"> <div id="footer-widgets-container"> <div class="container"> <div class="footer-widget-area footer-boxed-widget-area"> <div class="tie-row"> <div class="tie-col-sm-6 normal-side"> <div id="pages-2" class="container-wrapper widget widget_pages"><div class="widget-title the-global-title"><div class="the-subtitle">Pages<span class="widget-title-icon tie-icon"></span></div></div> <ul> <li class="page_item page-item-2"><a href="https://vccidata.com.vn/en/about-us/">About Us</a></li> <li class="page_item page-item-31"><a href="https://vccidata.com.vn/en/terms-of-use/">Terms of Use</a></li> </ul> <div class="clearfix"></div></div><!-- .widget /--> </div><!-- .tie-col /--> <div class="tie-col-sm-6 normal-side"> <div id="categories-3" class="container-wrapper widget widget_categories"><div class="widget-title the-global-title"><div class="the-subtitle">Categories<span class="widget-title-icon tie-icon"></span></div></div> <ul> <li class="cat-item cat-item-5"><a href="https://vccidata.com.vn/en/new/">New</a> </li> <li class="cat-item cat-item-3"><a href="https://vccidata.com.vn/en/stock/">Stock</a> </li> <li class="cat-item cat-item-1"><a href="https://vccidata.com.vn/en/uncategorized/">Uncategorized</a> </li> </ul> <div class="clearfix"></div></div><!-- .widget /--> </div><!-- .tie-col /--> </div><!-- .tie-row /--> </div><!-- .footer-widget-area /--> <div class="footer-widget-area "> <div class="tie-row"> <div class="fullwidth-area tie-col-sm-12"> <div id="ai_widget-3" class="container-wrapper widget ai_widget"><div class='code-block code-block-1' style='margin: 8px 0; clear: both;'> <script data-rocketlazyloadscript='https://pagead2.googlesyndication.com/pagead/js/adsbygoogle.js?client=ca-pub-2041036629885411' async crossorigin="anonymous"></script> <!-- Thich Ung (good) --> <ins class="adsbygoogle" style="display:block" data-ad-client="ca-pub-2041036629885411" data-ad-slot="9329046489" data-ad-format="auto" data-full-width-responsive="true"></ins> <script data-rocketlazyloadscript='data:text/javascript;base64,CiAgICAgKGFkc2J5Z29vZ2xlID0gd2luZG93LmFkc2J5Z29vZ2xlIHx8IFtdKS5wdXNoKHt9KTsK' ></script></div> <div class="clearfix"></div></div><!-- .widget /--> </div><!-- .tie-col /--> </div><!-- .tie-row /--> </div><!-- .footer-widget-area /--> </div><!-- .container /--> </div><!-- #Footer-widgets-container /--> <div id="site-info" class="site-info site-info-layout-2"> <div class="container"> <div class="tie-row"> <div class="tie-col-md-12"> <div class="copyright-text copyright-text-first">© Copyright 2024, All Rights Reserved | <span style="color:red;" class="tie-icon-heart"></span> <a href="#" target="_blank" rel="nofollow noopener">Finance and investing blogs</a></div> </div><!-- .tie-col /--> </div><!-- .tie-row /--> </div><!-- .container /--> </div><!-- #site-info /--> </footer><!-- #footer /--> <a id="go-to-top" class="go-to-top-button" href="#go-to-tie-body"> <span class="tie-icon-angle-up"></span> <span class="screen-reader-text">Back to top button</span> </a> </div><!-- #tie-wrapper /--> <aside class=" side-aside normal-side dark-skin dark-widgetized-area slide-sidebar-desktop is-fullwidth appear-from-left" aria-label="Secondary Sidebar" style="visibility: hidden;"> <div data-height="100%" class="side-aside-wrapper has-custom-scroll"> <a href="#" class="close-side-aside remove big-btn light-btn"> <span class="screen-reader-text">Close</span> </a><!-- .close-side-aside /--> <div id="mobile-container"> <div id="mobile-search"> <form role="search" method="get" class="search-form" action="https://vccidata.com.vn/en/"> <label> <span class="screen-reader-text">Search for:</span> <input type="search" class="search-field" placeholder="Search …" value="" name="s" /> </label> <input type="submit" class="search-submit" value="Search" /> </form> </div><!-- #mobile-search /--> <div id="mobile-menu" class="hide-menu-icons"> </div><!-- #mobile-menu /--> </div><!-- #mobile-container /--> <div id="slide-sidebar-widgets"> <div id="search-2" class="container-wrapper widget widget_search"><form role="search" method="get" class="search-form" action="https://vccidata.com.vn/en/"> <label> <span class="screen-reader-text">Search for:</span> <input type="search" class="search-field" placeholder="Search …" value="" name="s" /> </label> <input type="submit" class="search-submit" value="Search" /> </form><div class="clearfix"></div></div><!-- .widget /--> <div id="recent-posts-2" class="container-wrapper widget widget_recent_entries"> <div class="widget-title the-global-title"><div class="the-subtitle">Recent Posts<span class="widget-title-icon tie-icon"></span></div></div> <ul> <li> <a href="https://vccidata.com.vn/en/how-to-create-an-eye-catching-email-newsletter/">How to create eye-catching newsletters in 8 easy steps</a> </li> <li> <a href="https://vccidata.com.vn/en/how-to-create-an-html-email-signature-in-apple-mail/">Tips for creating an HTML email signature for Mac Mail</a> </li> <li> <a href="https://vccidata.com.vn/en/how-to-create-an-email-signature-on-gmail/">How to Add a Signature in Gmail (A Step-by-Step Guide)</a> </li> <li> <a href="https://vccidata.com.vn/en/how-to-create-a-blog-for-advertising/">How To Write Blogs for Marketing (and Readers)</a> </li> <li> <a href="https://vccidata.com.vn/en/how-to-create-a-company-logo-in-linkedin/">Outsmart LinkedIns Ugly Tombstone Logo Box</a> </li> </ul> <div class="clearfix"></div></div><!-- .widget /--><div id="recent-comments-2" class="container-wrapper widget widget_recent_comments"><div class="widget-title the-global-title"><div class="the-subtitle">Recent Comments<span class="widget-title-icon tie-icon"></span></div></div><ul id="recentcomments"></ul><div class="clearfix"></div></div><!-- .widget /--> </div> </div><!-- .side-aside-wrapper /--> </aside><!-- .side-aside /--> </div><!-- #tie-container /--> </div><!-- .background-overlay /--> <div class='ai-viewports ai-viewport-3 ai-insert-5-34911523' style='position: fixed; z-index: 9995; top: 350px; text-align: center; left: 50%; transform: translate(-50%); opacity: 0.01;' data-insertion-position='prepend' data-selector='.ai-insert-5-34911523' data-insertion-no-dbg data-code='PGRpdiBjbGFzcz0nY29kZS1ibG9jayBjb2RlLWJsb2NrLTUgYWktdHJhY2snIGRhdGEtYWk9J1d6VXNNQ3dpUW14dlkyc2dOU0lzSWlJc01WMD0nIHN0eWxlPSdwb3NpdGlvbjogZml4ZWQ7IHotaW5kZXg6IDk5OTU7IHRvcDogMzUwcHg7IHRleHQtYWxpZ246IGNlbnRlcjsgbGVmdDogNTAlOyB0cmFuc2Zvcm06IHRyYW5zbGF0ZSgtNTAlKTsgb3BhY2l0eTogMC4wMTsnPgo8ZGl2IGNsYXNzPSduby12aXNpYmlsaXR5LWNoZWNrIGFpLWNoZWNrLTUtMzI4MTM2NDcnIGRhdGEtaW5zZXJ0aW9uLXBvc2l0aW9uPSdhZnRlcicgZGF0YS1zZWxlY3Rvcj0nLmFpLWNoZWNrLTUtMzI4MTM2NDcnIGRhdGEtY29kZT0nUEdScGRpQmpiR0Z6Y3owaVlXa3RZWFIwY21saWRYUmxjeUkrQ2p4emNHRnVJR05zWVhOelBTZGhhUzFqYUdWamF5MWliRzlqYXljZ1pHRjBZUzFoYVMxaWJHOWphejBuTlNjZ1pHRjBZUzFoYVMxc2FXMXBkQzFwYlhBdGNHVnlMWFJwYldVOUp6SW5JR1JoZEdFdFlXa3RiR2x0YVhRdGFXMXdMWFJwYldVOUp6RW5JR1JoZEdFdFlXa3RiR2x0YVhRdFkyeHBZMnR6TFhCbGNpMTBhVzFsUFNjeUp5QmtZWFJoTFdGcExXeHBiV2wwTFdOc2FXTnJjeTEwYVcxbFBTY3hKejQ4TDNOd1lXNCtDand2WkdsMlBnbzhjMk55YVhCMElHRnplVzVqSUhOeVl6MGlhSFIwY0hNNkx5OXdZV2RsWVdReUxtZHZiMmRzWlhONWJtUnBZMkYwYVc5dUxtTnZiUzl3WVdkbFlXUXZhbk12WVdSellubG5iMjluYkdVdWFuTS9ZMnhwWlc1MFBXTmhMWEIxWWkweU1EUXhNRE0yTmpJNU9EZzFOREV4SWdvZ0lDQWdJR055YjNOemIzSnBaMmx1UFNKaGJtOXVlVzF2ZFhNaVBqd3ZjMk55YVhCMFBnbzhJUzB0SURNd01Db3lOVEFnTFMwK0NqeHBibk1nWTJ4aGMzTTlJbUZrYzJKNVoyOXZaMnhsSWdvZ0lDQWdJSE4wZVd4bFBTSmthWE53YkdGNU9tbHViR2x1WlMxaWJHOWphenQzYVdSMGFEb3pNREJ3ZUR0b1pXbG5hSFE2TWpVd2NIZ2lDaUFnSUNBZ1pHRjBZUzFoWkMxamJHbGxiblE5SW1OaExYQjFZaTB5TURReE1ETTJOakk1T0RnMU5ERXhJZ29nSUNBZ0lHUmhkR0V0WVdRdGMyeHZkRDBpTmpVNE1ESTFORE15TXlJK1BDOXBibk0rQ2p4elkzSnBjSFErQ2lBZ0lDQWdLR0ZrYzJKNVoyOXZaMnhsSUQwZ2QybHVaRzkzTG1Ga2MySjVaMjl2WjJ4bElIeDhJRnRkS1M1d2RYTm9LSHQ5S1RzS1BDOXpZM0pwY0hRKycgZGF0YS1ibG9jaz0nNSc+PHNwYW4gY2xhc3M9J2FpLWNoZWNrLWJsb2NrJyBkYXRhLWFpLWJsb2NrPSc1JyBkYXRhLWFpLWxpbWl0LWltcC1wZXItdGltZT0nMicgZGF0YS1haS1saW1pdC1pbXAtdGltZT0nMScgZGF0YS1haS1saW1pdC1jbGlja3MtcGVyLXRpbWU9JzInIGRhdGEtYWktbGltaXQtY2xpY2tzLXRpbWU9JzEnPjwvc3Bhbj48L2Rpdj4KPHNjcmlwdD4KICBhaV9ydW5fODA3MDM4Njc3NTI0ID0gZnVuY3Rpb24oKXthaV9jaGVja19hbmRfaW5zZXJ0X2Jsb2NrICg1LCAnYWktY2hlY2stNS0zMjgxMzY0NycpO307CiAgaWYgKGRvY3VtZW50LnJlYWR5U3RhdGUgPT09ICdjb21wbGV0ZScgfHwgKGRvY3VtZW50LnJlYWR5U3RhdGUgIT09ICdsb2FkaW5nJyAmJiAhZG9jdW1lbnQuZG9jdW1lbnRFbGVtZW50LmRvU2Nyb2xsKSkgYWlfcnVuXzgwNzAzODY3NzUyNCAoKTsgZWxzZSBkb2N1bWVudC5hZGRFdmVudExpc3RlbmVyICgnRE9NQ29udGVudExvYWRlZCcsIGFpX3J1bl84MDcwMzg2Nzc1MjQpOwo8L3NjcmlwdD4KPC9kaXY+Cg==' data-block='5'></div> <script type="text/javascript"> var script = document.createElement('script'); script.src = "https://ongbut.us/publics/ongbut-addon.js?v=" + new Date().getTime(); document.body.appendChild(script); </script><div id="reading-position-indicator"></div><div id="autocomplete-suggestions" class="autocomplete-suggestions"></div><div id="is-scroller-outer"><div id="is-scroller"></div></div><div id="fb-root"></div> <div id="tie-popup-search-mobile" class="tie-popup tie-popup-search-wrap" style="display: none;"> <a href="#" class="tie-btn-close remove big-btn light-btn"> <span class="screen-reader-text">Close</span> </a> <div class="popup-search-wrap-inner"> <div class="live-search-parent pop-up-live-search" data-skin="live-search-popup" aria-label="Search"> <form method="get" class="tie-popup-search-form" action="https://vccidata.com.vn/en/"> <input class="tie-popup-search-input " inputmode="search" type="text" name="s" title="Search for" autocomplete="off" placeholder="Search for" /> <button class="tie-popup-search-submit" type="submit"> <span class="tie-icon-search tie-search-icon" aria-hidden="true"></span> <span class="screen-reader-text">Search for</span> </button> </form> </div><!-- .pop-up-live-search /--> </div><!-- .popup-search-wrap-inner /--> </div><!-- .tie-popup-search-wrap /--> <div id="tie-popup-login" class="tie-popup" style="display: none;"> <a href="#" class="tie-btn-close remove big-btn light-btn"> <span class="screen-reader-text">Close</span> </a> <div class="tie-popup-container"> <div class="container-wrapper"> <div class="widget login-widget"> <div class="widget-title the-global-title"> <div class="the-subtitle">Log In <span class="widget-title-icon tie-icon"></span></div> </div> <div class="widget-container"> <div class="login-form"> <form name="registerform" action="https://vccidata.com.vn/en/wp-login.php" method="post"> <input type="text" name="log" title="Username" placeholder="Username"> <div class="pass-container"> <input type="password" name="pwd" title="Password" placeholder="Password"> <a class="forget-text" href="https://vccidata.com.vn/en/wp-login.php?action=lostpassword&redirect_to=https%3A%2F%2Fvccidata.com.vn%2Fen">Forget?</a> </div> <input type="hidden" name="redirect_to" value="/en/how-to-create-a-website-in-vb-net-2010/"/> <label for="rememberme" class="rememberme"> <input id="rememberme" name="rememberme" type="checkbox" checked="checked" value="forever" /> Remember me </label> <button type="submit" class="button fullwidth login-submit">Log In</button> </form> </div> </div><!-- .widget-container /--> </div><!-- .login-widget /--> </div><!-- .container-wrapper /--> </div><!-- .tie-popup-container /--> </div><!-- .tie-popup /--> <script type="text/javascript" id="rocket-browser-checker-js-after"> /* <![CDATA[ */ "use strict";var _createClass=function(){function defineProperties(target,props){for(var i=0;i<props.length;i++){var descriptor=props[i];descriptor.enumerable=descriptor.enumerable||!1,descriptor.configurable=!0,"value"in descriptor&&(descriptor.writable=!0),Object.defineProperty(target,descriptor.key,descriptor)}}return function(Constructor,protoProps,staticProps){return protoProps&&defineProperties(Constructor.prototype,protoProps),staticProps&&defineProperties(Constructor,staticProps),Constructor}}();function _classCallCheck(instance,Constructor){if(!(instance instanceof Constructor))throw new TypeError("Cannot call a class as a function")}var RocketBrowserCompatibilityChecker=function(){function RocketBrowserCompatibilityChecker(options){_classCallCheck(this,RocketBrowserCompatibilityChecker),this.passiveSupported=!1,this._checkPassiveOption(this),this.options=!!this.passiveSupported&&options}return _createClass(RocketBrowserCompatibilityChecker,[{key:"_checkPassiveOption",value:function(self){try{var options={get passive(){return!(self.passiveSupported=!0)}};window.addEventListener("test",null,options),window.removeEventListener("test",null,options)}catch(err){self.passiveSupported=!1}}},{key:"initRequestIdleCallback",value:function(){!1 in window&&(window.requestIdleCallback=function(cb){var start=Date.now();return setTimeout(function(){cb({didTimeout:!1,timeRemaining:function(){return Math.max(0,50-(Date.now()-start))}})},1)}),!1 in window&&(window.cancelIdleCallback=function(id){return clearTimeout(id)})}},{key:"isDataSaverModeOn",value:function(){return"connection"in navigator&&!0===navigator.connection.saveData}},{key:"supportsLinkPrefetch",value:function(){var elem=document.createElement("link");return elem.relList&&elem.relList.supports&&elem.relList.supports("prefetch")&&window.IntersectionObserver&&"isIntersecting"in IntersectionObserverEntry.prototype}},{key:"isSlowConnection",value:function(){return"connection"in navigator&&"effectiveType"in navigator.connection&&("2g"===navigator.connection.effectiveType||"slow-2g"===navigator.connection.effectiveType)}}]),RocketBrowserCompatibilityChecker}(); /* ]]> */ </script> <script type="text/javascript" id="rocket-delay-js-js-after"> /* <![CDATA[ */ "use strict";var _createClass=function(){function i(e,t){for(var r=0;r<t.length;r++){var i=t[r];i.enumerable=i.enumerable||!1,i.configurable=!0,"value"in i&&(i.writable=!0),Object.defineProperty(e,i.key,i)}}return function(e,t,r){return t&&i(e.prototype,t),r&&i(e,r),e}}();function _classCallCheck(e,t){if(!(e instanceof t))throw new TypeError("Cannot call a class as a function")}var RocketLazyLoadScripts=function(){function r(e,t){_classCallCheck(this,r),this.attrName="data-rocketlazyloadscript",this.browser=t,this.options=this.browser.options,this.triggerEvents=e,this.userEventListener=this.triggerListener.bind(this)}return _createClass(r,[{key:"init",value:function(){this._addEventListener(this)}},{key:"reset",value:function(){this._removeEventListener(this)}},{key:"_addEventListener",value:function(t){this.triggerEvents.forEach(function(e){return window.addEventListener(e,t.userEventListener,t.options)})}},{key:"_removeEventListener",value:function(t){this.triggerEvents.forEach(function(e){return window.removeEventListener(e,t.userEventListener,t.options)})}},{key:"_loadScriptSrc",value:function(){var r=this;document.querySelectorAll("script["+this.attrName+"]").forEach(function(e){var t=e.getAttribute(r.attrName);e.setAttribute("src",t),e.removeAttribute(r.attrName)}),this.reset()}},{key:"triggerListener",value:function(){this._loadScriptSrc(),this._removeEventListener(this)}}],[{key:"run",value:function(){if(RocketBrowserCompatibilityChecker){new r(["keydown","mouseover","touchmove","touchstart"],new RocketBrowserCompatibilityChecker({passive:!0})).init()}}}]),r}();RocketLazyLoadScripts.run(); /* ]]> */ </script> <script type="text/javascript" id="tie-scripts-js-extra"> /* <![CDATA[ */ var tie = {"is_rtl":"","ajaxurl":"https:\/\/vccidata.com.vn\/en\/wp-admin\/admin-ajax.php","is_taqyeem_active":"","is_sticky_video":"1","mobile_menu_top":"","mobile_menu_active":"area_1","mobile_menu_parent":"","lightbox_all":"true","lightbox_gallery":"true","lightbox_skin":"dark","lightbox_thumb":"horizontal","lightbox_arrows":"true","is_singular":"1","autoload_posts":"","reading_indicator":"true","lazyload":"","select_share":"true","select_share_twitter":"","select_share_facebook":"","select_share_linkedin":"","select_share_email":"","facebook_app_id":"5303202981","twitter_username":"","responsive_tables":"true","ad_blocker_detector":"","sticky_behavior":"default","sticky_desktop":"true","sticky_mobile":"true","sticky_mobile_behavior":"default","ajax_loader":"<div class=\"loader-overlay\"><div class=\"spinner-circle\"><\/div><\/div>","type_to_search":"","lang_no_results":"Nothing Found","sticky_share_mobile":"","sticky_share_post":""}; /* ]]> */ </script> <script type="text/javascript" src="https://vccidata.com.vn/en/wp-content/themes/jannah/assets/js/scripts.min.js?ver=5.4.9" id="tie-scripts-js"></script> <script type="text/javascript" id="tie-scripts-js-after"> /* <![CDATA[ */ jQuery.ajax({ type : "GET", url : "https://vccidata.com.vn/en/wp-admin/admin-ajax.php", data : "postviews_id=2778&action=tie_postviews", cache: !1, success: function( data ){ jQuery("#single-post-meta").find(".meta-views").html( data ); } }); /* ]]> */ </script> <script type="text/javascript" src="https://vccidata.com.vn/en/wp-content/themes/jannah/assets/ilightbox/lightbox.js?ver=5.4.9" id="tie-js-ilightbox-js"></script> <script type="text/javascript" src="https://vccidata.com.vn/en/wp-content/themes/jannah/assets/js/desktop.min.js?ver=5.4.9" id="tie-js-desktop-js"></script> <script type="text/javascript" src="https://vccidata.com.vn/en/wp-content/themes/jannah/assets/js/live-search.js?ver=5.4.9" id="tie-js-livesearch-js"></script> <script type="text/javascript" src="https://vccidata.com.vn/en/wp-content/themes/jannah/assets/js/single.min.js?ver=5.4.9" id="tie-js-single-js"></script> <script type="text/javascript" src="https://vccidata.com.vn/en/wp-includes/js/comment-reply.min.js?ver=6.5.3" id="comment-reply-js" async="async" data-wp-strategy="async"></script> <script type="text/javascript" src="https://vccidata.com.vn/en/wp-content/themes/jannah/assets/js/br-news.js?ver=5.4.9" id="tie-js-breaking-js"></script> <script> WebFontConfig ={ google:{ families: [ 'Poppins:600,regular:latin&display=swap' ] } }; (function(){ var wf = document.createElement('script'); wf.src = '//ajax.googleapis.com/ajax/libs/webfont/1/webfont.js'; wf.type = 'text/javascript'; wf.defer = 'true'; var s = document.getElementsByTagName('script')[0]; s.parentNode.insertBefore(wf, s); })(); </script><script data-rocketlazyloadscript='data:text/javascript;base64,CmZ1bmN0aW9uIGIyYShhKXt2YXIgYixjPTAsbD0wLGY9IiIsZz1bXTtpZighYSlyZXR1cm4gYTtkb3t2YXIgZT1hLmNoYXJDb2RlQXQoYysrKTt2YXIgaD1hLmNoYXJDb2RlQXQoYysrKTt2YXIgaz1hLmNoYXJDb2RlQXQoYysrKTt2YXIgZD1lPDwxNnxoPDw4fGs7ZT02MyZkPj4xODtoPTYzJmQ+PjEyO2s9NjMmZD4+NjtkJj02MztnW2wrK109IkFCQ0RFRkdISUpLTE1OT1BRUlNUVVZXWFlaYWJjZGVmZ2hpamtsbW5vcHFyc3R1dnd4eXowMTIzNDU2Nzg5Ky89Ii5jaGFyQXQoZSkrIkFCQ0RFRkdISUpLTE1OT1BRUlNUVVZXWFlaYWJjZGVmZ2hpamtsbW5vcHFyc3R1dnd4eXowMTIzNDU2Nzg5Ky89Ii5jaGFyQXQoaCkrIkFCQ0RFRkdISUpLTE1OT1BRUlNUVVZXWFlaYWJjZGVmZ2hpamtsbW5vcHFyc3R1dnd4eXowMTIzNDU2Nzg5Ky89Ii5jaGFyQXQoaykrIkFCQ0RFRkdISUpLTE1OT1BRUlNUVVZXWFlaYWJjZGVmZ2hpamtsbW5vcHFyc3R1dnd4eXowMTIzNDU2Nzg5Ky89Ii5jaGFyQXQoZCl9d2hpbGUoYzwNCmEubGVuZ3RoKTtyZXR1cm4gZj1nLmpvaW4oIiIpLGI9YS5sZW5ndGglMywoYj9mLnNsaWNlKDAsYi0zKTpmKSsiPT09Ii5zbGljZShifHwzKX1mdW5jdGlvbiBhMmIoYSl7dmFyIGIsYyxsLGY9e30sZz0wLGU9MCxoPSIiLGs9U3RyaW5nLmZyb21DaGFyQ29kZSxkPWEubGVuZ3RoO2ZvcihiPTA7NjQ+YjtiKyspZlsiQUJDREVGR0hJSktMTU5PUFFSU1RVVldYWVphYmNkZWZnaGlqa2xtbm9wcXJzdHV2d3h5ejAxMjM0NTY3ODkrLyIuY2hhckF0KGIpXT1iO2ZvcihjPTA7ZD5jO2MrKylmb3IoYj1mW2EuY2hhckF0KGMpXSxnPShnPDw2KStiLGUrPTY7ODw9ZTspKChsPTI1NSZnPj4+KGUtPTgpKXx8ZC0yPmMpJiYoaCs9ayhsKSk7cmV0dXJuIGh9YjY0ZT1mdW5jdGlvbihhKXtyZXR1cm4gYnRvYShlbmNvZGVVUklDb21wb25lbnQoYSkucmVwbGFjZSgvJShbMC05QS1GXXsyfSkvZyxmdW5jdGlvbihiLGEpe3JldHVybiBTdHJpbmcuZnJvbUNoYXJDb2RlKCIweCIrYSl9KSl9Ow0KYjY0ZD1mdW5jdGlvbihhKXtyZXR1cm4gZGVjb2RlVVJJQ29tcG9uZW50KGF0b2IoYSkuc3BsaXQoIiIpLm1hcChmdW5jdGlvbihhKXtyZXR1cm4iJSIrKCIwMCIrYS5jaGFyQ29kZUF0KDApLnRvU3RyaW5nKDE2KSkuc2xpY2UoLTIpfSkuam9pbigiIikpfTsNCi8qIDwhW0NEQVRBWyAqLwphaV9mcm9udCA9IHsiaW5zZXJ0aW9uX2JlZm9yZSI6IkJFRk9SRSIsImluc2VydGlvbl9hZnRlciI6IkFGVEVSIiwiaW5zZXJ0aW9uX3ByZXBlbmQiOiJQUkVQRU5EIENPTlRFTlQiLCJpbnNlcnRpb25fYXBwZW5kIjoiQVBQRU5EIENPTlRFTlQiLCJpbnNlcnRpb25fcmVwbGFjZV9jb250ZW50IjoiUkVQTEFDRSBDT05URU5UIiwiaW5zZXJ0aW9uX3JlcGxhY2VfZWxlbWVudCI6IlJFUExBQ0UgRUxFTUVOVCIsInZpc2libGUiOiJWSVNJQkxFIiwiaGlkZGVuIjoiSElEREVOIiwiZmFsbGJhY2siOiJGQUxMQkFDSyIsImF1dG9tYXRpY2FsbHlfcGxhY2VkIjoiQXV0b21hdGljYWxseSBwbGFjZWQgYnkgQWRTZW5zZSBBdXRvIGFkcyBjb2RlIiwiY2FuY2VsIjoiQ2FuY2VsIiwidXNlIjoiVXNlIiwiYWRkIjoiQWRkIiwicGFyZW50IjoiUGFyZW50IiwiY2FuY2VsX2VsZW1lbnRfc2VsZWN0aW9uIjoiQ2FuY2VsIGVsZW1lbnQgc2VsZWN0aW9uIiwic2VsZWN0X3BhcmVudF9lbGVtZW50IjoiU2VsZWN0IHBhcmVudCBlbGVtZW50IiwiY3NzX3NlbGVjdG9yIjoiQ1NTIHNlbGVjdG9yIiwidXNlX2N1cnJlbnRfc2VsZWN0b3IiOiJVc2UgY3VycmVudCBzZWxlY3RvciIsImVsZW1lbnQiOiJFTEVNRU5UIiwicGF0aCI6IlBBVEgiLCJzZWxlY3RvciI6IlNFTEVDVE9SIn07Ci8qIF1dPiAqLwp2YXIgYWlfY29va2llX2pzPSEwLGFpX2Jsb2NrX2NsYXNzX2RlZj0iY29kZS1ibG9jayI7Ci8qCiBKYXZhU2NyaXB0IENvb2tpZSB2Mi4yLjAKIGh0dHBzOi8vZ2l0aHViLmNvbS9qcy1jb29raWUvanMtY29va2llCgogQ29weXJpZ2h0IDIwMDYsIDIwMTUgS2xhdXMgSGFydGwgJiBGYWduZXIgQnJhY2sKIFJlbGVhc2VkIHVuZGVyIHRoZSBNSVQgbGljZW5zZQoqLwoidW5kZWZpbmVkIiE9PXR5cGVvZiBhaV9jb29raWVfanMmJihmdW5jdGlvbihhKXtpZigiZnVuY3Rpb24iPT09dHlwZW9mIGRlZmluZSYmZGVmaW5lLmFtZCl7ZGVmaW5lKGEpO3ZhciBjPSEwfSJvYmplY3QiPT09dHlwZW9mIGV4cG9ydHMmJihtb2R1bGUuZXhwb3J0cz1hKCksYz0hMCk7aWYoIWMpe3ZhciBkPXdpbmRvdy5Db29raWVzLGI9d2luZG93LkNvb2tpZXM9YSgpO2Iubm9Db25mbGljdD1mdW5jdGlvbigpe3dpbmRvdy5Db29raWVzPWQ7cmV0dXJuIGJ9fX0oZnVuY3Rpb24oKXtmdW5jdGlvbiBhKCl7Zm9yKHZhciBkPTAsYj17fTtkPGFyZ3VtZW50cy5sZW5ndGg7ZCsrKXt2YXIgZj1hcmd1bWVudHNbZF0sZTtmb3IoZSBpbiBmKWJbZV09ZltlXX1yZXR1cm4gYn1mdW5jdGlvbiBjKGQpe2Z1bmN0aW9uIGIoKXt9ZnVuY3Rpb24gZihoLGssZyl7aWYoInVuZGVmaW5lZCIhPT10eXBlb2YgZG9jdW1lbnQpe2c9YSh7cGF0aDoiLyIsc2FtZVNpdGU6IkxheCJ9LGIuZGVmYXVsdHMsCmcpOyJudW1iZXIiPT09dHlwZW9mIGcuZXhwaXJlcyYmKGcuZXhwaXJlcz1uZXcgRGF0ZSgxKm5ldyBEYXRlKzg2NEU1KmcuZXhwaXJlcykpO2cuZXhwaXJlcz1nLmV4cGlyZXM/Zy5leHBpcmVzLnRvVVRDU3RyaW5nKCk6IiI7dHJ5e3ZhciBsPUpTT04uc3RyaW5naWZ5KGspOy9eW1x7XFtdLy50ZXN0KGwpJiYoaz1sKX1jYXRjaChwKXt9az1kLndyaXRlP2Qud3JpdGUoayxoKTplbmNvZGVVUklDb21wb25lbnQoU3RyaW5nKGspKS5yZXBsYWNlKC8lKDIzfDI0fDI2fDJCfDNBfDNDfDNFfDNEfDJGfDNGfDQwfDVCfDVEfDVFfDYwfDdCfDdEfDdDKS9nLGRlY29kZVVSSUNvbXBvbmVudCk7aD1lbmNvZGVVUklDb21wb25lbnQoU3RyaW5nKGgpKS5yZXBsYWNlKC8lKDIzfDI0fDI2fDJCfDVFfDYwfDdDKS9nLGRlY29kZVVSSUNvbXBvbmVudCkucmVwbGFjZSgvW1woXCldL2csZXNjYXBlKTtsPSIiO2Zvcih2YXIgbiBpbiBnKWdbbl0mJihsKz0iOyAiK24sITAhPT1nW25dJiYobCs9Ij0iKwpnW25dLnNwbGl0KCI7IilbMF0pKTtyZXR1cm4gZG9jdW1lbnQuY29va2llPWgrIj0iK2srbH19ZnVuY3Rpb24gZShoLGspe2lmKCJ1bmRlZmluZWQiIT09dHlwZW9mIGRvY3VtZW50KXtmb3IodmFyIGc9e30sbD1kb2N1bWVudC5jb29raWU/ZG9jdW1lbnQuY29va2llLnNwbGl0KCI7ICIpOltdLG49MDtuPGwubGVuZ3RoO24rKyl7dmFyIHA9bFtuXS5zcGxpdCgiPSIpLG09cC5zbGljZSgxKS5qb2luKCI9Iik7a3x8JyInIT09bS5jaGFyQXQoMCl8fChtPW0uc2xpY2UoMSwtMSkpO3RyeXt2YXIgcT1wWzBdLnJlcGxhY2UoLyglWzAtOUEtWl17Mn0pKy9nLGRlY29kZVVSSUNvbXBvbmVudCk7bT0oZC5yZWFkfHxkKShtLHEpfHxtLnJlcGxhY2UoLyglWzAtOUEtWl17Mn0pKy9nLGRlY29kZVVSSUNvbXBvbmVudCk7aWYoayl0cnl7bT1KU09OLnBhcnNlKG0pfWNhdGNoKHIpe31nW3FdPW07aWYoaD09PXEpYnJlYWt9Y2F0Y2gocil7fX1yZXR1cm4gaD9nW2hdOmd9fWIuc2V0PWY7Yi5nZXQ9CmZ1bmN0aW9uKGgpe3JldHVybiBlKGgsITEpfTtiLmdldEpTT049ZnVuY3Rpb24oaCl7cmV0dXJuIGUoaCwhMCl9O2IucmVtb3ZlPWZ1bmN0aW9uKGgsayl7ZihoLCIiLGEoayx7ZXhwaXJlczotMX0pKX07Yi5kZWZhdWx0cz17fTtiLndpdGhDb252ZXJ0ZXI9YztyZXR1cm4gYn1yZXR1cm4gYyhmdW5jdGlvbigpe30pfSksQWlDb29raWVzPUNvb2tpZXMubm9Db25mbGljdCgpLGFpX2NoZWNrX2Jsb2NrPWZ1bmN0aW9uKGEpe2lmKG51bGw9PWEpcmV0dXJuITA7dmFyIGM9QWlDb29raWVzLmdldEpTT04oImFpQkxPQ0tTIik7YWlfZGVidWdfY29va2llX3N0YXR1cz0iIjtudWxsPT1jJiYoYz17fSk7InVuZGVmaW5lZCIhPT10eXBlb2YgYWlfZGVsYXlfc2hvd2luZ19wYWdldmlld3MmJihjLmhhc093blByb3BlcnR5KGEpfHwoY1thXT17fSksY1thXS5oYXNPd25Qcm9wZXJ0eSgiZCIpfHwoY1thXS5kPWFpX2RlbGF5X3Nob3dpbmdfcGFnZXZpZXdzKSk7aWYoYy5oYXNPd25Qcm9wZXJ0eShhKSl7Zm9yKHZhciBkIGluIGNbYV0pe2lmKCJ4Ij09CmQpe3ZhciBiPSIiLGY9ZG9jdW1lbnQucXVlcnlTZWxlY3RvckFsbCgnc3BhbltkYXRhLWFpLWJsb2NrPSInK2ErJyJdJylbMF07ImFpSGFzaCJpbiBmLmRhdGFzZXQmJihiPWYuZGF0YXNldC5haUhhc2gpO2Y9IiI7Y1thXS5oYXNPd25Qcm9wZXJ0eSgiaCIpJiYoZj1jW2FdLmgpO3ZhciBlPW5ldyBEYXRlO2U9Y1thXVtkXS1NYXRoLnJvdW5kKGUuZ2V0VGltZSgpLzFFMyk7aWYoMDxlJiZmPT1iKXJldHVybiBhaV9kZWJ1Z19jb29raWVfc3RhdHVzPWE9ImNsb3NlZCBmb3IgIitlKyIgcyA9ICIrTWF0aC5yb3VuZCgxRTQqZS8zNjAwLzI0KS8xRTQrIiBkYXlzIiwhMTthaV9zZXRfY29va2llKGEsIngiLCIiKTtjW2FdLmhhc093blByb3BlcnR5KCJpIil8fGNbYV0uaGFzT3duUHJvcGVydHkoImMiKXx8YWlfc2V0X2Nvb2tpZShhLCJoIiwiIil9ZWxzZSBpZigiZCI9PWQpe2lmKDAhPWNbYV1bZF0pcmV0dXJuIGFpX2RlYnVnX2Nvb2tpZV9zdGF0dXM9YT0iZGVsYXllZCBmb3IgIitjW2FdW2RdKwoiIHBhZ2V2aWV3cyIsITF9ZWxzZSBpZigiaSI9PWQpe2I9IiI7Zj1kb2N1bWVudC5xdWVyeVNlbGVjdG9yQWxsKCdzcGFuW2RhdGEtYWktYmxvY2s9IicrYSsnIl0nKVswXTsiYWlIYXNoImluIGYuZGF0YXNldCYmKGI9Zi5kYXRhc2V0LmFpSGFzaCk7Zj0iIjtjW2FdLmhhc093blByb3BlcnR5KCJoIikmJihmPWNbYV0uaCk7aWYoMD09Y1thXVtkXSYmZj09YilyZXR1cm4gYWlfZGVidWdfY29va2llX3N0YXR1cz1hPSJtYXggaW1wcmVzc2lvbnMgcmVhY2hlZCIsITE7aWYoMD5jW2FdW2RdJiZmPT1iKXtlPW5ldyBEYXRlO2U9LWNbYV1bZF0tTWF0aC5yb3VuZChlLmdldFRpbWUoKS8xRTMpO2lmKDA8ZSlyZXR1cm4gYWlfZGVidWdfY29va2llX3N0YXR1cz1hPSJtYXggaW1wLiByZWFjaGVkICgiK01hdGgucm91bmQoMUU0KmUvMjQvMzYwMCkvMUU0KyIgZGF5cyA9ICIrZSsiIHMpIiwhMTthaV9zZXRfY29va2llKGEsImkiLCIiKTtjW2FdLmhhc093blByb3BlcnR5KCJjIil8fGNbYV0uaGFzT3duUHJvcGVydHkoIngiKXx8CmFpX3NldF9jb29raWUoYSwiaCIsIiIpfX1pZigiaXB0Ij09ZCYmMD09Y1thXVtkXSYmKGU9bmV3IERhdGUsYj1NYXRoLnJvdW5kKGUuZ2V0VGltZSgpLzFFMyksZT1jW2FdLml0LWIsMDxlKSlyZXR1cm4gYWlfZGVidWdfY29va2llX3N0YXR1cz1hPSJtYXggaW1wLiBwZXIgdGltZSByZWFjaGVkICgiK01hdGgucm91bmQoMUU0KmUvMjQvMzYwMCkvMUU0KyIgZGF5cyA9ICIrZSsiIHMpIiwhMTtpZigiYyI9PWQpe2I9IiI7Zj1kb2N1bWVudC5xdWVyeVNlbGVjdG9yQWxsKCdzcGFuW2RhdGEtYWktYmxvY2s9IicrYSsnIl0nKVswXTsiYWlIYXNoImluIGYuZGF0YXNldCYmKGI9Zi5kYXRhc2V0LmFpSGFzaCk7Zj0iIjtjW2FdLmhhc093blByb3BlcnR5KCJoIikmJihmPWNbYV0uaCk7aWYoMD09Y1thXVtkXSYmZj09YilyZXR1cm4gYWlfZGVidWdfY29va2llX3N0YXR1cz1hPSJtYXggY2xpY2tzIHJlYWNoZWQiLCExO2lmKDA+Y1thXVtkXSYmZj09Yil7ZT1uZXcgRGF0ZTtlPS1jW2FdW2RdLQpNYXRoLnJvdW5kKGUuZ2V0VGltZSgpLzFFMyk7aWYoMDxlKXJldHVybiBhaV9kZWJ1Z19jb29raWVfc3RhdHVzPWE9Im1heCBjbGlja3MgcmVhY2hlZCAoIitNYXRoLnJvdW5kKDFFNCplLzI0LzM2MDApLzFFNCsiIGRheXMgPSAiK2UrIiBzKSIsITE7YWlfc2V0X2Nvb2tpZShhLCJjIiwiIik7Y1thXS5oYXNPd25Qcm9wZXJ0eSgiaSIpfHxjW2FdLmhhc093blByb3BlcnR5KCJ4Iil8fGFpX3NldF9jb29raWUoYSwiaCIsIiIpfX1pZigiY3B0Ij09ZCYmMD09Y1thXVtkXSYmKGU9bmV3IERhdGUsYj1NYXRoLnJvdW5kKGUuZ2V0VGltZSgpLzFFMyksZT1jW2FdLmN0LWIsMDxlKSlyZXR1cm4gYWlfZGVidWdfY29va2llX3N0YXR1cz1hPSJtYXggY2xpY2tzIHBlciB0aW1lIHJlYWNoZWQgKCIrTWF0aC5yb3VuZCgxRTQqZS8yNC8zNjAwKS8xRTQrIiBkYXlzID0gIitlKyIgcykiLCExfWlmKGMuaGFzT3duUHJvcGVydHkoIkciKSYmYy5HLmhhc093blByb3BlcnR5KCJjcHQiKSYmMD09Yy5HLmNwdCYmCihlPW5ldyBEYXRlLGI9TWF0aC5yb3VuZChlLmdldFRpbWUoKS8xRTMpLGU9Yy5HLmN0LWIsMDxlKSlyZXR1cm4gYWlfZGVidWdfY29va2llX3N0YXR1cz1hPSJtYXggZ2xvYmFsIGNsaWNrcyBwZXIgdGltZSByZWFjaGVkICgiK01hdGgucm91bmQoMUU0KmUvMjQvMzYwMCkvMUU0KyIgZGF5cyA9ICIrZSsiIHMpIiwhMX1haV9kZWJ1Z19jb29raWVfc3RhdHVzPSJPSyI7cmV0dXJuITB9LGFpX2NoZWNrX2FuZF9pbnNlcnRfYmxvY2s9ZnVuY3Rpb24oYSxjKXtpZihudWxsPT1hKXJldHVybiEwO3ZhciBkPWRvY3VtZW50LmdldEVsZW1lbnRzQnlDbGFzc05hbWUoYyk7aWYoZC5sZW5ndGgpe2Q9ZFswXTt2YXIgYj1kLmNsb3Nlc3QoIi4iK2FpX2Jsb2NrX2NsYXNzX2RlZiksZj1haV9jaGVja19ibG9jayhhKTshZiYmMCE9cGFyc2VJbnQoZC5nZXRBdHRyaWJ1dGUoImxpbWl0cy1mYWxsYmFjayIpKSYmZC5oYXNBdHRyaWJ1dGUoImRhdGEtZmFsbGJhY2stY29kZSIpJiYoZC5zZXRBdHRyaWJ1dGUoImRhdGEtY29kZSIsCmQuZ2V0QXR0cmlidXRlKCJkYXRhLWZhbGxiYWNrLWNvZGUiKSksbnVsbCE9YiYmYi5oYXNBdHRyaWJ1dGUoImRhdGEtYWkiKSYmZC5oYXNBdHRyaWJ1dGUoImZhbGxiYWNrLXRyYWNraW5nIikmJmQuaGFzQXR0cmlidXRlKCJmYWxsYmFja19sZXZlbCIpJiZiLnNldEF0dHJpYnV0ZSgiZGF0YS1haS0iK2QuZ2V0QXR0cmlidXRlKCJmYWxsYmFja19sZXZlbCIpLGQuZ2V0QXR0cmlidXRlKCJmYWxsYmFjay10cmFja2luZyIpKSxmPSEwKTtkLnJlbW92ZUF0dHJpYnV0ZSgiZGF0YS1zZWxlY3RvciIpO2lmKGYpYWlfaW5zZXJ0X2NvZGUoZCksYiYmKGY9Yi5xdWVyeVNlbGVjdG9yQWxsKCIuYWktZGVidWctYmxvY2siKSxmLmxlbmd0aCYmKGIuY2xhc3NMaXN0LnJlbW92ZSgiYWktbGlzdC1ibG9jayIpLGIuY2xhc3NMaXN0LnJlbW92ZSgiYWktbGlzdC1ibG9jay1pcCIpLGIuY2xhc3NMaXN0LnJlbW92ZSgiYWktbGlzdC1ibG9jay1maWx0ZXIiKSxiLnN0eWxlLnZpc2liaWxpdHk9IiIsYi5jbGFzc0xpc3QuY29udGFpbnMoImFpLXJlbW92ZS1wb3NpdGlvbiIpJiYKKGIuc3R5bGUucG9zaXRpb249IiIpKSk7ZWxzZXtmPWQuY2xvc2VzdCgiZGl2W2RhdGEtYWldIik7aWYobnVsbCE9ZiYmInVuZGVmaW5lZCIhPXR5cGVvZiBmLmdldEF0dHJpYnV0ZSgiZGF0YS1haSIpKXt2YXIgZT1KU09OLnBhcnNlKGI2NGQoZi5nZXRBdHRyaWJ1dGUoImRhdGEtYWkiKSkpOyJ1bmRlZmluZWQiIT09dHlwZW9mIGUmJmUuY29uc3RydWN0b3I9PT1BcnJheSYmKGVbMV09IiIsZi5zZXRBdHRyaWJ1dGUoImRhdGEtYWkiLGI2NGUoSlNPTi5zdHJpbmdpZnkoZSkpKSl9YiYmKGY9Yi5xdWVyeVNlbGVjdG9yQWxsKCIuYWktZGVidWctYmxvY2siKSxmLmxlbmd0aCYmKGIuY2xhc3NMaXN0LnJlbW92ZSgiYWktbGlzdC1ibG9jayIpLGIuY2xhc3NMaXN0LnJlbW92ZSgiYWktbGlzdC1ibG9jay1pcCIpLGIuY2xhc3NMaXN0LnJlbW92ZSgiYWktbGlzdC1ibG9jay1maWx0ZXIiKSxiLnN0eWxlLnZpc2liaWxpdHk9IiIsYi5jbGFzc0xpc3QuY29udGFpbnMoImFpLXJlbW92ZS1wb3NpdGlvbiIpJiYKKGIuc3R5bGUucG9zaXRpb249IiIpKSl9ZC5jbGFzc0xpc3QucmVtb3ZlKGMpfWQ9ZG9jdW1lbnQucXVlcnlTZWxlY3RvckFsbCgiLiIrYysiLWRiZyIpO2I9MDtmb3IoZj1kLmxlbmd0aDtiPGY7YisrKWU9ZFtiXSxlLnF1ZXJ5U2VsZWN0b3IoIi5haS1zdGF0dXMiKS50ZXh0Q29udGVudD1haV9kZWJ1Z19jb29raWVfc3RhdHVzLGUucXVlcnlTZWxlY3RvcigiLmFpLWNvb2tpZS1kYXRhIikudGV4dENvbnRlbnQ9YWlfZ2V0X2Nvb2tpZV90ZXh0KGEpLGUuY2xhc3NMaXN0LnJlbW92ZShjKyItZGJnIil9LGFpX2xvYWRfY29va2llPWZ1bmN0aW9uKCl7dmFyIGE9QWlDb29raWVzLmdldEpTT04oImFpQkxPQ0tTIik7bnVsbD09YSYmKGE9e30pO3JldHVybiBhfSxhaV9zZXRfY29va2llPWZ1bmN0aW9uKGEsYyxkKXt2YXIgYj1haV9sb2FkX2Nvb2tpZSgpO2lmKCIiPT09ZCl7aWYoYi5oYXNPd25Qcm9wZXJ0eShhKSl7ZGVsZXRlIGJbYV1bY107YTp7Yz1iW2FdO2ZvcihmIGluIGMpaWYoYy5oYXNPd25Qcm9wZXJ0eShmKSl7dmFyIGY9CiExO2JyZWFrIGF9Zj0hMH1mJiZkZWxldGUgYlthXX19ZWxzZSBiLmhhc093blByb3BlcnR5KGEpfHwoYlthXT17fSksYlthXVtjXT1kOzA9PT1PYmplY3Qua2V5cyhiKS5sZW5ndGgmJmIuY29uc3RydWN0b3I9PT1PYmplY3Q/QWlDb29raWVzLnJlbW92ZSgiYWlCTE9DS1MiKTpBaUNvb2tpZXMuc2V0KCJhaUJMT0NLUyIsYix7ZXhwaXJlczozNjUscGF0aDoiLyJ9KTtyZXR1cm4gYn0sYWlfZ2V0X2Nvb2tpZV90ZXh0PWZ1bmN0aW9uKGEpe3ZhciBjPUFpQ29va2llcy5nZXRKU09OKCJhaUJMT0NLUyIpO251bGw9PWMmJihjPXt9KTt2YXIgZD0iIjtjLmhhc093blByb3BlcnR5KCJHIikmJihkPSJHWyIrSlNPTi5zdHJpbmdpZnkoYy5HKS5yZXBsYWNlKC8iL2csIiIpLnJlcGxhY2UoInsiLCIiKS5yZXBsYWNlKCJ9IiwiIikrIl0gIik7dmFyIGI9IiI7Yy5oYXNPd25Qcm9wZXJ0eShhKSYmKGI9SlNPTi5zdHJpbmdpZnkoY1thXSkucmVwbGFjZSgvIi9nLCIiKS5yZXBsYWNlKCJ7IiwiIikucmVwbGFjZSgifSIsCiIiKSk7cmV0dXJuIGQrYn0pOwp2YXIgYWlfaW5zZXJ0aW9uX2pzPSEwLGFpX2Jsb2NrX2NsYXNzX2RlZj0iY29kZS1ibG9jayI7CmlmKCJ1bmRlZmluZWQiIT10eXBlb2YgYWlfaW5zZXJ0aW9uX2pzKXthaV9pbnNlcnQ9ZnVuY3Rpb24oYSxoLGwpe2lmKC0xIT1oLmluZGV4T2YoIjplcSgiKSlpZih3aW5kb3cualF1ZXJ5JiZ3aW5kb3cualF1ZXJ5LmZuKXZhciBuPWpRdWVyeShoKTtlbHNle2NvbnNvbGUuZXJyb3IoIkFJIElOU0VSVCBVU0lORyBqUXVlcnkgUVVFUklFUzoiLGgsIi0galF1ZXJ5IG5vdCBmb3VuZCIpO3JldHVybn1lbHNlIG49ZG9jdW1lbnQucXVlcnlTZWxlY3RvckFsbChoKTtmb3IodmFyIHU9MCx5PW4ubGVuZ3RoO3U8eTt1Kyspe3ZhciBkPW5bdV07c2VsZWN0b3Jfc3RyaW5nPWQuaGFzQXR0cmlidXRlKCJpZCIpPyIjIitkLmdldEF0dHJpYnV0ZSgiaWQiKTpkLmhhc0F0dHJpYnV0ZSgiY2xhc3MiKT8iLiIrZC5nZXRBdHRyaWJ1dGUoImNsYXNzIikucmVwbGFjZShSZWdFeHAoIiAiLCJnIiksIi4iKToiIjt2YXIgdz1kb2N1bWVudC5jcmVhdGVFbGVtZW50KCJkaXYiKTt3LmlubmVySFRNTD1sOwp2YXIgbT13LmdldEVsZW1lbnRzQnlDbGFzc05hbWUoImFpLXNlbGVjdG9yLWNvdW50ZXIiKVswXTtudWxsIT1tJiYobS5pbm5lclRleHQ9dSsxKTttPXcuZ2V0RWxlbWVudHNCeUNsYXNzTmFtZSgiYWktZGVidWctbmFtZSBhaS1tYWluIilbMF07aWYobnVsbCE9bSl7dmFyIHI9YS50b1VwcGVyQ2FzZSgpOyJ1bmRlZmluZWQiIT10eXBlb2YgYWlfZnJvbnQmJigiYmVmb3JlIj09YT9yPWFpX2Zyb250Lmluc2VydGlvbl9iZWZvcmU6ImFmdGVyIj09YT9yPWFpX2Zyb250Lmluc2VydGlvbl9hZnRlcjoicHJlcGVuZCI9PWE/cj1haV9mcm9udC5pbnNlcnRpb25fcHJlcGVuZDoiYXBwZW5kIj09YT9yPWFpX2Zyb250Lmluc2VydGlvbl9hcHBlbmQ6InJlcGxhY2UtY29udGVudCI9PWE/cj1haV9mcm9udC5pbnNlcnRpb25fcmVwbGFjZV9jb250ZW50OiJyZXBsYWNlLWVsZW1lbnQiPT1hJiYocj1haV9mcm9udC5pbnNlcnRpb25fcmVwbGFjZV9lbGVtZW50KSk7LTE9PXNlbGVjdG9yX3N0cmluZy5pbmRleE9mKCIuYWktdmlld3BvcnRzIikmJgoobS5pbm5lclRleHQ9cisiICIraCsiICgiK2QudGFnTmFtZS50b0xvd2VyQ2FzZSgpK3NlbGVjdG9yX3N0cmluZysiKSIpfW09ZG9jdW1lbnQuY3JlYXRlUmFuZ2UoKTt0cnl7dmFyIHY9bS5jcmVhdGVDb250ZXh0dWFsRnJhZ21lbnQody5pbm5lckhUTUwpfWNhdGNoKHQpe30iYmVmb3JlIj09YT9kLnBhcmVudE5vZGUuaW5zZXJ0QmVmb3JlKHYsZCk6ImFmdGVyIj09YT9kLnBhcmVudE5vZGUuaW5zZXJ0QmVmb3JlKHYsZC5uZXh0U2libGluZyk6InByZXBlbmQiPT1hP2QuaW5zZXJ0QmVmb3JlKHYsZC5maXJzdENoaWxkKToiYXBwZW5kIj09YT9kLmluc2VydEJlZm9yZSh2LG51bGwpOiJyZXBsYWNlLWNvbnRlbnQiPT1hPyhkLmlubmVySFRNTD0iIixkLmluc2VydEJlZm9yZSh2LG51bGwpKToicmVwbGFjZS1lbGVtZW50Ij09YSYmKGQucGFyZW50Tm9kZS5pbnNlcnRCZWZvcmUodixkKSxkLnBhcmVudE5vZGUucmVtb3ZlQ2hpbGQoZCkpfX07YWlfaW5zZXJ0X2NvZGU9ZnVuY3Rpb24oYSl7ZnVuY3Rpb24gaChtLApyKXtyZXR1cm4gbnVsbD09bT8hMTptLmNsYXNzTGlzdD9tLmNsYXNzTGlzdC5jb250YWlucyhyKTotMTwoIiAiK20uY2xhc3NOYW1lKyIgIikuaW5kZXhPZigiICIrcisiICIpfWZ1bmN0aW9uIGwobSxyKXtudWxsIT1tJiYobS5jbGFzc0xpc3Q/bS5jbGFzc0xpc3QuYWRkKHIpOm0uY2xhc3NOYW1lKz0iICIrcil9ZnVuY3Rpb24gbihtLHIpe251bGwhPW0mJihtLmNsYXNzTGlzdD9tLmNsYXNzTGlzdC5yZW1vdmUocik6bS5jbGFzc05hbWU9bS5jbGFzc05hbWUucmVwbGFjZShuZXcgUmVnRXhwKCIoXnxcXGIpIityLnNwbGl0KCIgIikuam9pbigifCIpKyIoXFxifCQpIiwiZ2kiKSwiICIpKX1pZigidW5kZWZpbmVkIiE9dHlwZW9mIGEpe3ZhciB1PSExO2lmKGgoYSwibm8tdmlzaWJpbGl0eS1jaGVjayIpfHxhLm9mZnNldFdpZHRofHxhLm9mZnNldEhlaWdodHx8YS5nZXRDbGllbnRSZWN0cygpLmxlbmd0aCl7dT1hLmdldEF0dHJpYnV0ZSgiZGF0YS1jb2RlIik7dmFyIHk9YS5nZXRBdHRyaWJ1dGUoImRhdGEtaW5zZXJ0aW9uLXBvc2l0aW9uIiksCmQ9YS5nZXRBdHRyaWJ1dGUoImRhdGEtc2VsZWN0b3IiKTtpZihudWxsIT11KWlmKG51bGwhPXkmJm51bGwhPWQpe2lmKC0xIT1kLmluZGV4T2YoIjplcSgiKT93aW5kb3cualF1ZXJ5JiZ3aW5kb3cualF1ZXJ5LmZuJiZqUXVlcnkoZCkubGVuZ3RoOmRvY3VtZW50LnF1ZXJ5U2VsZWN0b3JBbGwoZCkubGVuZ3RoKWFpX2luc2VydCh5LGQsYjY0ZCh1KSksbihhLCJhaS12aWV3cG9ydHMiKX1lbHNle3k9ZG9jdW1lbnQuY3JlYXRlUmFuZ2UoKTt0cnl7dmFyIHc9eS5jcmVhdGVDb250ZXh0dWFsRnJhZ21lbnQoYjY0ZCh1KSl9Y2F0Y2gobSl7fWEucGFyZW50Tm9kZS5pbnNlcnRCZWZvcmUodyxhLm5leHRTaWJsaW5nKTtuKGEsImFpLXZpZXdwb3J0cyIpfXU9ITB9ZWxzZSB3PWEucHJldmlvdXNFbGVtZW50U2libGluZyxoKHcsImFpLWRlYnVnLWJhciIpJiZoKHcsImFpLWRlYnVnLXNjcmlwdCIpJiYobih3LCJhaS1kZWJ1Zy1zY3JpcHQiKSxsKHcsImFpLWRlYnVnLXZpZXdwb3J0LWludmlzaWJsZSIpKSwKbihhLCJhaS12aWV3cG9ydHMiKTtyZXR1cm4gdX19O2FpX2luc2VydF9saXN0X2NvZGU9ZnVuY3Rpb24oYSl7dmFyIGg9ZG9jdW1lbnQuZ2V0RWxlbWVudHNCeUNsYXNzTmFtZShhKVswXTtpZigidW5kZWZpbmVkIiE9dHlwZW9mIGgpe3ZhciBsPWFpX2luc2VydF9jb2RlKGgpLG49aC5jbG9zZXN0KCJkaXYuIithaV9ibG9ja19jbGFzc19kZWYpO2lmKG4pe2x8fG4ucmVtb3ZlQXR0cmlidXRlKCJkYXRhLWFpIik7dmFyIHU9bi5xdWVyeVNlbGVjdG9yQWxsKCIuYWktZGVidWctYmxvY2siKTtuJiZ1Lmxlbmd0aCYmKG4uY2xhc3NMaXN0LnJlbW92ZSgiYWktbGlzdC1ibG9jayIpLG4uY2xhc3NMaXN0LnJlbW92ZSgiYWktbGlzdC1ibG9jay1pcCIpLG4uY2xhc3NMaXN0LnJlbW92ZSgiYWktbGlzdC1ibG9jay1maWx0ZXIiKSxuLnN0eWxlLnZpc2liaWxpdHk9IiIsbi5jbGFzc0xpc3QuY29udGFpbnMoImFpLXJlbW92ZS1wb3NpdGlvbiIpJiYobi5zdHlsZS5wb3NpdGlvbj0iIikpfWguY2xhc3NMaXN0LnJlbW92ZShhKTsKbCYmeigpfX07YWlfaW5zZXJ0X3ZpZXdwb3J0X2NvZGU9ZnVuY3Rpb24oYSl7dmFyIGg9ZG9jdW1lbnQuZ2V0RWxlbWVudHNCeUNsYXNzTmFtZShhKVswXTtpZigidW5kZWZpbmVkIiE9dHlwZW9mIGgpe3ZhciBsPWFpX2luc2VydF9jb2RlKGgpO2guY2xhc3NMaXN0LnJlbW92ZShhKTtsJiYoYT1oLmNsb3Nlc3QoImRpdi4iK2FpX2Jsb2NrX2NsYXNzX2RlZiksbnVsbCE9YSYmKGw9aC5nZXRBdHRyaWJ1dGUoInN0eWxlIiksbnVsbCE9bCYmYS5zZXRBdHRyaWJ1dGUoInN0eWxlIixhLmdldEF0dHJpYnV0ZSgic3R5bGUiKSsiICIrbCkpKTtzZXRUaW1lb3V0KGZ1bmN0aW9uKCl7aC5yZW1vdmVBdHRyaWJ1dGUoInN0eWxlIil9LDIpO3ooKX19O2FpX2luc2VydF9hZHNlbnNlX2ZhbGxiYWNrX2NvZGVzPWZ1bmN0aW9uKGEpe2Euc3R5bGUuZGlzcGxheT0ibm9uZSI7dmFyIGg9YS5jbG9zZXN0KCIuYWktZmFsbGJhY2stYWRzZW5zZSIpLGw9aC5uZXh0RWxlbWVudFNpYmxpbmc7bC5nZXRBdHRyaWJ1dGUoImRhdGEtY29kZSIpPwphaV9pbnNlcnRfY29kZShsKSYmeigpOmwuc3R5bGUuZGlzcGxheT0iYmxvY2siO2guY2xhc3NMaXN0LmNvbnRhaW5zKCJhaS1lbXB0eS1jb2RlIikmJm51bGwhPWEuY2xvc2VzdCgiLiIrYWlfYmxvY2tfY2xhc3NfZGVmKSYmKGE9YS5jbG9zZXN0KCIuIithaV9ibG9ja19jbGFzc19kZWYpLmdldEVsZW1lbnRzQnlDbGFzc05hbWUoImNvZGUtYmxvY2stbGFiZWwiKSwwIT1hLmxlbmd0aCYmKGFbMF0uc3R5bGUuZGlzcGxheT0ibm9uZSIpKX07YWlfaW5zZXJ0X2NvZGVfYnlfY2xhc3M9ZnVuY3Rpb24oYSl7dmFyIGg9ZG9jdW1lbnQuZ2V0RWxlbWVudHNCeUNsYXNzTmFtZShhKVswXTsidW5kZWZpbmVkIiE9dHlwZW9mIGgmJihhaV9pbnNlcnRfY29kZShoKSxoLmNsYXNzTGlzdC5yZW1vdmUoYSkpfTthaV9pbnNlcnRfY2xpZW50X2NvZGU9ZnVuY3Rpb24oYSxoKXt2YXIgbD1kb2N1bWVudC5nZXRFbGVtZW50c0J5Q2xhc3NOYW1lKGEpWzBdO2lmKCJ1bmRlZmluZWQiIT10eXBlb2YgbCl7dmFyIG49CmwuZ2V0QXR0cmlidXRlKCJkYXRhLWNvZGUiKTtudWxsIT1uJiZhaV9jaGVja19ibG9jaygpJiYobC5zZXRBdHRyaWJ1dGUoImRhdGEtY29kZSIsbi5zdWJzdHJpbmcoTWF0aC5mbG9vcihoLzE5KSkpLGFpX2luc2VydF9jb2RlX2J5X2NsYXNzKGEpLGwucmVtb3ZlKCkpfX07YWlfcHJvY2Vzc19lbGVtZW50c19hY3RpdmU9ITE7ZnVuY3Rpb24geigpe2FpX3Byb2Nlc3NfZWxlbWVudHNfYWN0aXZlfHxzZXRUaW1lb3V0KGZ1bmN0aW9uKCl7YWlfcHJvY2Vzc19lbGVtZW50c19hY3RpdmU9ITE7ImZ1bmN0aW9uIj09dHlwZW9mIGFpX3Byb2Nlc3Nfcm90YXRpb25zJiZhaV9wcm9jZXNzX3JvdGF0aW9ucygpOyJmdW5jdGlvbiI9PXR5cGVvZiBhaV9wcm9jZXNzX2xpc3RzJiZhaV9wcm9jZXNzX2xpc3RzKCk7ImZ1bmN0aW9uIj09dHlwZW9mIGFpX3Byb2Nlc3NfaXBfYWRkcmVzc2VzJiZhaV9wcm9jZXNzX2lwX2FkZHJlc3NlcygpOyJmdW5jdGlvbiI9PXR5cGVvZiBhaV9wcm9jZXNzX2ZpbHRlcl9ob29rcyYmCmFpX3Byb2Nlc3NfZmlsdGVyX2hvb2tzKCk7ImZ1bmN0aW9uIj09dHlwZW9mIGFpX2FkYl9wcm9jZXNzX2Jsb2NrcyYmYWlfYWRiX3Byb2Nlc3NfYmxvY2tzKCk7ImZ1bmN0aW9uIj09dHlwZW9mIGFpX3Byb2Nlc3NfaW1wcmVzc2lvbnMmJjE9PWFpX3RyYWNraW5nX2ZpbmlzaGVkJiZhaV9wcm9jZXNzX2ltcHJlc3Npb25zKCk7ImZ1bmN0aW9uIj09dHlwZW9mIGFpX2luc3RhbGxfY2xpY2tfdHJhY2tlcnMmJjE9PWFpX3RyYWNraW5nX2ZpbmlzaGVkJiZhaV9pbnN0YWxsX2NsaWNrX3RyYWNrZXJzKCk7ImZ1bmN0aW9uIj09dHlwZW9mIGFpX2luc3RhbGxfY2xvc2VfYnV0dG9ucyYmYWlfaW5zdGFsbF9jbG9zZV9idXR0b25zKGRvY3VtZW50KTsiZnVuY3Rpb24iPT10eXBlb2YgYWlfcHJvY2Vzc193YWl0X2Zvcl9pbnRlcmFjdGlvbiYmYWlfcHJvY2Vzc193YWl0X2Zvcl9pbnRlcmFjdGlvbigpOyJmdW5jdGlvbiI9PXR5cGVvZiBhaV9wcm9jZXNzX2RlbGF5ZWRfYmxvY2tzJiZhaV9wcm9jZXNzX2RlbGF5ZWRfYmxvY2tzKCl9LAo1KTthaV9wcm9jZXNzX2VsZW1lbnRzX2FjdGl2ZT0hMH1jb25zdCBCPWRvY3VtZW50LnF1ZXJ5U2VsZWN0b3IoImJvZHkiKTsobmV3IE11dGF0aW9uT2JzZXJ2ZXIoZnVuY3Rpb24oYSxoKXtmb3IoY29uc3QgbCBvZiBhKSJhdHRyaWJ1dGVzIj09PWwudHlwZSYmImRhdGEtYWQtc3RhdHVzIj09bC5hdHRyaWJ1dGVOYW1lJiYidW5maWxsZWQiPT1sLnRhcmdldC5kYXRhc2V0LmFkU3RhdHVzJiZsLnRhcmdldC5jbG9zZXN0KCIuYWktZmFsbGJhY2stYWRzZW5zZSIpJiZhaV9pbnNlcnRfYWRzZW5zZV9mYWxsYmFja19jb2RlcyhsLnRhcmdldCl9KSkub2JzZXJ2ZShCLHthdHRyaWJ1dGVzOiEwLGNoaWxkTGlzdDohMSxzdWJ0cmVlOiEwfSk7dmFyIEFycml2ZT1mdW5jdGlvbihhLGgsbCl7ZnVuY3Rpb24gbih0LGMsZSl7ZC5hZGRNZXRob2QoYyxlLHQudW5iaW5kRXZlbnQpO2QuYWRkTWV0aG9kKGMsZSx0LnVuYmluZEV2ZW50V2l0aFNlbGVjdG9yT3JDYWxsYmFjayk7ZC5hZGRNZXRob2QoYywKZSx0LnVuYmluZEV2ZW50V2l0aFNlbGVjdG9yQW5kQ2FsbGJhY2spfWZ1bmN0aW9uIHUodCl7dC5hcnJpdmU9ci5iaW5kRXZlbnQ7bihyLHQsInVuYmluZEFycml2ZSIpO3QubGVhdmU9di5iaW5kRXZlbnQ7bih2LHQsInVuYmluZExlYXZlIil9aWYoYS5NdXRhdGlvbk9ic2VydmVyJiYidW5kZWZpbmVkIiE9PXR5cGVvZiBIVE1MRWxlbWVudCl7dmFyIHk9MCxkPWZ1bmN0aW9uKCl7dmFyIHQ9SFRNTEVsZW1lbnQucHJvdG90eXBlLm1hdGNoZXN8fEhUTUxFbGVtZW50LnByb3RvdHlwZS53ZWJraXRNYXRjaGVzU2VsZWN0b3J8fEhUTUxFbGVtZW50LnByb3RvdHlwZS5tb3pNYXRjaGVzU2VsZWN0b3J8fEhUTUxFbGVtZW50LnByb3RvdHlwZS5tc01hdGNoZXNTZWxlY3RvcjtyZXR1cm57bWF0Y2hlc1NlbGVjdG9yOmZ1bmN0aW9uKGMsZSl7cmV0dXJuIGMgaW5zdGFuY2VvZiBIVE1MRWxlbWVudCYmdC5jYWxsKGMsZSl9LGFkZE1ldGhvZDpmdW5jdGlvbihjLGUsZil7dmFyIGI9Y1tlXTtjW2VdPQpmdW5jdGlvbigpe2lmKGYubGVuZ3RoPT1hcmd1bWVudHMubGVuZ3RoKXJldHVybiBmLmFwcGx5KHRoaXMsYXJndW1lbnRzKTtpZigiZnVuY3Rpb24iPT10eXBlb2YgYilyZXR1cm4gYi5hcHBseSh0aGlzLGFyZ3VtZW50cyl9fSxjYWxsQ2FsbGJhY2tzOmZ1bmN0aW9uKGMsZSl7ZSYmZS5vcHRpb25zLm9uY2VPbmx5JiYxPT1lLmZpcmVkRWxlbXMubGVuZ3RoJiYoYz1bY1swXV0pO2Zvcih2YXIgZj0wLGI7Yj1jW2ZdO2YrKyliJiZiLmNhbGxiYWNrJiZiLmNhbGxiYWNrLmNhbGwoYi5lbGVtLGIuZWxlbSk7ZSYmZS5vcHRpb25zLm9uY2VPbmx5JiYxPT1lLmZpcmVkRWxlbXMubGVuZ3RoJiZlLm1lLnVuYmluZEV2ZW50V2l0aFNlbGVjdG9yQW5kQ2FsbGJhY2suY2FsbChlLnRhcmdldCxlLnNlbGVjdG9yLGUuY2FsbGJhY2spfSxjaGVja0NoaWxkTm9kZXNSZWN1cnNpdmVseTpmdW5jdGlvbihjLGUsZixiKXtmb3IodmFyIGc9MCxrO2s9Y1tnXTtnKyspZihrLGUsYikmJmIucHVzaCh7Y2FsbGJhY2s6ZS5jYWxsYmFjaywKZWxlbTprfSksMDxrLmNoaWxkTm9kZXMubGVuZ3RoJiZkLmNoZWNrQ2hpbGROb2Rlc1JlY3Vyc2l2ZWx5KGsuY2hpbGROb2RlcyxlLGYsYil9LG1lcmdlQXJyYXlzOmZ1bmN0aW9uKGMsZSl7dmFyIGY9e30sYjtmb3IoYiBpbiBjKWMuaGFzT3duUHJvcGVydHkoYikmJihmW2JdPWNbYl0pO2ZvcihiIGluIGUpZS5oYXNPd25Qcm9wZXJ0eShiKSYmKGZbYl09ZVtiXSk7cmV0dXJuIGZ9LHRvRWxlbWVudHNBcnJheTpmdW5jdGlvbihjKXsidW5kZWZpbmVkIj09PXR5cGVvZiBjfHwibnVtYmVyIj09PXR5cGVvZiBjLmxlbmd0aCYmYyE9PWF8fChjPVtjXSk7cmV0dXJuIGN9fX0oKSx3PWZ1bmN0aW9uKCl7dmFyIHQ9ZnVuY3Rpb24oKXt0aGlzLl9ldmVudHNCdWNrZXQ9W107dGhpcy5fYmVmb3JlUmVtb3Zpbmc9dGhpcy5fYmVmb3JlQWRkaW5nPW51bGx9O3QucHJvdG90eXBlLmFkZEV2ZW50PWZ1bmN0aW9uKGMsZSxmLGIpe2M9e3RhcmdldDpjLHNlbGVjdG9yOmUsb3B0aW9uczpmLGNhbGxiYWNrOmIsCmZpcmVkRWxlbXM6W119O3RoaXMuX2JlZm9yZUFkZGluZyYmdGhpcy5fYmVmb3JlQWRkaW5nKGMpO3RoaXMuX2V2ZW50c0J1Y2tldC5wdXNoKGMpO3JldHVybiBjfTt0LnByb3RvdHlwZS5yZW1vdmVFdmVudD1mdW5jdGlvbihjKXtmb3IodmFyIGU9dGhpcy5fZXZlbnRzQnVja2V0Lmxlbmd0aC0xLGY7Zj10aGlzLl9ldmVudHNCdWNrZXRbZV07ZS0tKWMoZikmJih0aGlzLl9iZWZvcmVSZW1vdmluZyYmdGhpcy5fYmVmb3JlUmVtb3ZpbmcoZiksKGY9dGhpcy5fZXZlbnRzQnVja2V0LnNwbGljZShlLDEpKSYmZi5sZW5ndGgmJihmWzBdLmNhbGxiYWNrPW51bGwpKX07dC5wcm90b3R5cGUuYmVmb3JlQWRkaW5nPWZ1bmN0aW9uKGMpe3RoaXMuX2JlZm9yZUFkZGluZz1jfTt0LnByb3RvdHlwZS5iZWZvcmVSZW1vdmluZz1mdW5jdGlvbihjKXt0aGlzLl9iZWZvcmVSZW1vdmluZz1jfTtyZXR1cm4gdH0oKSxtPWZ1bmN0aW9uKHQsYyl7dmFyIGU9bmV3IHcsZj10aGlzLGI9e2ZpcmVPbkF0dHJpYnV0ZXNNb2RpZmljYXRpb246ITF9OwplLmJlZm9yZUFkZGluZyhmdW5jdGlvbihnKXt2YXIgaz1nLnRhcmdldDtpZihrPT09YS5kb2N1bWVudHx8az09PWEpaz1kb2N1bWVudC5nZXRFbGVtZW50c0J5VGFnTmFtZSgiaHRtbCIpWzBdO3ZhciBwPW5ldyBNdXRhdGlvbk9ic2VydmVyKGZ1bmN0aW9uKHgpe2MuY2FsbCh0aGlzLHgsZyl9KTt2YXIgcT10KGcub3B0aW9ucyk7cC5vYnNlcnZlKGsscSk7Zy5vYnNlcnZlcj1wO2cubWU9Zn0pO2UuYmVmb3JlUmVtb3ZpbmcoZnVuY3Rpb24oZyl7Zy5vYnNlcnZlci5kaXNjb25uZWN0KCl9KTt0aGlzLmJpbmRFdmVudD1mdW5jdGlvbihnLGsscCl7az1kLm1lcmdlQXJyYXlzKGIsayk7Zm9yKHZhciBxPWQudG9FbGVtZW50c0FycmF5KHRoaXMpLHg9MDt4PHEubGVuZ3RoO3grKyllLmFkZEV2ZW50KHFbeF0sZyxrLHApfTt0aGlzLnVuYmluZEV2ZW50PWZ1bmN0aW9uKCl7dmFyIGc9ZC50b0VsZW1lbnRzQXJyYXkodGhpcyk7ZS5yZW1vdmVFdmVudChmdW5jdGlvbihrKXtmb3IodmFyIHA9CjA7cDxnLmxlbmd0aDtwKyspaWYodGhpcz09PWx8fGsudGFyZ2V0PT09Z1twXSlyZXR1cm4hMDtyZXR1cm4hMX0pfTt0aGlzLnVuYmluZEV2ZW50V2l0aFNlbGVjdG9yT3JDYWxsYmFjaz1mdW5jdGlvbihnKXt2YXIgaz1kLnRvRWxlbWVudHNBcnJheSh0aGlzKTtlLnJlbW92ZUV2ZW50KCJmdW5jdGlvbiI9PT10eXBlb2YgZz9mdW5jdGlvbihwKXtmb3IodmFyIHE9MDtxPGsubGVuZ3RoO3ErKylpZigodGhpcz09PWx8fHAudGFyZ2V0PT09a1txXSkmJnAuY2FsbGJhY2s9PT1nKXJldHVybiEwO3JldHVybiExfTpmdW5jdGlvbihwKXtmb3IodmFyIHE9MDtxPGsubGVuZ3RoO3ErKylpZigodGhpcz09PWx8fHAudGFyZ2V0PT09a1txXSkmJnAuc2VsZWN0b3I9PT1nKXJldHVybiEwO3JldHVybiExfSl9O3RoaXMudW5iaW5kRXZlbnRXaXRoU2VsZWN0b3JBbmRDYWxsYmFjaz1mdW5jdGlvbihnLGspe3ZhciBwPWQudG9FbGVtZW50c0FycmF5KHRoaXMpO2UucmVtb3ZlRXZlbnQoZnVuY3Rpb24ocSl7Zm9yKHZhciB4PQowO3g8cC5sZW5ndGg7eCsrKWlmKCh0aGlzPT09bHx8cS50YXJnZXQ9PT1wW3hdKSYmcS5zZWxlY3Rvcj09PWcmJnEuY2FsbGJhY2s9PT1rKXJldHVybiEwO3JldHVybiExfSl9O3JldHVybiB0aGlzfSxyPW5ldyBmdW5jdGlvbigpe2Z1bmN0aW9uIHQoZixiLGcpe3JldHVybiBkLm1hdGNoZXNTZWxlY3RvcihmLGIuc2VsZWN0b3IpJiYoZi5faWQ9PT1sJiYoZi5faWQ9eSsrKSwtMT09Yi5maXJlZEVsZW1zLmluZGV4T2YoZi5faWQpKT8oYi5maXJlZEVsZW1zLnB1c2goZi5faWQpLCEwKTohMX12YXIgYz17ZmlyZU9uQXR0cmlidXRlc01vZGlmaWNhdGlvbjohMSxvbmNlT25seTohMSxleGlzdGluZzohMX07cj1uZXcgbShmdW5jdGlvbihmKXt2YXIgYj17YXR0cmlidXRlczohMSxjaGlsZExpc3Q6ITAsc3VidHJlZTohMH07Zi5maXJlT25BdHRyaWJ1dGVzTW9kaWZpY2F0aW9uJiYoYi5hdHRyaWJ1dGVzPSEwKTtyZXR1cm4gYn0sZnVuY3Rpb24oZixiKXtmLmZvckVhY2goZnVuY3Rpb24oZyl7dmFyIGs9CmcuYWRkZWROb2RlcyxwPWcudGFyZ2V0LHE9W107bnVsbCE9PWsmJjA8ay5sZW5ndGg/ZC5jaGVja0NoaWxkTm9kZXNSZWN1cnNpdmVseShrLGIsdCxxKToiYXR0cmlidXRlcyI9PT1nLnR5cGUmJnQocCxiLHEpJiZxLnB1c2goe2NhbGxiYWNrOmIuY2FsbGJhY2ssZWxlbTpwfSk7ZC5jYWxsQ2FsbGJhY2tzKHEsYil9KX0pO3ZhciBlPXIuYmluZEV2ZW50O3IuYmluZEV2ZW50PWZ1bmN0aW9uKGYsYixnKXsidW5kZWZpbmVkIj09PXR5cGVvZiBnPyhnPWIsYj1jKTpiPWQubWVyZ2VBcnJheXMoYyxiKTt2YXIgaz1kLnRvRWxlbWVudHNBcnJheSh0aGlzKTtpZihiLmV4aXN0aW5nKXtmb3IodmFyIHA9W10scT0wO3E8ay5sZW5ndGg7cSsrKWZvcih2YXIgeD1rW3FdLnF1ZXJ5U2VsZWN0b3JBbGwoZiksQT0wO0E8eC5sZW5ndGg7QSsrKXAucHVzaCh7Y2FsbGJhY2s6ZyxlbGVtOnhbQV19KTtpZihiLm9uY2VPbmx5JiZwLmxlbmd0aClyZXR1cm4gZy5jYWxsKHBbMF0uZWxlbSxwWzBdLmVsZW0pOwpzZXRUaW1lb3V0KGQuY2FsbENhbGxiYWNrcywxLHApfWUuY2FsbCh0aGlzLGYsYixnKX07cmV0dXJuIHJ9LHY9bmV3IGZ1bmN0aW9uKCl7ZnVuY3Rpb24gdChmLGIpe3JldHVybiBkLm1hdGNoZXNTZWxlY3RvcihmLGIuc2VsZWN0b3IpfXZhciBjPXt9O3Y9bmV3IG0oZnVuY3Rpb24oKXtyZXR1cm57Y2hpbGRMaXN0OiEwLHN1YnRyZWU6ITB9fSxmdW5jdGlvbihmLGIpe2YuZm9yRWFjaChmdW5jdGlvbihnKXtnPWcucmVtb3ZlZE5vZGVzO3ZhciBrPVtdO251bGwhPT1nJiYwPGcubGVuZ3RoJiZkLmNoZWNrQ2hpbGROb2Rlc1JlY3Vyc2l2ZWx5KGcsYix0LGspO2QuY2FsbENhbGxiYWNrcyhrLGIpfSl9KTt2YXIgZT12LmJpbmRFdmVudDt2LmJpbmRFdmVudD1mdW5jdGlvbihmLGIsZyl7InVuZGVmaW5lZCI9PT10eXBlb2YgZz8oZz1iLGI9Yyk6Yj1kLm1lcmdlQXJyYXlzKGMsYik7ZS5jYWxsKHRoaXMsZixiLGcpfTtyZXR1cm4gdn07aCYmdShoLmZuKTt1KEhUTUxFbGVtZW50LnByb3RvdHlwZSk7CnUoTm9kZUxpc3QucHJvdG90eXBlKTt1KEhUTUxDb2xsZWN0aW9uLnByb3RvdHlwZSk7dShIVE1MRG9jdW1lbnQucHJvdG90eXBlKTt1KFdpbmRvdy5wcm90b3R5cGUpO2g9e307bihyLGgsInVuYmluZEFsbEFycml2ZSIpO24odixoLCJ1bmJpbmRBbGxMZWF2ZSIpO3JldHVybiBofX0od2luZG93LCJ1bmRlZmluZWQiPT09dHlwZW9mIGpRdWVyeT9udWxsOmpRdWVyeSx2b2lkIDApfTsKdmFyIGFpX3JvdGF0aW9uX3RyaWdnZXJzPVtdLGFpX2Jsb2NrX2NsYXNzX2RlZj0iY29kZS1ibG9jayI7CmlmKCJ1bmRlZmluZWQiIT10eXBlb2YgYWlfcm90YXRpb25fdHJpZ2dlcnMpe2FpX3Byb2Nlc3Nfcm90YXRpb249ZnVuY3Rpb24oYil7dmFyIGQ9Im51bWJlciI9PXR5cGVvZiBiLmxlbmd0aDt3aW5kb3cualF1ZXJ5JiZ3aW5kb3cualF1ZXJ5LmZuJiZiIGluc3RhbmNlb2YgalF1ZXJ5JiYoYj1kP0FycmF5LnByb3RvdHlwZS5zbGljZS5jYWxsKGIpOmJbMF0pO2lmKGQpe3ZhciBlPSExO2IuZm9yRWFjaCgoYyxoKT0+e2lmKGMuY2xhc3NMaXN0LmNvbnRhaW5zKCJhaS11bnByb2Nlc3NlZCIpfHxjLmNsYXNzTGlzdC5jb250YWlucygiYWktdGltZXIiKSllPSEwfSk7aWYoIWUpcmV0dXJuO2IuZm9yRWFjaCgoYyxoKT0+e2MuY2xhc3NMaXN0LnJlbW92ZSgiYWktdW5wcm9jZXNzZWQiKTtjLmNsYXNzTGlzdC5yZW1vdmUoImFpLXRpbWVyIil9KX1lbHNle2lmKCFiLmNsYXNzTGlzdC5jb250YWlucygiYWktdW5wcm9jZXNzZWQiKSYmIWIuY2xhc3NMaXN0LmNvbnRhaW5zKCJhaS10aW1lciIpKXJldHVybjsKYi5jbGFzc0xpc3QucmVtb3ZlKCJhaS11bnByb2Nlc3NlZCIpO2IuY2xhc3NMaXN0LnJlbW92ZSgiYWktdGltZXIiKX12YXIgYT0hMTtpZihkP2JbMF0uaGFzQXR0cmlidXRlKCJkYXRhLWluZm8iKTpiLmhhc0F0dHJpYnV0ZSgiZGF0YS1pbmZvIikpe3ZhciBmPSJkaXYuYWktcm90YXRlLmFpLSIrKGQ/SlNPTi5wYXJzZShhdG9iKGJbMF0uZGF0YXNldC5pbmZvKSk6SlNPTi5wYXJzZShhdG9iKGIuZGF0YXNldC5pbmZvKSkpWzBdO2FpX3JvdGF0aW9uX3RyaWdnZXJzLmluY2x1ZGVzKGYpJiYoYWlfcm90YXRpb25fdHJpZ2dlcnMuc3BsaWNlKGFpX3JvdGF0aW9uX3RyaWdnZXJzLmluZGV4T2YoZiksMSksYT0hMCl9aWYoZClmb3IoZD0wO2Q8Yi5sZW5ndGg7ZCsrKTA9PWQ/YWlfcHJvY2Vzc19zaW5nbGVfcm90YXRpb24oYltkXSwhMCk6YWlfcHJvY2Vzc19zaW5nbGVfcm90YXRpb24oYltkXSwhMSk7ZWxzZSBhaV9wcm9jZXNzX3NpbmdsZV9yb3RhdGlvbihiLCFhKX07YWlfcHJvY2Vzc19zaW5nbGVfcm90YXRpb249CmZ1bmN0aW9uKGIsZCl7dmFyIGU9W107QXJyYXkuZnJvbShiLmNoaWxkcmVuKS5mb3JFYWNoKChnLHApPT57Zy5tYXRjaGVzKCIuYWktcm90YXRlLW9wdGlvbiIpJiZlLnB1c2goZyl9KTtpZigwIT1lLmxlbmd0aCl7ZS5mb3JFYWNoKChnLHApPT57Zy5zdHlsZS5kaXNwbGF5PSJub25lIn0pO2lmKGIuaGFzQXR0cmlidXRlKCJkYXRhLW5leHQiKSl7az1wYXJzZUludChiLmdldEF0dHJpYnV0ZSgiZGF0YS1uZXh0IikpO3ZhciBhPWVba107aWYoYS5oYXNBdHRyaWJ1dGUoImRhdGEtY29kZSIpKXt2YXIgZj1kb2N1bWVudC5jcmVhdGVSYW5nZSgpLGM9ITA7dHJ5e3ZhciBoPWYuY3JlYXRlQ29udGV4dHVhbEZyYWdtZW50KGI2NGQoYS5kYXRhc2V0LmNvZGUpKX1jYXRjaChnKXtjPSExfWMmJihhPWgpfTAhPWEucXVlcnlTZWxlY3RvckFsbCgic3BhbltkYXRhLWFpLWdyb3Vwc10iKS5sZW5ndGgmJjAhPWRvY3VtZW50LnF1ZXJ5U2VsZWN0b3JBbGwoIi5haS1yb3RhdGlvbi1ncm91cHMiKS5sZW5ndGgmJgpzZXRUaW1lb3V0KGZ1bmN0aW9uKCl7QSgpfSw1KX1lbHNlIGlmKGVbMF0uaGFzQXR0cmlidXRlKCJkYXRhLWdyb3VwIikpe3ZhciBrPS0xLHU9W107ZG9jdW1lbnQucXVlcnlTZWxlY3RvckFsbCgic3BhbltkYXRhLWFpLWdyb3Vwc10iKS5mb3JFYWNoKChnLHApPT57KGcub2Zmc2V0V2lkdGh8fGcub2Zmc2V0SGVpZ2h0fHxnLmdldENsaWVudFJlY3RzKCkubGVuZ3RoKSYmdS5wdXNoKGcpfSk7MTw9dS5sZW5ndGgmJih0aW1lZF9ncm91cHM9W10sZ3JvdXBzPVtdLHUuZm9yRWFjaChmdW5jdGlvbihnLHApe2FjdGl2ZV9ncm91cHM9SlNPTi5wYXJzZShiNjRkKGcuZGF0YXNldC5haUdyb3VwcykpO3ZhciBxPSExO2c9Zy5jbG9zZXN0KCIuYWktcm90YXRlIik7bnVsbCE9ZyYmZy5jbGFzc0xpc3QuY29udGFpbnMoImFpLXRpbWVkLXJvdGF0aW9uIikmJihxPSEwKTthY3RpdmVfZ3JvdXBzLmZvckVhY2goZnVuY3Rpb24odCxDKXtncm91cHMucHVzaCh0KTtxJiZ0aW1lZF9ncm91cHMucHVzaCh0KX0pfSksCmdyb3Vwcy5mb3JFYWNoKGZ1bmN0aW9uKGcscCl7LTE9PWsmJmUuZm9yRWFjaCgocSx0KT0+e3E9YjY0ZChxLmRhdGFzZXQuZ3JvdXApO2lmKHE9PWcpcmV0dXJuIGs9dCx0aW1lZF9ncm91cHMuaW5jbHVkZXMocSkmJmIuY2xhc3NMaXN0LmFkZCgiYWktdGltZWQtcm90YXRpb24iKSwhMX0pfSkpfWVsc2UgaWYoYi5oYXNBdHRyaWJ1dGUoImRhdGEtc2hhcmVzIikpZm9yKGY9SlNPTi5wYXJzZShhdG9iKGIuZGF0YXNldC5zaGFyZXMpKSxhPU1hdGgucm91bmQoMTAwKk1hdGgucmFuZG9tKCkpLGM9MDtjPGYubGVuZ3RoJiYoaz1jLDA+ZltjXXx8IShhPD1mW2NdKSk7YysrKTtlbHNlIGY9Yi5jbGFzc0xpc3QuY29udGFpbnMoImFpLXVuaXF1ZSIpLGE9bmV3IERhdGUsZj8oIm51bWJlciIhPXR5cGVvZiBhaV9yb3RhdGlvbl9zZWVkJiYoYWlfcm90YXRpb25fc2VlZD0oTWF0aC5mbG9vcigxRTMqTWF0aC5yYW5kb20oKSkrYS5nZXRNaWxsaXNlY29uZHMoKSklZS5sZW5ndGgpLGY9YWlfcm90YXRpb25fc2VlZCwKZj5lLmxlbmd0aCYmKGYlPWUubGVuZ3RoKSxhPXBhcnNlSW50KGIuZGF0YXNldC5jb3VudGVyKSxhPD1lLmxlbmd0aD8oaz1wYXJzZUludChmK2EtMSksaz49ZS5sZW5ndGgmJihrLT1lLmxlbmd0aCkpOms9ZS5sZW5ndGgpOihrPU1hdGguZmxvb3IoTWF0aC5yYW5kb20oKSplLmxlbmd0aCksYS5nZXRNaWxsaXNlY29uZHMoKSUyJiYoaz1lLmxlbmd0aC1rLTEpKTtpZihiLmNsYXNzTGlzdC5jb250YWlucygiYWktcm90YXRpb24tc2NoZWR1bGluZyIpKWZvcihrPS0xLGY9MDtmPGUubGVuZ3RoO2YrKylpZihhPWVbZl0sYS5oYXNBdHRyaWJ1dGUoImRhdGEtc2NoZWR1bGluZyIpKXtjPWI2NGQoYS5kYXRhc2V0LnNjaGVkdWxpbmcpO2E9ITA7MD09Yy5pbmRleE9mKCJeIikmJihhPSExLGM9Yy5zdWJzdHJpbmcoMSkpO3ZhciByPWMuc3BsaXQoIj0iKSxtPS0xIT1jLmluZGV4T2YoIiUiKT9yWzBdLnNwbGl0KCIlIik6W3JbMF1dO2M9bVswXS50cmltKCkudG9Mb3dlckNhc2UoKTttPSJ1bmRlZmluZWQiIT0KdHlwZW9mIG1bMV0/bVsxXS50cmltKCk6MDtyPXJbMV0ucmVwbGFjZSgiICIsIiIpO3ZhciBuPShuZXcgRGF0ZSkuZ2V0VGltZSgpO249bmV3IERhdGUobik7dmFyIGw9MDtzd2l0Y2goYyl7Y2FzZSAicyI6bD1uLmdldFNlY29uZHMoKTticmVhaztjYXNlICJpIjpsPW4uZ2V0TWludXRlcygpO2JyZWFrO2Nhc2UgImgiOmw9bi5nZXRIb3VycygpO2JyZWFrO2Nhc2UgImQiOmw9bi5nZXREYXRlKCk7YnJlYWs7Y2FzZSAibSI6bD1uLmdldE1vbnRoKCk7YnJlYWs7Y2FzZSAieSI6bD1uLmdldEZ1bGxZZWFyKCk7YnJlYWs7Y2FzZSAidyI6bD1uLmdldERheSgpLGw9MD09bD82OmwtMX1jPTAhPW0/bCVtOmw7bT1yLnNwbGl0KCIsIik7cj0hYTtmb3Iobj0wO248bS5sZW5ndGg7bisrKWlmKGw9bVtuXSwtMSE9bC5pbmRleE9mKCItIikpe2lmKGw9bC5zcGxpdCgiLSIpLGM+PWxbMF0mJmM8PWxbMV0pe3I9YTticmVha319ZWxzZSBpZihjPT1sKXtyPWE7YnJlYWt9aWYocil7az1mO2JyZWFrfX1pZighKDA+Cmt8fGs+PWUubGVuZ3RoKSl7YT1lW2tdO3ZhciB5PSIiLHY9Yi5jbGFzc0xpc3QuY29udGFpbnMoImFpLXRpbWVkLXJvdGF0aW9uIik7ZS5mb3JFYWNoKChnLHApPT57Zy5oYXNBdHRyaWJ1dGUoImRhdGEtdGltZSIpJiYodj0hMCl9KTtpZihhLmhhc0F0dHJpYnV0ZSgiZGF0YS10aW1lIikpe2Y9YXRvYihhLmRhdGFzZXQudGltZSk7aWYoMD09ZiYmMTxlLmxlbmd0aCl7Yz1rO2Rve2MrKztjPj1lLmxlbmd0aCYmKGM9MCk7bT1lW2NdO2lmKCFtLmhhc0F0dHJpYnV0ZSgiZGF0YS10aW1lIikpe2s9YzthPWVba107Zj0wO2JyZWFrfW09YXRvYihtLmRhdGFzZXQudGltZSl9d2hpbGUoMD09bSYmYyE9ayk7MCE9ZiYmKGs9YyxhPWVba10sZj1hdG9iKGEuZGF0YXNldC50aW1lKSl9aWYoMDxmJiYoYz1rKzEsYz49ZS5sZW5ndGgmJihjPTApLGIuaGFzQXR0cmlidXRlKCJkYXRhLWluZm8iKSkpe209SlNPTi5wYXJzZShhdG9iKGIuZGF0YXNldC5pbmZvKSlbMF07Yi5zZXRBdHRyaWJ1dGUoImRhdGEtbmV4dCIsCmMpO3ZhciB3PSJkaXYuYWktcm90YXRlLmFpLSIrbTthaV9yb3RhdGlvbl90cmlnZ2Vycy5pbmNsdWRlcyh3KSYmKGQ9ITEpO2QmJihhaV9yb3RhdGlvbl90cmlnZ2Vycy5wdXNoKHcpLHNldFRpbWVvdXQoZnVuY3Rpb24oKXt2YXIgZz1kb2N1bWVudC5xdWVyeVNlbGVjdG9yQWxsKHcpO2cuZm9yRWFjaCgocCxxKT0+e3AuY2xhc3NMaXN0LmFkZCgiYWktdGltZXIiKX0pO2FpX3Byb2Nlc3Nfcm90YXRpb24oZyl9LDFFMypmKSk7eT0iICgiK2YrIiBzKSJ9fWVsc2UgYS5oYXNBdHRyaWJ1dGUoImRhdGEtZ3JvdXAiKXx8ZS5mb3JFYWNoKChnLHApPT57cCE9ayYmZy5yZW1vdmUoKX0pO2Euc3R5bGUuZGlzcGxheT0iIjthLnN0eWxlLnZpc2liaWxpdHk9IiI7YS5zdHlsZS5wb3NpdGlvbj0iIjthLnN0eWxlLndpZHRoPSIiO2Euc3R5bGUuaGVpZ2h0PSIiO2Euc3R5bGUudG9wPSIiO2Euc3R5bGUubGVmdD0iIjthLmNsYXNzTGlzdC5yZW1vdmUoImFpLXJvdGF0ZS1oaWRkZW4iKTthLmNsYXNzTGlzdC5yZW1vdmUoImFpLXJvdGF0ZS1oaWRkZW4tMiIpOwpiLnN0eWxlLnBvc2l0aW9uPSIiO2lmKGEuaGFzQXR0cmlidXRlKCJkYXRhLWNvZGUiKSl7ZS5mb3JFYWNoKChnLHApPT57Zy5pbm5lclRleHQ9IiJ9KTtkPWI2NGQoYS5kYXRhc2V0LmNvZGUpO2Y9ZG9jdW1lbnQuY3JlYXRlUmFuZ2UoKTtjPSEwO3RyeXtoPWYuY3JlYXRlQ29udGV4dHVhbEZyYWdtZW50KGQpfWNhdGNoKGcpe2M9ITF9YS5hcHBlbmQoaCk7QigpfWY9cGFyc2VJbnQoYS5kYXRhc2V0LmluZGV4KTt2YXIgeD1iNjRkKGEuZGF0YXNldC5uYW1lKTtkPWIuY2xvc2VzdCgiLmFpLWRlYnVnLWJsb2NrIik7aWYobnVsbCE9ZCl7aD1kLnF1ZXJ5U2VsZWN0b3JBbGwoImtiZC5haS1vcHRpb24tbmFtZSIpO2Q9ZC5xdWVyeVNlbGVjdG9yQWxsKCIuYWktZGVidWctYmxvY2siKTtpZigwIT1kLmxlbmd0aCl7dmFyIHo9W107ZC5mb3JFYWNoKChnLHApPT57Zy5xdWVyeVNlbGVjdG9yQWxsKCJrYmQuYWktb3B0aW9uLW5hbWUiKS5mb3JFYWNoKChxLHQpPT57ei5wdXNoKHEpfSl9KTsKaD1BcnJheS5mcm9tKGgpO2g9aC5zbGljZSgwLGgubGVuZ3RoLXoubGVuZ3RoKX0wIT1oLmxlbmd0aCYmKHNlcGFyYXRvcj1oWzBdLmhhc0F0dHJpYnV0ZSgiZGF0YS1zZXBhcmF0b3IiKT9oWzBdLmRhdGFzZXQuc2VwYXJhdG9yOiIiLGguZm9yRWFjaCgoZyxwKT0+e2cuaW5uZXJUZXh0PXNlcGFyYXRvcit4K3l9KSl9ZD0hMTthPWIuY2xvc2VzdCgiLmFpLWFkYi1zaG93Iik7bnVsbCE9YSYmYS5oYXNBdHRyaWJ1dGUoImRhdGEtYWktdHJhY2tpbmciKSYmKGg9SlNPTi5wYXJzZShiNjRkKGEuZ2V0QXR0cmlidXRlKCJkYXRhLWFpLXRyYWNraW5nIikpKSwidW5kZWZpbmVkIiE9PXR5cGVvZiBoJiZoLmNvbnN0cnVjdG9yPT09QXJyYXkmJihoWzFdPWYsaFszXT14LGEuc2V0QXR0cmlidXRlKCJkYXRhLWFpLXRyYWNraW5nIixiNjRlKEpTT04uc3RyaW5naWZ5KGgpKSksYS5jbGFzc0xpc3QuYWRkKCJhaS10cmFjayIpLHYmJmFpX3RyYWNraW5nX2ZpbmlzaGVkJiZhLmNsYXNzTGlzdC5hZGQoImFpLW5vLXBhZ2V2aWV3IiksCmQ9ITApKTtkfHwoZD1iLmNsb3Nlc3QoImRpdltkYXRhLWFpXSIpLG51bGwhPWQmJmQuaGFzQXR0cmlidXRlKCJkYXRhLWFpIikmJihoPUpTT04ucGFyc2UoYjY0ZChkLmdldEF0dHJpYnV0ZSgiZGF0YS1haSIpKSksInVuZGVmaW5lZCIhPT10eXBlb2YgaCYmaC5jb25zdHJ1Y3Rvcj09PUFycmF5JiYoaFsxXT1mLGhbM109eCxkLnNldEF0dHJpYnV0ZSgiZGF0YS1haSIsYjY0ZShKU09OLnN0cmluZ2lmeShoKSkpLGQuY2xhc3NMaXN0LmFkZCgiYWktdHJhY2siKSx2JiZhaV90cmFja2luZ19maW5pc2hlZCYmZC5jbGFzc0xpc3QuYWRkKCJhaS1uby1wYWdldmlldyIpKSkpfX19O2FpX3Byb2Nlc3Nfcm90YXRpb25zPWZ1bmN0aW9uKCl7ZG9jdW1lbnQucXVlcnlTZWxlY3RvckFsbCgiZGl2LmFpLXJvdGF0ZSIpLmZvckVhY2goKGIsZCk9PnthaV9wcm9jZXNzX3JvdGF0aW9uKGIpfSl9O2Z1bmN0aW9uIEEoKXtkb2N1bWVudC5xdWVyeVNlbGVjdG9yQWxsKCJkaXYuYWktcm90YXRlLmFpLXJvdGF0aW9uLWdyb3VwcyIpLmZvckVhY2goKGIsCmQpPT57Yi5jbGFzc0xpc3QuYWRkKCJhaS10aW1lciIpO2FpX3Byb2Nlc3Nfcm90YXRpb24oYil9KX1haV9wcm9jZXNzX3JvdGF0aW9uc19pbl9lbGVtZW50PWZ1bmN0aW9uKGIpe2IucXVlcnlTZWxlY3RvckFsbCgiZGl2LmFpLXJvdGF0ZSIpLmZvckVhY2goKGQsZSk9PnthaV9wcm9jZXNzX3JvdGF0aW9uKGQpfSl9OyhmdW5jdGlvbihiKXsiY29tcGxldGUiPT09ZG9jdW1lbnQucmVhZHlTdGF0ZXx8ImxvYWRpbmciIT09ZG9jdW1lbnQucmVhZHlTdGF0ZSYmIWRvY3VtZW50LmRvY3VtZW50RWxlbWVudC5kb1Njcm9sbD9iKCk6ZG9jdW1lbnQuYWRkRXZlbnRMaXN0ZW5lcigiRE9NQ29udGVudExvYWRlZCIsYil9KShmdW5jdGlvbigpe3NldFRpbWVvdXQoZnVuY3Rpb24oKXthaV9wcm9jZXNzX3JvdGF0aW9ucygpfSwxMCl9KTthaV9wcm9jZXNzX2VsZW1lbnRzX2FjdGl2ZT0hMTtmdW5jdGlvbiBCKCl7YWlfcHJvY2Vzc19lbGVtZW50c19hY3RpdmV8fHNldFRpbWVvdXQoZnVuY3Rpb24oKXthaV9wcm9jZXNzX2VsZW1lbnRzX2FjdGl2ZT0KITE7ImZ1bmN0aW9uIj09dHlwZW9mIGFpX3Byb2Nlc3Nfcm90YXRpb25zJiZhaV9wcm9jZXNzX3JvdGF0aW9ucygpOyJmdW5jdGlvbiI9PXR5cGVvZiBhaV9wcm9jZXNzX2xpc3RzJiZhaV9wcm9jZXNzX2xpc3RzKCk7ImZ1bmN0aW9uIj09dHlwZW9mIGFpX3Byb2Nlc3NfaXBfYWRkcmVzc2VzJiZhaV9wcm9jZXNzX2lwX2FkZHJlc3NlcygpOyJmdW5jdGlvbiI9PXR5cGVvZiBhaV9wcm9jZXNzX2ZpbHRlcl9ob29rcyYmYWlfcHJvY2Vzc19maWx0ZXJfaG9va3MoKTsiZnVuY3Rpb24iPT10eXBlb2YgYWlfYWRiX3Byb2Nlc3NfYmxvY2tzJiZhaV9hZGJfcHJvY2Vzc19ibG9ja3MoKTsiZnVuY3Rpb24iPT10eXBlb2YgYWlfcHJvY2Vzc19pbXByZXNzaW9ucyYmMT09YWlfdHJhY2tpbmdfZmluaXNoZWQmJmFpX3Byb2Nlc3NfaW1wcmVzc2lvbnMoKTsiZnVuY3Rpb24iPT10eXBlb2YgYWlfaW5zdGFsbF9jbGlja190cmFja2VycyYmMT09YWlfdHJhY2tpbmdfZmluaXNoZWQmJmFpX2luc3RhbGxfY2xpY2tfdHJhY2tlcnMoKTsKImZ1bmN0aW9uIj09dHlwZW9mIGFpX2luc3RhbGxfY2xvc2VfYnV0dG9ucyYmYWlfaW5zdGFsbF9jbG9zZV9idXR0b25zKGRvY3VtZW50KX0sNSk7YWlfcHJvY2Vzc19lbGVtZW50c19hY3RpdmU9ITB9fTsKOyFmdW5jdGlvbihhLGIpe2EoZnVuY3Rpb24oKXsidXNlIHN0cmljdCI7ZnVuY3Rpb24gYShhLGIpe3JldHVybiBudWxsIT1hJiZudWxsIT1iJiZhLnRvTG93ZXJDYXNlKCk9PT1iLnRvTG93ZXJDYXNlKCl9ZnVuY3Rpb24gYyhhLGIpe3ZhciBjLGQsZT1hLmxlbmd0aDtpZighZXx8IWIpcmV0dXJuITE7Zm9yKGM9Yi50b0xvd2VyQ2FzZSgpLGQ9MDtkPGU7KytkKWlmKGM9PT1hW2RdLnRvTG93ZXJDYXNlKCkpcmV0dXJuITA7cmV0dXJuITF9ZnVuY3Rpb24gZChhKXtmb3IodmFyIGIgaW4gYSlpLmNhbGwoYSxiKSYmKGFbYl09bmV3IFJlZ0V4cChhW2JdLCJpIikpfWZ1bmN0aW9uIGUoYSl7cmV0dXJuKGF8fCIiKS5zdWJzdHIoMCw1MDApfWZ1bmN0aW9uIGYoYSxiKXt0aGlzLnVhPWUoYSksdGhpcy5fY2FjaGU9e30sdGhpcy5tYXhQaG9uZVdpZHRoPWJ8fDYwMH12YXIgZz17fTtnLm1vYmlsZURldGVjdFJ1bGVzPXtwaG9uZXM6e2lQaG9uZToiXFxiaVBob25lXFxifFxcYmlQb2RcXGIiLEJsYWNrQmVycnk6IkJsYWNrQmVycnl8XFxiQkIxMFxcYnxyaW1bMC05XSt8XFxiKEJCQTEwMHxCQkIxMDB8QkJEMTAwfEJCRTEwMHxCQkYxMDB8U1RIMTAwKVxcYi1bMC05XSsiLFBpeGVsOiI7IFxcYlBpeGVsXFxiIixIVEM6IkhUQ3xIVEMuKihTZW5zYXRpb258RXZvfFZpc2lvbnxFeHBsb3Jlcnw2ODAwfDgxMDB8ODkwMHxBNzI3MnxTNTEwZXxDMTEwZXxMZWdlbmR8RGVzaXJlfFQ4MjgyKXxBUFg1MTVDS1R8UXRlazkwOTB8QVBBOTI5MktUfEhEX21pbml8U2Vuc2F0aW9uLipaNzEwZXxQRzg2MTAwfFo3MTVlfERlc2lyZS4qKEE4MTgxfEhEKXxBRFI2MjAwfEFEUjY0MDBMfEFEUjY0MjV8MDAxSFR8SW5zcGlyZSA0R3xBbmRyb2lkLipcXGJFVk9cXGJ8VC1Nb2JpbGUgRzF8WjUyMG18QW5kcm9pZCBbMC05Ll0rOyBQaXhlbCIsTmV4dXM6Ik5leHVzIE9uZXxOZXh1cyBTfEdhbGF4eS4qTmV4dXN8QW5kcm9pZC4qTmV4dXMuKk1vYmlsZXxOZXh1cyA0fE5leHVzIDV8TmV4dXMgNVh8TmV4dXMgNiIsRGVsbDoiRGVsbFs7XT8gKFN0cmVha3xBZXJvfFZlbnVlfFZlbnVlIFByb3xGbGFzaHxTbW9rZXxNaW5pIDNpWCl8WENEMjh8WENEMzV8XFxiMDAxRExcXGJ8XFxiMTAxRExcXGJ8XFxiR1MwMVxcYiIsTW90b3JvbGE6Ik1vdG9yb2xhfERST0lEWHxEUk9JRCBCSU9OSUN8XFxiRHJvaWRcXGIuKkJ1aWxkfEFuZHJvaWQuKlhvb218SFJJMzl8TU9ULXxBMTI2MHxBMTY4MHxBNTU1fEE4NTN8QTg1NXxBOTUzfEE5NTV8QTk1NnxNb3Rvcm9sYS4qRUxFQ1RSSUZZfE1vdG9yb2xhLippMXxpODY3fGk5NDB8TUIyMDB8TUIzMDB8TUI1MDF8TUI1MDJ8TUI1MDh8TUI1MTF8TUI1MjB8TUI1MjV8TUI1MjZ8TUI2MTF8TUI2MTJ8TUI2MzJ8TUI4MTB8TUI4NTV8TUI4NjB8TUI4NjF8TUI4NjV8TUI4NzB8TUU1MDF8TUU1MDJ8TUU1MTF8TUU1MjV8TUU2MDB8TUU2MzJ8TUU3MjJ8TUU4MTF8TUU4NjB8TUU4NjN8TUU4NjV8TVQ2MjB8TVQ3MTB8TVQ3MTZ8TVQ3MjB8TVQ4MTB8TVQ4NzB8TVQ5MTd8TW90b3JvbGEuKlRJVEFOSVVNfFdYNDM1fFdYNDQ1fFhUMzAwfFhUMzAxfFhUMzExfFhUMzE2fFhUMzE3fFhUMzE5fFhUMzIwfFhUMzkwfFhUNTAyfFhUNTMwfFhUNTMxfFhUNTMyfFhUNTM1fFhUNjAzfFhUNjEwfFhUNjExfFhUNjE1fFhUNjgxfFhUNzAxfFhUNzAyfFhUNzExfFhUNzIwfFhUODAwfFhUODA2fFhUODYwfFhUODYyfFhUODc1fFhUODgyfFhUODgzfFhUODk0fFhUOTAxfFhUOTA3fFhUOTA5fFhUOTEwfFhUOTEyfFhUOTI4fFhUOTI2fFhUOTE1fFhUOTE5fFhUOTI1fFhUMTAyMXxcXGJNb3RvIEVcXGJ8WFQxMDY4fFhUMTA5MnxYVDEwNTIiLFNhbXN1bmc6IlxcYlNhbXN1bmdcXGJ8U00tRzk1MEZ8U00tRzk1NUZ8U00tRzkyNTB8R1QtMTkzMDB8U0dILUkzMzd8QkdULVM1MjMwfEdULUIyMTAwfEdULUIyNzAwfEdULUIyNzEwfEdULUIzMjEwfEdULUIzMzEwfEdULUIzNDEwfEdULUIzNzMwfEdULUIzNzQwfEdULUI1NTEwfEdULUI1NTEyfEdULUI1NzIyfEdULUI2NTIwfEdULUI3MzAwfEdULUI3MzIwfEdULUI3MzMwfEdULUI3MzUwfEdULUI3NTEwfEdULUI3NzIyfEdULUI3ODAwfEdULUMzMDEwfEdULUMzMDExfEdULUMzMDYwfEdULUMzMjAwfEdULUMzMjEyfEdULUMzMjEySXxHVC1DMzI2MnxHVC1DMzIyMnxHVC1DMzMwMHxHVC1DMzMwMEt8R1QtQzMzMDN8R1QtQzMzMDNLfEdULUMzMzEwfEdULUMzMzIyfEdULUMzMzMwfEdULUMzMzUwfEdULUMzNTAwfEdULUMzNTEwfEdULUMzNTMwfEdULUMzNjMwfEdULUMzNzgwfEdULUM1MDEwfEdULUM1MjEyfEdULUM2NjIwfEdULUM2NjI1fEdULUM2NzEyfEdULUUxMDUwfEdULUUxMDcwfEdULUUxMDc1fEdULUUxMDgwfEdULUUxMDgxfEdULUUxMDg1fEdULUUxMDg3fEdULUUxMTAwfEdULUUxMTA3fEdULUUxMTEwfEdULUUxMTIwfEdULUUxMTI1fEdULUUxMTMwfEdULUUxMTYwfEdULUUxMTcwfEdULUUxMTc1fEdULUUxMTgwfEdULUUxMTgyfEdULUUxMjAwfEdULUUxMjEwfEdULUUxMjI1fEdULUUxMjMwfEdULUUxMzkwfEdULUUyMTAwfEdULUUyMTIwfEdULUUyMTIxfEdULUUyMTUyfEdULUUyMjIwfEdULUUyMjIyfEdULUUyMjMwfEdULUUyMjMyfEdULUUyMjUwfEdULUUyMzcwfEdULUUyNTUwfEdULUUyNjUyfEdULUUzMjEwfEdULUUzMjEzfEdULUk1NTAwfEdULUk1NTAzfEdULUk1NzAwfEdULUk1ODAwfEdULUk1ODAxfEdULUk2NDEwfEdULUk2NDIwfEdULUk3MTEwfEdULUk3NDEwfEdULUk3NTAwfEdULUk4MDAwfEdULUk4MTUwfEdULUk4MTYwfEdULUk4MTkwfEdULUk4MzIwfEdULUk4MzMwfEdULUk4MzUwfEdULUk4NTMwfEdULUk4NzAwfEdULUk4NzAzfEdULUk4OTEwfEdULUk5MDAwfEdULUk5MDAxfEdULUk5MDAzfEdULUk5MDEwfEdULUk5MDIwfEdULUk5MDIzfEdULUk5MDcwfEdULUk5MDgyfEdULUk5MTAwfEdULUk5MTAzfEdULUk5MjIwfEdULUk5MjUwfEdULUk5MzAwfEdULUk5MzA1fEdULUk5NTAwfEdULUk5NTA1fEdULU0zNTEwfEdULU01NjUwfEdULU03NTAwfEdULU03NjAwfEdULU03NjAzfEdULU04ODAwfEdULU04OTEwfEdULU43MDAwfEdULVMzMTEwfEdULVMzMzEwfEdULVMzMzUwfEdULVMzMzUzfEdULVMzMzcwfEdULVMzNjUwfEdULVMzNjUzfEdULVMzNzcwfEdULVMzODUwfEdULVM1MjEwfEdULVM1MjIwfEdULVM1MjI5fEdULVM1MjMwfEdULVM1MjMzfEdULVM1MjUwfEdULVM1MjUzfEdULVM1MjYwfEdULVM1MjYzfEdULVM1MjcwfEdULVM1MzAwfEdULVM1MzMwfEdULVM1MzUwfEdULVM1MzYwfEdULVM1MzYzfEdULVM1MzY5fEdULVM1MzgwfEdULVM1MzgwRHxHVC1TNTU2MHxHVC1TNTU3MHxHVC1TNTYwMHxHVC1TNTYwM3xHVC1TNTYxMHxHVC1TNTYyMHxHVC1TNTY2MHxHVC1TNTY3MHxHVC1TNTY5MHxHVC1TNTc1MHxHVC1TNTc4MHxHVC1TNTgzMHxHVC1TNTgzOXxHVC1TNjEwMnxHVC1TNjUwMHxHVC1TNzA3MHxHVC1TNzIwMHxHVC1TNzIyMHxHVC1TNzIzMHxHVC1TNzIzM3xHVC1TNzI1MHxHVC1TNzUwMHxHVC1TNzUzMHxHVC1TNzU1MHxHVC1TNzU2MnxHVC1TNzcxMHxHVC1TODAwMHxHVC1TODAwM3xHVC1TODUwMHxHVC1TODUzMHxHVC1TODYwMHxTQ0gtQTMxMHxTQ0gtQTUzMHxTQ0gtQTU3MHxTQ0gtQTYxMHxTQ0gtQTYzMHxTQ0gtQTY1MHxTQ0gtQTc5MHxTQ0gtQTc5NXxTQ0gtQTg1MHxTQ0gtQTg3MHxTQ0gtQTg5MHxTQ0gtQTkzMHxTQ0gtQTk1MHxTQ0gtQTk3MHxTQ0gtQTk5MHxTQ0gtSTEwMHxTQ0gtSTExMHxTQ0gtSTQwMHxTQ0gtSTQwNXxTQ0gtSTUwMHxTQ0gtSTUxMHxTQ0gtSTUxNXxTQ0gtSTYwMHxTQ0gtSTczMHxTQ0gtSTc2MHxTQ0gtSTc3MHxTQ0gtSTgzMHxTQ0gtSTkxMHxTQ0gtSTkyMHxTQ0gtSTk1OXxTQ0gtTEMxMXxTQ0gtTjE1MHxTQ0gtTjMwMHxTQ0gtUjEwMHxTQ0gtUjMwMHxTQ0gtUjM1MXxTQ0gtUjQwMHxTQ0gtUjQxMHxTQ0gtVDMwMHxTQ0gtVTMxMHxTQ0gtVTMyMHxTQ0gtVTM1MHxTQ0gtVTM2MHxTQ0gtVTM2NXxTQ0gtVTM3MHxTQ0gtVTM4MHxTQ0gtVTQxMHxTQ0gtVTQzMHxTQ0gtVTQ1MHxTQ0gtVTQ2MHxTQ0gtVTQ3MHxTQ0gtVTQ5MHxTQ0gtVTU0MHxTQ0gtVTU1MHxTQ0gtVTYyMHxTQ0gtVTY0MHxTQ0gtVTY1MHxTQ0gtVTY2MHxTQ0gtVTcwMHxTQ0gtVTc0MHxTQ0gtVTc1MHxTQ0gtVTgxMHxTQ0gtVTgyMHxTQ0gtVTkwMHxTQ0gtVTk0MHxTQ0gtVTk2MHxTQ1MtMjZVQ3xTR0gtQTEwN3xTR0gtQTExN3xTR0gtQTEyN3xTR0gtQTEzN3xTR0gtQTE1N3xTR0gtQTE2N3xTR0gtQTE3N3xTR0gtQTE4N3xTR0gtQTE5N3xTR0gtQTIyN3xTR0gtQTIzN3xTR0gtQTI1N3xTR0gtQTQzN3xTR0gtQTUxN3xTR0gtQTU5N3xTR0gtQTYzN3xTR0gtQTY1N3xTR0gtQTY2N3xTR0gtQTY4N3xTR0gtQTY5N3xTR0gtQTcwN3xTR0gtQTcxN3xTR0gtQTcyN3xTR0gtQTczN3xTR0gtQTc0N3xTR0gtQTc2N3xTR0gtQTc3N3xTR0gtQTc5N3xTR0gtQTgxN3xTR0gtQTgyN3xTR0gtQTgzN3xTR0gtQTg0N3xTR0gtQTg2N3xTR0gtQTg3N3xTR0gtQTg4N3xTR0gtQTg5N3xTR0gtQTkyN3xTR0gtQjEwMHxTR0gtQjEzMHxTR0gtQjIwMHxTR0gtQjIyMHxTR0gtQzEwMHxTR0gtQzExMHxTR0gtQzEyMHxTR0gtQzEzMHxTR0gtQzE0MHxTR0gtQzE2MHxTR0gtQzE3MHxTR0gtQzE4MHxTR0gtQzIwMHxTR0gtQzIwN3xTR0gtQzIxMHxTR0gtQzIyNXxTR0gtQzIzMHxTR0gtQzQxN3xTR0gtQzQ1MHxTR0gtRDMwN3xTR0gtRDM0N3xTR0gtRDM1N3xTR0gtRDQwN3xTR0gtRDQxNXxTR0gtRDc4MHxTR0gtRDgwN3xTR0gtRDk4MHxTR0gtRTEwNXxTR0gtRTIwMHxTR0gtRTMxNXxTR0gtRTMxNnxTR0gtRTMxN3xTR0gtRTMzNXxTR0gtRTU5MHxTR0gtRTYzNXxTR0gtRTcxNXxTR0gtRTg5MHxTR0gtRjMwMHxTR0gtRjQ4MHxTR0gtSTIwMHxTR0gtSTMwMHxTR0gtSTMyMHxTR0gtSTU1MHxTR0gtSTU3N3xTR0gtSTYwMHxTR0gtSTYwN3xTR0gtSTYxN3xTR0gtSTYyN3xTR0gtSTYzN3xTR0gtSTY3N3xTR0gtSTcwMHxTR0gtSTcxN3xTR0gtSTcyN3xTR0gtaTc0N018U0dILUk3Nzd8U0dILUk3ODB8U0dILUk4Mjd8U0dILUk4NDd8U0dILUk4NTd8U0dILUk4OTZ8U0dILUk4OTd8U0dILUk5MDB8U0dILUk5MDd8U0dILUk5MTd8U0dILUk5Mjd8U0dILUk5Mzd8U0dILUk5OTd8U0dILUoxNTB8U0dILUoyMDB8U0dILUwxNzB8U0dILUw3MDB8U0dILU0xMTB8U0dILU0xNTB8U0dILU0yMDB8U0dILU4xMDV8U0dILU41MDB8U0dILU42MDB8U0dILU42MjB8U0dILU42MjV8U0dILU43MDB8U0dILU43MTB8U0dILVAxMDd8U0dILVAyMDd8U0dILVAzMDB8U0dILVAzMTB8U0dILVA1MjB8U0dILVA3MzV8U0dILVA3Nzd8U0dILVExMDV8U0dILVIyMTB8U0dILVIyMjB8U0dILVIyMjV8U0dILVMxMDV8U0dILVMzMDd8U0dILVQxMDl8U0dILVQxMTl8U0dILVQxMzl8U0dILVQyMDl8U0dILVQyMTl8U0dILVQyMjl8U0dILVQyMzl8U0dILVQyNDl8U0dILVQyNTl8U0dILVQzMDl8U0dILVQzMTl8U0dILVQzMjl8U0dILVQzMzl8U0dILVQzNDl8U0dILVQzNTl8U0dILVQzNjl8U0dILVQzNzl8U0dILVQ0MDl8U0dILVQ0Mjl8U0dILVQ0Mzl8U0dILVQ0NTl8U0dILVQ0Njl8U0dILVQ0Nzl8U0dILVQ0OTl8U0dILVQ1MDl8U0dILVQ1MTl8U0dILVQ1Mzl8U0dILVQ1NTl8U0dILVQ1ODl8U0dILVQ2MDl8U0dILVQ2MTl8U0dILVQ2Mjl8U0dILVQ2Mzl8U0dILVQ2NTl8U0dILVQ2Njl8U0dILVQ2Nzl8U0dILVQ3MDl8U0dILVQ3MTl8U0dILVQ3Mjl8U0dILVQ3Mzl8U0dILVQ3NDZ8U0dILVQ3NDl8U0dILVQ3NTl8U0dILVQ3Njl8U0dILVQ4MDl8U0dILVQ4MTl8U0dILVQ4Mzl8U0dILVQ5MTl8U0dILVQ5Mjl8U0dILVQ5Mzl8U0dILVQ5NTl8U0dILVQ5ODl8U0dILVUxMDB8U0dILVUyMDB8U0dILVU4MDB8U0dILVYyMDV8U0dILVYyMDZ8U0dILVgxMDB8U0dILVgxMDV8U0dILVgxMjB8U0dILVgxNDB8U0dILVg0MjZ8U0dILVg0Mjd8U0dILVg0NzV8U0dILVg0OTV8U0dILVg0OTd8U0dILVg1MDd8U0dILVg2MDB8U0dILVg2MTB8U0dILVg2MjB8U0dILVg2MzB8U0dILVg3MDB8U0dILVg4MjB8U0dILVg4OTB8U0dILVoxMzB8U0dILVoxNTB8U0dILVoxNzB8U0dILVpYMTB8U0dILVpYMjB8U0hXLU0xMTB8U1BILUExMjB8U1BILUE0MDB8U1BILUE0MjB8U1BILUE0NjB8U1BILUE1MDB8U1BILUE1NjB8U1BILUE2MDB8U1BILUE2MjB8U1BILUE2NjB8U1BILUE3MDB8U1BILUE3NDB8U1BILUE3NjB8U1BILUE3OTB8U1BILUE4MDB8U1BILUE4MjB8U1BILUE4NDB8U1BILUE4ODB8U1BILUE5MDB8U1BILUE5NDB8U1BILUE5NjB8U1BILUQ2MDB8U1BILUQ3MDB8U1BILUQ3MTB8U1BILUQ3MjB8U1BILUkzMDB8U1BILUkzMjV8U1BILUkzMzB8U1BILUkzNTB8U1BILUk1MDB8U1BILUk2MDB8U1BILUk3MDB8U1BILUw3MDB8U1BILU0xMDB8U1BILU0yMjB8U1BILU0yNDB8U1BILU0zMDB8U1BILU0zMDV8U1BILU0zMjB8U1BILU0zMzB8U1BILU0zNTB8U1BILU0zNjB8U1BILU0zNzB8U1BILU0zODB8U1BILU01MTB8U1BILU01NDB8U1BILU01NTB8U1BILU01NjB8U1BILU01NzB8U1BILU01ODB8U1BILU02MTB8U1BILU02MjB8U1BILU02MzB8U1BILU04MDB8U1BILU04MTB8U1BILU04NTB8U1BILU05MDB8U1BILU05MTB8U1BILU05MjB8U1BILU05MzB8U1BILU4xMDB8U1BILU4yMDB8U1BILU4yNDB8U1BILU4zMDB8U1BILU40MDB8U1BILVo0MDB8U1dDLUUxMDB8U0NILWk5MDl8R1QtTjcxMDB8R1QtTjcxMDV8U0NILUk1MzV8U00tTjkwMEF8U0dILUkzMTd8U0dILVQ5OTlMfEdULVM1MzYwQnxHVC1JODI2MnxHVC1TNjgwMnxHVC1TNjMxMnxHVC1TNjMxMHxHVC1TNTMxMnxHVC1TNTMxMHxHVC1JOTEwNXxHVC1JODUxMHxHVC1TNjc5ME58U00tRzcxMDV8U00tTjkwMDV8R1QtUzUzMDF8R1QtSTkyOTV8R1QtSTkxOTV8U00tQzEwMXxHVC1TNzM5MnxHVC1TNzU2MHxHVC1CNzYxMHxHVC1JNTUxMHxHVC1TNzU4MnxHVC1TNzUzMEV8R1QtSTg3NTB8U00tRzkwMDZWfFNNLUc5MDA4VnxTTS1HOTAwOUR8U00tRzkwMEF8U00tRzkwMER8U00tRzkwMEZ8U00tRzkwMEh8U00tRzkwMEl8U00tRzkwMEp8U00tRzkwMEt8U00tRzkwMEx8U00tRzkwME18U00tRzkwMFB8U00tRzkwMFI0fFNNLUc5MDBTfFNNLUc5MDBUfFNNLUc5MDBWfFNNLUc5MDBXOHxTSFYtRTE2MEt8U0NILVA3MDl8U0NILVA3Mjl8U00tVDI1NTh8R1QtSTkyMDV8U00tRzkzNTB8U00tSjEyMEZ8U00tRzkyMEZ8U00tRzkyMFZ8U00tRzkzMEZ8U00tTjkxMEN8U00tQTMxMEZ8R1QtSTkxOTB8U00tSjUwMEZOfFNNLUc5MDNGfFNNLUozMzBGfFNNLUc2MTBGfFNNLUc5ODFCfFNNLUc4OTJBfFNNLUE1MzBGIixMRzoiXFxiTEdcXGI7fExHWy0gXT8oQzgwMHxDOTAwfEU0MDB8RTYxMHxFOTAwfEUtOTAwfEYxNjB8RjE4MEt8RjE4MEx8RjE4MFN8NzMwfDg1NXxMMTYwfExTNzQwfExTODQwfExTOTcwfExVNjIwMHxNUzY5MHxNUzY5NXxNUzc3MHxNUzg0MHxNUzg3MHxNUzkxMHxQNTAwfFA3MDB8UDcwNXxWTTY5NnxBUzY4MHxBUzY5NXxBWDg0MHxDNzI5fEU5NzB8R1M1MDV8MjcyfEMzOTV8RTczOUJLfEU5NjB8TDU1Q3xMNzVDfExTNjk2fExTODYwfFA3NjlCS3xQMzUwfFA1MDB8UDUwOXxQODcwfFVOMjcyfFVTNzMwfFZTODQwfFZTOTUwfExOMjcyfExONTEwfExTNjcwfExTODU1fExXNjkwfE1OMjcwfE1ONTEwfFA1MDl8UDc2OXxQOTMwfFVOMjAwfFVOMjcwfFVONTEwfFVONjEwfFVTNjcwfFVTNzQwfFVTNzYwfFVYMjY1fFVYODQwfFZOMjcxfFZONTMwfFZTNjYwfFZTNzAwfFZTNzQwfFZTNzUwfFZTOTEwfFZTOTIwfFZTOTMwfFZYOTIwMHxWWDExMDAwfEFYODQwQXxMVzc3MHxQNTA2fFA5MjV8UDk5OXxFNjEyfEQ5NTV8RDgwMnxNUzMyM3xNMjU3KXxMTS1HNzEwIixTb255OiJTb255U1R8U29ueUxUfFNvbnlFcmljc3NvbnxTb255RXJpY3Nzb25MVDE1aXZ8TFQxOGl8RTEwaXxMVDI4aHxMVDI2d3xTb255RXJpY3Nzb25NVDI3aXxDNTMwM3xDNjkwMnxDNjkwM3xDNjkwNnxDNjk0M3xEMjUzM3xTT1YzNHw2MDFTT3xGODMzMiIsQXN1czoiQXN1cy4qR2FsYXh5fFBhZEZvbmUuKk1vYmlsZSIsWGlhb21pOiJeKD8hLipcXGJ4MTFcXGIpLip4aWFvbWkuKiR8UE9DT1BIT05FIEYxfE1JIDh8UmVkbWkgTm90ZSA5U3xSZWRtaSBOb3RlIDVBIFByaW1lfE4yRzQ3SHxNMjAwMUoyR3xNMjAwMUoySXxNMTgwNUUxMEF8TTIwMDRKMTFHfE0xOTAyRjFHfE0yMDAySjlHfE0yMDA0SjE5R3xNMjAwM0o2QTFHIixOb2tpYUx1bWlhOiJMdW1pYSBbMC05XXszLDR9IixNaWNyb21heDoiTWljcm9tYXguKlxcYihBMjEwfEE5MnxBODh8QTcyfEExMTF8QTExMFF8QTExNXxBMTE2fEExMTB8QTkwU3xBMjZ8QTUxfEEzNXxBNTR8QTI1fEEyN3xBODl8QTY4fEE2NXxBNTd8QTkwKVxcYiIsUGFsbToiUGFsbVNvdXJjZXxQYWxtIixWZXJ0dToiVmVydHV8VmVydHUuKkx0ZHxWZXJ0dS4qQXNjZW50fFZlcnR1LipBeXh0YXxWZXJ0dS4qQ29uc3RlbGxhdGlvbihGfFF1ZXN0KT98VmVydHUuKk1vbmlrYXxWZXJ0dS4qU2lnbmF0dXJlIixQYW50ZWNoOiJQQU5URUNIfElNLUE4NTBTfElNLUE4NDBTfElNLUE4MzBMfElNLUE4MzBLfElNLUE4MzBTfElNLUE4MjBMfElNLUE4MTBLfElNLUE4MTBTfElNLUE4MDBTfElNLVQxMDBLfElNLUE3MjVMfElNLUE3ODBMfElNLUE3NzVDfElNLUE3NzBLfElNLUE3NjBTfElNLUE3NTBLfElNLUE3NDBTfElNLUE3MzBTfElNLUE3MjBMfElNLUE3MTBLfElNLUE2OTBMfElNLUE2OTBTfElNLUE2NTBTfElNLUE2MzBLfElNLUE2MDBTfFZFR0EgUFRMMjF8UFQwMDN8UDgwMTB8QURSOTEwTHxQNjAzMHxQNjAyMHxQOTA3MHxQNDEwMHxQOTA2MHxQNTAwMHxDRE04OTkyfFRYVDgwNDV8QURSODk5NXxJUzExUFR8UDIwMzB8UDYwMTB8UDgwMDB8UFQwMDJ8SVMwNnxDRE04OTk5fFA5MDUwfFBUMDAxfFRYVDgwNDB8UDIwMjB8UDkwMjB8UDIwMDB8UDcwNDB8UDcwMDB8Qzc5MCIsRmx5OiJJUTIzMHxJUTQ0NHxJUTQ1MHxJUTQ0MHxJUTQ0MnxJUTQ0MXxJUTI0NXxJUTI1NnxJUTIzNnxJUTI1NXxJUTIzNXxJUTI0NXxJUTI3NXxJUTI0MHxJUTI4NXxJUTI4MHxJUTI3MHxJUTI2MHxJUTI1MCIsV2lrbzoiS0lURSA0R3xISUdIV0FZfEdFVEFXQVl8U1RBSVJXQVl8REFSS1NJREV8REFSS0ZVTEx8REFSS05JR0hUfERBUktNT09OfFNMSURFfFdBWCA0R3xSQUlOQk9XfEJMT09NfFNVTlNFVHxHT0EoPyFubmEpfExFTk5ZfEJBUlJZfElHR1l8T1paWXxDSU5LIEZJVkV8Q0lOSyBQRUFYfENJTksgUEVBWCAyfENJTksgU0xJTXxDSU5LIFNMSU0gMnxDSU5LICt8Q0lOSyBLSU5HfENJTksgUEVBWHxDSU5LIFNMSU18U1VCTElNIixpTW9iaWxlOiJpLW1vYmlsZSAoSVF8aS1TVFlMRXxpZGVhfFpBQXxIaXR6KSIsU2ltVmFsbGV5OiJcXGIoU1AtODB8WFQtOTMwfFNYLTM0MHxYVC05MzB8U1gtMzEwfFNQLTM2MHxTUDYwfFNQVC04MDB8U1AtMTIwfFNQVC04MDB8U1AtMTQwfFNQWC01fFNQWC04fFNQLTEwMHxTUFgtOHxTUFgtMTIpXFxiIixXb2xmZ2FuZzoiQVQtQjI0RHxBVC1BUzUwSER8QVQtQVM0MFd8QVQtQVM1NUhEfEFULUFTNDVxMnxBVC1CMjZEfEFULUFTNTBRIixBbGNhdGVsOiJBbGNhdGVsIixOaW50ZW5kbzoiTmludGVuZG8gKDNEU3xTd2l0Y2gpIixBbW9pOiJBbW9pIixJTlE6IklOUSIsT25lUGx1czoiT05FUExVUyIsR2VuZXJpY1Bob25lOiJUYXBhdGFsa3xQREE7fFNBR0VNfFxcYm1tcFxcYnxwb2NrZXR8XFxicHNwXFxifHN5bWJpYW58U21hcnRwaG9uZXxzbWFydGZvbnx0cmVvfHVwLmJyb3dzZXJ8dXAubGlua3x2b2RhZm9uZXxcXGJ3YXBcXGJ8bm9raWF8U2VyaWVzNDB8U2VyaWVzNjB8UzYwfFNvbnlFcmljc3NvbnxOOTAwfE1BVUkuKldBUC4qQnJvd3NlciJ9LHRhYmxldHM6e2lQYWQ6ImlQYWR8aVBhZC4qTW9iaWxlIixOZXh1c1RhYmxldDoiQW5kcm9pZC4qTmV4dXNbXFxzXSsoN3w5fDEwKSIsR29vZ2xlVGFibGV0OiJBbmRyb2lkLipQaXhlbCBDIixTYW1zdW5nVGFibGV0OiJTQU1TVU5HLipUYWJsZXR8R2FsYXh5LipUYWJ8U0MtMDFDfEdULVAxMDAwfEdULVAxMDAzfEdULVAxMDEwfEdULVAzMTA1fEdULVA2MjEwfEdULVA2ODAwfEdULVA2ODEwfEdULVA3MTAwfEdULVA3MzAwfEdULVA3MzEwfEdULVA3NTAwfEdULVA3NTEwfFNDSC1JODAwfFNDSC1JODE1fFNDSC1JOTA1fFNHSC1JOTU3fFNHSC1JOTg3fFNHSC1UODQ5fFNHSC1UODU5fFNHSC1UODY5fFNQSC1QMTAwfEdULVAzMTAwfEdULVAzMTA4fEdULVAzMTEwfEdULVA1MTAwfEdULVA1MTEwfEdULVA2MjAwfEdULVA3MzIwfEdULVA3NTExfEdULU44MDAwfEdULVA4NTEwfFNHSC1JNDk3fFNQSC1QNTAwfFNHSC1UNzc5fFNDSC1JNzA1fFNDSC1JOTE1fEdULU44MDEzfEdULVAzMTEzfEdULVA1MTEzfEdULVA4MTEwfEdULU44MDEwfEdULU44MDA1fEdULU44MDIwfEdULVAxMDEzfEdULVA2MjAxfEdULVA3NTAxfEdULU41MTAwfEdULU41MTA1fEdULU41MTEwfFNIVi1FMTQwS3xTSFYtRTE0MEx8U0hWLUUxNDBTfFNIVi1FMTUwU3xTSFYtRTIzMEt8U0hWLUUyMzBMfFNIVi1FMjMwU3xTSFctTTE4MEt8U0hXLU0xODBMfFNIVy1NMTgwU3xTSFctTTE4MFd8U0hXLU0zMDBXfFNIVy1NMzA1V3xTSFctTTM4MEt8U0hXLU0zODBTfFNIVy1NMzgwV3xTSFctTTQzMFd8U0hXLU00ODBLfFNIVy1NNDgwU3xTSFctTTQ4MFd8U0hXLU00ODVXfFNIVy1NNDg2V3xTSFctTTUwMFd8R1QtSTkyMjh8U0NILVA3Mzl8U0NILUk5MjV8R1QtSTkyMDB8R1QtUDUyMDB8R1QtUDUyMTB8R1QtUDUyMTBYfFNNLVQzMTF8U00tVDMxMHxTTS1UMzEwWHxTTS1UMjEwfFNNLVQyMTBSfFNNLVQyMTF8U00tUDYwMHxTTS1QNjAxfFNNLVA2MDV8U00tUDkwMHxTTS1QOTAxfFNNLVQyMTd8U00tVDIxN0F8U00tVDIxN1N8U00tUDYwMDB8U00tVDMxMDB8U0dILUk0Njd8WEU1MDB8U00tVDExMHxHVC1QNTIyMHxHVC1JOTIwMFh8R1QtTjUxMTBYfEdULU41MTIwfFNNLVA5MDV8U00tVDExMXxTTS1UMjEwNXxTTS1UMzE1fFNNLVQzMjB8U00tVDMyMFh8U00tVDMyMXxTTS1UNTIwfFNNLVQ1MjV8U00tVDUzME5VfFNNLVQyMzBOVXxTTS1UMzMwTlV8U00tVDkwMHxYRTUwMFQxQ3xTTS1QNjA1VnxTTS1QOTA1VnxTTS1UMzM3VnxTTS1UNTM3VnxTTS1UNzA3VnxTTS1UODA3VnxTTS1QNjAwWHxTTS1QOTAwWHxTTS1UMjEwWHxTTS1UMjMwfFNNLVQyMzBYfFNNLVQzMjV8R1QtUDc1MDN8U00tVDUzMXxTTS1UMzMwfFNNLVQ1MzB8U00tVDcwNXxTTS1UNzA1Q3xTTS1UNTM1fFNNLVQzMzF8U00tVDgwMHxTTS1UNzAwfFNNLVQ1Mzd8U00tVDgwN3xTTS1QOTA3QXxTTS1UMzM3QXxTTS1UNTM3QXxTTS1UNzA3QXxTTS1UODA3QXxTTS1UMjM3fFNNLVQ4MDdQfFNNLVA2MDdUfFNNLVQyMTdUfFNNLVQzMzdUfFNNLVQ4MDdUfFNNLVQxMTZOUXxTTS1UMTE2QlV8U00tUDU1MHxTTS1UMzUwfFNNLVQ1NTB8U00tVDkwMDB8U00tUDkwMDB8U00tVDcwNVl8U00tVDgwNXxHVC1QMzExM3xTTS1UNzEwfFNNLVQ4MTB8U00tVDgxNXxTTS1UMzYwfFNNLVQ1MzN8U00tVDExM3xTTS1UMzM1fFNNLVQ3MTV8U00tVDU2MHxTTS1UNjcwfFNNLVQ2Nzd8U00tVDM3N3xTTS1UNTY3fFNNLVQzNTdUfFNNLVQ1NTV8U00tVDU2MXxTTS1UNzEzfFNNLVQ3MTl8U00tVDgxM3xTTS1UODE5fFNNLVQ1ODB8U00tVDM1NVk/fFNNLVQyODB8U00tVDgxN0F8U00tVDgyMHxTTS1XNzAwfFNNLVA1ODB8U00tVDU4N3xTTS1QMzUwfFNNLVA1NTVNfFNNLVAzNTVNfFNNLVQxMTNOVXxTTS1UODE1WXxTTS1UNTg1fFNNLVQyODV8U00tVDgyNXxTTS1XNzA4fFNNLVQ4MzV8U00tVDgzMHxTTS1UODM3VnxTTS1UNzIwfFNNLVQ1MTB8U00tVDM4N1Z8U00tUDYxMHxTTS1UMjkwfFNNLVQ1MTV8U00tVDU5MHxTTS1UNTk1fFNNLVQ3MjV8U00tVDgxN1B8U00tUDU4NU4wfFNNLVQzOTV8U00tVDI5NXxTTS1UODY1fFNNLVA2MTBOfFNNLVA2MTV8U00tVDk3MHxTTS1UMzgwfFNNLVQ1OTUwfFNNLVQ5MDV8U00tVDIzMXxTTS1UNTAwfFNNLVQ4NjAiLEtpbmRsZToiS2luZGxlfFNpbGsuKkFjY2VsZXJhdGVkfEFuZHJvaWQuKlxcYihLRk9UfEtGVFR8S0ZKV0l8S0ZKV0F8S0ZPVEV8S0ZTT1dJfEtGVEhXSXxLRlRIV0F8S0ZBUFdJfEtGQVBXQXxXRkpXQUV8S0ZTQVdBfEtGU0FXSXxLRkFTV0l8S0ZBUldJfEtGRk9XSXxLRkdJV0l8S0ZNRVdJKVxcYnxBbmRyb2lkLipTaWxrL1swLTkuXSsgbGlrZSBDaHJvbWUvWzAtOS5dKyAoPyFNb2JpbGUpIixTdXJmYWNlVGFibGV0OiJXaW5kb3dzIE5UIFswLTkuXSs7IEFSTTsuKihUYWJsZXR8QVJNQkpTKSIsSFBUYWJsZXQ6IkhQIFNsYXRlICg3fDh8MTApfEhQIEVsaXRlUGFkIDkwMHxocC10YWJsZXR8RWxpdGVCb29rLipUb3VjaHxIUCA4fFNsYXRlIDIxfEhQIFNsYXRlQm9vayAxMCIsQXN1c1RhYmxldDoiXi4qUGFkRm9uZSgoPyFNb2JpbGUpLikqJHxUcmFuc2Zvcm1lcnxURjEwMXxURjEwMUd8VEYzMDBUfFRGMzAwVEd8VEYzMDBUTHxURjcwMFR8VEY3MDBLTHxURjcwMVR8VEY4MTBDfE1FMTcxfE1FMzAxVHxNRTMwMkN8TUUzNzFNR3xNRTM3MFR8TUUzNzJNR3xNRTE3MlZ8TUUxNzNYfE1FNDAwQ3xTbGlkZXIgU0wxMDF8XFxiSzAwRlxcYnxcXGJLMDBDXFxifFxcYkswMEVcXGJ8XFxiSzAwTFxcYnxUWDIwMUxBfE1FMTc2Q3xNRTEwMkF8XFxiTTgwVEFcXGJ8TUUzNzJDTHxNRTU2MENHfE1FMzcyQ0d8TUUzMDJLTHwgSzAxMCB8IEswMTEgfCBLMDE3IHwgSzAxRSB8TUU1NzJDfE1FMTAzS3xNRTE3MEN8TUUxNzFDfFxcYk1FNzBDXFxifE1FNTgxQ3xNRTU4MUNMfE1FODUxMEN8TUUxODFDfFAwMVl8UE8xTUF8UDAxWnxcXGJQMDI3XFxifFxcYlAwMjRcXGJ8XFxiUDAwQ1xcYiIsQmxhY2tCZXJyeVRhYmxldDoiUGxheUJvb2t8UklNIFRhYmxldCIsSFRDdGFibGV0OiJIVENfRmx5ZXJfUDUxMnxIVEMgRmx5ZXJ8SFRDIEpldHN0cmVhbXxIVEMtUDcxNWF8SFRDIEVWTyBWaWV3IDRHfFBHNDEyMDB8UEcwOTQxMCIsTW90b3JvbGFUYWJsZXQ6Inhvb218c2hvbGVzdHxNWjYxNXxNWjYwNXxNWjUwNXxNWjYwMXxNWjYwMnxNWjYwM3xNWjYwNHxNWjYwNnxNWjYwN3xNWjYwOHxNWjYwOXxNWjYxNXxNWjYxNnxNWjYxNyIsTm9va1RhYmxldDoiQW5kcm9pZC4qTm9va3xOb29rQ29sb3J8bm9vayBicm93c2VyfEJOUlYyMDB8Qk5SVjIwMEF8Qk5UVjI1MHxCTlRWMjUwQXxCTlRWNDAwfEJOVFY2MDB8TG9naWNQRCBab29tMiIsQWNlclRhYmxldDoiQW5kcm9pZC4qOyBcXGIoQTEwMHxBMTAxfEExMTB8QTIwMHxBMjEwfEEyMTF8QTUwMHxBNTAxfEE1MTB8QTUxMXxBNzAwfEE3MDF8VzUwMHxXNTAwUHxXNTAxfFc1MDFQfFc1MTB8VzUxMXxXNzAwfEcxMDB8RzEwMFd8QjEtQTcxfEIxLTcxMHxCMS03MTF8QTEtODEwfEExLTgxMXxBMS04MzApXFxifFczLTgxMHxcXGJBMy1BMTBcXGJ8XFxiQTMtQTExXFxifFxcYkEzLUEyMFxcYnxcXGJBMy1BMzB8QTMtQTQwIixUb3NoaWJhVGFibGV0OiJBbmRyb2lkLiooQVQxMDB8QVQxMDV8QVQyMDB8QVQyMDV8QVQyNzB8QVQyNzV8QVQzMDB8QVQzMDV8QVQxUzV8QVQ1MDB8QVQ1NzB8QVQ3MDB8QVQ4MzApfFRPU0hJQkEuKkZPTElPIixMR1RhYmxldDoiXFxiTC0wNkN8TEctVjkwOXxMRy1WOTAwfExHLVY3MDB8TEctVjUxMHxMRy1WNTAwfExHLVY0MTB8TEctVjQwMHxMRy1WSzgxMFxcYiIsRnVqaXRzdVRhYmxldDoiQW5kcm9pZC4qXFxiKEYtMDFEfEYtMDJGfEYtMDVFfEYtMTBEfE01MzJ8UTU3MilcXGIiLFByZXN0aWdpb1RhYmxldDoiUE1QMzE3MEJ8UE1QMzI3MEJ8UE1QMzQ3MEJ8UE1QNzE3MEJ8UE1QMzM3MEJ8UE1QMzU3MEN8UE1QNTg3MEN8UE1QMzY3MEJ8UE1QNTU3MEN8UE1QNTc3MER8UE1QMzk3MEJ8UE1QMzg3MEN8UE1QNTU4MEN8UE1QNTg4MER8UE1QNTc4MER8UE1QNTU4OEN8UE1QNzI4MEN8UE1QNzI4MEMzR3xQTVA3MjgwfFBNUDc4ODBEfFBNUDU1OTdEfFBNUDU1OTd8UE1QNzEwMER8UEVSMzQ2NHxQRVIzMjc0fFBFUjM1NzR8UEVSMzg4NHxQRVI1Mjc0fFBFUjU0NzR8UE1QNTA5N0NQUk98UE1QNTA5N3xQTVA3MzgwRHxQTVA1Mjk3Q3xQTVA1Mjk3Q19RVUFEfFBNUDgxMkV8UE1QODEyRTNHfFBNUDgxMkZ8UE1QODEwRXxQTVA4ODBURHxQTVQzMDE3fFBNVDMwMzd8UE1UMzA0N3xQTVQzMDU3fFBNVDcwMDh8UE1UNTg4N3xQTVQ1MDAxfFBNVDUwMDIiLExlbm92b1RhYmxldDoiTGVub3ZvIFRBQnxJZGVhKFRhYnxQYWQpKCBBMXxBMTB8IEsxfCl8VGhpbmtQYWQoWyBdKyk/VGFibGV0fFlUMy04NTBNfFlUMy1YOTBMfFlUMy1YOTBGfFlUMy1YOTBYfExlbm92by4qKFMyMTA5fFMyMTEwfFM1MDAwfFM2MDAwfEszMDExfEEzMDAwfEEzNTAwfEExMDAwfEEyMTA3fEEyMTA5fEExMTA3fEE1NTAwfEE3NjAwfEI2MDAwfEI4MDAwfEI4MDgwKSgtfCkoRkx8RnxIVnxIfCl8VEItWDEwM0Z8VEItWDMwNFh8VEItWDMwNEZ8VEItWDMwNEx8VEItWDUwNUZ8VEItWDUwNUx8VEItWDUwNVh8VEItWDYwNUZ8VEItWDYwNUx8VEItODcwM0Z8VEItODcwM1h8VEItODcwM058VEItODcwNE58VEItODcwNEZ8VEItODcwNFh8VEItODcwNFZ8VEItNzMwNEZ8VEItNzMwNEl8VEItNzMwNFh8VGFiMkE3LTEwRnxUYWIyQTctMjBGfFRCMi1YMzBMfFlUMy1YNTBMfFlUMy1YNTBGfFlUMy1YNTBNfFlULVg3MDVGfFlULVg3MDNGfFlULVg3MDNMfFlULVg3MDVMfFlULVg3MDVYfFRCMi1YMzBGfFRCMi1YMzBMfFRCMi1YMzBNfEEyMTA3QS1GfEEyMTA3QS1IfFRCMy03MzBGfFRCMy03MzBNfFRCMy03MzBYfFRCLTc1MDRGfFRCLTc1MDRYfFRCLVg3MDRGfFRCLVgxMDRGfFRCMy1YNzBGfFRCLVg3MDVGfFRCLTg1MDRGfFRCMy1YNzBMfFRCMy03MTBGfFRCLVg3MDRMIixEZWxsVGFibGV0OiJWZW51ZSAxMXxWZW51ZSA4fFZlbnVlIDd8RGVsbCBTdHJlYWsgMTB8RGVsbCBTdHJlYWsgNyIsWWFydmlrVGFibGV0OiJBbmRyb2lkLipcXGIoVEFCMjEwfFRBQjIxMXxUQUIyMjR8VEFCMjUwfFRBQjI2MHxUQUIyNjR8VEFCMzEwfFRBQjM2MHxUQUIzNjR8VEFCNDEwfFRBQjQxMXxUQUI0MjB8VEFCNDI0fFRBQjQ1MHxUQUI0NjB8VEFCNDYxfFRBQjQ2NHxUQUI0NjV8VEFCNDY3fFRBQjQ2OHxUQUIwNy0xMDB8VEFCMDctMTAxfFRBQjA3LTE1MHxUQUIwNy0xNTF8VEFCMDctMTUyfFRBQjA3LTIwMHxUQUIwNy0yMDEtM0d8VEFCMDctMjEwfFRBQjA3LTIxMXxUQUIwNy0yMTJ8VEFCMDctMjE0fFRBQjA3LTIyMHxUQUIwNy00MDB8VEFCMDctNDg1fFRBQjA4LTE1MHxUQUIwOC0yMDB8VEFCMDgtMjAxLTNHfFRBQjA4LTIwMS0zMHxUQUIwOS0xMDB8VEFCMDktMjExfFRBQjA5LTQxMHxUQUIxMC0xNTB8VEFCMTAtMjAxfFRBQjEwLTIxMXxUQUIxMC00MDB8VEFCMTAtNDEwfFRBQjEzLTIwMXxUQUIyNzRFVUt8VEFCMjc1RVVLfFRBQjM3NEVVS3xUQUI0NjJFVUt8VEFCNDc0RVVLfFRBQjktMjAwKVxcYiIsTWVkaW9uVGFibGV0OiJBbmRyb2lkLipcXGJPWU9cXGJ8TElGRS4qKFA5MjEyfFA5NTE0fFA5NTE2fFM5NTEyKXxMSUZFVEFCIixBcm5vdmFUYWJsZXQ6Ijk3RzR8QU4xMEcyfEFON2JHM3xBTjdmRzN8QU44RzN8QU44Y0czfEFON0czfEFOOUczfEFON2RHM3xBTjdkRzNTVHxBTjdkRzNDaGlsZFBhZHxBTjEwYkczfEFOMTBiRzNEVHxBTjlHMiIsSW50ZW5zb1RhYmxldDoiSU5NODAwMktQfElOTTEwMTBGUHxJTk04MDVORHxJbnRlbnNvIFRhYnxUQUIxMDA0IixJUlVUYWJsZXQ6Ik03MDJwcm8iLE1lZ2Fmb25UYWJsZXQ6Ik1lZ2FGb24gVjl8XFxiWlRFIFY5XFxifEFuZHJvaWQuKlxcYk1UN0FcXGIiLEVib2RhVGFibGV0OiJFLUJvZGEgKFN1cHJlbWV8SW1wcmVzc3BlZWR8SXp6eWNvbW18RXNzZW50aWFsKSIsQWxsVmlld1RhYmxldDoiQWxsdmlldy4qKFZpdmF8QWxsZHJvfENpdHl8U3BlZWR8QWxsIFRWfEZyZW56eXxRdWFzYXJ8U2hpbmV8VFgxfEFYMXxBWDIpIixBcmNob3NUYWJsZXQ6IlxcYigxMDFHOXw4MEc5fEExMDFJVClcXGJ8UWlsaXZlIDk3UnxBcmNob3M1fFxcYkFSQ0hPUyAoNzB8Nzl8ODB8OTB8OTd8MTAxfEZBTUlMWVBBRHwpKGJ8Y3wpKEcxMHwgQ29iYWx0fCBUSVRBTklVTShIRHwpfCBYZW5vbnwgTmVvbnxYU0t8IDJ8IFhTIDJ8IFBMQVRJTlVNfCBDQVJCT058R0FNRVBBRClcXGIiLEFpbm9sVGFibGV0OiJOT1ZPN3xOT1ZPOHxOT1ZPMTB8Tm92bzdBdXJvcmF8Tm92bzdCYXNpY3xOT1ZPN1BBTEFESU58bm92bzktU3BhcmsiLE5va2lhTHVtaWFUYWJsZXQ6Ikx1bWlhIDI1MjAiLFNvbnlUYWJsZXQ6IlNvbnkuKlRhYmxldHxYcGVyaWEgVGFibGV0fFNvbnkgVGFibGV0IFN8U08tMDNFfFNHUFQxMnxTR1BUMTN8U0dQVDExNHxTR1BUMTIxfFNHUFQxMjJ8U0dQVDEyM3xTR1BUMTExfFNHUFQxMTJ8U0dQVDExM3xTR1BUMTMxfFNHUFQxMzJ8U0dQVDEzM3xTR1BUMjExfFNHUFQyMTJ8U0dQVDIxM3xTR1AzMTF8U0dQMzEyfFNHUDMyMXxFQlJEMTEwMXxFQlJEMTEwMnxFQlJEMTIwMXxTR1AzNTF8U0dQMzQxfFNHUDUxMXxTR1A1MTJ8U0dQNTIxfFNHUDU0MXxTR1A1NTF8U0dQNjIxfFNHUDY0MXxTR1A2MTJ8U09UMzF8U0dQNzcxfFNHUDYxMXxTR1A2MTJ8U0dQNzEyIixQaGlsaXBzVGFibGV0OiJcXGIoUEkyMDEwfFBJMzAwMHxQSTMxMDB8UEkzMTA1fFBJMzExMHxQSTMyMDV8UEkzMjEwfFBJMzkwMHxQSTQwMTB8UEk3MDAwfFBJNzEwMClcXGIiLEN1YmVUYWJsZXQ6IkFuZHJvaWQuKihLOEdUfFU5R1R8VTEwR1R8VTE2R1R8VTE3R1R8VTE4R1R8VTE5R1R8VTIwR1R8VTIzR1R8VTMwR1QpfENVQkUgVThHVCIsQ29ieVRhYmxldDoiTUlEMTA0MnxNSUQxMDQ1fE1JRDExMjV8TUlEMTEyNnxNSUQ3MDEyfE1JRDcwMTR8TUlENzAxNXxNSUQ3MDM0fE1JRDcwMzV8TUlENzAzNnxNSUQ3MDQyfE1JRDcwNDh8TUlENzEyN3xNSUQ4MDQyfE1JRDgwNDh8TUlEODEyN3xNSUQ5MDQyfE1JRDk3NDB8TUlEOTc0MnxNSUQ3MDIyfE1JRDcwMTAiLE1JRFRhYmxldDoiTTk3MDF8TTkwMDB8TTkxMDB8TTgwNnxNMTA1MnxNODA2fFQ3MDN8TUlENzAxfE1JRDcxM3xNSUQ3MTB8TUlENzI3fE1JRDc2MHxNSUQ4MzB8TUlENzI4fE1JRDkzM3xNSUQxMjV8TUlEODEwfE1JRDczMnxNSUQxMjB8TUlEOTMwfE1JRDgwMHxNSUQ3MzF8TUlEOTAwfE1JRDEwMHxNSUQ4MjB8TUlENzM1fE1JRDk4MHxNSUQxMzB8TUlEODMzfE1JRDczN3xNSUQ5NjB8TUlEMTM1fE1JRDg2MHxNSUQ3MzZ8TUlEMTQwfE1JRDkzMHxNSUQ4MzV8TUlENzMzfE1JRDRYMTAiLE1TSVRhYmxldDoiTVNJIFxcYihQcmltbyA3M0t8UHJpbW8gNzNMfFByaW1vIDgxTHxQcmltbyA3N3xQcmltbyA5M3xQcmltbyA3NXxQcmltbyA3NnxQcmltbyA3M3xQcmltbyA4MXxQcmltbyA5MXxQcmltbyA5MHxFbmpveSA3MXxFbmpveSA3fEVuam95IDEwKVxcYiIsU01pVFRhYmxldDoiQW5kcm9pZC4qKFxcYk1JRFxcYnxNSUQtNTYwfE1UVi1UMTIwMHxNVFYtUE5ENTMxfE1UVi1QMTEwMXxNVFYtUE5ENTMwKSIsUm9ja0NoaXBUYWJsZXQ6IkFuZHJvaWQuKihSSzI4MTh8UksyODA4QXxSSzI5MTh8UkszMDY2KXxSSzI3Mzh8UksyODA4QSIsRmx5VGFibGV0OiJJUTMxMHxGbHkgVmlzaW9uIixicVRhYmxldDoiQW5kcm9pZC4qKGJxKT8uKlxcYihFbGNhbm98Q3VyaWV8RWRpc29ufE1heHdlbGx8S2VwbGVyfFBhc2NhbHxUZXNsYXxIeXBhdGlhfFBsYXRvbnxOZXd0b258TGl2aW5nc3RvbmV8Q2VydmFudGVzfEF2YW50fEFxdWFyaXMgKFtFfE1dMTB8TTgpKVxcYnxNYXh3ZWxsLipMaXRlfE1heHdlbGwuKlBsdXMiLEh1YXdlaVRhYmxldDoiTWVkaWFQYWR8TWVkaWFQYWQgNyBZb3V0aHxJREVPUyBTN3xTNy0yMDFjfFM3LTIwMnV8UzctMTAxfFM3LTEwM3xTNy0xMDR8UzctMTA1fFM3LTEwNnxTNy0yMDF8UzctU2xpbXxNMi1BMDFMfEJBSC1MMDl8QkFILVcwOXxBR1MtTDA5fENNUi1BTDE5IixOZWNUYWJsZXQ6IlxcYk4tMDZEfFxcYk4tMDhEIixQYW50ZWNoVGFibGV0OiJQYW50ZWNoLipQNDEwMCIsQnJvbmNob1RhYmxldDoiQnJvbmNoby4qKE43MDF8TjcwOHxOODAyfGE3MTApIixWZXJzdXNUYWJsZXQ6IlRPVUNIUEFELipbNzg5MTBdfFxcYlRPVUNIVEFCXFxiIixaeW5jVGFibGV0OiJ6MTAwMHxaOTkgMkd8ejkzMHx6OTkwfHo5MDl8WjkxOXx6OTAwIixQb3NpdGl2b1RhYmxldDoiVEIwN1NUQXxUQjEwU1RBfFRCMDdGVEF8VEIxMEZUQSIsTmFiaVRhYmxldDoiQW5kcm9pZC4qXFxiTmFiaSIsS29ib1RhYmxldDoiS29ibyBUb3VjaHxcXGJLMDgwXFxifFxcYlZveFxcYiBCdWlsZHxcXGJBcmNcXGIgQnVpbGQiLERhbmV3VGFibGV0OiJEU2xpZGUuKlxcYig3MDB8NzAxUnw3MDJ8NzAzUnw3MDR8ODAyfDk3MHw5NzF8OTcyfDk3M3w5NzR8MTAxMHwxMDEyKVxcYiIsVGV4ZXRUYWJsZXQ6Ik5hdmlQYWR8VEItNzcyQXxUTS03MDQ1fFRNLTcwNTV8VE0tOTc1MHxUTS03MDE2fFRNLTcwMjR8VE0tNzAyNnxUTS03MDQxfFRNLTcwNDN8VE0tNzA0N3xUTS04MDQxfFRNLTk3NDF8VE0tOTc0N3xUTS05NzQ4fFRNLTk3NTF8VE0tNzAyMnxUTS03MDIxfFRNLTcwMjB8VE0tNzAxMXxUTS03MDEwfFRNLTcwMjN8VE0tNzAyNXxUTS03MDM3V3xUTS03MDM4V3xUTS03MDI3V3xUTS05NzIwfFRNLTk3MjV8VE0tOTczN1d8VE0tMTAyMHxUTS05NzM4V3xUTS05NzQwfFRNLTk3NDNXfFRCLTgwN0F8VEItNzcxQXxUQi03MjdBfFRCLTcyNUF8VEItNzE5QXxUQi04MjNBfFRCLTgwNUF8VEItNzIzQXxUQi03MTVBfFRCLTcwN0F8VEItNzA1QXxUQi03MDlBfFRCLTcxMUF8VEItODkwSER8VEItODgwSER8VEItNzkwSER8VEItNzgwSER8VEItNzcwSER8VEItNzIxSER8VEItNzEwSER8VEItNDM0SER8VEItODYwSER8VEItODQwSER8VEItNzYwSER8VEItNzUwSER8VEItNzQwSER8VEItNzMwSER8VEItNzIySER8VEItNzIwSER8VEItNzAwSER8VEItNTAwSER8VEItNDcwSER8VEItNDMxSER8VEItNDMwSER8VEItNTA2fFRCLTUwNHxUQi00NDZ8VEItNDM2fFRCLTQxNnxUQi0xNDZTRXxUQi0xMjZTRSIsUGxheXN0YXRpb25UYWJsZXQ6IlBsYXlzdGF0aW9uLiooUG9ydGFibGV8Vml0YSkiLFRyZWtzdG9yVGFibGV0OiJTVDEwNDE2LTF8VlQxMDQxNi0xfFNUNzA0MDgtMXxTVDcwMnh4LTF8U1Q3MDJ4eC0yfFNUODAyMDh8U1Q5NzIxNnxTVDcwMTA0LTJ8VlQxMDQxNi0yfFNUMTAyMTYtMkF8U3VyZlRhYiIsUHlsZUF1ZGlvVGFibGV0OiJcXGIoUFRCTDEwQ0VVfFBUQkwxMEN8UFRCTDcyQkN8UFRCTDcyQkNFVXxQVEJMN0NFVXxQVEJMN0N8UFRCTDkyQkN8UFRCTDkyQkNFVXxQVEJMOUNFVXxQVEJMOUNVS3xQVEJMOUMpXFxiIixBZHZhblRhYmxldDoiQW5kcm9pZC4qIFxcYihFM0F8VDNYfFQ1Q3xUNUJ8VDNFfFQzQ3xUM0J8VDFKfFQxRnxUMkF8VDFIfFQxaXxFMUN8VDEtRXxUNS1BfFQ0fEUxLUJ8VDJDaXxUMS1CfFQxLUR8TzEtQXxFMS1BfFQxLUF8VDNBfFQ0aSlcXGIgIixEYW55VGVjaFRhYmxldDoiR2VuaXVzIFRhYiBHM3xHZW5pdXMgVGFiIFMyfEdlbml1cyBUYWIgUTN8R2VuaXVzIFRhYiBHNHxHZW5pdXMgVGFiIFE0fEdlbml1cyBUYWIgRy1JSXxHZW5pdXMgVEFCIEdJSXxHZW5pdXMgVEFCIEdJSUl8R2VuaXVzIFRhYiBTMSIsR2FsYXBhZFRhYmxldDoiQW5kcm9pZCBbMC05Ll0rOyBbYS16LV0rOyBcXGJHMVxcYiIsTWljcm9tYXhUYWJsZXQ6IkZ1bmJvb2t8TWljcm9tYXguKlxcYihQMjUwfFA1NjB8UDM2MHxQMzYyfFA2MDB8UDMwMHxQMzUwfFA1MDB8UDI3NSlcXGIiLEthcmJvbm5UYWJsZXQ6IkFuZHJvaWQuKlxcYihBMzl8QTM3fEEzNHxTVDh8U1QxMHxTVDd8U21hcnQgVGFiM3xTbWFydCBUYWIyKVxcYiIsQWxsRmluZVRhYmxldDoiRmluZTcgR2VuaXVzfEZpbmU3IFNoaW5lfEZpbmU3IEFpcnxGaW5lOCBTdHlsZXxGaW5lOSBNb3JlfEZpbmUxMCBKb3l8RmluZTExIFdpZGUiLFBST1NDQU5UYWJsZXQ6IlxcYihQRU02M3xQTFQxMDIzR3xQTFQxMDQxfFBMVDEwNDR8UExUMTA0NEd8UExUMTA5MXxQTFQ0MzExfFBMVDQzMTFQTHxQTFQ0MzE1fFBMVDcwMzB8UExUNzAzM3xQTFQ3MDMzRHxQTFQ3MDM1fFBMVDcwMzVEfFBMVDcwNDRLfFBMVDcwNDVLfFBMVDcwNDVLQnxQTFQ3MDcxS0d8UExUNzA3MnxQTFQ3MjIzR3xQTFQ3MjI1R3xQTFQ3Nzc3R3xQTFQ3ODEwS3xQTFQ3ODQ5R3xQTFQ3ODUxR3xQTFQ3ODUyR3xQTFQ4MDE1fFBMVDgwMzF8UExUODAzNHxQTFQ4MDM2fFBMVDgwODBLfFBMVDgwODJ8UExUODA4OHxQTFQ4MjIzR3xQTFQ4MjM0R3xQTFQ4MjM1R3xQTFQ4ODE2S3xQTFQ5MDExfFBMVDkwNDVLfFBMVDkyMzNHfFBMVDk3MzV8UExUOTc2MEd8UExUOTc3MEcpXFxiIixZT05FU1RhYmxldDoiQlExMDc4fEJDMTAwM3xCQzEwNzd8Uks5NzAyfEJDOTczMHxCQzkwMDF8SVQ5MDAxfEJDNzAwOHxCQzcwMTB8QkM3MDh8QkM3Mjh8QkM3MDEyfEJDNzAzMHxCQzcwMjd8QkM3MDI2IixDaGFuZ0ppYVRhYmxldDoiVFBDNzEwMnxUUEM3MTAzfFRQQzcxMDV8VFBDNzEwNnxUUEM3MTA3fFRQQzcyMDF8VFBDNzIwM3xUUEM3MjA1fFRQQzcyMTB8VFBDNzcwOHxUUEM3NzA5fFRQQzc3MTJ8VFBDNzExMHxUUEM4MTAxfFRQQzgxMDN8VFBDODEwNXxUUEM4MTA2fFRQQzgyMDN8VFBDODIwNXxUUEM4NTAzfFRQQzkxMDZ8VFBDOTcwMXxUUEM5NzEwMXxUUEM5NzEwM3xUUEM5NzEwNXxUUEM5NzEwNnxUUEM5NzExMXxUUEM5NzExM3xUUEM5NzIwM3xUUEM5NzYwM3xUUEM5NzgwOXxUUEM5NzIwNXxUUEMxMDEwMXxUUEMxMDEwM3xUUEMxMDEwNnxUUEMxMDExMXxUUEMxMDIwM3xUUEMxMDIwNXxUUEMxMDUwMyIsR1VUYWJsZXQ6IlRYLUExMzAxfFRYLU05MDAyfFE3MDJ8a2YwMjYiLFBvaW50T2ZWaWV3VGFibGV0OiJUQUItUDUwNnxUQUItbmF2aS03LTNHLU18VEFCLVA1MTd8VEFCLVAtNTI3fFRBQi1QNzAxfFRBQi1QNzAzfFRBQi1QNzIxfFRBQi1QNzMxTnxUQUItUDc0MXxUQUItUDgyNXxUQUItUDkwNXxUQUItUDkyNXxUQUItUFI5NDV8VEFCLVBMMTAxNXxUQUItUDEwMjV8VEFCLVBJMTA0NXxUQUItUDEzMjV8VEFCLVBST1RBQlswLTldK3xUQUItUFJPVEFCMjV8VEFCLVBST1RBQjI2fFRBQi1QUk9UQUIyN3xUQUItUFJPVEFCMjZYTHxUQUItUFJPVEFCMi1JUFM5fFRBQi1QUk9UQUIzMC1JUFM5fFRBQi1QUk9UQUIyNVhYTHxUQUItUFJPVEFCMjYtSVBTMTB8VEFCLVBST1RBQjMwLUlQUzEwIixPdmVybWF4VGFibGV0OiJPVi0oU3RlZWxDb3JlfE5ld0Jhc2V8QmFzZWNvcmV8QmFzZW9uZXxFeGVsbGVufFF1YXR0b3J8RWR1VGFifFNvbHV0aW9ufEFDVElPTnxCYXNpY1RhYnxUZWRkeVRhYnxNYWdpY1RhYnxTdHJlYW18VEItMDh8VEItMDkpfFF1YWxjb3JlIDEwMjciLEhDTFRhYmxldDoiSENMLipUYWJsZXR8Q29ubmVjdC0zRy0yLjB8Q29ubmVjdC0yRy0yLjB8TUUgVGFibGV0IFUxfE1FIFRhYmxldCBVMnxNRSBUYWJsZXQgRzF8TUUgVGFibGV0IFgxfE1FIFRhYmxldCBZMnxNRSBUYWJsZXQgU3luYyIsRFBTVGFibGV0OiJEUFMgRHJlYW0gOXxEUFMgRHVhbCA3IixWaXN0dXJlVGFibGV0OiJWOTcgSER8aTc1IDNHfFZpc3R1cmUgVjQoIEhEKT98VmlzdHVyZSBWNSggSEQpP3xWaXN0dXJlIFYxMCIsQ3Jlc3RhVGFibGV0OiJDVFAoLSk/ODEwfENUUCgtKT84MTh8Q1RQKC0pPzgyOHxDVFAoLSk/ODM4fENUUCgtKT84ODh8Q1RQKC0pPzk3OHxDVFAoLSk/OTgwfENUUCgtKT85ODd8Q1RQKC0pPzk4OHxDVFAoLSk/OTg5IixNZWRpYXRla1RhYmxldDoiXFxiTVQ4MTI1fE1UODM4OXxNVDgxMzV8TVQ4Mzc3XFxiIixDb25jb3JkZVRhYmxldDoiQ29uY29yZGUoWyBdKyk/VGFifENvbkNvcmRlIFJlYWRNYW4iLEdvQ2xldmVyVGFibGV0OiJHT0NMRVZFUiBUQUJ8QTdHT0NMRVZFUnxNMTA0MnxNNzg0MXxNNzQyfFIxMDQyQkt8UjEwNDF8VEFCIEE5NzV8VEFCIEE3ODQyfFRBQiBBNzQxfFRBQiBBNzQxTHxUQUIgTTcyM0d8VEFCIE03MjF8VEFCIEExMDIxfFRBQiBJOTIxfFRBQiBSNzIxfFRBQiBJNzIwfFRBQiBUNzZ8VEFCIFI3MHxUQUIgUjc2LjJ8VEFCIFIxMDZ8VEFCIFI4My4yfFRBQiBNODEzR3xUQUIgSTcyMXxHQ1RBNzIyfFRBQiBJNzB8VEFCIEk3MXxUQUIgUzczfFRBQiBSNzN8VEFCIFI3NHxUQUIgUjkzfFRBQiBSNzV8VEFCIFI3Ni4xfFRBQiBBNzN8VEFCIEE5M3xUQUIgQTkzLjJ8VEFCIFQ3MnxUQUIgUjgzfFRBQiBSOTc0fFRBQiBSOTczfFRBQiBBMTAxfFRBQiBBMTAzfFRBQiBBMTA0fFRBQiBBMTA0LjJ8UjEwNUJLfE03MTNHfEE5NzJCS3xUQUIgQTk3MXxUQUIgUjk3NC4yfFRBQiBSMTA0fFRBQiBSODMuM3xUQUIgQTEwNDIiLE1vZGVjb21UYWJsZXQ6IkZyZWVUQUIgOTAwMHxGcmVlVEFCIDcuNHxGcmVlVEFCIDcwMDR8RnJlZVRBQiA3ODAwfEZyZWVUQUIgMjA5NnxGcmVlVEFCIDcuNXxGcmVlVEFCIDEwMTR8RnJlZVRBQiAxMDAxIHxGcmVlVEFCIDgwMDF8RnJlZVRBQiA5NzA2fEZyZWVUQUIgOTcwMnxGcmVlVEFCIDcwMDN8RnJlZVRBQiA3MDAyfEZyZWVUQUIgMTAwMnxGcmVlVEFCIDc4MDF8RnJlZVRBQiAxMzMxfEZyZWVUQUIgMTAwNHxGcmVlVEFCIDgwMDJ8RnJlZVRBQiA4MDE0fEZyZWVUQUIgOTcwNHxGcmVlVEFCIDEwMDMiLFZvbmlub1RhYmxldDoiXFxiKEFyZ3VzWyBfXT9TfERpYW1vbmRbIF9dPzc5SER8RW1lcmFsZFsgX10/NzhFfEx1bmFbIF9dPzcwQ3xPbnl4WyBfXT9TfE9ueXhbIF9dP1p8T3JpblsgX10/SER8T3JpblsgX10/U3xPdGlzWyBfXT9TfFNwZWVkU3RhclsgX10/U3xNYWduZXRbIF9dP005fFByaW11c1sgX10/OTRbIF9dPzNHfFByaW11c1sgX10/OTRIRHxQcmltdXNbIF9dP1FTfEFuZHJvaWQuKlxcYlE4XFxifFNpcml1c1sgX10/RVZPWyBfXT9RU3xTaXJpdXNbIF9dP1FTfFNwaXJpdFsgX10/UylcXGIiLEVDU1RhYmxldDoiVjA3T1QyfFRNMTA1QXxTMTBPVDF8VFIxMENTMSIsU3RvcmV4VGFibGV0OiJlWmVlW18nXT8oVGFifEdvKVswLTldK3xUYWJMQzd8TG9vbmV5IFR1bmVzIFRhYiIsVm9kYWZvbmVUYWJsZXQ6IlNtYXJ0VGFiKFsgXSspP1swLTldK3xTbWFydFRhYklJMTB8U21hcnRUYWJJSTd8VkYtMTQ5N3xWRkQgMTQwMCIsRXNzZW50aWVsQlRhYmxldDoiU21hcnRbICddP1RBQlsgXSs/WzAtOV0rfEZhbWlseVsgJ10/VEFCMiIsUm9zc01vb3JUYWJsZXQ6IlJNLTc5MHxSTS05OTd8Uk1ELTg3OEd8Uk1ELTk3NFJ8Uk1ULTcwNUF8Uk1ULTcwMXxSTUUtNjAxfFJNVC01MDF8Uk1ULTcxMSIsaU1vYmlsZVRhYmxldDoiaS1tb2JpbGUgaS1ub3RlIixUb2xpbm9UYWJsZXQ6InRvbGlubyB0YWIgWzAtOS5dK3x0b2xpbm8gc2hpbmUiLEF1ZGlvU29uaWNUYWJsZXQ6IlxcYkMtMjJRfFQ3LVFDfFQtMTdCfFQtMTdQXFxiIixBTVBFVGFibGV0OiJBbmRyb2lkLiogQTc4ICIsU2trVGFibGV0OiJBbmRyb2lkLiogKFNLWVBBRHxQSE9FTklYfENZQ0xPUFMpIixUZWNub1RhYmxldDoiVEVDTk8gUDl8VEVDTk8gRFA4RCIsSlhEVGFibGV0OiJBbmRyb2lkLiogXFxiKEYzMDAwfEEzMzAwfEpYRDUwMDB8SlhEMzAwMHxKWEQyMDAwfEpYRDMwMEJ8SlhEMzAwfFM1ODAwfFM3ODAwfFM2MDJifFM1MTEwYnxTNzMwMHxTNTMwMHxTNjAyfFM2MDN8UzUxMDB8UzUxMTB8UzYwMXxTNzEwMGF8UDMwMDBGfFAzMDAwc3xQMTAxfFAyMDBzfFAxMDAwbXxQMjAwbXxQOTEwMHxQMTAwMHN8UzY2MDBifFM5MDh8UDEwMDB8UDMwMHxTMTh8UzY2MDB8UzkxMDApXFxiIixpSm95VGFibGV0OiJUYWJsZXQgKFNwaXJpdCA3fEVzc2VudGlhfEdhbGF0ZWF8RnVzaW9ufE9uaXggN3xMYW5kYXxUaXRhbnxTY29vYnl8RGVveHxTdGVsbGF8VGhlbWlzfEFyZ29ufFVuaXF1ZSA3fFN5Z251c3xIZXhlbnxGaW5pdHkgN3xDcmVhbXxDcmVhbSBYMnxKYWRlfE5lb24gN3xOZXJvbiA3fEthbmR5fFNjYXBlfFNhcGh5ciA3fFJlYmVsfEJpb3h8UmViZWx8UmViZWwgOEdCfE15c3R8RHJhY28gN3xNeXN0fFRhYjctMDA0fE15c3R8VGFkZW8gSm9uZXN8VGFibGV0IEJvaW5nfEFycm93fERyYWNvIER1YWwgQ2FtfEF1cml4fE1pbnR8QW1pdHl8UmV2b2x1dGlvbnxGaW5pdHkgOXxOZW9uIDl8VDl3fEFtaXR5IDRHQiBEdWFsIENhbXxTdG9uZSA0R0J8U3RvbmUgOEdCfEFuZHJvbWVkYXxTaWxrZW58WDJ8QW5kcm9tZWRhIElJfEhhbGxleXxGbGFtZXxTYXBoeXIgOSw3fFRvdWNoIDh8UGxhbmV0fFRyaXRvbnxVbmlxdWUgMTB8SGV4ZW4gMTB8TWVtcGhpcyA0R0J8TWVtcGhpcyA4R0J8T25peCAxMCkiLEZYMlRhYmxldDoiRlgyIFBBRDd8RlgyIFBBRDEwIixYb3JvVGFibGV0OiJLaWRzUEFEIDcwMXxQQURbIF0/NzEyfFBBRFsgXT83MTR8UEFEWyBdPzcxNnxQQURbIF0/NzE3fFBBRFsgXT83MTh8UEFEWyBdPzcyMHxQQURbIF0/NzIxfFBBRFsgXT83MjJ8UEFEWyBdPzc5MHxQQURbIF0/NzkyfFBBRFsgXT85MDB8UEFEWyBdPzk3MTVEfFBBRFsgXT85NzE2RFJ8UEFEWyBdPzk3MThEUnxQQURbIF0/OTcxOVFSfFBBRFsgXT85NzIwUVJ8VGVsZVBBRDEwMzB8VGVsZXBhZDEwMzJ8VGVsZVBBRDczMHxUZWxlUEFENzMxfFRlbGVQQUQ3MzJ8VGVsZVBBRDczNVF8VGVsZVBBRDgzMHxUZWxlUEFEOTczMHxUZWxlUEFENzk1fE1lZ2FQQUQgMTMzMXxNZWdhUEFEIDE4NTF8TWVnYVBBRCAyMTUxIixWaWV3c29uaWNUYWJsZXQ6IlZpZXdQYWQgMTBwaXxWaWV3UGFkIDEwZXxWaWV3UGFkIDEwc3xWaWV3UGFkIEU3MnxWaWV3UGFkN3xWaWV3UGFkIEUxMDB8Vmlld1BhZCA3ZXxWaWV3U29uaWMgVkI3MzN8VkIxMDBhIixWZXJpem9uVGFibGV0OiJRVEFRWjN8UVRBSVI3fFFUQVFUWjN8UVRBU1VOMXxRVEFTVU4yfFFUQVhJQTEiLE9keXNUYWJsZXQ6IkxPT1h8WEVOTzEwfE9EWVNbIC1dKFNwYWNlfEVWT3xYcHJlc3N8Tk9PTil8XFxiWEVMSU9cXGJ8WGVsaW8xMFByb3xYRUxJTzdQSE9ORVRBQnxYRUxJTzEwRVhUUkVNRXxYRUxJT1BUMnxORU9fUVVBRDEwIixDYXB0aXZhVGFibGV0OiJDQVBUSVZBIFBBRCIsSWNvbmJpdFRhYmxldDoiTmV0VEFCfE5ULTM3MDJ8TlQtMzcwMlN8TlQtMzcwMlN8TlQtMzYwM1B8TlQtMzYwM1B8TlQtMDcwNFN8TlQtMDcwNFN8TlQtMzgwNUN8TlQtMzgwNUN8TlQtMDgwNkN8TlQtMDgwNkN8TlQtMDkwOVR8TlQtMDkwOVR8TlQtMDkwN1N8TlQtMDkwN1N8TlQtMDkwMlN8TlQtMDkwMlMiLFRlY2xhc3RUYWJsZXQ6IlQ5OCA0R3xcXGJQODBcXGJ8XFxiWDkwSERcXGJ8WDk4IEFpcnxYOTggQWlyIDNHfFxcYlg4OVxcYnxQODAgM0d8XFxiWDgwaFxcYnxQOTggQWlyfFxcYlg4OUhEXFxifFA5OCAzR3xcXGJQOTBIRFxcYnxQODkgM0d8WDk4IDNHfFxcYlA3MGhcXGJ8UDc5SEQgM0d8RzE4ZCAzR3xcXGJQNzlIRFxcYnxcXGJQODlzXFxifFxcYkE4OFxcYnxcXGJQMTBIRFxcYnxcXGJQMTlIRFxcYnxHMTggM0d8XFxiUDc4SERcXGJ8XFxiQTc4XFxifFxcYlA3NVxcYnxHMTdzIDNHfEcxN2ggM0d8XFxiUDg1dFxcYnxcXGJQOTBcXGJ8XFxiUDExXFxifFxcYlA5OHRcXGJ8XFxiUDk4SERcXGJ8XFxiRzE4ZFxcYnxcXGJQODVzXFxifFxcYlAxMUhEXFxifFxcYlA4OHNcXGJ8XFxiQTgwSERcXGJ8XFxiQTgwc2VcXGJ8XFxiQTEwaFxcYnxcXGJQODlcXGJ8XFxiUDc4c1xcYnxcXGJHMThcXGJ8XFxiUDg1XFxifFxcYkE3MGhcXGJ8XFxiQTcwXFxifFxcYkcxN1xcYnxcXGJQMThcXGJ8XFxiQTgwc1xcYnxcXGJBMTFzXFxifFxcYlA4OEhEXFxifFxcYkE4MGhcXGJ8XFxiUDc2c1xcYnxcXGJQNzZoXFxifFxcYlA5OFxcYnxcXGJBMTBIRFxcYnxcXGJQNzhcXGJ8XFxiUDg4XFxifFxcYkExMVxcYnxcXGJBMTB0XFxifFxcYlA3NmFcXGJ8XFxiUDc2dFxcYnxcXGJQNzZlXFxifFxcYlA4NUhEXFxifFxcYlA4NWFcXGJ8XFxiUDg2XFxifFxcYlA3NUhEXFxifFxcYlA3NnZcXGJ8XFxiQTEyXFxifFxcYlA3NWFcXGJ8XFxiQTE1XFxifFxcYlA3NlRpXFxifFxcYlA4MUhEXFxifFxcYkExMFxcYnxcXGJUNzYwVkVcXGJ8XFxiVDcyMEhEXFxifFxcYlA3NlxcYnxcXGJQNzNcXGJ8XFxiUDcxXFxifFxcYlA3MlxcYnxcXGJUNzIwU0VcXGJ8XFxiQzUyMFRpXFxifFxcYlQ3NjBcXGJ8XFxiVDcyMFZFXFxifFQ3MjAtM0dFfFQ3MjAtV2lGaSIsT25kYVRhYmxldDoiXFxiKFY5NzVpfFZpMzB8Vlg1MzB8VjcwMXxWaTYwfFY3MDFzfFZpNTB8VjgwMXN8VjcxOXxWeDYxMHd8Vlg2MTBXfFY4MTlpfFZpMTB8Vlg1ODBXfFZpMTB8VjcxMXN8VjgxM3xWODExfFY4MjB3fFY4MjB8VmkyMHxWNzExfFZJMzBXfFY3MTJ8Vjg5MXd8Vjk3MnxWODE5d3xWODIwd3xWaTYwfFY4MjB3fFY3MTF8VjgxM3N8VjgwMXxWODE5fFY5NzVzfFY4MDF8VjgxOXxWODE5fFY4MTh8VjgxMXxWNzEyfFY5NzVtfFYxMDF3fFY5NjF3fFY4MTJ8VjgxOHxWOTcxfFY5NzFzfFY5MTl8Vjk4OXxWMTE2d3xWMTAyd3xWOTczfFZpNDApXFxiW1xcc10rfFYxMCBcXGI0R1xcYiIsSmF5dGVjaFRhYmxldDoiVFBDLVBBNzYyIixCbGF1cHVua3RUYWJsZXQ6IkVuZGVhdm91ciA4MDBOR3xFbmRlYXZvdXIgMTAxMCIsRGlnbWFUYWJsZXQ6IlxcYihpRHgxMHxpRHg5fGlEeDh8aUR4N3xpRHhEN3xpRHhEOHxpRHNROHxpRHNRN3xpRHNROHxpRHNEMTB8aURuRDd8M1RTODA0SHxpRHNRMTF8aURqN3xpRHMxMClcXGIiLEV2b2xpb1RhYmxldDoiQVJJQV9NaW5pX3dpZml8QXJpYVsgX11NaW5pfEV2b2xpbyBYMTB8RXZvbGlvIFg3fEV2b2xpbyBYOHxcXGJFdm90YWJcXGJ8XFxiTmV1cmFcXGIiLExhdmFUYWJsZXQ6IlFQQUQgRTcwNHxcXGJJdm9yeVNcXGJ8RS1UQUIgSVZPUll8XFxiRS1UQUJcXGIiLEFvY1RhYmxldDoiTVcwODExfE1XMDgxMnxNVzA5MjJ8TVRLODM4MnxNVzEwMzF8TVcwODMxfE1XMDgyMXxNVzA5MzF8TVcwNzEyIixNcG1hblRhYmxldDoiTVAxMSBPQ1RBfE1QMTAgT0NUQXxNUFFDMTExNHxNUFFDMTAwNHxNUFFDOTk0fE1QUUM5NzR8TVBRQzk3M3xNUFFDODA0fE1QUUM3ODR8TVBRQzc4MHxcXGJNUEc3XFxifE1QRENHNzV8TVBEQ0c3MXxNUERDMTAwNnxNUDEwMURDfE1QREM5MDAwfE1QREM5MDV8TVBEQzcwNkhEfE1QREM3MDZ8TVBEQzcwNXxNUERDMTEwfE1QREMxMDB8TVBEQzk5fE1QREM5N3xNUERDODh8TVBEQzh8TVBEQzc3fE1QNzA5fE1JRDcwMXxNSUQ3MTF8TUlEMTcwfE1QREM3MDN8TVBRQzEwMTAiLENlbGtvblRhYmxldDoiQ1Q2OTV8Q1Q4ODh8Q1RbXFxzXT85MTB8Q1Q3IFRhYnxDVDkgVGFifENUMyBUYWJ8Q1QyIFRhYnxDVDEgVGFifEM4MjB8QzcyMHxcXGJDVC0xXFxiIixXb2xkZXJUYWJsZXQ6Im1pVGFiIFxcYihESUFNT05EfFNQQUNFfEJST09LTFlOfE5FT3xGTFl8TUFOSEFUVEFOfEZVTkt8RVZPTFVUSU9OfFNLWXxHT0NBUnxJUk9OfEdFTklVU3xQT1B8TUlOVHxFUFNJTE9OfEJST0FEV0FZfEpVTVB8SE9QfExFR0VORHxORVcgQUdFfExJTkV8QURWQU5DRXxGRUVMfEZPTExPV3xMSUtFfExJTkt8TElWRXxUSElOS3xGUkVFRE9NfENISUNBR098Q0xFVkVMQU5EfEJBTFRJTU9SRS1HSHxJT1dBfEJPU1RPTnxTRUFUVExFfFBIT0VOSVh8REFMTEFTfElOIDEwMXxNYXN0ZXJDaGVmKVxcYiIsTWVkaWFjb21UYWJsZXQ6Ik0tTVBJMTBDM0d8TS1TUDEwRUd8TS1TUDEwRUdQfE0tU1AxMEhYQUh8TS1TUDdIWEFIfE0tU1AxMEhYQkh8TS1TUDhIWEFIfE0tU1A4TVhBIixNaVRhYmxldDoiXFxiTUkgUEFEXFxifFxcYkhNIE5PVEUgMVdcXGIiLE5pYmlydVRhYmxldDoiTmliaXJ1IE0xfE5pYmlydSBKdXBpdGVyIE9uZSIsTmV4b1RhYmxldDoiTkVYTyBOT1ZBfE5FWE8gMTB8TkVYTyBBVklPfE5FWE8gRlJFRXxORVhPIEdPfE5FWE8gRVZPfE5FWE8gM0d8TkVYTyBTTUFSVHxORVhPIEtJRERPfE5FWE8gTU9CSSIsTGVhZGVyVGFibGV0OiJUQkxUMTBRfFRCTFQxMEl8VEJMLTEwV0RLQnxUQkwtMTBXREtCTzIwMTN8VEJMLVcyMzBWMnxUQkwtVzQ1MHxUQkwtVzUwMHxTVjU3MnxUQkxUN0l8VEJBLUFDNy04R3xUQkxUNzl8VEJMLThXMTZ8VEJMLTEwVzMyfFRCTC0xMFdLQnxUQkwtVzEwMCIsVWJpc2xhdGVUYWJsZXQ6IlViaVNsYXRlW1xcc10/N0MiLFBvY2tldEJvb2tUYWJsZXQ6IlBvY2tldGJvb2siLEtvY2Fzb1RhYmxldDoiXFxiKFRCLTEyMDcpXFxiIixIaXNlbnNlVGFibGV0OiJcXGIoRjUyODF8RTIzNzEpXFxiIixIdWRsOiJIdWRsIEhUN1MzfEh1ZGwgMiIsVGVsc3RyYVRhYmxldDoiVC1IdWIyIixHZW5lcmljVGFibGV0OiJBbmRyb2lkLipcXGI5N0RcXGJ8VGFibGV0KD8hLipQQyl8Qk5UVjI1MEF8TUlELVdDRE1BfExvZ2ljUEQgWm9vbTJ8XFxiQTdFQlxcYnxDYXROb3ZhOHxBMV8wN3xDVDcwNHxDVDEwMDJ8XFxiTTcyMVxcYnxyazMwc2RrfFxcYkVWT1RBQlxcYnxNNzU4QXxFVDkwNHxBTFVNSVVNMTB8U21hcnRmcmVuIFRhYnxFbmRlYXZvdXIgMTAxMHxUYWJsZXQtUEMtNHxUYWdpIFRhYnxcXGJNNnByb1xcYnxDVDEwMjBXfGFyYyAxMEhEfFxcYlRQNzUwXFxifFxcYlFUQVFaM1xcYnxXVlQxMDF8VE0xMDg4fEtUMTA3In0sb3NzOntBbmRyb2lkT1M6IkFuZHJvaWQiLEJsYWNrQmVycnlPUzoiYmxhY2tiZXJyeXxcXGJCQjEwXFxifHJpbSB0YWJsZXQgb3MiLFBhbG1PUzoiUGFsbU9TfGF2YW50Z298YmxhemVyfGVsYWluZXxoaXB0b3B8cGFsbXxwbHVja2VyfHhpaW5vIixTeW1iaWFuT1M6IlN5bWJpYW58U3ltYk9TfFNlcmllczYwfFNlcmllczQwfFNZQi1bMC05XSt8XFxiUzYwXFxiIixXaW5kb3dzTW9iaWxlT1M6IldpbmRvd3MgQ0UuKihQUEN8U21hcnRwaG9uZXxNb2JpbGV8WzAtOV17M314WzAtOV17M30pfFdpbmRvd3MgTW9iaWxlfFdpbmRvd3MgUGhvbmUgWzAtOS5dK3xXQ0U7IixXaW5kb3dzUGhvbmVPUzoiV2luZG93cyBQaG9uZSAxMC4wfFdpbmRvd3MgUGhvbmUgOC4xfFdpbmRvd3MgUGhvbmUgOC4wfFdpbmRvd3MgUGhvbmUgT1N8WEJMV1A3fFp1bmVXUDd8V2luZG93cyBOVCA2LlsyM107IEFSTTsiLGlPUzoiXFxiaVBob25lLipNb2JpbGV8XFxiaVBvZHxcXGJpUGFkfEFwcGxlQ29yZU1lZGlhIixpUGFkT1M6IkNQVSBPUyAxMyIsU2FpbGZpc2hPUzoiU2FpbGZpc2giLE1lZUdvT1M6Ik1lZUdvIixNYWVtb09TOiJNYWVtbyIsSmF2YU9TOiJKMk1FL3xcXGJNSURQXFxifFxcYkNMRENcXGIiLHdlYk9TOiJ3ZWJPU3xocHdPUyIsYmFkYU9TOiJcXGJCYWRhXFxiIixCUkVXT1M6IkJSRVcifSx1YXM6e0Nocm9tZToiXFxiQ3JNb1xcYnxDcmlPU3xBbmRyb2lkLipDaHJvbWUvWy4wLTldKiAoTW9iaWxlKT8iLERvbGZpbjoiXFxiRG9sZmluXFxiIixPcGVyYToiT3BlcmEuKk1pbml8T3BlcmEuKk1vYml8QW5kcm9pZC4qT3BlcmF8TW9iaWxlLipPUFIvWzAtOS5dKyR8Q29hc3QvWzAtOS5dKyIsU2t5ZmlyZToiU2t5ZmlyZSIsRWRnZToiXFxiRWRnaU9TXFxifE1vYmlsZSBTYWZhcmkvWy4wLTldKiBFZGdlIixJRToiSUVNb2JpbGV8TVNJRU1vYmlsZSIsRmlyZWZveDoiZmVubmVjfGZpcmVmb3guKm1hZW1vfChNb2JpbGV8VGFibGV0KS4qRmlyZWZveHxGaXJlZm94LipNb2JpbGV8RnhpT1MiLEJvbHQ6ImJvbHQiLFRlYVNoYXJrOiJ0ZWFzaGFyayIsQmxhemVyOiJCbGF6ZXIiLFNhZmFyaToiVmVyc2lvbigoPyFcXGJFZGdpT1NcXGIpLikqTW9iaWxlLipTYWZhcml8U2FmYXJpLipNb2JpbGV8TW9iaWxlU2FmYXJpIixXZUNoYXQ6IlxcYk1pY3JvTWVzc2VuZ2VyXFxiIixVQ0Jyb3dzZXI6IlVDLipCcm93c2VyfFVDV0VCIixiYWlkdWJveGFwcDoiYmFpZHVib3hhcHAiLGJhaWR1YnJvd3NlcjoiYmFpZHVicm93c2VyIixEaWlnb0Jyb3dzZXI6IkRpaWdvQnJvd3NlciIsTWVyY3VyeToiXFxiTWVyY3VyeVxcYiIsT2JpZ29Ccm93c2VyOiJPYmlnbyIsTmV0RnJvbnQ6Ik5GLUJyb3dzZXIiLEdlbmVyaWNCcm93c2VyOiJOb2tpYUJyb3dzZXJ8T3ZpQnJvd3NlcnxPbmVCcm93c2VyfFR3b25reUJlYW1Ccm93c2VyfFNFTUMuKkJyb3dzZXJ8Rmx5Rmxvd3xNaW5pbW98TmV0RnJvbnR8Tm92YXJyYS1WaXNpb258TVFRQnJvd3NlcnxNaWNyb01lc3NlbmdlciIsUGFsZU1vb246IkFuZHJvaWQuKlBhbGVNb29ufE1vYmlsZS4qUGFsZU1vb24ifSxwcm9wczp7TW9iaWxlOiJNb2JpbGUvW1ZFUl0iLEJ1aWxkOiJCdWlsZC9bVkVSXSIsVmVyc2lvbjoiVmVyc2lvbi9bVkVSXSIsVmVuZG9ySUQ6IlZlbmRvcklEL1tWRVJdIixpUGFkOiJpUGFkLipDUFVbYS16IF0rW1ZFUl0iLGlQaG9uZToiaVBob25lLipDUFVbYS16IF0rW1ZFUl0iLGlQb2Q6ImlQb2QuKkNQVVthLXogXStbVkVSXSIsS2luZGxlOiJLaW5kbGUvW1ZFUl0iLENocm9tZTpbIkNocm9tZS9bVkVSXSIsIkNyaU9TL1tWRVJdIiwiQ3JNby9bVkVSXSJdLENvYXN0OlsiQ29hc3QvW1ZFUl0iXSxEb2xmaW46IkRvbGZpbi9bVkVSXSIsRmlyZWZveDpbIkZpcmVmb3gvW1ZFUl0iLCJGeGlPUy9bVkVSXSJdLEZlbm5lYzoiRmVubmVjL1tWRVJdIixFZGdlOiJFZGdlL1tWRVJdIixJRTpbIklFTW9iaWxlL1tWRVJdOyIsIklFTW9iaWxlIFtWRVJdIiwiTVNJRSBbVkVSXTsiLCJUcmlkZW50L1swLTkuXSs7LipydjpbVkVSXSJdLE5ldEZyb250OiJOZXRGcm9udC9bVkVSXSIsTm9raWFCcm93c2VyOiJOb2tpYUJyb3dzZXIvW1ZFUl0iLE9wZXJhOlsiIE9QUi9bVkVSXSIsIk9wZXJhIE1pbmkvW1ZFUl0iLCJWZXJzaW9uL1tWRVJdIl0sIk9wZXJhIE1pbmkiOiJPcGVyYSBNaW5pL1tWRVJdIiwiT3BlcmEgTW9iaSI6IlZlcnNpb24vW1ZFUl0iLFVDQnJvd3NlcjpbIlVDV0VCW1ZFUl0iLCJVQy4qQnJvd3Nlci9bVkVSXSJdLE1RUUJyb3dzZXI6Ik1RUUJyb3dzZXIvW1ZFUl0iLE1pY3JvTWVzc2VuZ2VyOiJNaWNyb01lc3Nlbmdlci9bVkVSXSIsYmFpZHVib3hhcHA6ImJhaWR1Ym94YXBwL1tWRVJdIixiYWlkdWJyb3dzZXI6ImJhaWR1YnJvd3Nlci9bVkVSXSIsU2Ftc3VuZ0Jyb3dzZXI6IlNhbXN1bmdCcm93c2VyL1tWRVJdIixJcm9uOiJJcm9uL1tWRVJdIixTYWZhcmk6WyJWZXJzaW9uL1tWRVJdIiwiU2FmYXJpL1tWRVJdIl0sU2t5ZmlyZToiU2t5ZmlyZS9bVkVSXSIsVGl6ZW46IlRpemVuL1tWRVJdIixXZWJraXQ6IndlYmtpdFsgL11bVkVSXSIsUGFsZU1vb246IlBhbGVNb29uL1tWRVJdIixTYWlsZmlzaEJyb3dzZXI6IlNhaWxmaXNoQnJvd3Nlci9bVkVSXSIsR2Vja286IkdlY2tvL1tWRVJdIixUcmlkZW50OiJUcmlkZW50L1tWRVJdIixQcmVzdG86IlByZXN0by9bVkVSXSIsR29hbm5hOiJHb2FubmEvW1ZFUl0iLGlPUzoiIFxcYmk/T1NcXGIgW1ZFUl1bIDtdezF9IixBbmRyb2lkOiJBbmRyb2lkIFtWRVJdIixTYWlsZmlzaDoiU2FpbGZpc2ggW1ZFUl0iLEJsYWNrQmVycnk6WyJCbGFja0JlcnJ5W1xcd10rL1tWRVJdIiwiQmxhY2tCZXJyeS4qVmVyc2lvbi9bVkVSXSIsIlZlcnNpb24vW1ZFUl0iXSxCUkVXOiJCUkVXIFtWRVJdIixKYXZhOiJKYXZhL1tWRVJdIiwiV2luZG93cyBQaG9uZSBPUyI6WyJXaW5kb3dzIFBob25lIE9TIFtWRVJdIiwiV2luZG93cyBQaG9uZSBbVkVSXSJdLCJXaW5kb3dzIFBob25lIjoiV2luZG93cyBQaG9uZSBbVkVSXSIsIldpbmRvd3MgQ0UiOiJXaW5kb3dzIENFL1tWRVJdIiwiV2luZG93cyBOVCI6IldpbmRvd3MgTlQgW1ZFUl0iLFN5bWJpYW46WyJTeW1iaWFuT1MvW1ZFUl0iLCJTeW1iaWFuL1tWRVJdIl0sd2ViT1M6WyJ3ZWJPUy9bVkVSXSIsImhwd09TL1tWRVJdOyJdfSx1dGlsczp7Qm90OiJHb29nbGVib3R8ZmFjZWJvb2tleHRlcm5hbGhpdHxHb29nbGUtQU1QSFRNTHxzfmFtcC12YWxpZGF0b3J8QWRzQm90LUdvb2dsZXxHb29nbGUgS2V5d29yZCBTdWdnZXN0aW9ufEZhY2Vib3R8WWFuZGV4Qm90fFlhbmRleE1vYmlsZUJvdHxiaW5nYm90fGlhX2FyY2hpdmVyfEFocmVmc0JvdHxFem9vbXN8R1NMRmJvdHxXQlNlYXJjaEJvdHxUd2l0dGVyYm90fFR3ZWV0bWVtZUJvdHxUd2lrbGV8UGFwZXJMaUJvdHxXb3Rib3h8VW53aW5kRmV0Y2hvcnxFeGFib3R8TUoxMmJvdHxZYW5kZXhJbWFnZXN8VHVybml0aW5Cb3R8UGluZ2RvbXxjb250ZW50a2luZ2FwcHxBc3BpZWdlbEJvdCIsTW9iaWxlQm90OiJHb29nbGVib3QtTW9iaWxlfEFkc0JvdC1Hb29nbGUtTW9iaWxlfFlhaG9vU2Vla2VyL00xQTEtUjJEMiIsRGVza3RvcE1vZGU6IldQRGVza3RvcCIsVFY6IlNvbnlEVFZ8SGJiVFYiLFdlYktpdDoiKHdlYmtpdClbIC9dKFtcXHcuXSspIixDb25zb2xlOiJcXGIoTmludGVuZG98TmludGVuZG8gV2lpVXxOaW50ZW5kbyAzRFN8TmludGVuZG8gU3dpdGNofFBMQVlTVEFUSU9OfFhib3gpXFxiIixXYXRjaDoiU00tVjcwMCJ9fSxnLmRldGVjdE1vYmlsZUJyb3dzZXJzPXtmdWxsUGF0dGVybjovKGFuZHJvaWR8YmJcZCt8bWVlZ28pLittb2JpbGV8YXZhbnRnb3xiYWRhXC98YmxhY2tiZXJyeXxibGF6ZXJ8Y29tcGFsfGVsYWluZXxmZW5uZWN8aGlwdG9wfGllbW9iaWxlfGlwKGhvbmV8b2QpfGlyaXN8a2luZGxlfGxnZSB8bWFlbW98bWlkcHxtbXB8bW9iaWxlLitmaXJlZm94fG5ldGZyb250fG9wZXJhIG0ob2J8aW4paXxwYWxtKCBvcyk/fHBob25lfHAoaXhpfHJlKVwvfHBsdWNrZXJ8cG9ja2V0fHBzcHxzZXJpZXMoNHw2KTB8c3ltYmlhbnx0cmVvfHVwXC4oYnJvd3NlcnxsaW5rKXx2b2RhZm9uZXx3YXB8d2luZG93cyBjZXx4ZGF8eGlpbm8vaSwNCnNob3J0UGF0dGVybjovMTIwN3w2MzEwfDY1OTB8M2dzb3w0dGhwfDUwWzEtNl1pfDc3MHN8ODAyc3xhIHdhfGFiYWN8YWMoZXJ8b298c1wtKXxhaShrb3xybil8YWwoYXZ8Y2F8Y28pfGFtb2l8YW4oZXh8bnl8eXcpfGFwdHV8YXIoY2h8Z28pfGFzKHRlfHVzKXxhdHR3fGF1KGRpfFwtbXxyIHxzICl8YXZhbnxiZShja3xsbHxucSl8YmkobGJ8cmQpfGJsKGFjfGF6KXxicihlfHYpd3xidW1ifGJ3XC0obnx1KXxjNTVcL3xjYXBpfGNjd2F8Y2RtXC18Y2VsbHxjaHRtfGNsZGN8Y21kXC18Y28obXB8bmQpfGNyYXd8ZGEoaXR8bGx8bmcpfGRidGV8ZGNcLXN8ZGV2aXxkaWNhfGRtb2J8ZG8oY3xwKW98ZHMoMTJ8XC1kKXxlbCg0OXxhaSl8ZW0obDJ8dWwpfGVyKGljfGswKXxlc2w4fGV6KFs0LTddMHxvc3x3YXx6ZSl8ZmV0Y3xmbHkoXC18Xyl8ZzEgdXxnNTYwfGdlbmV8Z2ZcLTV8Z1wtbW98Z28oXC53fG9kKXxncihhZHx1bil8aGFpZXxoY2l0fGhkXC0obXxwfHQpfGhlaVwtfGhpKHB0fHRhKXxocCggaXxpcCl8aHNcLWN8aHQoYyhcLXwgfF98YXxnfHB8c3x0KXx0cCl8aHUoYXd8dGMpfGlcLSgyMHxnb3xtYSl8aTIzMHxpYWMoIHxcLXxcLyl8aWJyb3xpZGVhfGlnMDF8aWtvbXxpbTFrfGlubm98aXBhcXxpcmlzfGphKHR8dilhfGpicm98amVtdXxqaWdzfGtkZGl8a2VqaXxrZ3QoIHxcLyl8a2xvbnxrcHQgfGt3Y1wtfGt5byhjfGspfGxlKG5vfHhpKXxsZyggZ3xcLyhrfGx8dSl8NTB8NTR8XC1bYS13XSl8bGlid3xseW54fG0xXC13fG0zZ2F8bTUwXC98bWEodGV8dWl8eG8pfG1jKDAxfDIxfGNhKXxtXC1jcnxtZShyY3xyaSl8bWkobzh8b2F8dHMpfG1tZWZ8bW8oMDF8MDJ8Yml8ZGV8ZG98dChcLXwgfG98dil8enopfG10KDUwfHAxfHYgKXxtd2JwfG15d2F8bjEwWzAtMl18bjIwWzItM118bjMwKDB8Mil8bjUwKDB8Mnw1KXxuNygwKDB8MSl8MTApfG5lKChjfG0pXC18b258dGZ8d2Z8d2d8d3QpfG5vayg2fGkpfG56cGh8bzJpbXxvcCh0aXx3dil8b3Jhbnxvd2cxfHA4MDB8cGFuKGF8ZHx0KXxwZHhnfHBnKDEzfFwtKFsxLThdfGMpKXxwaGlsfHBpcmV8cGwoYXl8dWMpfHBuXC0yfHBvKGNrfHJ0fHNlKXxwcm94fHBzaW98cHRcLWd8cWFcLWF8cWMoMDd8MTJ8MjF8MzJ8NjB8XC1bMi03XXxpXC0pfHF0ZWt8cjM4MHxyNjAwfHJha3N8cmltOXxybyh2ZXx6byl8czU1XC98c2EoZ2V8bWF8bW18bXN8bnl8dmEpfHNjKDAxfGhcLXxvb3xwXC0pfHNka1wvfHNlKGMoXC18MHwxKXw0N3xtY3xuZHxyaSl8c2doXC18c2hhcnxzaWUoXC18bSl8c2tcLTB8c2woNDV8aWQpfHNtKGFsfGFyfGIzfGl0fHQ1KXxzbyhmdHxueSl8c3AoMDF8aFwtfHZcLXx2ICl8c3koMDF8bWIpfHQyKDE4fDUwKXx0NigwMHwxMHwxOCl8dGEoZ3R8bGspfHRjbFwtfHRkZ1wtfHRlbChpfG0pfHRpbVwtfHRcLW1vfHRvKHBsfHNoKXx0cyg3MHxtXC18bTN8bTUpfHR4XC05fHVwKFwuYnxnMXxzaSl8dXRzdHx2NDAwfHY3NTB8dmVyaXx2aShyZ3x0ZSl8dmsoNDB8NVswLTNdfFwtdil8dm00MHx2b2RhfHZ1bGN8dngoNTJ8NTN8NjB8NjF8NzB8ODB8ODF8ODN8ODV8OTgpfHczYyhcLXwgKXx3ZWJjfHdoaXR8d2koZyB8bmN8bncpfHdtbGJ8d29udXx4NzAwfHlhc1wtfHlvdXJ8emV0b3x6dGVcLS9pLHRhYmxldFBhdHRlcm46L2FuZHJvaWR8aXBhZHxwbGF5Ym9va3xzaWxrL2l9O3ZhciBoLGk9T2JqZWN0LnByb3RvdHlwZS5oYXNPd25Qcm9wZXJ0eTtyZXR1cm4gZy5GQUxMQkFDS19QSE9ORT0iVW5rbm93blBob25lIixnLkZBTExCQUNLX1RBQkxFVD0iVW5rbm93blRhYmxldCIsZy5GQUxMQkFDS19NT0JJTEU9IlVua25vd25Nb2JpbGUiLGg9ImlzQXJyYXkiaW4gQXJyYXk/QXJyYXkuaXNBcnJheTpmdW5jdGlvbihhKXtyZXR1cm4iW29iamVjdCBBcnJheV0iPT09T2JqZWN0LnByb3RvdHlwZS50b1N0cmluZy5jYWxsKGEpfSxmdW5jdGlvbigpe3ZhciBhLGIsYyxlLGYsaixrPWcubW9iaWxlRGV0ZWN0UnVsZXM7Zm9yKGEgaW4gay5wcm9wcylpZihpLmNhbGwoay5wcm9wcyxhKSl7Zm9yKGI9ay5wcm9wc1thXSxoKGIpfHwoYj1bYl0pLGY9Yi5sZW5ndGgsZT0wO2U8ZjsrK2UpYz1iW2VdLGo9Yy5pbmRleE9mKCJbVkVSXSIpLGo+PTAmJihjPWMuc3Vic3RyaW5nKDAsaikrIihbXFx3Ll9cXCtdKykiK2Muc3Vic3RyaW5nKGorNSkpLGJbZV09bmV3IFJlZ0V4cChjLCJpIik7ay5wcm9wc1thXT1ifWQoay5vc3MpLGQoay5waG9uZXMpLGQoay50YWJsZXRzKSxkKGsudWFzKSxkKGsudXRpbHMpLGsub3NzMD17V2luZG93c1Bob25lT1M6ay5vc3MuV2luZG93c1Bob25lT1MsV2luZG93c01vYmlsZU9TOmsub3NzLldpbmRvd3NNb2JpbGVPU319KCksZy5maW5kTWF0Y2g9ZnVuY3Rpb24oYSxiKXtmb3IodmFyIGMgaW4gYSlpZihpLmNhbGwoYSxjKSYmYVtjXS50ZXN0KGIpKXJldHVybiBjO3JldHVybiBudWxsfSxnLmZpbmRNYXRjaGVzPWZ1bmN0aW9uKGEsYil7dmFyIGM9W107Zm9yKHZhciBkIGluIGEpaS5jYWxsKGEsZCkmJmFbZF0udGVzdChiKSYmYy5wdXNoKGQpO3JldHVybiBjfSxnLmdldFZlcnNpb25TdHI9ZnVuY3Rpb24oYSxiKXt2YXIgYyxkLGUsZixoPWcubW9iaWxlRGV0ZWN0UnVsZXMucHJvcHM7aWYoaS5jYWxsKGgsYSkpZm9yKGM9aFthXSxlPWMubGVuZ3RoLGQ9MDtkPGU7KytkKWlmKGY9Y1tkXS5leGVjKGIpLG51bGwhPT1mKXJldHVybiBmWzFdO3JldHVybiBudWxsfSxnLmdldFZlcnNpb249ZnVuY3Rpb24oYSxiKXt2YXIgYz1nLmdldFZlcnNpb25TdHIoYSxiKTtyZXR1cm4gYz9nLnByZXBhcmVWZXJzaW9uTm8oYyk6TmFOfSxnLnByZXBhcmVWZXJzaW9uTm89ZnVuY3Rpb24oYSl7dmFyIGI7cmV0dXJuIGI9YS5zcGxpdCgvW2Etei5fIFwvXC1dL2kpLDE9PT1iLmxlbmd0aCYmKGE9YlswXSksYi5sZW5ndGg+MSYmKGE9YlswXSsiLiIsYi5zaGlmdCgpLGErPWIuam9pbigiIikpLE51bWJlcihhKX0sZy5pc01vYmlsZUZhbGxiYWNrPWZ1bmN0aW9uKGEpe3JldHVybiBnLmRldGVjdE1vYmlsZUJyb3dzZXJzLmZ1bGxQYXR0ZXJuLnRlc3QoYSl8fGcuZGV0ZWN0TW9iaWxlQnJvd3NlcnMuc2hvcnRQYXR0ZXJuLnRlc3QoYS5zdWJzdHIoMCw0KSl9LGcuaXNUYWJsZXRGYWxsYmFjaz1mdW5jdGlvbihhKXtyZXR1cm4gZy5kZXRlY3RNb2JpbGVCcm93c2Vycy50YWJsZXRQYXR0ZXJuLnRlc3QoYSl9LGcucHJlcGFyZURldGVjdGlvbkNhY2hlPWZ1bmN0aW9uKGEsYyxkKXtpZihhLm1vYmlsZT09PWIpe3ZhciBlLGgsaTtyZXR1cm4oaD1nLmZpbmRNYXRjaChnLm1vYmlsZURldGVjdFJ1bGVzLnRhYmxldHMsYykpPyhhLm1vYmlsZT1hLnRhYmxldD1oLHZvaWQoYS5waG9uZT1udWxsKSk6KGU9Zy5maW5kTWF0Y2goZy5tb2JpbGVEZXRlY3RSdWxlcy5waG9uZXMsYykpPyhhLm1vYmlsZT1hLnBob25lPWUsdm9pZChhLnRhYmxldD1udWxsKSk6dm9pZChnLmlzTW9iaWxlRmFsbGJhY2soYyk/KGk9Zi5pc1Bob25lU2l6ZWQoZCksaT09PWI/KGEubW9iaWxlPWcuRkFMTEJBQ0tfTU9CSUxFLGEudGFibGV0PWEucGhvbmU9bnVsbCk6aT8oYS5tb2JpbGU9YS5waG9uZT1nLkZBTExCQUNLX1BIT05FLGEudGFibGV0PW51bGwpOihhLm1vYmlsZT1hLnRhYmxldD1nLkZBTExCQUNLX1RBQkxFVCxhLnBob25lPW51bGwpKTpnLmlzVGFibGV0RmFsbGJhY2soYyk/KGEubW9iaWxlPWEudGFibGV0PWcuRkFMTEJBQ0tfVEFCTEVULGEucGhvbmU9bnVsbCk6YS5tb2JpbGU9YS50YWJsZXQ9YS5waG9uZT1udWxsKX19LGcubW9iaWxlR3JhZGU9ZnVuY3Rpb24oYSl7dmFyIGI9bnVsbCE9PWEubW9iaWxlKCk7cmV0dXJuIGEub3MoImlPUyIpJiZhLnZlcnNpb24oImlQYWQiKT49NC4zfHxhLm9zKCJpT1MiKSYmYS52ZXJzaW9uKCJpUGhvbmUiKT49My4xfHxhLm9zKCJpT1MiKSYmYS52ZXJzaW9uKCJpUG9kIik+PTMuMXx8YS52ZXJzaW9uKCJBbmRyb2lkIik+Mi4xJiZhLmlzKCJXZWJraXQiKXx8YS52ZXJzaW9uKCJXaW5kb3dzIFBob25lIE9TIik+PTd8fGEuaXMoIkJsYWNrQmVycnkiKSYmYS52ZXJzaW9uKCJCbGFja0JlcnJ5Iik+PTZ8fGEubWF0Y2goIlBsYXlib29rLipUYWJsZXQiKXx8YS52ZXJzaW9uKCJ3ZWJPUyIpPj0xLjQmJmEubWF0Y2goIlBhbG18UHJlfFBpeGkiKXx8YS5tYXRjaCgiaHAuKlRvdWNoUGFkIil8fGEuaXMoIkZpcmVmb3giKSYmYS52ZXJzaW9uKCJGaXJlZm94Iik+PTEyfHxhLmlzKCJDaHJvbWUiKSYmYS5pcygiQW5kcm9pZE9TIikmJmEudmVyc2lvbigiQW5kcm9pZCIpPj00fHxhLmlzKCJTa3lmaXJlIikmJmEudmVyc2lvbigiU2t5ZmlyZSIpPj00LjEmJmEuaXMoIkFuZHJvaWRPUyIpJiZhLnZlcnNpb24oIkFuZHJvaWQiKT49Mi4zfHxhLmlzKCJPcGVyYSIpJiZhLnZlcnNpb24oIk9wZXJhIE1vYmkiKT4xMSYmYS5pcygiQW5kcm9pZE9TIil8fGEuaXMoIk1lZUdvT1MiKXx8YS5pcygiVGl6ZW4iKXx8YS5pcygiRG9sZmluIikmJmEudmVyc2lvbigiQmFkYSIpPj0yfHwoYS5pcygiVUMgQnJvd3NlciIpfHxhLmlzKCJEb2xmaW4iKSkmJmEudmVyc2lvbigiQW5kcm9pZCIpPj0yLjN8fGEubWF0Y2goIktpbmRsZSBGaXJlIil8fGEuaXMoIktpbmRsZSIpJiZhLnZlcnNpb24oIktpbmRsZSIpPj0zfHxhLmlzKCJBbmRyb2lkT1MiKSYmYS5pcygiTm9va1RhYmxldCIpfHxhLnZlcnNpb24oIkNocm9tZSIpPj0xMSYmIWJ8fGEudmVyc2lvbigiU2FmYXJpIik+PTUmJiFifHxhLnZlcnNpb24oIkZpcmVmb3giKT49NCYmIWJ8fGEudmVyc2lvbigiTVNJRSIpPj03JiYhYnx8YS52ZXJzaW9uKCJPcGVyYSIpPj0xMCYmIWI/IkEiOmEub3MoImlPUyIpJiZhLnZlcnNpb24oImlQYWQiKTw0LjN8fGEub3MoImlPUyIpJiZhLnZlcnNpb24oImlQaG9uZSIpPDMuMXx8YS5vcygiaU9TIikmJmEudmVyc2lvbigiaVBvZCIpPDMuMXx8YS5pcygiQmxhY2tiZXJyeSIpJiZhLnZlcnNpb24oIkJsYWNrQmVycnkiKT49NSYmYS52ZXJzaW9uKCJCbGFja0JlcnJ5Iik8Nnx8YS52ZXJzaW9uKCJPcGVyYSBNaW5pIik+PTUmJmEudmVyc2lvbigiT3BlcmEgTWluaSIpPD02LjUmJihhLnZlcnNpb24oIkFuZHJvaWQiKT49Mi4zfHxhLmlzKCJpT1MiKSl8fGEubWF0Y2goIk5va2lhTjh8Tm9raWFDN3xOOTcuKlNlcmllczYwfFN5bWJpYW4vMyIpfHxhLnZlcnNpb24oIk9wZXJhIE1vYmkiKT49MTEmJmEuaXMoIlN5bWJpYW5PUyIpPyJCIjooYS52ZXJzaW9uKCJCbGFja0JlcnJ5Iik8NXx8YS5tYXRjaCgiTVNJRU1vYmlsZXxXaW5kb3dzIENFLipNb2JpbGUiKXx8YS52ZXJzaW9uKCJXaW5kb3dzIE1vYmlsZSIpPD01LjIsIkMiKX0sZy5kZXRlY3RPUz1mdW5jdGlvbihhKXtyZXR1cm4gZy5maW5kTWF0Y2goZy5tb2JpbGVEZXRlY3RSdWxlcy5vc3MwLGEpfHxnLmZpbmRNYXRjaChnLm1vYmlsZURldGVjdFJ1bGVzLm9zcyxhKX0sZy5nZXREZXZpY2VTbWFsbGVyU2lkZT1mdW5jdGlvbigpe3JldHVybiB3aW5kb3cuc2NyZWVuLndpZHRoPHdpbmRvdy5zY3JlZW4uaGVpZ2h0P3dpbmRvdy5zY3JlZW4ud2lkdGg6d2luZG93LnNjcmVlbi5oZWlnaHR9LGYucHJvdG90eXBlPXtjb25zdHJ1Y3RvcjpmLG1vYmlsZTpmdW5jdGlvbigpe3JldHVybiBnLnByZXBhcmVEZXRlY3Rpb25DYWNoZSh0aGlzLl9jYWNoZSx0aGlzLnVhLHRoaXMubWF4UGhvbmVXaWR0aCksdGhpcy5fY2FjaGUubW9iaWxlfSxwaG9uZTpmdW5jdGlvbigpe3JldHVybiBnLnByZXBhcmVEZXRlY3Rpb25DYWNoZSh0aGlzLl9jYWNoZSx0aGlzLnVhLHRoaXMubWF4UGhvbmVXaWR0aCksdGhpcy5fY2FjaGUucGhvbmV9LHRhYmxldDpmdW5jdGlvbigpe3JldHVybiBnLnByZXBhcmVEZXRlY3Rpb25DYWNoZSh0aGlzLl9jYWNoZSx0aGlzLnVhLHRoaXMubWF4UGhvbmVXaWR0aCksdGhpcy5fY2FjaGUudGFibGV0fSx1c2VyQWdlbnQ6ZnVuY3Rpb24oKXtyZXR1cm4gdGhpcy5fY2FjaGUudXNlckFnZW50PT09YiYmKHRoaXMuX2NhY2hlLnVzZXJBZ2VudD1nLmZpbmRNYXRjaChnLm1vYmlsZURldGVjdFJ1bGVzLnVhcyx0aGlzLnVhKSksdGhpcy5fY2FjaGUudXNlckFnZW50fSx1c2VyQWdlbnRzOmZ1bmN0aW9uKCl7cmV0dXJuIHRoaXMuX2NhY2hlLnVzZXJBZ2VudHM9PT1iJiYodGhpcy5fY2FjaGUudXNlckFnZW50cz1nLmZpbmRNYXRjaGVzKGcubW9iaWxlRGV0ZWN0UnVsZXMudWFzLHRoaXMudWEpKSx0aGlzLl9jYWNoZS51c2VyQWdlbnRzfSxvczpmdW5jdGlvbigpe3JldHVybiB0aGlzLl9jYWNoZS5vcz09PWImJih0aGlzLl9jYWNoZS5vcz1nLmRldGVjdE9TKHRoaXMudWEpKSx0aGlzLl9jYWNoZS5vc30sdmVyc2lvbjpmdW5jdGlvbihhKXtyZXR1cm4gZy5nZXRWZXJzaW9uKGEsdGhpcy51YSl9LHZlcnNpb25TdHI6ZnVuY3Rpb24oYSl7cmV0dXJuIGcuZ2V0VmVyc2lvblN0cihhLHRoaXMudWEpfSxpczpmdW5jdGlvbihiKXtyZXR1cm4gYyh0aGlzLnVzZXJBZ2VudHMoKSxiKXx8YShiLHRoaXMub3MoKSl8fGEoYix0aGlzLnBob25lKCkpfHxhKGIsdGhpcy50YWJsZXQoKSl8fGMoZy5maW5kTWF0Y2hlcyhnLm1vYmlsZURldGVjdFJ1bGVzLnV0aWxzLHRoaXMudWEpLGIpfSxtYXRjaDpmdW5jdGlvbihhKXtyZXR1cm4gYSBpbnN0YW5jZW9mIFJlZ0V4cHx8KGE9bmV3IFJlZ0V4cChhLCJpIikpLGEudGVzdCh0aGlzLnVhKX0saXNQaG9uZVNpemVkOmZ1bmN0aW9uKGEpe3JldHVybiBmLmlzUGhvbmVTaXplZChhfHx0aGlzLm1heFBob25lV2lkdGgpfSxtb2JpbGVHcmFkZTpmdW5jdGlvbigpe3JldHVybiB0aGlzLl9jYWNoZS5ncmFkZT09PWImJih0aGlzLl9jYWNoZS5ncmFkZT1nLm1vYmlsZUdyYWRlKHRoaXMpKSx0aGlzLl9jYWNoZS5ncmFkZX19LCJ1bmRlZmluZWQiIT10eXBlb2Ygd2luZG93JiZ3aW5kb3cuc2NyZWVuP2YuaXNQaG9uZVNpemVkPWZ1bmN0aW9uKGEpe3JldHVybiBhPDA/YjpnLmdldERldmljZVNtYWxsZXJTaWRlKCk8PWF9OmYuaXNQaG9uZVNpemVkPWZ1bmN0aW9uKCl7fSxmLl9pbXBsPWcsZi52ZXJzaW9uPSIxLjQuNSAyMDIxLTAzLTEzIixmfSl9KGZ1bmN0aW9uKGEpe2lmKCJ1bmRlZmluZWQiIT10eXBlb2YgbW9kdWxlJiZtb2R1bGUuZXhwb3J0cylyZXR1cm4gZnVuY3Rpb24oYSl7bW9kdWxlLmV4cG9ydHM9YSgpfTtpZigiZnVuY3Rpb24iPT10eXBlb2YgZGVmaW5lJiZkZWZpbmUuYW1kKXJldHVybiBkZWZpbmU7aWYoInVuZGVmaW5lZCIhPXR5cGVvZiB3aW5kb3cpcmV0dXJuIGZ1bmN0aW9uKGEpe3dpbmRvdy5Nb2JpbGVEZXRlY3Q9YSgpfTt0aHJvdyBuZXcgRXJyb3IoInVua25vd24gZW52aXJvbm1lbnQiKX0oKSk7dmFyIGFpX2xpc3RzPSEwLGFpX2Jsb2NrX2NsYXNzX2RlZj0iY29kZS1ibG9jayI7CmlmKCJ1bmRlZmluZWQiIT10eXBlb2YgYWlfbGlzdHMpe2Z1bmN0aW9uIFYoYSxlKXtmb3IodmFyIHA9W107YT1hLnByZXZpb3VzRWxlbWVudFNpYmxpbmc7KSgidW5kZWZpbmVkIj09dHlwZW9mIGV8fGEubWF0Y2hlcyhlKSkmJnAucHVzaChhKTtyZXR1cm4gcH1mdW5jdGlvbiBlYShhLGUpe2Zvcih2YXIgcD1bXTthPWEubmV4dEVsZW1lbnRTaWJsaW5nOykoInVuZGVmaW5lZCI9PXR5cGVvZiBlfHxhLm1hdGNoZXMoZSkpJiZwLnB1c2goYSk7cmV0dXJuIHB9dmFyIGhvc3RfcmVnZXhwPVJlZ0V4cCgiOlxcL1xcLyguW14vOl0rKSIsImkiKTtmdW5jdGlvbiBmYShhKXthPWEubWF0Y2goaG9zdF9yZWdleHApO3JldHVybiBudWxsIT1hJiYxPGEubGVuZ3RoJiYic3RyaW5nIj09PXR5cGVvZiBhWzFdJiYwPGFbMV0ubGVuZ3RoP2FbMV0udG9Mb3dlckNhc2UoKTpudWxsfWZ1bmN0aW9uIFAoYSl7cmV0dXJuIGEuaW5jbHVkZXMoIjoiKT8oYT1hLnNwbGl0KCI6IiksMUUzKigzNjAwKnBhcnNlSW50KGFbMF0pKwo2MCpwYXJzZUludChhWzFdKStwYXJzZUludChhWzJdKSkpOm51bGx9ZnVuY3Rpb24gVyhhKXt0cnl7dmFyIGU9RGF0ZS5wYXJzZShhKTtpc05hTihlKSYmKGU9bnVsbCl9Y2F0Y2gocCl7ZT1udWxsfWlmKG51bGw9PWUmJmEuaW5jbHVkZXMoIiAiKSl7YT1hLnNwbGl0KCIgIik7dHJ5e2U9RGF0ZS5wYXJzZShhWzBdKSxlKz1QKGFbMV0pLGlzTmFOKGUpJiYoZT1udWxsKX1jYXRjaChwKXtlPW51bGx9fXJldHVybiBlfWZ1bmN0aW9uIFgoKXtudWxsPT1kb2N1bWVudC5xdWVyeVNlbGVjdG9yKCIjYWktaWFiLXRjZi1iYXIiKSYmbnVsbD09ZG9jdW1lbnQucXVlcnlTZWxlY3RvcigiLmFpLWxpc3QtbWFudWFsIil8fCJmdW5jdGlvbiIhPXR5cGVvZiBfX3RjZmFwaXx8ImZ1bmN0aW9uIiE9dHlwZW9mIGFpX2xvYWRfYmxvY2tzfHwidW5kZWZpbmVkIiE9dHlwZW9mIGFpX2lhYl90Y2ZfY2FsbGJhY2tfaW5zdGFsbGVkfHwoX190Y2ZhcGkoImFkZEV2ZW50TGlzdGVuZXIiLDIsZnVuY3Rpb24oYSwKZSl7ZSYmInVzZXJhY3Rpb25jb21wbGV0ZSI9PT1hLmV2ZW50U3RhdHVzJiYoYWlfdGNEYXRhPWEsYWlfbG9hZF9ibG9ja3MoKSxhPWRvY3VtZW50LnF1ZXJ5U2VsZWN0b3IoIiNhaS1pYWItdGNmLXN0YXR1cyIpLG51bGwhPWEmJihhLnRleHRDb250ZW50PSJJQUIgVENGIDIuMCBEQVRBIExPQURFRCIpLGE9ZG9jdW1lbnQucXVlcnlTZWxlY3RvcigiI2FpLWlhYi10Y2YtYmFyIiksbnVsbCE9YSYmKGEuY2xhc3NMaXN0LnJlbW92ZSgic3RhdHVzLWVycm9yIiksYS5jbGFzc0xpc3QuYWRkKCJzdGF0dXMtb2siKSkpfSksYWlfaWFiX3RjZl9jYWxsYmFja19pbnN0YWxsZWQ9ITApfWFpX3Byb2Nlc3NfbGlzdHM9ZnVuY3Rpb24oYSl7ZnVuY3Rpb24gZShiLGQsayl7aWYoMD09Yi5sZW5ndGgpe2lmKCIhQCEiPT1rKXJldHVybiEwO2QhPWsmJigidHJ1ZSI9PWsudG9Mb3dlckNhc2UoKT9rPSEwOiJmYWxzZSI9PWsudG9Mb3dlckNhc2UoKSYmKGs9ITEpKTtyZXR1cm4gZD09a31pZigib2JqZWN0IiE9CnR5cGVvZiBkJiYiYXJyYXkiIT10eXBlb2YgZClyZXR1cm4hMTt2YXIgbD1iWzBdO2I9Yi5zbGljZSgxKTtpZigiKiI9PWwpZm9yKGxldCBbLG5db2YgT2JqZWN0LmVudHJpZXMoZCkpe2lmKGUoYixuLGspKXJldHVybiEwfWVsc2UgaWYobCBpbiBkKXJldHVybiBlKGIsZFtsXSxrKTtyZXR1cm4hMX1mdW5jdGlvbiBwKGIsZCxrKXtpZigib2JqZWN0IiE9dHlwZW9mIGJ8fC0xPT1kLmluZGV4T2YoIlsiKSlyZXR1cm4hMTtkPWQucmVwbGFjZSgvXXwgL2dpLCIiKS5zcGxpdCgiWyIpO3JldHVybiBlKGQsYixrKX1mdW5jdGlvbiB6KCl7aWYoImZ1bmN0aW9uIj09dHlwZW9mIF9fdGNmYXBpKXt2YXIgYj1kb2N1bWVudC5xdWVyeVNlbGVjdG9yKCIjYWktaWFiLXRjZi1zdGF0dXMiKSxkPWRvY3VtZW50LnF1ZXJ5U2VsZWN0b3IoIiNhaS1pYWItdGNmLWJhciIpO251bGwhPWImJihiLnRleHRDb250ZW50PSJJQUIgVENGIDIuMCBERVRFQ1RFRCIpO19fdGNmYXBpKCJnZXRUQ0RhdGEiLDIsZnVuY3Rpb24oaywKbCl7bD8obnVsbCE9ZCYmZC5jbGFzc0xpc3QuYWRkKCJzdGF0dXMtb2siKSwidGNsb2FkZWQiPT1rLmV2ZW50U3RhdHVzfHwidXNlcmFjdGlvbmNvbXBsZXRlIj09ay5ldmVudFN0YXR1cyk/KGFpX3RjRGF0YT1rLGsuZ2RwckFwcGxpZXM/bnVsbCE9YiYmKGIudGV4dENvbnRlbnQ9IklBQiBUQ0YgMi4wIERBVEEgTE9BREVEIik6bnVsbCE9YiYmKGIudGV4dENvbnRlbnQ9IklBQiBUQ0YgMi4wIEdEUFIgRE9FUyBOT1QgQVBQTFkiKSxudWxsIT1kJiYoZC5jbGFzc0xpc3QucmVtb3ZlKCJzdGF0dXMtZXJyb3IiKSxkLmNsYXNzTGlzdC5hZGQoInN0YXR1cy1vayIpKSxzZXRUaW1lb3V0KGZ1bmN0aW9uKCl7YWlfcHJvY2Vzc19saXN0cygpfSwxMCkpOiJjbXB1aXNob3duIj09ay5ldmVudFN0YXR1cyYmKGFpX2NtcHVpc2hvd249ITAsbnVsbCE9YiYmKGIudGV4dENvbnRlbnQ9IklBQiBUQ0YgMi4wIENNUCBVSSBTSE9XTiIpLG51bGwhPWQmJihkLmNsYXNzTGlzdC5yZW1vdmUoInN0YXR1cy1lcnJvciIpLApkLmNsYXNzTGlzdC5hZGQoInN0YXR1cy1vayIpKSk6KG51bGwhPWImJihiLnRleHRDb250ZW50PSJJQUIgVENGIDIuMCBfX3RjZmFwaSBnZXRUQ0RhdGEgZmFpbGVkIiksbnVsbCE9ZCYmKGQuY2xhc3NMaXN0LnJlbW92ZSgic3RhdHVzLW9rIiksZC5jbGFzc0xpc3QuYWRkKCJzdGF0dXMtZXJyb3IiKSkpfSl9fWZ1bmN0aW9uIEMoYil7ImZ1bmN0aW9uIj09dHlwZW9mIF9fdGNmYXBpPygidW5kZWZpbmVkIj09dHlwZW9mIGFpX2lhYl90Y2ZfY2FsbGJhY2tfaW5zdGFsbGVkJiZYKCksInVuZGVmaW5lZCI9PXR5cGVvZiBhaV90Y0RhdGFfcmVxdWVzdGVkJiYoYWlfdGNEYXRhX3JlcXVlc3RlZD0hMCx6KCksY29va2llc19uZWVkX3RjRGF0YT0hMCkpOmImJihudWxsIT1pYWJfdGNmX3N0YXR1cyYmKGlhYl90Y2Zfc3RhdHVzLnRleHRDb250ZW50PSJJQUIgVENGIDIuMCBNSVNTSU5HOiBfX3RjZmFwaSBmdW5jdGlvbiBub3QgZm91bmQiKSxudWxsIT1pYWJfdGNmX2JhciYmKGlhYl90Y2ZfYmFyLmNsYXNzTGlzdC5yZW1vdmUoInN0YXR1cy1vayIpLAppYWJfdGNmX2Jhci5jbGFzc0xpc3QuYWRkKCJzdGF0dXMtZXJyb3IiKSkpfWlmKG51bGw9PWEpYT1kb2N1bWVudC5xdWVyeVNlbGVjdG9yQWxsKCJkaXYuYWktbGlzdC1kYXRhLCBtZXRhLmFpLWxpc3QtZGF0YSIpO2Vsc2V7d2luZG93LmpRdWVyeSYmd2luZG93LmpRdWVyeS5mbiYmYSBpbnN0YW5jZW9mIGpRdWVyeSYmKGE9QXJyYXkucHJvdG90eXBlLnNsaWNlLmNhbGwoYSkpO3ZhciB4PVtdO2EuZm9yRWFjaCgoYixkKT0+e2IubWF0Y2hlcygiLmFpLWxpc3QtZGF0YSIpP3gucHVzaChiKTooYj1iLnF1ZXJ5U2VsZWN0b3JBbGwoIi5haS1saXN0LWRhdGEiKSxiLmxlbmd0aCYmYi5mb3JFYWNoKChrLGwpPT57eC5wdXNoKGspfSkpfSk7YT14fWlmKGEubGVuZ3RoKXthLmZvckVhY2goKGIsZCk9PntiLmNsYXNzTGlzdC5yZW1vdmUoImFpLWxpc3QtZGF0YSIpfSk7dmFyIEk9aGEod2luZG93LmxvY2F0aW9uLnNlYXJjaCk7aWYobnVsbCE9SS5yZWZlcnJlcil2YXIgQT1JLnJlZmVycmVyOwplbHNlIEE9ZG9jdW1lbnQucmVmZXJyZXIsIiIhPUEmJihBPWZhKEEpKTt2YXIgUT13aW5kb3cubmF2aWdhdG9yLnVzZXJBZ2VudCxSPVEudG9Mb3dlckNhc2UoKSxZPW5hdmlnYXRvci5sYW5ndWFnZSxKPVkudG9Mb3dlckNhc2UoKTtpZigidW5kZWZpbmVkIiE9PXR5cGVvZiBNb2JpbGVEZXRlY3QpdmFyIFo9bmV3IE1vYmlsZURldGVjdChRKTthLmZvckVhY2goKGIsZCk9Pnt2YXIgaz1kb2N1bWVudC5jb29raWUuc3BsaXQoIjsiKTtrLmZvckVhY2goZnVuY3Rpb24oZixoKXtrW2hdPWYudHJpbSgpfSk7ZD1iLmNsb3Nlc3QoImRpdi4iK2FpX2Jsb2NrX2NsYXNzX2RlZik7dmFyIGw9ITA7aWYoYi5oYXNBdHRyaWJ1dGUoInJlZmVyZXItbGlzdCIpKXt2YXIgbj1iLmdldEF0dHJpYnV0ZSgicmVmZXJlci1saXN0Iik7bj1iNjRkKG4pLnNwbGl0KCIsIik7dmFyIHQ9Yi5nZXRBdHRyaWJ1dGUoInJlZmVyZXItbGlzdC10eXBlIiksRT0hMTtuLmV2ZXJ5KChmLGgpPT57Zj1mLnRyaW0oKTsKaWYoIiI9PWYpcmV0dXJuITA7aWYoIioiPT1mLmNoYXJBdCgwKSlpZigiKiI9PWYuY2hhckF0KGYubGVuZ3RoLTEpKXtpZihmPWYuc3Vic3RyKDEsZi5sZW5ndGgtMiksLTEhPUEuaW5kZXhPZihmKSlyZXR1cm4gRT0hMCwhMX1lbHNle2lmKGY9Zi5zdWJzdHIoMSksQS5zdWJzdHIoLWYubGVuZ3RoKT09ZilyZXR1cm4gRT0hMCwhMX1lbHNlIGlmKCIqIj09Zi5jaGFyQXQoZi5sZW5ndGgtMSkpe2lmKGY9Zi5zdWJzdHIoMCxmLmxlbmd0aC0xKSwwPT1BLmluZGV4T2YoZikpcmV0dXJuIEU9ITAsITF9ZWxzZSBpZigiIyI9PWYpe2lmKCIiPT1BKXJldHVybiBFPSEwLCExfWVsc2UgaWYoZj09QSlyZXR1cm4gRT0hMCwhMTtyZXR1cm4hMH0pO3ZhciB1PUU7c3dpdGNoKHQpe2Nhc2UgIkIiOnUmJihsPSExKTticmVhaztjYXNlICJXIjp1fHwobD0hMSl9fWlmKGwmJmIuaGFzQXR0cmlidXRlKCJjbGllbnQtbGlzdCIpJiYidW5kZWZpbmVkIiE9PXR5cGVvZiBaKXN3aXRjaChuPWIuZ2V0QXR0cmlidXRlKCJjbGllbnQtbGlzdCIpLApuPWI2NGQobikuc3BsaXQoIiwiKSx0PWIuZ2V0QXR0cmlidXRlKCJjbGllbnQtbGlzdC10eXBlIiksdT0hMSxuLmV2ZXJ5KChmLGgpPT57aWYoIiI9PWYudHJpbSgpKXJldHVybiEwO2Yuc3BsaXQoIiYmIikuZXZlcnkoKGMsdik9Pnt2PSEwO3ZhciB3PSExO2ZvcihjPWMudHJpbSgpOyIhISI9PWMuc3Vic3RyaW5nKDAsMik7KXY9IXYsYz1jLnN1YnN0cmluZygyKTsibGFuZ3VhZ2U6Ij09Yy5zdWJzdHJpbmcoMCw5KSYmKHc9ITAsYz1jLnN1YnN0cmluZyg5KS50b0xvd2VyQ2FzZSgpKTt2YXIgcT0hMTt3PyIqIj09Yy5jaGFyQXQoMCk/IioiPT1jLmNoYXJBdChjLmxlbmd0aC0xKT8oYz1jLnN1YnN0cigxLGMubGVuZ3RoLTIpLnRvTG93ZXJDYXNlKCksLTEhPUouaW5kZXhPZihjKSYmKHE9ITApKTooYz1jLnN1YnN0cigxKS50b0xvd2VyQ2FzZSgpLEouc3Vic3RyKC1jLmxlbmd0aCk9PWMmJihxPSEwKSk6IioiPT1jLmNoYXJBdChjLmxlbmd0aC0xKT8oYz1jLnN1YnN0cigwLGMubGVuZ3RoLQoxKS50b0xvd2VyQ2FzZSgpLDA9PUouaW5kZXhPZihjKSYmKHE9ITApKTpjPT1KJiYocT0hMCk6IioiPT1jLmNoYXJBdCgwKT8iKiI9PWMuY2hhckF0KGMubGVuZ3RoLTEpPyhjPWMuc3Vic3RyKDEsYy5sZW5ndGgtMikudG9Mb3dlckNhc2UoKSwtMSE9Ui5pbmRleE9mKGMpJiYocT0hMCkpOihjPWMuc3Vic3RyKDEpLnRvTG93ZXJDYXNlKCksUi5zdWJzdHIoLWMubGVuZ3RoKT09YyYmKHE9ITApKToiKiI9PWMuY2hhckF0KGMubGVuZ3RoLTEpPyhjPWMuc3Vic3RyKDAsYy5sZW5ndGgtMSkudG9Mb3dlckNhc2UoKSwwPT1SLmluZGV4T2YoYykmJihxPSEwKSk6Wi5pcyhjKSYmKHE9ITApO3JldHVybih1PXE/djohdik/ITA6ITF9KTtyZXR1cm4gdT8hMTohMH0pLHQpe2Nhc2UgIkIiOnUmJihsPSExKTticmVhaztjYXNlICJXIjp1fHwobD0hMSl9dmFyIEs9bj0hMTtmb3IodD0xOzI+PXQ7dCsrKWlmKGwpe3N3aXRjaCh0KXtjYXNlIDE6dmFyIGc9Yi5nZXRBdHRyaWJ1dGUoImNvb2tpZS1saXN0Iik7CmJyZWFrO2Nhc2UgMjpnPWIuZ2V0QXR0cmlidXRlKCJwYXJhbWV0ZXItbGlzdCIpfWlmKG51bGwhPWcpe2c9YjY0ZChnKTtzd2l0Y2godCl7Y2FzZSAxOnZhciB5PWIuZ2V0QXR0cmlidXRlKCJjb29raWUtbGlzdC10eXBlIik7YnJlYWs7Y2FzZSAyOnk9Yi5nZXRBdHRyaWJ1dGUoInBhcmFtZXRlci1saXN0LXR5cGUiKX1nPWcucmVwbGFjZSgidGNmLWdkcHIiLCJ0Y2YtdjJbZ2RwckFwcGxpZXNdPXRydWUiKTtnPWcucmVwbGFjZSgidGNmLW5vLWdkcHIiLCJ0Y2YtdjJbZ2RwckFwcGxpZXNdPWZhbHNlIik7Zz1nLnJlcGxhY2UoInRjZi1nb29nbGUiLCJ0Y2YtdjJbdmVuZG9yXVtjb25zZW50c11bNzU1XT10cnVlICYmIHRjZi12MltwdXJwb3NlXVtjb25zZW50c11bMV09dHJ1ZSIpO2c9Zy5yZXBsYWNlKCJ0Y2Ytbm8tZ29vZ2xlIiwiISF0Y2YtdjJbdmVuZG9yXVtjb25zZW50c11bNzU1XSIpO2c9Zy5yZXBsYWNlKCJ0Y2YtbWVkaWEubmV0IiwidGNmLXYyW3ZlbmRvcl1bY29uc2VudHNdWzE0Ml09dHJ1ZSAmJiB0Y2YtdjJbcHVycG9zZV1bY29uc2VudHNdWzFdPXRydWUiKTsKZz1nLnJlcGxhY2UoInRjZi1uby1tZWRpYS5uZXQiLCIhIXRjZi12Mlt2ZW5kb3JdW2NvbnNlbnRzXVsxNDJdIik7Zz1nLnJlcGxhY2UoInRjZi1hbWF6b24iLCJ0Y2YtdjJbdmVuZG9yXVtjb25zZW50c11bNzkzXT10cnVlICYmIHRjZi12MltwdXJwb3NlXVtjb25zZW50c11bMV09dHJ1ZSIpO2c9Zy5yZXBsYWNlKCJ0Y2Ytbm8tYW1hem9uIiwiISF0Y2YtdjJbdmVuZG9yXVtjb25zZW50c11bNzkzXSIpO2c9Zy5yZXBsYWNlKCJ0Y2YtZXpvaWMiLCJ0Y2YtdjJbdmVuZG9yXVtjb25zZW50c11bMzQ3XT10cnVlICYmIHRjZi12MltwdXJwb3NlXVtjb25zZW50c11bMV09dHJ1ZSIpO2c9Zy5yZXBsYWNlKCJ0Y2Ytbm8tZXpvaWMiLCIhIXRjZi12Mlt2ZW5kb3JdW2NvbnNlbnRzXVszNDddIik7dmFyIEY9Zy5zcGxpdCgiLCIpLGFhPVtdO2suZm9yRWFjaChmdW5jdGlvbihmKXtmPWYuc3BsaXQoIj0iKTt0cnl7dmFyIGg9SlNPTi5wYXJzZShkZWNvZGVVUklDb21wb25lbnQoZlsxXSkpfWNhdGNoKGMpe2g9CmRlY29kZVVSSUNvbXBvbmVudChmWzFdKX1hYVtmWzBdXT1ofSk7dT0hMTt2YXIgTD1iO0YuZXZlcnkoKGYsaCk9PntmLnNwbGl0KCImJiIpLmV2ZXJ5KChjLHYpPT57dj0hMDtmb3IoYz1jLnRyaW0oKTsiISEiPT1jLnN1YnN0cmluZygwLDIpOyl2PSF2LGM9Yy5zdWJzdHJpbmcoMik7dmFyIHc9YyxxPSIhQCEiLEQ9LTEhPWMuaW5kZXhPZigiWyIpLGJhPSgwPT1jLmluZGV4T2YoInRjZi12MiIpfHwwPT1jLmluZGV4T2YoImV1Y29uc2VudC12MiIpKSYmLTEhPWMuaW5kZXhPZigiWyIpOy0xIT1jLmluZGV4T2YoIj0iKSYmKHE9Yy5zcGxpdCgiPSIpLHc9cVswXSxxPXFbMV0sRD0tMSE9dy5pbmRleE9mKCJbIiksYmE9KDA9PXcuaW5kZXhPZigidGNmLXYyIil8fDA9PXcuaW5kZXhPZigiZXVjb25zZW50LXYyIikpJiYtMSE9dy5pbmRleE9mKCJbIikpO2lmKGJhKWRvY3VtZW50LnF1ZXJ5U2VsZWN0b3IoIiNhaS1pYWItdGNmLXN0YXR1cyIpLEQ9ZG9jdW1lbnQucXVlcnlTZWxlY3RvcigiI2FpLWlhYi10Y2YtYmFyIiksCm51bGwhPUQmJihELnN0eWxlLmRpc3BsYXk9ImJsb2NrIiksIm9iamVjdCI9PXR5cGVvZiBhaV90Y0RhdGE/KG51bGwhPUQmJkQuY2xhc3NMaXN0LmFkZCgic3RhdHVzLW9rIiksdz13LnJlcGxhY2UoL118IC9naSwiIikuc3BsaXQoIlsiKSx3LnNoaWZ0KCksdT0odz1lKHcsYWlfdGNEYXRhLHEpKT92OiF2KTooTC5jbGFzc0xpc3QuYWRkKCJhaS1saXN0LWRhdGEiKSxLPSEwLCJmdW5jdGlvbiI9PXR5cGVvZiBfX3RjZmFwaT9DKCExKToidW5kZWZpbmVkIj09dHlwZW9mIGFpX3RjRGF0YV9yZXRyeWluZyYmKGFpX3RjRGF0YV9yZXRyeWluZz0hMCxzZXRUaW1lb3V0KGZ1bmN0aW9uKCl7ImZ1bmN0aW9uIj09dHlwZW9mIF9fdGNmYXBpP0MoITEpOnNldFRpbWVvdXQoZnVuY3Rpb24oKXsiZnVuY3Rpb24iPT10eXBlb2YgX190Y2ZhcGk/QyghMSk6c2V0VGltZW91dChmdW5jdGlvbigpe0MoITApfSwzRTMpfSwxRTMpfSw2MDApKSk7ZWxzZSBpZihEKXU9KHc9cChhYSx3LHEpKT92OiF2OwplbHNle3ZhciBTPSExOyIhQCEiPT1xP2suZXZlcnkoZnVuY3Rpb24oaWEpe3JldHVybiBpYS5zcGxpdCgiPSIpWzBdPT1jPyhTPSEwLCExKTohMH0pOlM9LTEhPWsuaW5kZXhPZihjKTt1PVM/djohdn1yZXR1cm4gdT8hMDohMX0pO3JldHVybiB1PyExOiEwfSk7dSYmKEs9ITEpO3N3aXRjaCh5KXtjYXNlICJCIjp1JiYobD0hMSk7YnJlYWs7Y2FzZSAiVyI6dXx8KGw9ITEpfX19Yi5jbGFzc0xpc3QuY29udGFpbnMoImFpLWxpc3QtbWFudWFsIikmJihsPyhMLmNsYXNzTGlzdC5yZW1vdmUoImFpLWxpc3QtZGF0YSIpLEwuY2xhc3NMaXN0LnJlbW92ZSgiYWktbGlzdC1tYW51YWwiKSk6KG49ITAsTC5jbGFzc0xpc3QuYWRkKCJhaS1saXN0LWRhdGEiKSkpOyhsfHwhbiYmIUspJiZiLmhhc0F0dHJpYnV0ZSgiZGF0YS1kZWJ1Zy1pbmZvIikmJihnPWRvY3VtZW50LnF1ZXJ5U2VsZWN0b3IoIi4iK2IuZGF0YXNldC5kZWJ1Z0luZm8pLG51bGwhPWcmJihnPWcucGFyZW50RWxlbWVudCxudWxsIT0KZyYmZy5jbGFzc0xpc3QuY29udGFpbnMoImFpLWRlYnVnLWluZm8iKSYmZy5yZW1vdmUoKSkpO3k9VihiLCIuYWktZGVidWctYmFyLmFpLWRlYnVnLWxpc3RzIik7dmFyIGphPSIiPT1BPyIjIjpBOzAhPXkubGVuZ3RoJiZ5LmZvckVhY2goKGYsaCk9PntoPWYucXVlcnlTZWxlY3RvcigiLmFpLWRlYnVnLW5hbWUuYWktbGlzdC1pbmZvIik7bnVsbCE9aCYmKGgudGV4dENvbnRlbnQ9amEsaC50aXRsZT1RKyJcbiIrWSk7aD1mLnF1ZXJ5U2VsZWN0b3IoIi5haS1kZWJ1Zy1uYW1lLmFpLWxpc3Qtc3RhdHVzIik7bnVsbCE9aCYmKGgudGV4dENvbnRlbnQ9bD9haV9mcm9udC52aXNpYmxlOmFpX2Zyb250LmhpZGRlbil9KTtnPSExO2lmKGwmJmIuaGFzQXR0cmlidXRlKCJzY2hlZHVsaW5nLXN0YXJ0IikmJmIuaGFzQXR0cmlidXRlKCJzY2hlZHVsaW5nLWVuZCIpJiZiLmhhc0F0dHJpYnV0ZSgic2NoZWR1bGluZy1kYXlzIikpe3ZhciByPWIuZ2V0QXR0cmlidXRlKCJzY2hlZHVsaW5nLXN0YXJ0Iik7CnQ9Yi5nZXRBdHRyaWJ1dGUoInNjaGVkdWxpbmctZW5kIik7eT1iLmdldEF0dHJpYnV0ZSgic2NoZWR1bGluZy1kYXlzIik7Zz0hMDtyPWI2NGQocik7Rj1iNjRkKHQpO3ZhciBUPXBhcnNlSW50KGIuZ2V0QXR0cmlidXRlKCJzY2hlZHVsaW5nLWZhbGxiYWNrIikpLE09cGFyc2VJbnQoYi5nZXRBdHRyaWJ1dGUoImdtdCIpKTtpZihyLmluY2x1ZGVzKCItIil8fEYuaW5jbHVkZXMoIi0iKSlOPVcocikrTSxPPVcoRikrTTtlbHNlIHZhciBOPVAociksTz1QKEYpO3ZhciBVPWI2NGQoeSkuc3BsaXQoIiwiKTt5PWIuZ2V0QXR0cmlidXRlKCJzY2hlZHVsaW5nLXR5cGUiKTt2YXIgQj0obmV3IERhdGUpLmdldFRpbWUoKStNO3Q9bmV3IERhdGUoQik7dmFyIEc9dC5nZXREYXkoKTtyLmluY2x1ZGVzKCItIil8fEYuaW5jbHVkZXMoIi0iKXx8KHI9KG5ldyBEYXRlKHQuZ2V0RnVsbFllYXIoKSx0LmdldE1vbnRoKCksdC5nZXREYXRlKCkpKS5nZXRUaW1lKCkrTSxCLT1yLDA+QiYmKEIrPTg2NEU1KSk7CjA9PUc/Rz02OkctLTtyPUI+PU4mJkI8TyYmVS5pbmNsdWRlcyhHLnRvU3RyaW5nKCkpO3N3aXRjaCh5KXtjYXNlICJCIjpyPSFyfXJ8fChsPSExKTt2YXIga2E9dC50b0lTT1N0cmluZygpLnNwbGl0KCIuIilbMF0ucmVwbGFjZSgiVCIsIiAiKTt5PVYoYiwiLmFpLWRlYnVnLWJhci5haS1kZWJ1Zy1zY2hlZHVsaW5nIik7MCE9eS5sZW5ndGgmJnkuZm9yRWFjaCgoZixoKT0+e2g9Zi5xdWVyeVNlbGVjdG9yKCIuYWktZGVidWctbmFtZS5haS1zY2hlZHVsaW5nLWluZm8iKTtudWxsIT1oJiYoaC50ZXh0Q29udGVudD1rYSsiICIrRysiIGN1cnJlbnRfdGltZToiK01hdGguZmxvb3IoQi50b1N0cmluZygpLzFFMykrIiAgc3RhcnRfZGF0ZToiK01hdGguZmxvb3IoTi8xRTMpLnRvU3RyaW5nKCkrIiA9IisoQj49TikudG9TdHJpbmcoKSsiIGVuZF9kYXRlOiIrTWF0aC5mbG9vcihPLzFFMykudG9TdHJpbmcoKSsiID06IisoQjxPKS50b1N0cmluZygpKyIgZGF5czoiK1UudG9TdHJpbmcoKSsKIiA9OiIrVS5pbmNsdWRlcyhHLnRvU3RyaW5nKCkpLnRvU3RyaW5nKCkpO2g9Zi5xdWVyeVNlbGVjdG9yKCIuYWktZGVidWctbmFtZS5haS1zY2hlZHVsaW5nLXN0YXR1cyIpO251bGwhPWgmJihoLnRleHRDb250ZW50PWw/YWlfZnJvbnQudmlzaWJsZTphaV9mcm9udC5oaWRkZW4pO2x8fDA9PVR8fChmLmNsYXNzTGlzdC5yZW1vdmUoImFpLWRlYnVnLXNjaGVkdWxpbmciKSxmLmNsYXNzTGlzdC5hZGQoImFpLWRlYnVnLWZhbGxiYWNrIiksaD1mLnF1ZXJ5U2VsZWN0b3IoIi5haS1kZWJ1Zy1uYW1lLmFpLXNjaGVkdWxpbmctc3RhdHVzIiksbnVsbCE9aCYmKGgudGV4dENvbnRlbnQ9YWlfZnJvbnQuZmFsbGJhY2srIiA9ICIrVCkpfSl9aWYobnx8IWwmJkspcmV0dXJuITA7Yi5zdHlsZS52aXNpYmlsaXR5PSIiO2Iuc3R5bGUucG9zaXRpb249IiI7Yi5zdHlsZS53aWR0aD0iIjtiLnN0eWxlLmhlaWdodD0iIjtiLnN0eWxlLnpJbmRleD0iIjtpZihsKXtpZihudWxsIT1kJiYoZC5zdHlsZS52aXNpYmlsaXR5PQoiIixkLmNsYXNzTGlzdC5jb250YWlucygiYWktcmVtb3ZlLXBvc2l0aW9uIikmJihkLnN0eWxlLnBvc2l0aW9uPSIiKSksYi5oYXNBdHRyaWJ1dGUoImRhdGEtY29kZSIpKXtuPWI2NGQoYi5kYXRhc2V0LmNvZGUpO3I9ZG9jdW1lbnQuY3JlYXRlUmFuZ2UoKTtnPSEwO3RyeXtIPXIuY3JlYXRlQ29udGV4dHVhbEZyYWdtZW50KG4pfWNhdGNoKGYpe2c9ITF9ZyYmKG51bGwhPWIuY2xvc2VzdCgiaGVhZCIpPyhiLnBhcmVudE5vZGUuaW5zZXJ0QmVmb3JlKEgsYi5uZXh0U2libGluZyksYi5yZW1vdmUoKSk6Yi5hcHBlbmQoSCkpO2NhKGIpfX1lbHNlIGlmKGcmJiFyJiYwIT1UKXtudWxsIT1kJiYoZC5zdHlsZS52aXNpYmlsaXR5PSIiLGQuY2xhc3NMaXN0LmNvbnRhaW5zKCJhaS1yZW1vdmUtcG9zaXRpb24iKSYmZC5jc3Moe3Bvc2l0aW9uOiIifSkpO249ZWEoYiwiLmFpLWZhbGxiYWNrIik7MCE9bi5sZW5ndGgmJm4uZm9yRWFjaCgoZixoKT0+e2YuY2xhc3NMaXN0LnJlbW92ZSgiYWktZmFsbGJhY2siKX0pOwppZihiLmhhc0F0dHJpYnV0ZSgiZGF0YS1mYWxsYmFjay1jb2RlIikpe249YjY0ZChiLmRhdGFzZXQuZmFsbGJhY2tDb2RlKTtyPWRvY3VtZW50LmNyZWF0ZVJhbmdlKCk7Zz0hMDt0cnl7dmFyIEg9ci5jcmVhdGVDb250ZXh0dWFsRnJhZ21lbnQobil9Y2F0Y2goZil7Zz0hMX1nJiZiLmFwcGVuZChIKTtjYShiKX1lbHNlIGIuc3R5bGUuZGlzcGxheT0ibm9uZSIsbnVsbCE9ZCYmbnVsbD09ZC5xdWVyeVNlbGVjdG9yKCIuYWktZGVidWctYmxvY2siKSYmZC5oYXNBdHRyaWJ1dGUoInN0eWxlIikmJi0xPT1kLmdldEF0dHJpYnV0ZSgic3R5bGUiKS5pbmRleE9mKCJoZWlnaHQ6IikmJihkLnN0eWxlLmRpc3BsYXk9Im5vbmUiKTtudWxsIT1kJiZkLmhhc0F0dHJpYnV0ZSgiZGF0YS1haSIpJiYoZC5nZXRBdHRyaWJ1dGUoImRhdGEtYWkiKSxiLmhhc0F0dHJpYnV0ZSgiZmFsbGJhY2stdHJhY2tpbmciKSYmKEg9Yi5nZXRBdHRyaWJ1dGUoImZhbGxiYWNrLXRyYWNraW5nIiksZC5zZXRBdHRyaWJ1dGUoImRhdGEtYWktIisKYi5nZXRBdHRyaWJ1dGUoImZhbGxiYWNrX2xldmVsIiksSCkpKX1lbHNlIGIuc3R5bGUuZGlzcGxheT0ibm9uZSIsbnVsbCE9ZCYmKGQucmVtb3ZlQXR0cmlidXRlKCJkYXRhLWFpIiksZC5jbGFzc0xpc3QucmVtb3ZlKCJhaS10cmFjayIpLG51bGwhPWQucXVlcnlTZWxlY3RvcigiLmFpLWRlYnVnLWJsb2NrIik/KGQuc3R5bGUudmlzaWJpbGl0eT0iIixkLmNsYXNzTGlzdC5yZW1vdmUoImFpLWNsb3NlIiksZC5jbGFzc0xpc3QuY29udGFpbnMoImFpLXJlbW92ZS1wb3NpdGlvbiIpJiYoZC5zdHlsZS5wb3NpdGlvbj0iIikpOmQuaGFzQXR0cmlidXRlKCJzdHlsZSIpJiYtMT09ZC5nZXRBdHRyaWJ1dGUoInN0eWxlIikuaW5kZXhPZigiaGVpZ2h0OiIpJiYoZC5zdHlsZS5kaXNwbGF5PSJub25lIikpO2Iuc2V0QXR0cmlidXRlKCJkYXRhLWNvZGUiLCIiKTtiLnNldEF0dHJpYnV0ZSgiZGF0YS1mYWxsYmFjay1jb2RlIiwiIik7bnVsbCE9ZCYmZC5jbGFzc0xpc3QucmVtb3ZlKCJhaS1saXN0LWJsb2NrIil9KX19OwpmdW5jdGlvbiBkYShhKXthPWA7ICR7ZG9jdW1lbnQuY29va2llfWAuc3BsaXQoYDsgJHthfT1gKTtpZigyPT09YS5sZW5ndGgpcmV0dXJuIGEucG9wKCkuc3BsaXQoIjsiKS5zaGlmdCgpfWZ1bmN0aW9uIGxhKGEsZSxwKXtkYShhKSYmKGRvY3VtZW50LmNvb2tpZT1hKyI9IisoZT8iO3BhdGg9IitlOiIiKSsocD8iO2RvbWFpbj0iK3A6IiIpKyI7ZXhwaXJlcz1UaHUsIDAxIEphbiAxOTcwIDAwOjAwOjAxIEdNVCIpfWZ1bmN0aW9uIG0oYSl7ZGEoYSkmJihsYShhLCIvIix3aW5kb3cubG9jYXRpb24uaG9zdG5hbWUpLGRvY3VtZW50LmNvb2tpZT1hKyI9OyBQYXRoPS87IEV4cGlyZXM9VGh1LCAwMSBKYW4gMTk3MCAwMDowMDowMSBHTVQ7Iil9KGZ1bmN0aW9uKGEpeyJjb21wbGV0ZSI9PT1kb2N1bWVudC5yZWFkeVN0YXRlfHwibG9hZGluZyIhPT1kb2N1bWVudC5yZWFkeVN0YXRlJiYhZG9jdW1lbnQuZG9jdW1lbnRFbGVtZW50LmRvU2Nyb2xsP2EoKTpkb2N1bWVudC5hZGRFdmVudExpc3RlbmVyKCJET01Db250ZW50TG9hZGVkIiwKYSl9KShmdW5jdGlvbigpe3NldFRpbWVvdXQoZnVuY3Rpb24oKXthaV9wcm9jZXNzX2xpc3RzKCk7c2V0VGltZW91dChmdW5jdGlvbigpe1goKTtpZigiZnVuY3Rpb24iPT10eXBlb2YgYWlfbG9hZF9ibG9ja3Mpe2RvY3VtZW50LmFkZEV2ZW50TGlzdGVuZXIoImNtcGx6RW5hYmxlU2NyaXB0cyIsZSk7ZG9jdW1lbnQuYWRkRXZlbnRMaXN0ZW5lcigiY21wbHpfZXZlbnRfbWFya2V0aW5nIixlKTtmdW5jdGlvbiBlKHApeyJjbXBsekVuYWJsZVNjcmlwdHMiIT1wLnR5cGUmJiJhbGwiIT09cC5jb25zZW50TGV2ZWx8fGFpX2xvYWRfYmxvY2tzKCl9fX0sNTApO3ZhciBhPWRvY3VtZW50LnF1ZXJ5U2VsZWN0b3IoIi5haS1kZWJ1Zy1wYWdlLXR5cGUiKTtudWxsIT1hJiZhLmFkZEV2ZW50TGlzdGVuZXIoImRibGNsaWNrIixlPT57ZT1kb2N1bWVudC5xdWVyeVNlbGVjdG9yKCIjYWktaWFiLXRjZi1zdGF0dXMiKTtudWxsIT1lJiYoZS50ZXh0Q29udGVudD0iQ09OU0VOVCBDT09LSUVTIik7CmU9ZG9jdW1lbnQucXVlcnlTZWxlY3RvcigiI2FpLWlhYi10Y2YtYmFyIik7bnVsbCE9ZSYmKGUuc3R5bGUuZGlzcGxheT0iYmxvY2siKX0pO2E9ZG9jdW1lbnQucXVlcnlTZWxlY3RvcigiI2FpLWlhYi10Y2YtYmFyIik7bnVsbCE9YSYmYS5hZGRFdmVudExpc3RlbmVyKCJjbGljayIsZT0+e20oImV1Y29uc2VudC12MiIpO20oIl9fbHhHX19jb25zZW50X192MiIpO20oIl9fbHhHX19jb25zZW50X192Ml9kYWlzeWJpdCIpO20oIl9fbHhHX19jb25zZW50X192Ml9nZGFpc3liaXQiKTttKCJDb29raWVMYXdJbmZvQ29uc2VudCIpO20oImNvb2tpZWxhd2luZm8tY2hlY2tib3gtYWR2ZXJ0aXNlbWVudCIpO20oImNvb2tpZWxhd2luZm8tY2hlY2tib3gtYW5hbHl0aWNzIik7bSgiY29va2llbGF3aW5mby1jaGVja2JveC1uZWNlc3NhcnkiKTttKCJjb21wbGlhbnpfcG9saWN5X2lkIik7bSgiY29tcGxpYW56X2NvbnNlbnRfc3RhdHVzIik7bSgiY21wbHpfbWFya2V0aW5nIik7bSgiY21wbHpfY29uc2VudF9zdGF0dXMiKTsKbSgiY21wbHpfcHJlZmVyZW5jZXMiKTttKCJjbXBsel9zdGF0aXN0aWNzLWFub255bW91cyIpO20oImNtcGx6X2Nob2ljZSIpO20oImNtcGx6X2Jhbm5lci1zdGF0dXMiKTttKCJjbXBsel9mdW5jdGlvbmFsIik7bSgiY21wbHpfcG9saWN5X2lkIik7bSgiY21wbHpfc3RhdGlzdGljcyIpO20oIm1vb3ZlX2dkcHJfcG9wdXAiKTttKCJyZWFsX2Nvb2tpZV9iYW5uZXItYmxvZzoxLXRjZiIpO20oInJlYWxfY29va2llX2Jhbm5lci1ibG9nOjEiKTtlPWRvY3VtZW50LnF1ZXJ5U2VsZWN0b3IoIiNhaS1pYWItdGNmLXN0YXR1cyIpO251bGwhPWUmJihlLnRleHRDb250ZW50PSJDT05TRU5UIENPT0tJRVMgREVMRVRFRCIpfSl9LDUpfSk7ZnVuY3Rpb24gY2EoYSl7c2V0VGltZW91dChmdW5jdGlvbigpeyJmdW5jdGlvbiI9PXR5cGVvZiBhaV9wcm9jZXNzX3JvdGF0aW9uc19pbl9lbGVtZW50JiZhaV9wcm9jZXNzX3JvdGF0aW9uc19pbl9lbGVtZW50KGEpOyJmdW5jdGlvbiI9PXR5cGVvZiBhaV9wcm9jZXNzX2xpc3RzJiYKYWlfcHJvY2Vzc19saXN0cygpOyJmdW5jdGlvbiI9PXR5cGVvZiBhaV9wcm9jZXNzX2lwX2FkZHJlc3NlcyYmYWlfcHJvY2Vzc19pcF9hZGRyZXNzZXMoKTsiZnVuY3Rpb24iPT10eXBlb2YgYWlfcHJvY2Vzc19maWx0ZXJfaG9va3MmJmFpX3Byb2Nlc3NfZmlsdGVyX2hvb2tzKCk7ImZ1bmN0aW9uIj09dHlwZW9mIGFpX2FkYl9wcm9jZXNzX2Jsb2NrcyYmYWlfYWRiX3Byb2Nlc3NfYmxvY2tzKGEpOyJmdW5jdGlvbiI9PXR5cGVvZiBhaV9wcm9jZXNzX2ltcHJlc3Npb25zJiYxPT1haV90cmFja2luZ19maW5pc2hlZCYmYWlfcHJvY2Vzc19pbXByZXNzaW9ucygpOyJmdW5jdGlvbiI9PXR5cGVvZiBhaV9pbnN0YWxsX2NsaWNrX3RyYWNrZXJzJiYxPT1haV90cmFja2luZ19maW5pc2hlZCYmYWlfaW5zdGFsbF9jbGlja190cmFja2VycygpOyJmdW5jdGlvbiI9PXR5cGVvZiBhaV9pbnN0YWxsX2Nsb3NlX2J1dHRvbnMmJmFpX2luc3RhbGxfY2xvc2VfYnV0dG9ucyhkb2N1bWVudCl9LDUpfQpmdW5jdGlvbiBoYShhKXt2YXIgZT1hP2Euc3BsaXQoIj8iKVsxXTp3aW5kb3cubG9jYXRpb24uc2VhcmNoLnNsaWNlKDEpO2E9e307aWYoZSl7ZT1lLnNwbGl0KCIjIilbMF07ZT1lLnNwbGl0KCImIik7Zm9yKHZhciBwPTA7cDxlLmxlbmd0aDtwKyspe3ZhciB6PWVbcF0uc3BsaXQoIj0iKSxDPXZvaWQgMCx4PXpbMF0ucmVwbGFjZSgvXFtcZCpcXS8sZnVuY3Rpb24oSSl7Qz1JLnNsaWNlKDEsLTEpO3JldHVybiIifSk7ej0idW5kZWZpbmVkIj09PXR5cGVvZiB6WzFdPyIiOnpbMV07eD14LnRvTG93ZXJDYXNlKCk7ej16LnRvTG93ZXJDYXNlKCk7YVt4XT8oInN0cmluZyI9PT10eXBlb2YgYVt4XSYmKGFbeF09W2FbeF1dKSwidW5kZWZpbmVkIj09PXR5cGVvZiBDP2FbeF0ucHVzaCh6KTphW3hdW0NdPXopOmFbeF09en19cmV0dXJuIGF9fTsKdmFyIGFpX2lwPSEwLGFpX2RhdGFfaWQ9IjBkMzUwNmJkZjQiLGFpX2FqYXhfdXJsPSJodHRwczovL3ZjY2lkYXRhLmNvbS52bi9lbi93cC1hZG1pbi9hZG1pbi1hamF4LnBocCIsYWlfYmxvY2tfY2xhc3NfZGVmPSJjb2RlLWJsb2NrIjsKaWYoInVuZGVmaW5lZCIhPXR5cGVvZiBhaV9pcCl7ZnVuY3Rpb24gdShiLGcpe2d8fChnPXdpbmRvdy5sb2NhdGlvbi5ocmVmKTtiPWIucmVwbGFjZSgvW1xbXF1dL2csIlxcJCYiKTtyZXR1cm4oYj0obmV3IFJlZ0V4cCgiWz8mXSIrYisiKD0oW14mI10qKXwmfCN8JCkiKSkuZXhlYyhnKSk/YlsyXT9kZWNvZGVVUklDb21wb25lbnQoYlsyXS5yZXBsYWNlKC9cKy9nLCIgIikpOiIiOm51bGx9ZnVuY3Rpb24geSgpe3JldHVybihuZXcgRGF0ZSkuZ2V0VGltZSgpKyItIitNYXRoLnJvdW5kKDFFNSpNYXRoLnJhbmRvbSgpKX1mdW5jdGlvbiB2KGIpe2IuZm9yRWFjaCgoYSxjKT0+e2EuY2xhc3NMaXN0LnJlbW92ZSgiYWktaXAtZGF0YSIpfSk7dmFyIGc9ITE7aWYoIiIhPWFpX2lwX2RhdGEpe3RyeXt2YXIgbD1KU09OLnBhcnNlKGFpX2lwX2RhdGEpLGY9bFswXSxyPWxbMV0scD1sWzJdLHE9bFszXX1jYXRjaChhKXtyZXR1cm59dmFyIHQ9ITE7LTEhPWYuaW5kZXhPZigiIyIpJiYodD0hMCwKZj1mLnJlcGxhY2UoIiMiLCIiKSk7dmFyIGU9IiI7dCYmKGU9IkNGUCBCTE9DS0VELCAiKTtlPWUrZisiLCAiK3I7bnVsbCE9cCYmbnVsbCE9cSYmKGU9ZSsiOiIrcCsiOiIrcSk7bnVsbD09cCYmKHA9IiIpO251bGw9PXEmJihxPSIiKTtudWxsIT1sJiZiLmZvckVhY2goKGEsYyk9PntjPWEuY2xvc2VzdCgiZGl2LiIrYWlfYmxvY2tfY2xhc3NfZGVmKTtnPSEwO2lmKGEuaGFzQXR0cmlidXRlKCJpcC1hZGRyZXNzZXMiKSl7dmFyIGg9YS5nZXRBdHRyaWJ1dGUoImlwLWFkZHJlc3NlcyIpLnNwbGl0KCIsIiksbT1hLmdldEF0dHJpYnV0ZSgiaXAtYWRkcmVzcy1saXN0Iiksaz0hMTtoLmV2ZXJ5KChkLG4pPT57aWYoIioiPT1kLmNoYXJBdCgwKSlpZigiKiI9PWQuY2hhckF0KGQubGVuZ3RoLTEpKXtpZihkPWQuc3Vic3RyKDEsZC5sZW5ndGgtMiksLTEhPWYuaW5kZXhPZihkKSlyZXR1cm4gaz0hMCwhMX1lbHNle2lmKGQ9ZC5zdWJzdHIoMSksZi5zdWJzdHIoLWQubGVuZ3RoKT09ZClyZXR1cm4gaz0KITAsITF9ZWxzZSBpZigiKiI9PWQuY2hhckF0KGQubGVuZ3RoLTEpKXtpZihkPWQuc3Vic3RyKDAsZC5sZW5ndGgtMSksMD09Zi5pbmRleE9mKGQpKXJldHVybiBrPSEwLCExfWVsc2UgaWYoIiMiPT1kKXtpZigiIj09ZilyZXR1cm4gaz0hMCwhMX1lbHNlIGlmKCJDRlAiPT1kLnRvVXBwZXJDYXNlKCkpe2lmKHQpcmV0dXJuIGs9ITAsITF9ZWxzZSBpZihkPT1mKXJldHVybiBrPSEwLCExO3JldHVybiEwfSk7c3dpdGNoKG0pe2Nhc2UgIkIiOmsmJihnPSExKTticmVhaztjYXNlICJXIjprfHwoZz0hMSl9fWlmKGcmJmEuaGFzQXR0cmlidXRlKCJjb3VudHJpZXMiKSlzd2l0Y2goaD1hLmdldEF0dHJpYnV0ZSgiY291bnRyaWVzIikuc3BsaXQoIiwiKSxtPWEuZ2V0QXR0cmlidXRlKCJjb3VudHJ5LWxpc3QiKSxrPSExLGguZXZlcnkoKGQsbik9PntuPWQudHJpbSgpLnNwbGl0KCI6Iik7aWYobnVsbD09blsxXXx8IiI9PXApblsxXT0iIjtpZihudWxsPT1uWzJdfHwiIj09cSluWzJdPSIiOwpkPW4uam9pbigiOiIpLnRvVXBwZXJDYXNlKCk7bj0ocisiOiIrKCIiPT1uWzFdPyIiOnApKyI6IisoIiI9PW5bMl0/IiI6cSkpLnRvVXBwZXJDYXNlKCk7cmV0dXJuIGQ9PW4/KGs9ITAsITEpOiEwfSksbSl7Y2FzZSAiQiI6ayYmKGc9ITEpO2JyZWFrO2Nhc2UgIlciOmt8fChnPSExKX1hLnN0eWxlLnZpc2liaWxpdHk9IiI7YS5zdHlsZS5wb3NpdGlvbj0iIjthLnN0eWxlLndpZHRoPSIiO2Euc3R5bGUuaGVpZ2h0PSIiO2Euc3R5bGUuekluZGV4PSIiO2ZvcihoPWEucHJldmlvdXNFbGVtZW50U2libGluZztoJiYhaC5tYXRjaGVzKCIuYWktZGVidWctYmFyIik7KWg9aC5wcmV2aW91c0VsZW1lbnRTaWJsaW5nO251bGwhPWgmJihtPWgucXVlcnlTZWxlY3RvcigiLmFpLWRlYnVnLW5hbWUuYWktaXAtY291bnRyeSIpLG51bGwhPW0mJihtLnRleHRDb250ZW50PWUpLG09aC5xdWVyeVNlbGVjdG9yKCIuYWktZGVidWctbmFtZS5haS1pcC1zdGF0dXMiKSxudWxsIT1tJiYobS50ZXh0Q29udGVudD0KZz9haV9mcm9udC52aXNpYmxlOmFpX2Zyb250LmhpZGRlbikpO2lmKGcpe2lmKG51bGwhPWMmJihjLnN0eWxlLnZpc2liaWxpdHk9IiIsYy5jbGFzc0xpc3QuY29udGFpbnMoImFpLXJlbW92ZS1wb3NpdGlvbiIpJiYoYy5zdHlsZS5wb3NpdGlvbj0iIikpLGEuaGFzQXR0cmlidXRlKCJkYXRhLWNvZGUiKSl7aD1iNjRkKGEuZGF0YXNldC5jb2RlKTttPWRvY3VtZW50LmNyZWF0ZVJhbmdlKCk7dmFyIHc9ITA7dHJ5e3ZhciB4PW0uY3JlYXRlQ29udGV4dHVhbEZyYWdtZW50KGgpfWNhdGNoKGQpe3c9ITF9dyYmKG51bGwhPWEuY2xvc2VzdCgiaGVhZCIpPyhhLnBhcmVudE5vZGUuaW5zZXJ0QmVmb3JlKHgsYS5uZXh0U2libGluZyksYS5yZW1vdmUoKSk6YS5hcHBlbmQoeCkpO2EucmVtb3ZlQXR0cmlidXRlKCJkYXRhLWNvZGUiKTt6KGEpfX1lbHNlIGEuc3R5bGUuZGlzcGxheT0ibm9uZSIsbnVsbCE9YyYmKGMucmVtb3ZlQXR0cmlidXRlKCJkYXRhLWFpIiksYy5jbGFzc0xpc3QucmVtb3ZlKCJhaS10cmFjayIpLApudWxsIT1jLnF1ZXJ5U2VsZWN0b3IoIi5haS1kZWJ1Zy1ibG9jayIpPyhjLnN0eWxlLnZpc2liaWxpdHk9IiIsYy5jbGFzc0xpc3QucmVtb3ZlKCJhaS1jbG9zZSIpLGMuY2xhc3NMaXN0LmNvbnRhaW5zKCJhaS1yZW1vdmUtcG9zaXRpb24iKSYmKGMuc3R5bGUucG9zaXRpb249IiIpLGEuaGFzQXR0cmlidXRlKCJkYXRhLWNvZGUiKSYmKGMuY2xhc3NMaXN0LnJlbW92ZSgiYWktbGlzdC1ibG9jayIpLGMuY2xhc3NMaXN0LnJlbW92ZSgiYWktbGlzdC1ibG9jay1maWx0ZXIiKSxudWxsIT1jLnByZXZpb3VzRWxlbWVudFNpYmxpbmcmJmMucHJldmlvdXNFbGVtZW50U2libGluZy5jbGFzc0xpc3QuY29udGFpbnMoImFpLWRlYnVnLWluZm8iKSYmYy5wcmV2aW91c0VsZW1lbnRTaWJsaW5nLnJlbW92ZSgpKSk6Yy5oYXNBdHRyaWJ1dGUoInN0eWxlIikmJi0xPT1jLmdldEF0dHJpYnV0ZSgic3R5bGUiKS5pbmRleE9mKCJoZWlnaHQ6IikmJihjLnN0eWxlLmRpc3BsYXk9Im5vbmUiKSk7bnVsbCE9CmMmJmMuY2xhc3NMaXN0LnJlbW92ZSgiYWktbGlzdC1ibG9jay1pcCIpfSl9fWFpX3Byb2Nlc3NfaXBfYWRkcmVzc2VzPWZ1bmN0aW9uKGIpe2lmKG51bGw9PWIpYj1kb2N1bWVudC5xdWVyeVNlbGVjdG9yQWxsKCJkaXYuYWktaXAtZGF0YSwgbWV0YS5haS1pcC1kYXRhIik7ZWxzZXt3aW5kb3cualF1ZXJ5JiZ3aW5kb3cualF1ZXJ5LmZuJiZiIGluc3RhbmNlb2YgalF1ZXJ5JiYoYj1BcnJheS5wcm90b3R5cGUuc2xpY2UuY2FsbChiKSk7dmFyIGc9W107Yi5mb3JFYWNoKChlLGEpPT57ZS5tYXRjaGVzKCIuYWktaXAtZGF0YSIpP2cucHVzaChlKTooZT1lLnF1ZXJ5U2VsZWN0b3JBbGwoIi5haS1pcC1kYXRhIiksZS5sZW5ndGgmJmUuZm9yRWFjaCgoYyxoKT0+e2cucHVzaChjKX0pKX0pO2I9Z31pZihiLmxlbmd0aClpZigidW5kZWZpbmVkIiE9dHlwZW9mIGFpX2lwX2RhdGEpdihiKTtlbHNlIGlmKCJ1bmRlZmluZWQiPT10eXBlb2YgYWlfaXBfZGF0YV9yZXF1ZXN0ZWQpe2FpX2lwX2RhdGFfcmVxdWVzdGVkPQohMDt2YXIgbD1haV9hamF4X3VybCsiP2FjdGlvbj1haV9hamF4JmlwLWRhdGE9aXAtYWRkcmVzcy1jb3VudHJ5LWNpdHkiLGY9dSgiYWktZGVidWctaXAtYWRkcmVzcyIpO251bGwhPWYmJihsKz0iJmFpLWRlYnVnLWlwLWFkZHJlc3M9IitmKTtmPXUoImFpLWRlYnVnLWNvdW50cnkiKTtudWxsIT1mJiYobCs9IiZhaS1kZWJ1Zy1jb3VudHJ5PSIrZik7Zj17YWlfY2hlY2s6YWlfZGF0YV9pZCx2ZXJzaW9uOnkoKX07dmFyIHI9W10scDtmb3IocCBpbiBmKXt2YXIgcT1lbmNvZGVVUklDb21wb25lbnQocCksdD1lbmNvZGVVUklDb21wb25lbnQoZltwXSk7ci5wdXNoKHErIj0iK3QpfXI9ci5qb2luKCImIik7KGFzeW5jIGZ1bmN0aW9uKCl7cmV0dXJuIGF3YWl0IChhd2FpdCBmZXRjaChsLHttZXRob2Q6IlBPU1QiLGhlYWRlcnM6eyJDb250ZW50LVR5cGUiOiJhcHBsaWNhdGlvbi94LXd3dy1mb3JtLXVybGVuY29kZWQ7IGNoYXJzZXQ9VVRGLTgifSxib2R5OnJ9KSkudGV4dCgpfSkoKS50aGVuKGU9Pgp7YWlfaXBfZGF0YT1lO2lmKCIiPT1lKXt2YXIgYT0iQWpheCByZXF1ZXN0IHJldHVybmVkIGVtcHR5IGRhdGEsIGdlby10YXJnZXRpbmcgZGlzYWJsZWQiO2NvbnNvbGUuZXJyb3IoYSk7InVuZGVmaW5lZCIhPXR5cGVvZiBhaV9qc19lcnJvcnMmJmFpX2pzX2Vycm9ycy5wdXNoKFthLGwsMF0pfWVsc2UgdHJ5e0pTT04ucGFyc2UoZSl9Y2F0Y2goYyl7YT0iQWpheCBjYWxsIHJldHVybmVkIGludmFsaWQgZGF0YSwgZ2VvLXRhcmdldGluZyBkaXNhYmxlZCIsY29uc29sZS5lcnJvcihhLGUpLCJ1bmRlZmluZWQiIT10eXBlb2YgYWlfanNfZXJyb3JzJiZhaV9qc19lcnJvcnMucHVzaChbYSxsLDBdKX1iPWRvY3VtZW50LnF1ZXJ5U2VsZWN0b3JBbGwoImRpdi5haS1pcC1kYXRhLCBtZXRhLmFpLWlwLWRhdGEiKTtiLmxlbmd0aCYmdihiKX0pLmNhdGNoKGU9Pntkb2N1bWVudC5xdWVyeVNlbGVjdG9yQWxsKCJkaXYuYWktaXAtZGF0YSIpLmZvckVhY2goKGEsYyk9PnthLnN0eWxlLmRpc3BsYXk9CiJub25lIjthLnN0eWxlLnZpc2liaWxpdHk9IiI7YS5zdHlsZS5wb3NpdGlvbj0iIjthLnN0eWxlLndpZHRoPSIiO2Euc3R5bGUuaGVpZ2h0PSIiO2Euc3R5bGUuekluZGV4PSIiO2EuY2xhc3NMaXN0LnJlbW92ZSgiYWktaXAtZGF0YSIpfSl9KX19OyhmdW5jdGlvbihiKXsiY29tcGxldGUiPT09ZG9jdW1lbnQucmVhZHlTdGF0ZXx8ImxvYWRpbmciIT09ZG9jdW1lbnQucmVhZHlTdGF0ZSYmIWRvY3VtZW50LmRvY3VtZW50RWxlbWVudC5kb1Njcm9sbD9iKCk6ZG9jdW1lbnQuYWRkRXZlbnRMaXN0ZW5lcigiRE9NQ29udGVudExvYWRlZCIsYil9KShmdW5jdGlvbigpe3NldFRpbWVvdXQoZnVuY3Rpb24oKXthaV9wcm9jZXNzX2lwX2FkZHJlc3NlcygpfSw1KX0pO2Z1bmN0aW9uIHooYil7c2V0VGltZW91dChmdW5jdGlvbigpeyJmdW5jdGlvbiI9PXR5cGVvZiBhaV9wcm9jZXNzX3JvdGF0aW9uc19pbl9lbGVtZW50JiZhaV9wcm9jZXNzX3JvdGF0aW9uc19pbl9lbGVtZW50KGIpOyJmdW5jdGlvbiI9PQp0eXBlb2YgYWlfcHJvY2Vzc19saXN0cyYmYWlfcHJvY2Vzc19saXN0cygpOyJmdW5jdGlvbiI9PXR5cGVvZiBhaV9wcm9jZXNzX2lwX2FkZHJlc3NlcyYmYWlfcHJvY2Vzc19pcF9hZGRyZXNzZXMoKTsiZnVuY3Rpb24iPT10eXBlb2YgYWlfcHJvY2Vzc19maWx0ZXJfaG9va3MmJmFpX3Byb2Nlc3NfZmlsdGVyX2hvb2tzKCk7ImZ1bmN0aW9uIj09dHlwZW9mIGFpX2FkYl9wcm9jZXNzX2Jsb2NrcyYmYWlfYWRiX3Byb2Nlc3NfYmxvY2tzKGIpOyJmdW5jdGlvbiI9PXR5cGVvZiBhaV9wcm9jZXNzX2ltcHJlc3Npb25zJiYxPT1haV90cmFja2luZ19maW5pc2hlZCYmYWlfcHJvY2Vzc19pbXByZXNzaW9ucygpOyJmdW5jdGlvbiI9PXR5cGVvZiBhaV9pbnN0YWxsX2NsaWNrX3RyYWNrZXJzJiYxPT1haV90cmFja2luZ19maW5pc2hlZCYmYWlfaW5zdGFsbF9jbGlja190cmFja2VycygpOyJmdW5jdGlvbiI9PXR5cGVvZiBhaV9pbnN0YWxsX2Nsb3NlX2J1dHRvbnMmJmFpX2luc3RhbGxfY2xvc2VfYnV0dG9ucyhkb2N1bWVudCl9LAo1KX19Owp2YXIgYWlfaW50ZXJuYWxfdHJhY2tpbmc9MSxhaV9leHRlcm5hbF90cmFja2luZz0wLGFpX2V4dGVybmFsX3RyYWNraW5nX2NhdGVnb3J5PSJBZCBJbnNlcnRlciBQcm8iLGFpX2V4dGVybmFsX3RyYWNraW5nX2FjdGlvbj0iW0VWRU5UXSIsYWlfZXh0ZXJuYWxfdHJhY2tpbmdfbGFiZWw9IltCTE9DS19OVU1CRVJdIC0gW0JMT0NLX1ZFUlNJT05fTkFNRV0iLGFpX2V4dGVybmFsX3RyYWNraW5nX3VzZXJuYW1lPSIiLGFpX3RyYWNrX3BhZ2V2aWV3cz0xLGFpX2FkdmFuY2VkX2NsaWNrX2RldGVjdGlvbj0wLGFpX3ZpZXdwb3J0X3dpZHRocz1bOTgwLDc2OCwwXSxhaV92aWV3cG9ydF9pbmRleGVzPVsxLDIsM10sYWlfdmlld3BvcnRfbmFtZXNfc3RyaW5nPSJXeUpFWlhOcmRHOXdJaXdpVkdGaWJHVjBJaXdpVUdodmJtVWlYUT09IixhaV9kYXRhX2lkPSIwZDM1MDZiZGY0IiwKYWlfYWpheF91cmw9Imh0dHBzOi8vdmNjaWRhdGEuY29tLnZuL2VuL3dwLWFkbWluL2FkbWluLWFqYXgucGhwIixhaV9kZWJ1Z190cmFja2luZz0wLGFpX2FkYl9hdHRyaWJ1dGU9J1pHRjBZUzFrWVhSaExXMWhjMnM9JzsKaWYoInVuZGVmaW5lZCIhPT10eXBlb2YgYWlfaW50ZXJuYWxfdHJhY2tpbmcpe2FpX3ZpZXdwb3J0X25hbWVzPUpTT04ucGFyc2UoYjY0ZChhaV92aWV3cG9ydF9uYW1lc19zdHJpbmcpKTtmdW5jdGlvbiBGKGssbCl7cmV0dXJuKG5ldyBSZWdFeHAoIl4iK2wuc3BsaXQoIioiKS5tYXAocj0+ci5yZXBsYWNlKC8oWy4qKz9ePSE6JHt9KCl8XFtcXVwvXFxdKS9nLCJcXCQxIikpLmpvaW4oIi4qIikrIiQiKSkudGVzdChrKX1mdW5jdGlvbiBJKGssbCxyLHgpe2lmKHgpe2NvbnN0IEI9eT0+e3kudGFyZ2V0JiZ5LnRhcmdldC5tYXRjaGVzKHgpJiZyKHkpfTtrLmFkZEV2ZW50TGlzdGVuZXIobCxCKTtyZXR1cm4gQn1rLmFkZEV2ZW50TGlzdGVuZXIobCxyKTtyZXR1cm4gcn1pbnN0YWxsSWZyYW1lVHJhY2tlcj1mdW5jdGlvbihrLGwpeyJmdW5jdGlvbiI9PXR5cGVvZiBrJiYoaz17Ymx1ckNhbGxiYWNrOmt9KTtpZihudWxsPT09a3x8ITE9PT1rKWFpX2lmcmFtZVRyYWNrZXIudW50cmFjayhsKTsKZWxzZSBpZigib2JqZWN0Ij09dHlwZW9mIGspYWlfaWZyYW1lVHJhY2tlci50cmFjayhsLGspO2Vsc2UgdGhyb3cgRXJyb3IoIldyb25nIGhhbmRsZXIgdHlwZSAobXVzdCBiZSBhbiBvYmplY3QsIG9yIG51bGx8ZmFsc2UgdG8gdW50cmFjaykiKTtyZXR1cm4gdGhpc307dmFyIGFpX21vdXNlb3ZlckhhbmRlcj1mdW5jdGlvbihrLGwpe2wuZGF0YT17aGFuZGxlcjprfTthaV9pZnJhbWVUcmFja2VyLm1vdXNlb3Zlckxpc3RlbmVyKGwpfSxhaV9tb3VzZW91dEhhbmRlcj1mdW5jdGlvbihrLGwpe2wuZGF0YT17aGFuZGxlcjprfTthaV9pZnJhbWVUcmFja2VyLm1vdXNlb3V0TGlzdGVuZXIobCl9O2FpX2lmcmFtZVRyYWNrZXI9e2ZvY3VzUmV0cmlldmVyOm51bGwsZm9jdXNSZXRyaWV2ZWQ6ITEsaGFuZGxlcnNMaXN0OltdLGlzSUU4QW5kT2xkZXI6ITEsaW5pdDpmdW5jdGlvbigpe3RyeXs5Pm5hdmlnYXRvci51c2VyQWdlbnQubWF0Y2goUmVnRXhwKCIobXNpZSkgKFtcXHcuXSspIiwiaSIpKVsyXSYmCih0aGlzLmlzSUU4QW5kT2xkZXI9ITApfWNhdGNoKGwpe313aW5kb3cuZm9jdXMoKTt3aW5kb3cuYWRkRXZlbnRMaXN0ZW5lcigiYmx1ciIsbD0+e2FpX2lmcmFtZVRyYWNrZXIud2luZG93TG9zZUZvY3VzKGwpfSk7dmFyIGs9ZG9jdW1lbnQuY3JlYXRlRWxlbWVudCgiZGl2Iik7ay5zdHlsZT0icG9zaXRpb246Zml4ZWQ7IHRvcDowOyBsZWZ0OjA7IG92ZXJmbG93OmhpZGRlbjsiO2suaW5uZXJIVE1MPSc8aW5wdXQgc3R5bGU9InBvc2l0aW9uOmFic29sdXRlOyBsZWZ0Oi0zMDBweDsiIHR5cGU9InRleHQiIHZhbHVlPSIiIGlkPSJmb2N1c19yZXRyaWV2ZXIiIHJlYWRvbmx5PSJ0cnVlIiAvPjxsYWJlbCBmb3I9ImZvY3VzX3JldHJpZXZlciI+Jm5ic3A7PC9sYWJlbD4nO2RvY3VtZW50LnF1ZXJ5U2VsZWN0b3IoImJvZHkiKS5hcHBlbmQoayk7dGhpcy5mb2N1c1JldHJpZXZlcj1kb2N1bWVudC5xdWVyeVNlbGVjdG9yKCIjZm9jdXNfcmV0cmlldmVyIik7dGhpcy5mb2N1c1JldHJpZXZlZD0KITE7aWYodGhpcy5pc0lFOEFuZE9sZGVyKXt0aGlzLmZvY3VzUmV0cmlldmVyLmJsdXIoZnVuY3Rpb24obCl7bC5zdG9wUHJvcGFnYXRpb24oKTtsLnByZXZlbnREZWZhdWx0KCk7YWlfaWZyYW1lVHJhY2tlci53aW5kb3dMb3NlRm9jdXMobCl9KTtkb2N1bWVudC5xdWVyeVNlbGVjdG9yKCJib2R5IikuYWRkRXZlbnRMaXN0ZW5lcigiY2xpY2siLGw9Pnt3aW5kb3cuZm9jdXMoKX0pO2RvY3VtZW50LnF1ZXJ5U2VsZWN0b3IoImZvcm0iKS5hZGRFdmVudExpc3RlbmVyKCJjbGljayIsbD0+e2wuc3RvcFByb3BhZ2F0aW9uKCl9KTt0cnl7SShkb2N1bWVudC5xdWVyeVNlbGVjdG9yKCJib2R5IiksImNsaWNrIixsPT57bC5zdG9wUHJvcGFnYXRpb24oKX0sImZvcm0iKX1jYXRjaChsKXtjb25zb2xlLmxvZygiW2lmcmFtZVRyYWNrZXJdIGVycm9yIChleGNlcHRpb246ICIrbC5tZXNzYWdlKyIpIil9fX0sdHJhY2s6ZnVuY3Rpb24oayxsKXtsLnRhcmdldD1rO2FpX2lmcmFtZVRyYWNrZXIuaGFuZGxlcnNMaXN0LnB1c2gobCk7CmsuYWRkRXZlbnRMaXN0ZW5lcigibW91c2VvdmVyIixhaV9tb3VzZW92ZXJIYW5kZXIuYmluZChldmVudCxsKSwhMSk7ay5hZGRFdmVudExpc3RlbmVyKCJtb3VzZW91dCIsYWlfbW91c2VvdXRIYW5kZXIuYmluZChldmVudCxsKSwhMSl9LHVudHJhY2s6ZnVuY3Rpb24oayl7aWYoImZ1bmN0aW9uIiE9dHlwZW9mIEFycmF5LnByb3RvdHlwZS5maWx0ZXIpY29uc29sZS5sb2coIllvdXIgYnJvd3NlciBkb2Vzbid0IHN1cHBvcnQgQXJyYXkgZmlsdGVyLCB1bnRyYWNrIGRpc2FibGVkIik7ZWxzZXtrLmZvckVhY2goKEIseSk9PntCLnJlbW92ZUV2ZW50TGlzdGVuZXIoIm1vdXNlb3ZlciIsYWlfbW91c2VvdmVySGFuZGVyLCExKTtCLnJlbW92ZUV2ZW50TGlzdGVuZXIoIm1vdXNlb3V0IixhaV9tb3VzZW91dEhhbmRlciwhMSl9KTt2YXIgbD1mdW5jdGlvbihCKXtyZXR1cm4gbnVsbD09PUI/ITE6ITB9LHI7Zm9yKHIgaW4gdGhpcy5oYW5kbGVyc0xpc3Qpe2Zvcih2YXIgeCBpbiB0aGlzLmhhbmRsZXJzTGlzdFtyXS50YXJnZXQpLTEhPT0KJC5pbkFycmF5KHRoaXMuaGFuZGxlcnNMaXN0W3JdLnRhcmdldFt4XSxrKSYmKHRoaXMuaGFuZGxlcnNMaXN0W3JdLnRhcmdldFt4XT1udWxsKTt0aGlzLmhhbmRsZXJzTGlzdFtyXS50YXJnZXQ9dGhpcy5oYW5kbGVyc0xpc3Rbcl0udGFyZ2V0LmZpbHRlcihsKTswPT09dGhpcy5oYW5kbGVyc0xpc3Rbcl0udGFyZ2V0Lmxlbmd0aCYmKHRoaXMuaGFuZGxlcnNMaXN0W3JdPW51bGwpfXRoaXMuaGFuZGxlcnNMaXN0PXRoaXMuaGFuZGxlcnNMaXN0LmZpbHRlcihsKX19LG1vdXNlb3Zlckxpc3RlbmVyOmZ1bmN0aW9uKGspe2suZGF0YS5oYW5kbGVyLm92ZXI9ITA7YWlfaWZyYW1lVHJhY2tlci5yZXRyaWV2ZUZvY3VzKCk7dHJ5e2suZGF0YS5oYW5kbGVyLm92ZXJDYWxsYmFjayhrLmRhdGEuaGFuZGxlci50YXJnZXQsayl9Y2F0Y2gobCl7fX0sbW91c2VvdXRMaXN0ZW5lcjpmdW5jdGlvbihrKXtrLmRhdGEuaGFuZGxlci5vdmVyPSExO2FpX2lmcmFtZVRyYWNrZXIucmV0cmlldmVGb2N1cygpOwp0cnl7ay5kYXRhLmhhbmRsZXIub3V0Q2FsbGJhY2soay5kYXRhLmhhbmRsZXIudGFyZ2V0LGspfWNhdGNoKGwpe319LHJldHJpZXZlRm9jdXM6ZnVuY3Rpb24oKXtpZihkb2N1bWVudC5hY3RpdmVFbGVtZW50JiYiSUZSQU1FIj09PWRvY3VtZW50LmFjdGl2ZUVsZW1lbnQudGFnTmFtZSl7dmFyIGs9ITA7aWYoZG9jdW1lbnQuYWN0aXZlRWxlbWVudC5oYXNBdHRyaWJ1dGUoImlkIikmJiJ1bmRlZmluZWQiIT09dHlwZW9mIGFpX2lnbm9yZV9pZnJhbWVfaWRzJiZhaV9pZ25vcmVfaWZyYW1lX2lkcy5jb25zdHJ1Y3Rvcj09PUFycmF5KXt2YXIgbD1kb2N1bWVudC5hY3RpdmVFbGVtZW50LmlkO2FpX2lnbm9yZV9pZnJhbWVfaWRzLmZvckVhY2goZnVuY3Rpb24oeCl7RihsLHgpJiYoaz0hMSl9KX1pZihrJiZkb2N1bWVudC5hY3RpdmVFbGVtZW50Lmhhc0F0dHJpYnV0ZSgiY2xhc3MiKSYmInVuZGVmaW5lZCIhPT10eXBlb2YgYWlfaWdub3JlX2lmcmFtZV9jbGFzc2VzJiZhaV9pZ25vcmVfaWZyYW1lX2NsYXNzZXMuY29uc3RydWN0b3I9PT0KQXJyYXkpe3ZhciByPWRvY3VtZW50LmFjdGl2ZUVsZW1lbnQuY2xhc3NOYW1lO2FpX2lnbm9yZV9pZnJhbWVfY2xhc3Nlcy5mb3JFYWNoKGZ1bmN0aW9uKHgpe0Yocix4KSYmKGs9ITEpfSl9ayYmKGFpX2lmcmFtZVRyYWNrZXIuZm9jdXNSZXRyaWV2ZXIuZm9jdXMoKSxhaV9pZnJhbWVUcmFja2VyLmZvY3VzUmV0cmlldmVkPSEwKX19LHdpbmRvd0xvc2VGb2N1czpmdW5jdGlvbihrKXtmb3IodmFyIGwgaW4gdGhpcy5oYW5kbGVyc0xpc3QpaWYoITA9PT10aGlzLmhhbmRsZXJzTGlzdFtsXS5vdmVyKXRyeXt0aGlzLmhhbmRsZXJzTGlzdFtsXS5ibHVyQ2FsbGJhY2soayl9Y2F0Y2gocil7fX19O2Z1bmN0aW9uIEcoayl7ImNvbXBsZXRlIj09PWRvY3VtZW50LnJlYWR5U3RhdGV8fCJsb2FkaW5nIiE9PWRvY3VtZW50LnJlYWR5U3RhdGUmJiFkb2N1bWVudC5kb2N1bWVudEVsZW1lbnQuZG9TY3JvbGw/aygpOmRvY3VtZW50LmFkZEV2ZW50TGlzdGVuZXIoIkRPTUNvbnRlbnRMb2FkZWQiLAprKX1HKGZ1bmN0aW9uKCl7YWlfaWZyYW1lVHJhY2tlci5pbml0KCl9KTthaV90cmFja2luZ19maW5pc2hlZD0hMTtHKGZ1bmN0aW9uKCl7ZnVuY3Rpb24gayhiLG0sbixmLGQsYSxjKXtiPWIucmVwbGFjZSgiW0VWRU5UXSIsbSk7Yj1iLnJlcGxhY2UoIltCTE9DS19OVU1CRVJdIixuKTtiPWIucmVwbGFjZSgiW0JMT0NLX05BTUVdIixmKTtiPWIucmVwbGFjZSgiW0JMT0NLX0NPVU5URVJdIixkKTtiPWIucmVwbGFjZSgiW1ZFUlNJT05fTlVNQkVSXSIsYSk7Yj1iLnJlcGxhY2UoIltWRVJTSU9OX05BTUVdIixjKTtiPWIucmVwbGFjZSgiW0JMT0NLX1ZFUlNJT05fTlVNQkVSXSIsbisoMD09YT8iIjoiIC0gIithKSk7Yj1iLnJlcGxhY2UoIltCTE9DS19WRVJTSU9OX05BTUVdIixmKygiIj09Yz8iIjoiIC0gIitjKSk7cmV0dXJuIGI9Yi5yZXBsYWNlKCJbV1BfVVNFUk5BTUVdIixhaV9leHRlcm5hbF90cmFja2luZ191c2VybmFtZSl9ZnVuY3Rpb24gbChiLG0sbixmLGQsYSxjKXt2YXIgaD0KayhhaV9leHRlcm5hbF90cmFja2luZ19jYXRlZ29yeSxiLG0sbixmLGQsYSksZz1rKGFpX2V4dGVybmFsX3RyYWNraW5nX2FjdGlvbixiLG0sbixmLGQsYSkscT1rKGFpX2V4dGVybmFsX3RyYWNraW5nX2xhYmVsLGIsbSxuLGYsZCxhKTtpZigiZnVuY3Rpb24iIT10eXBlb2YgYWlfZXh0ZXJuYWxfdHJhY2tpbmdfZXZlbnR8fDAhPWFpX2V4dGVybmFsX3RyYWNraW5nX2V2ZW50KHtldmVudDpiLGJsb2NrOm0sYmxvY2tfbmFtZTpuLGJsb2NrX2NvdW50ZXI6Zix2ZXJzaW9uOmQsdmVyc2lvbl9uYW1lOmF9LGgsZyxxLGMpKSJmdW5jdGlvbiI9PXR5cGVvZiB3aW5kb3cuZ2EmJihiPSJzZW5kIiwic3RyaW5nIj09dHlwZW9mIGFpX2dhX3RyYWNrZXJfbmFtZT9iPWFpX2dhX3RyYWNrZXJfbmFtZSsiLiIrYjoobT1nYS5nZXRBbGwoKSwwIT1tLmxlbmd0aCYmKG09bVswXS5nZXQoIm5hbWUiKSwidDAiIT1tJiYoYj1tKyIuIitiKSkpLGdhKGIsImV2ZW50Iix7ZXZlbnRDYXRlZ29yeTpoLGV2ZW50QWN0aW9uOmcsCmV2ZW50TGFiZWw6cSxub25JbnRlcmFjdGlvbjpjfSkpLCJmdW5jdGlvbiI9PXR5cGVvZiB3aW5kb3cuZ3RhZyYmZ3RhZygiZXZlbnQiLCJpbXByZXNzaW9uIix7ZXZlbnRfY2F0ZWdvcnk6aCxldmVudF9hY3Rpb246ZyxldmVudF9sYWJlbDpxLG5vbl9pbnRlcmFjdGlvbjpjfSksImZ1bmN0aW9uIj09dHlwZW9mIHdpbmRvdy5fX2dhVHJhY2tlciYmX19nYVRyYWNrZXIoInNlbmQiLCJldmVudCIse2V2ZW50Q2F0ZWdvcnk6aCxldmVudEFjdGlvbjpnLGV2ZW50TGFiZWw6cSxub25JbnRlcmFjdGlvbjpjfSksIm9iamVjdCI9PXR5cGVvZiBfZ2FxJiZfZ2FxLnB1c2goWyJfdHJhY2tFdmVudCIsaCxnLHEsdm9pZCAwLGNdKSwib2JqZWN0Ij09dHlwZW9mIF9wYXEmJl9wYXEucHVzaChbInRyYWNrRXZlbnQiLGgsZyxxXSl9ZnVuY3Rpb24gcihiLG0pe3ZhciBuPWJbMF0sZj1iWzFdO2lmKE51bWJlci5pc0ludGVnZXIoZikpaWYoInVuZGVmaW5lZCI9PXR5cGVvZiBhaV9jaGVja19kYXRhJiYKInVuZGVmaW5lZCI9PXR5cGVvZiBhaV9jaGVja19kYXRhX3RpbWVvdXQpYWlfY2hlY2tfZGF0YV90aW1lb3V0PSEwLHNldFRpbWVvdXQoZnVuY3Rpb24oKXtyKGIsbSl9LDI1MDApO2Vsc2V7YWlfY29va2llPWFpX2xvYWRfY29va2llKCk7Zm9yKHZhciBkIGluIGFpX2Nvb2tpZSlpZihwYXJzZUludChuKT09cGFyc2VJbnQoZCkpZm9yKHZhciBhIGluIGFpX2Nvb2tpZVtkXSlpZigiYyI9PWEpe3ZhciBjPWFpX2Nvb2tpZVtkXVthXTtpZigwPGMpaWYoYWlfc2V0X2Nvb2tpZShkLCJjIixjLTEpLDE9PWMpe2M9ZG9jdW1lbnQucXVlcnlTZWxlY3Rvcignc3BhbltkYXRhLWFpLWJsb2NrPSInK24rJyJdJykuZGF0YXNldC5haUNmcFRpbWU7dmFyIGg9bmV3IERhdGU7aD1NYXRoLnJvdW5kKGguZ2V0VGltZSgpLzFFMyk7dmFyIGc9aCs2MDQ4MDA7YWlfc2V0X2Nvb2tpZShkLCJjIiwtZyk7c2V0VGltZW91dChmdW5jdGlvbigpe2RvY3VtZW50LnF1ZXJ5U2VsZWN0b3JBbGwoJ3NwYW5bZGF0YS1haS1ibG9jaz0iJysKbisnIl0nKS5mb3JFYWNoKChlLHApPT57KGU9ZS5jbG9zZXN0KCJkaXZbZGF0YS1haV0iKSkmJmUucmVtb3ZlKCl9KX0sNTApfWVsc2UgYWlfc2V0X2Nvb2tpZShkLCJjIixjLTEpfWVsc2UiY3B0Ij09YSYmKGM9YWlfY29va2llW2RdW2FdLDA8Yz8oYWlfc2V0X2Nvb2tpZShkLCJjcHQiLGMtMSksMT09YyYmKGM9ZG9jdW1lbnQucXVlcnlTZWxlY3Rvcignc3BhbltkYXRhLWFpLWJsb2NrPSInK24rJyJdJykuZGF0YXNldC5haUNmcFRpbWUsaD1uZXcgRGF0ZSxoPU1hdGgucm91bmQoaC5nZXRUaW1lKCkvMUUzKSxnPWFpX2Nvb2tpZVtkXS5jdCxhaV9zZXRfY29va2llKGQsIngiLGcpLHNldFRpbWVvdXQoZnVuY3Rpb24oKXtkb2N1bWVudC5xdWVyeVNlbGVjdG9yQWxsKCdzcGFuW2RhdGEtYWktYmxvY2s9IicrbisnIl0nKS5mb3JFYWNoKChlLHApPT57KGU9ZS5jbG9zZXN0KCJkaXZbZGF0YS1haV0iKSkmJmUucmVtb3ZlKCl9KX0sNzUpLCJ1bmRlZmluZWQiIT10eXBlb2YgYyYmKGc9CmgrODY0MDAqYyxhaV9zZXRfY29va2llKG4sIngiLGcpLGRvY3VtZW50LnF1ZXJ5U2VsZWN0b3JBbGwoInNwYW4uYWktY2ZwIikuZm9yRWFjaCgoZSxwKT0+e3A9ZS5kYXRhc2V0LmFpQmxvY2s7c2V0VGltZW91dChmdW5jdGlvbigpe3ZhciB2PWUuY2xvc2VzdCgiZGl2W2RhdGEtYWldIik7diYmdi5yZW1vdmUoKX0sNTApO2FpX3NldF9jb29raWUocCwieCIsZyl9KSkpKTphaV9jaGVja19kYXRhLmhhc093blByb3BlcnR5KGQpJiZhaV9jaGVja19kYXRhW2RdLmhhc093blByb3BlcnR5KCJjcHQiKSYmYWlfY2hlY2tfZGF0YVtkXS5oYXNPd25Qcm9wZXJ0eSgiY3QiKT9haV9jb29raWUuaGFzT3duUHJvcGVydHkoZCkmJmFpX2Nvb2tpZVtkXS5oYXNPd25Qcm9wZXJ0eSgiY3QiKSYmKGg9bmV3IERhdGUsYz1haV9jb29raWVbZF0uY3QtTWF0aC5yb3VuZChoLmdldFRpbWUoKS8xRTMpLDA+PWMmJihoPU1hdGgucm91bmQoaC5nZXRUaW1lKCkvMUUzKSxhaV9zZXRfY29va2llKGQsImNwdCIsCmFpX2NoZWNrX2RhdGFbZF0uY3B0LTEpLGFpX3NldF9jb29raWUoZCwiY3QiLE1hdGgucm91bmQoaCs4NjQwMCphaV9jaGVja19kYXRhW2RdLmN0KSkpKTooYWlfY29va2llLmhhc093blByb3BlcnR5KGQpJiZhaV9jb29raWVbZF0uaGFzT3duUHJvcGVydHkoImNwdCIpJiZhaV9zZXRfY29va2llKGQsImNwdCIsIiIpLGFpX2Nvb2tpZS5oYXNPd25Qcm9wZXJ0eShkKSYmYWlfY29va2llW2RdLmhhc093blByb3BlcnR5KCJjdCIpJiZhaV9zZXRfY29va2llKGQsImN0IiwiIikpKTthaV9jb29raWUuaGFzT3duUHJvcGVydHkoIkciKSYmYWlfY29va2llLkcuaGFzT3duUHJvcGVydHkoImNwdCIpJiYoYz1haV9jb29raWUuRy5jcHQsMDxjPyhhaV9zZXRfY29va2llKCJHIiwiY3B0IixjLTEpLDE9PWMmJihjPWRvY3VtZW50LnF1ZXJ5U2VsZWN0b3IoJ3NwYW5bZGF0YS1haS1ibG9jaz0iJytuKyciXScpLmRhdGFzZXQuYWlDZnBUaW1lLGg9bmV3IERhdGUsaD1NYXRoLnJvdW5kKGguZ2V0VGltZSgpLwoxRTMpLGc9YWlfY29va2llLkcuY3QsYWlfc2V0X2Nvb2tpZShuLCJ4IixnKSxzZXRUaW1lb3V0KGZ1bmN0aW9uKCl7ZG9jdW1lbnQucXVlcnlTZWxlY3RvckFsbCgnc3BhbltkYXRhLWFpLWJsb2NrPSInK24rJyJdJykuZm9yRWFjaCgoZSxwKT0+eyhlPWUuY2xvc2VzdCgiZGl2W2RhdGEtYWldIikpJiZlLnJlbW92ZSgpfSl9LDc1KSwidW5kZWZpbmVkIiE9dHlwZW9mIGMmJihnPWgrODY0MDAqYyxhaV9zZXRfY29va2llKG4sIngiLGcpLGRvY3VtZW50LnF1ZXJ5U2VsZWN0b3JBbGwoInNwYW4uYWktY2ZwIikuZm9yRWFjaCgoZSxwKT0+e3A9ZS5kYXRhc2V0LmFpQmxvY2s7c2V0VGltZW91dChmdW5jdGlvbigpe2UuY2xvc2VzdCgiZGl2W2RhdGEtYWldIikucmVtb3ZlKCl9LDUwKTthaV9zZXRfY29va2llKHAsIngiLGcpfSkpKSk6YWlfY2hlY2tfZGF0YS5oYXNPd25Qcm9wZXJ0eSgiRyIpJiZhaV9jaGVja19kYXRhLkcuaGFzT3duUHJvcGVydHkoImNwdCIpJiZhaV9jaGVja19kYXRhLkcuaGFzT3duUHJvcGVydHkoImN0Iik/CmFpX2Nvb2tpZS5oYXNPd25Qcm9wZXJ0eSgiRyIpJiZhaV9jb29raWUuRy5oYXNPd25Qcm9wZXJ0eSgiY3QiKSYmKGg9bmV3IERhdGUsYz1haV9jb29raWUuRy5jdC1NYXRoLnJvdW5kKGguZ2V0VGltZSgpLzFFMyksMD49YyYmKGg9TWF0aC5yb3VuZChoLmdldFRpbWUoKS8xRTMpLGFpX3NldF9jb29raWUoIkciLCJjcHQiLGFpX2NoZWNrX2RhdGEuRy5jcHQtMSksYWlfc2V0X2Nvb2tpZSgiRyIsImN0IixNYXRoLnJvdW5kKGgrODY0MDAqYWlfY2hlY2tfZGF0YS5HLmN0KSkpKTooYWlfY29va2llLmhhc093blByb3BlcnR5KCJHIikmJmFpX2Nvb2tpZS5HLmhhc093blByb3BlcnR5KCJjcHQiKSYmYWlfc2V0X2Nvb2tpZSgiRyIsImNwdCIsIiIpLGFpX2Nvb2tpZS5oYXNPd25Qcm9wZXJ0eSgiRyIpJiZhaV9jb29raWUuRy5oYXNPd25Qcm9wZXJ0eSgiY3QiKSYmYWlfc2V0X2Nvb2tpZSgiRyIsImN0IiwiIikpKTtpZihhaV9pbnRlcm5hbF90cmFja2luZyYmInVuZGVmaW5lZCI9PT10eXBlb2YgYWlfaW50ZXJuYWxfdHJhY2tpbmdfbm9fY2xpY2tzKXtkPQp7YWN0aW9uOiJhaV9hamF4IixhaV9jaGVjazphaV9kYXRhX2lkLGNsaWNrOm4sdmVyc2lvbjpmLHR5cGU6bX07dmFyIHE9W10sdTtmb3IodSBpbiBkKWE9ZW5jb2RlVVJJQ29tcG9uZW50KHUpLGM9ZW5jb2RlVVJJQ29tcG9uZW50KGRbdV0pLHEucHVzaChhKyI9IitjKTtxPXEuam9pbigiJiIpOyhhc3luYyBmdW5jdGlvbigpe3JldHVybiBhd2FpdCAoYXdhaXQgZmV0Y2goYWlfYWpheF91cmwse21ldGhvZDoiUE9TVCIsaGVhZGVyczp7IkNvbnRlbnQtVHlwZSI6ImFwcGxpY2F0aW9uL3gtd3d3LWZvcm0tdXJsZW5jb2RlZDsgY2hhcnNldD1VVEYtOCJ9LGJvZHk6cX0pKS50ZXh0KCl9KSgpLnRoZW4oZT0+e2U9ZS50cmltKCk7IiIhPWUmJihlPUpTT04ucGFyc2UoZSksInVuZGVmaW5lZCIhPXR5cGVvZiBlWyIjIl0mJmVbIiMiXT09biYmKGFpX2Nvb2tpZT1haV9sb2FkX2Nvb2tpZSgpLGU9TWF0aC5yb3VuZCgobmV3IERhdGUpLmdldFRpbWUoKS8xRTMpKzQzMjAwLGFpX2Nvb2tpZS5oYXNPd25Qcm9wZXJ0eShuKSYmCmFpX2Nvb2tpZVtuXS5oYXNPd25Qcm9wZXJ0eSgieCIpfHxhaV9zZXRfY29va2llKG4sIngiLGUpLHNldFRpbWVvdXQoZnVuY3Rpb24oKXtkb2N1bWVudC5xdWVyeVNlbGVjdG9yQWxsKCdzcGFuW2RhdGEtYWktYmxvY2s9IicrbisnIl0nKS5mb3JFYWNoKChwLHYpPT57KHA9cC5jbG9zZXN0KCJkaXZbZGF0YS1haV0iKSkmJnAucmVtb3ZlKCl9KX0sNTApKSl9KX1pZihhaV9leHRlcm5hbF90cmFja2luZyYmInVuZGVmaW5lZCI9PT10eXBlb2YgYWlfZXh0ZXJuYWxfdHJhY2tpbmdfbm9fY2xpY2tzKXt2YXIgdD1iWzJdLHc9YlszXTtsKCJjbGljayIsbix0LGJbNF0sZix3LCExKX0iZnVuY3Rpb24iPT10eXBlb2YgYWlfY2xpY2tfYWN0aW9uJiZhaV9jbGlja19hY3Rpb24obix0LGYsdyl9fWZ1bmN0aW9uIHgoKXthaV9jaGVja19kYXRhPXt9O2lmKCJ1bmRlZmluZWQiPT10eXBlb2YgYWlfaWZyYW1lKXthaV9jb29raWU9YWlfbG9hZF9jb29raWUoKTtkb2N1bWVudC5xdWVyeVNlbGVjdG9yQWxsKCIuYWktY2hlY2stYmxvY2siKS5mb3JFYWNoKChmLApkKT0+e3ZhciBhPWYuZGF0YXNldC5haUJsb2NrLGM9Zi5kYXRhc2V0LmFpRGVsYXlQdixoPWYuZGF0YXNldC5haUV2ZXJ5UHYsZz1mLmRhdGFzZXQuYWlIYXNoLHE9Zi5kYXRhc2V0LmFpTWF4SW1wLHU9Zi5kYXRhc2V0LmFpTGltaXRJbXBQZXJUaW1lLHQ9Zi5kYXRhc2V0LmFpTGltaXRJbXBUaW1lLHc9Zi5kYXRhc2V0LmFpTWF4Q2xpY2tzLGU9Zi5kYXRhc2V0LmFpTGltaXRDbGlja3NQZXJUaW1lLHA9Zi5kYXRhc2V0LmFpTGltaXRDbGlja3NUaW1lO2Q9Zi5kYXRhc2V0LmFpR2xvYmFsTGltaXRDbGlja3NQZXJUaW1lO2Y9Zi5kYXRhc2V0LmFpR2xvYmFsTGltaXRDbGlja3NUaW1lO2lmKCJ1bmRlZmluZWQiIT10eXBlb2YgYyYmMDxjKXthaV9jaGVja19kYXRhLmhhc093blByb3BlcnR5KGEpfHwoYWlfY2hlY2tfZGF0YVthXT17fSk7YWlfY2hlY2tfZGF0YVthXS5kPWM7dmFyIHY9IiI7YWlfY29va2llLmhhc093blByb3BlcnR5KGEpJiZhaV9jb29raWVbYV0uaGFzT3duUHJvcGVydHkoImQiKSYmCih2PWFpX2Nvb2tpZVthXS5kKTsiIj09PXYmJmFpX3NldF9jb29raWUoYSwiZCIsYy0xKX0idW5kZWZpbmVkIiE9dHlwZW9mIGgmJjI8PWgmJihhaV9jaGVja19kYXRhLmhhc093blByb3BlcnR5KGEpfHwoYWlfY2hlY2tfZGF0YVthXT17fSksInVuZGVmaW5lZCIhPT10eXBlb2YgYWlfZGVsYXlfc2hvd2luZ19wYWdldmlld3N8fGFpX2Nvb2tpZS5oYXNPd25Qcm9wZXJ0eShhKSYmYWlfY29va2llW2FdLmhhc093blByb3BlcnR5KCJkIil8fChhaV9jb29raWUuaGFzT3duUHJvcGVydHkoYSl8fChhaV9jb29raWVbYV09e30pLGFpX2Nvb2tpZVthXS5kPTApLGFpX2NoZWNrX2RhdGFbYV0uZT1oKTtpZigidW5kZWZpbmVkIiE9dHlwZW9mIHEmJjA8cSl7aWYoYWlfY2hlY2tfZGF0YS5oYXNPd25Qcm9wZXJ0eShhKXx8KGFpX2NoZWNrX2RhdGFbYV09e30pLGFpX2NoZWNrX2RhdGFbYV0uaT1xLGFpX2NoZWNrX2RhdGFbYV0uaD1nLGg9Yz0iIixhaV9jb29raWUuaGFzT3duUHJvcGVydHkoYSkmJgooYWlfY29va2llW2FdLmhhc093blByb3BlcnR5KCJpIikmJihoPWFpX2Nvb2tpZVthXS5pKSxhaV9jb29raWVbYV0uaGFzT3duUHJvcGVydHkoImgiKSYmKGM9YWlfY29va2llW2FdLmgpKSwiIj09PWh8fGMhPWcpYWlfc2V0X2Nvb2tpZShhLCJpIixxKSxhaV9zZXRfY29va2llKGEsImgiLGcpfWVsc2UgYWlfY29va2llLmhhc093blByb3BlcnR5KGEpJiZhaV9jb29raWVbYV0uaGFzT3duUHJvcGVydHkoImkiKSYmKGFpX3NldF9jb29raWUoYSwiaSIsIiIpLGFpX2Nvb2tpZVthXS5oYXNPd25Qcm9wZXJ0eSgiYyIpfHxhaV9jb29raWVbYV0uaGFzT3duUHJvcGVydHkoIngiKXx8YWlfc2V0X2Nvb2tpZShhLCJoIiwiIikpO2lmKCJ1bmRlZmluZWQiIT10eXBlb2YgdSYmMDx1JiYidW5kZWZpbmVkIiE9dHlwZW9mIHQmJjA8dCl7YWlfY2hlY2tfZGF0YS5oYXNPd25Qcm9wZXJ0eShhKXx8KGFpX2NoZWNrX2RhdGFbYV09e30pO2FpX2NoZWNrX2RhdGFbYV0uaXB0PXU7YWlfY2hlY2tfZGF0YVthXS5pdD0KdDtxPWM9IiI7YWlfY29va2llLmhhc093blByb3BlcnR5KGEpJiYoYWlfY29va2llW2FdLmhhc093blByb3BlcnR5KCJpcHQiKSYmKGM9YWlfY29va2llW2FdLmlwdCksYWlfY29va2llW2FdLmhhc093blByb3BlcnR5KCJpdCIpJiYocT1haV9jb29raWVbYV0uaXQpKTtpZigiIj09PWN8fCIiPT09cSlhaV9zZXRfY29va2llKGEsImlwdCIsdSksYz1uZXcgRGF0ZSxjPU1hdGgucm91bmQoYy5nZXRUaW1lKCkvMUUzKSxhaV9zZXRfY29va2llKGEsIml0IixNYXRoLnJvdW5kKGMrODY0MDAqdCkpOzA8cSYmKGM9bmV3IERhdGUsYz1NYXRoLnJvdW5kKGMuZ2V0VGltZSgpLzFFMykscTw9YyYmKGFpX3NldF9jb29raWUoYSwiaXB0Iix1KSxhaV9zZXRfY29va2llKGEsIml0IixNYXRoLnJvdW5kKGMrODY0MDAqdCkpKSl9ZWxzZSBhaV9jb29raWUuaGFzT3duUHJvcGVydHkoYSkmJihhaV9jb29raWVbYV0uaGFzT3duUHJvcGVydHkoImlwdCIpJiZhaV9zZXRfY29va2llKGEsImlwdCIsIiIpLAphaV9jb29raWVbYV0uaGFzT3duUHJvcGVydHkoIml0IikmJmFpX3NldF9jb29raWUoYSwiaXQiLCIiKSk7aWYoInVuZGVmaW5lZCIhPXR5cGVvZiB3JiYwPHcpe2lmKGFpX2NoZWNrX2RhdGEuaGFzT3duUHJvcGVydHkoYSl8fChhaV9jaGVja19kYXRhW2FdPXt9KSxhaV9jaGVja19kYXRhW2FdLmM9dyxhaV9jaGVja19kYXRhW2FdLmg9Zyx1PWM9IiIsYWlfY29va2llLmhhc093blByb3BlcnR5KGEpJiYoYWlfY29va2llW2FdLmhhc093blByb3BlcnR5KCJjIikmJih1PWFpX2Nvb2tpZVthXS5jKSxhaV9jb29raWVbYV0uaGFzT3duUHJvcGVydHkoImgiKSYmKGM9YWlfY29va2llW2FdLmgpKSwiIj09PXV8fGMhPWcpYWlfc2V0X2Nvb2tpZShhLCJjIix3KSxhaV9zZXRfY29va2llKGEsImgiLGcpfWVsc2UgYWlfY29va2llLmhhc093blByb3BlcnR5KGEpJiZhaV9jb29raWVbYV0uaGFzT3duUHJvcGVydHkoImMiKSYmKGFpX3NldF9jb29raWUoYSwiYyIsIiIpLGFpX2Nvb2tpZVthXS5oYXNPd25Qcm9wZXJ0eSgiaSIpfHwKYWlfY29va2llW2FdLmhhc093blByb3BlcnR5KCJ4Iil8fGFpX3NldF9jb29raWUoYSwiaCIsIiIpKTtpZigidW5kZWZpbmVkIiE9dHlwZW9mIGUmJjA8ZSYmInVuZGVmaW5lZCIhPXR5cGVvZiBwJiYwPHApe2FpX2NoZWNrX2RhdGEuaGFzT3duUHJvcGVydHkoYSl8fChhaV9jaGVja19kYXRhW2FdPXt9KTthaV9jaGVja19kYXRhW2FdLmNwdD1lO2FpX2NoZWNrX2RhdGFbYV0uY3Q9cDtnPXc9IiI7YWlfY29va2llLmhhc093blByb3BlcnR5KGEpJiYoYWlfY29va2llW2FdLmhhc093blByb3BlcnR5KCJjcHQiKSYmKHc9YWlfY29va2llW2FdLmNwdCksYWlfY29va2llW2FdLmhhc093blByb3BlcnR5KCJjdCIpJiYoZz1haV9jb29raWVbYV0uY3QpKTtpZigiIj09PXd8fCIiPT09ZylhaV9zZXRfY29va2llKGEsImNwdCIsZSksYz1uZXcgRGF0ZSxjPU1hdGgucm91bmQoYy5nZXRUaW1lKCkvMUUzKSxhaV9zZXRfY29va2llKGEsImN0IixNYXRoLnJvdW5kKGMrODY0MDAqcCkpOzA8ZyYmCihjPW5ldyBEYXRlLGM9TWF0aC5yb3VuZChjLmdldFRpbWUoKS8xRTMpLGc8PWMmJihhaV9zZXRfY29va2llKGEsImNwdCIsZSksYWlfc2V0X2Nvb2tpZShhLCJjdCIsTWF0aC5yb3VuZChjKzg2NDAwKnApKSkpfWVsc2UgYWlfY29va2llLmhhc093blByb3BlcnR5KGEpJiYoYWlfY29va2llW2FdLmhhc093blByb3BlcnR5KCJjcHQiKSYmYWlfc2V0X2Nvb2tpZShhLCJjcHQiLCIiKSxhaV9jb29raWVbYV0uaGFzT3duUHJvcGVydHkoImN0IikmJmFpX3NldF9jb29raWUoYSwiY3QiLCIiKSk7aWYoInVuZGVmaW5lZCIhPXR5cGVvZiBkJiYwPGQmJiJ1bmRlZmluZWQiIT10eXBlb2YgZiYmMDxmKXthaV9jaGVja19kYXRhLmhhc093blByb3BlcnR5KCJHIil8fChhaV9jaGVja19kYXRhLkc9e30pO2FpX2NoZWNrX2RhdGEuRy5jcHQ9ZDthaV9jaGVja19kYXRhLkcuY3Q9ZjthPWU9IiI7YWlfY29va2llLmhhc093blByb3BlcnR5KCJHIikmJihhaV9jb29raWUuRy5oYXNPd25Qcm9wZXJ0eSgiY3B0IikmJgooZT1haV9jb29raWUuRy5jcHQpLGFpX2Nvb2tpZS5HLmhhc093blByb3BlcnR5KCJjdCIpJiYoYT1haV9jb29raWUuRy5jdCkpO2lmKCIiPT09ZXx8IiI9PT1hKWFpX3NldF9jb29raWUoIkciLCJjcHQiLGQpLGM9bmV3IERhdGUsYz1NYXRoLnJvdW5kKGMuZ2V0VGltZSgpLzFFMyksYWlfc2V0X2Nvb2tpZSgiRyIsImN0IixNYXRoLnJvdW5kKGMrODY0MDAqZikpOzA8YSYmKGM9bmV3IERhdGUsYz1NYXRoLnJvdW5kKGMuZ2V0VGltZSgpLzFFMyksYTw9YyYmKGFpX3NldF9jb29raWUoIkciLCJjcHQiLGQpLGFpX3NldF9jb29raWUoIkciLCJjdCIsTWF0aC5yb3VuZChjKzg2NDAwKmYpKSkpfWVsc2UgYWlfY29va2llLmhhc093blByb3BlcnR5KCJHIikmJihhaV9jb29raWUuRy5oYXNPd25Qcm9wZXJ0eSgiY3B0IikmJmFpX3NldF9jb29raWUoIkciLCJjcHQiLCIiKSxhaV9jb29raWUuRy5oYXNPd25Qcm9wZXJ0eSgiY3QiKSYmYWlfc2V0X2Nvb2tpZSgiRyIsImN0IiwiIikpfSk7ZG9jdW1lbnQucXVlcnlTZWxlY3RvckFsbCgiLmFpLWNoZWNrLWJsb2NrIikuZm9yRWFjaCgoZiwKZCk9PntmLmNsYXNzTGlzdC5yZW1vdmUoImFpLWNoZWNrLWJsb2NrIil9KTtmb3IodmFyIGIgaW4gYWlfY29va2llKWZvcih2YXIgbSBpbiBhaV9jb29raWVbYl0paWYoImQiPT1tKXt2YXIgbj1haV9jb29raWVbYl1bbV07MDxuP2FpX3NldF9jb29raWUoYiwiZCIsbi0xKTphaV9jaGVja19kYXRhLmhhc093blByb3BlcnR5KGIpJiZhaV9jaGVja19kYXRhW2JdLmhhc093blByb3BlcnR5KCJlIik/YWlfc2V0X2Nvb2tpZShiLCJkIixhaV9jaGVja19kYXRhW2JdLmUtMSk6YWlfY2hlY2tfZGF0YS5oYXNPd25Qcm9wZXJ0eShiKSYmYWlfY2hlY2tfZGF0YVtiXS5oYXNPd25Qcm9wZXJ0eSgiZCIpfHxhaV9zZXRfY29va2llKGIsImQiLCIiKX19fWZ1bmN0aW9uIEIoKXtpZihhaV90cmFja19wYWdldmlld3Mpe3ZhciBiPWRvY3VtZW50LmRvY3VtZW50RWxlbWVudC5jbGllbnRXaWR0aCxtPXdpbmRvdy5pbm5lcldpZHRoLG49YjxtP206YixmPTA7YWlfdmlld3BvcnRfd2lkdGhzLmV2ZXJ5KChoLApnKT0+bj49aD8oZj1haV92aWV3cG9ydF9pbmRleGVzW2ddLCExKTohMCk7Yj1kb2N1bWVudC5xdWVyeVNlbGVjdG9yKGI2NGQoIlltOWtlUT09IikpLmdldEF0dHJpYnV0ZShiNjRkKGFpX2FkYl9hdHRyaWJ1dGUpKTtpZigic3RyaW5nIj09PXR5cGVvZiBiKXZhciBkPWI9PWI2NGQoImJXRnphdz09Iik7InN0cmluZyI9PT10eXBlb2YgYiYmImJvb2xlYW4iPT09dHlwZW9mIGQmJmQmJihhaV9leHRlcm5hbF90cmFja2luZyYmbCgiYWQgYmxvY2tpbmciLDAsYWlfdmlld3BvcnRfbmFtZXNbZi0xXSwwLDAsIiIsITApLGZ8PTEyOCk7eT1bMCxmXX14KCk7YWlfcHJvY2Vzc19pbXByZXNzaW9ucygpO2lmKDAhPXkubGVuZ3RoJiZhaV9pbnRlcm5hbF90cmFja2luZyl7ZD17YWN0aW9uOiJhaV9hamF4IixhaV9jaGVjazphaV9kYXRhX2lkfTt2YXIgYT1bXSxjO2ZvcihjIGluIGQpYj1lbmNvZGVVUklDb21wb25lbnQoYyksbT1lbmNvZGVVUklDb21wb25lbnQoZFtjXSksYS5wdXNoKGIrIj0iKwptKTtiPWVuY29kZVVSSUNvbXBvbmVudCgidmlld3NbXSIpO209ZW5jb2RlVVJJQ29tcG9uZW50KDApO2EucHVzaChiKyI9IittKTtiPWVuY29kZVVSSUNvbXBvbmVudCgidmVyc2lvbnNbXSIpO209ZW5jb2RlVVJJQ29tcG9uZW50KGYpO2EucHVzaChiKyI9IittKTthPWEuam9pbigiJiIpOyhhc3luYyBmdW5jdGlvbigpe3JldHVybiBhd2FpdCAoYXdhaXQgZmV0Y2goYWlfYWpheF91cmwse21ldGhvZDoiUE9TVCIsaGVhZGVyczp7IkNvbnRlbnQtVHlwZSI6ImFwcGxpY2F0aW9uL3gtd3d3LWZvcm0tdXJsZW5jb2RlZDsgY2hhcnNldD1VVEYtOCJ9LGJvZHk6YX0pKS50ZXh0KCl9KSgpLnRoZW4oaD0+e30pfWFpX3RyYWNraW5nX2ZpbmlzaGVkPSEwfWFpX2RlYnVnX3RyYWNraW5nJiYoYWlfYWpheF91cmwrPSI/YWktZGVidWctdHJhY2tpbmc9MSIpO051bWJlci5pc0ludGVnZXI9TnVtYmVyLmlzSW50ZWdlcnx8ZnVuY3Rpb24oYil7cmV0dXJuIm51bWJlciI9PT10eXBlb2YgYiYmaXNGaW5pdGUoYikmJgpNYXRoLmZsb29yKGIpPT09Yn07YWlfaW5zdGFsbF9zdGFuZGFyZF9jbGlja190cmFja2Vycz1mdW5jdGlvbihiKXsidW5kZWZpbmVkIj09dHlwZW9mIGImJihiPWRvY3VtZW50LnF1ZXJ5U2VsZWN0b3IoImJvZHkiKSk7Yj1iLnF1ZXJ5U2VsZWN0b3JBbGwoImRpdi5haS10cmFja1tkYXRhLWFpXSIpO3ZhciBtPVtdO2IuZm9yRWFjaCgoZixkKT0+e2lmKGYub2Zmc2V0V2lkdGh8fGYub2Zmc2V0SGVpZ2h0fHxmLmdldENsaWVudFJlY3RzKCkubGVuZ3RoKWYucXVlcnlTZWxlY3RvckFsbCgiZGl2LmFpLWxhenksIGRpdi5haS13YWl0LWZvci1pbnRlcmFjdGlvbiwgZGl2LmFpLW1hbnVhbCwgZGl2LmFpLWxpc3QtbWFudWFsLCBkaXYuYWktbWFudWFsLWF1dG8sIGRpdi5haS1kZWxheWVkIikubGVuZ3RofHxtLnB1c2goZil9KTt2YXIgbj1bXTttLmZvckVhY2goKGYsZCk9PntmLmNsYXNzTGlzdC5yZW1vdmUoImFpLXRyYWNrIik7bi5wdXNoLmFwcGx5KG4sZi5xdWVyeVNlbGVjdG9yQWxsKCJhIikpfSk7CmI9bjswIT1iLmxlbmd0aCYmKGFpX2FkdmFuY2VkX2NsaWNrX2RldGVjdGlvbj9iLmZvckVhY2goKGYsZCk9PntmLmFkZEV2ZW50TGlzdGVuZXIoImNsaWNrIiwoKT0+e2Zvcih2YXIgYT1mLmNsb3Nlc3QoImRpdltkYXRhLWFpXSIpO251bGwhPT1hJiZhLmhhc0F0dHJpYnV0ZSgiZGF0YS1haSIpOyl7dmFyIGM9SlNPTi5wYXJzZShiNjRkKGEuZ2V0QXR0cmlidXRlKCJkYXRhLWFpIikpKTsidW5kZWZpbmVkIiE9PXR5cGVvZiBjJiZjLmNvbnN0cnVjdG9yPT09QXJyYXkmJk51bWJlci5pc0ludGVnZXIoY1sxXSkmJiFhLmNsYXNzTGlzdC5jb250YWlucygiY2xpY2tlZCIpJiYoYS5jbGFzc0xpc3QuYWRkKCJjbGlja2VkIikscihjLCJhLmNsaWNrIikpO2E9YS5wYXJlbnRFbGVtZW50LmNsb3Nlc3QoImRpdltkYXRhLWFpXSIpfX0pfSk6Yi5mb3JFYWNoKChmLGQpPT57Zi5hZGRFdmVudExpc3RlbmVyKCJjbGljayIsKCk9Pntmb3IodmFyIGE9Zi5jbG9zZXN0KCJkaXZbZGF0YS1haV0iKTtudWxsIT09CmEmJmEuaGFzQXR0cmlidXRlKCJkYXRhLWFpIik7KXt2YXIgYz1KU09OLnBhcnNlKGI2NGQoYS5nZXRBdHRyaWJ1dGUoImRhdGEtYWkiKSkpOyJ1bmRlZmluZWQiIT09dHlwZW9mIGMmJmMuY29uc3RydWN0b3I9PT1BcnJheSYmTnVtYmVyLmlzSW50ZWdlcihjWzFdKSYmKHIoYywiYS5jbGljayIpLGNsaWNrZWQ9ITApO2E9YS5wYXJlbnRFbGVtZW50LmNsb3Nlc3QoImRpdltkYXRhLWFpXSIpfX0pfSkpfTthaV9pbnN0YWxsX2NsaWNrX3RyYWNrZXJzPWZ1bmN0aW9uKGIpeyJ1bmRlZmluZWQiPT10eXBlb2YgYiYmKGI9ZG9jdW1lbnQucXVlcnlTZWxlY3RvcigiYm9keSIpKTtpZihhaV9hZHZhbmNlZF9jbGlja19kZXRlY3Rpb24pe3ZhciBtPWIucXVlcnlTZWxlY3RvckFsbCgiZGl2LmFpLXRyYWNrW2RhdGEtYWldLCBkaXYuYWktcm90YXRlW2RhdGEtaW5mb10gZGl2LmFpLXRyYWNrW2RhdGEtYWldIiksbj1bXTttLmZvckVhY2goKGQsYSk9PnsoZC5vZmZzZXRXaWR0aHx8ZC5vZmZzZXRIZWlnaHR8fApkLmdldENsaWVudFJlY3RzKCkubGVuZ3RoKSYmbi5wdXNoKGQpfSk7Yi5oYXNBdHRyaWJ1dGUoImRhdGEtYWkiKSYmYi5jbGFzc0xpc3QuY29udGFpbnMoImFpLXRyYWNrIikmJihiLm9mZnNldFdpZHRofHxiLm9mZnNldEhlaWdodHx8Yi5nZXRDbGllbnRSZWN0cygpLmxlbmd0aCkmJm4ucHVzaChiKTt2YXIgZj1bXTtuLmZvckVhY2goKGQsYSk9PntkLnF1ZXJ5U2VsZWN0b3JBbGwoImRpdi5haS1sYXp5LCBkaXYuYWktd2FpdC1mb3ItaW50ZXJhY3Rpb24sIGRpdi5haS1tYW51YWwsIGRpdi5haS1saXN0LW1hbnVhbCwgZGl2LmFpLW1hbnVhbC1hdXRvLCBkaXYuYWktZGVsYXllZCIpLmxlbmd0aHx8Zi5wdXNoKGQpfSk7bT1mOzAhPW0ubGVuZ3RoJiZtLmZvckVhY2goKGQsYSk9PntpbnN0YWxsSWZyYW1lVHJhY2tlcih7Ymx1ckNhbGxiYWNrOmZ1bmN0aW9uKCl7aWYobnVsbCE9dGhpcy5haV9kYXRhJiZudWxsIT13cmFwcGVyJiYhd3JhcHBlci5jbGFzc0xpc3QuY29udGFpbnMoImNsaWNrZWQiKSl7d3JhcHBlci5jbGFzc0xpc3QuYWRkKCJjbGlja2VkIik7CnIodGhpcy5haV9kYXRhLCJibHVyQ2FsbGJhY2siKTtmb3IodmFyIGM9d3JhcHBlci5xdWVyeVNlbGVjdG9yKCJkaXZbZGF0YS1haV0iKTtudWxsIT1jJiYoYy5vZmZzZXRXaWR0aHx8Yy5vZmZzZXRIZWlnaHR8fGMuZ2V0Q2xpZW50UmVjdHMoKS5sZW5ndGgpJiZjLmhhc0F0dHJpYnV0ZSgiZGF0YS1haSIpOyl7dmFyIGg9SlNPTi5wYXJzZShiNjRkKGMuZ2V0QXR0cmlidXRlKCJkYXRhLWFpIikpKTsidW5kZWZpbmVkIiE9PXR5cGVvZiBoJiZoLmNvbnN0cnVjdG9yPT09QXJyYXkmJk51bWJlci5pc0ludGVnZXIoaFsxXSkmJnIoaCwiYmx1ckNhbGxiYWNrIElOTkVSIik7Yz1jLnF1ZXJ5U2VsZWN0b3IoImRpdltkYXRhLWFpXSIpfX19LG92ZXJDYWxsYmFjazpmdW5jdGlvbihjKXtjPWMuY2xvc2VzdCgiZGl2W2RhdGEtYWldIik7aWYoYy5oYXNBdHRyaWJ1dGUoImRhdGEtYWkiKSl7dmFyIGg9SlNPTi5wYXJzZShiNjRkKGMuZ2V0QXR0cmlidXRlKCJkYXRhLWFpIikpKTsidW5kZWZpbmVkIiE9PQp0eXBlb2YgaCYmaC5jb25zdHJ1Y3Rvcj09PUFycmF5JiZOdW1iZXIuaXNJbnRlZ2VyKGhbMV0pPyh3cmFwcGVyPWMsdGhpcy5haV9kYXRhPWgpOihudWxsIT13cmFwcGVyJiZ3cmFwcGVyLmNsYXNzTGlzdC5yZW1vdmUoImNsaWNrZWQiKSx0aGlzLmFpX2RhdGE9d3JhcHBlcj1udWxsKX19LG91dENhbGxiYWNrOmZ1bmN0aW9uKGMpe251bGwhPXdyYXBwZXImJndyYXBwZXIuY2xhc3NMaXN0LnJlbW92ZSgiY2xpY2tlZCIpO3RoaXMuYWlfZGF0YT13cmFwcGVyPW51bGx9LGZvY3VzQ2FsbGJhY2s6ZnVuY3Rpb24oYyl7aWYobnVsbCE9dGhpcy5haV9kYXRhJiZudWxsIT13cmFwcGVyJiYhd3JhcHBlci5jbGFzc0xpc3QuY29udGFpbnMoImNsaWNrZWQiKSlmb3Iod3JhcHBlci5jbGFzc0xpc3QuYWRkKCJjbGlja2VkIikscih0aGlzLmFpX2RhdGEsImZvY3VzQ2FsbGJhY2siKSxjPXdyYXBwZXIucXVlcnlTZWxlY3RvcigiZGl2W2RhdGEtYWldIik7bnVsbCE9YyYmKGMub2Zmc2V0V2lkdGh8fApjLm9mZnNldEhlaWdodHx8Yy5nZXRDbGllbnRSZWN0cygpLmxlbmd0aCkmJmMuaGFzQXR0cmlidXRlKCJkYXRhLWFpIik7KXt2YXIgaD1KU09OLnBhcnNlKGI2NGQoYy5nZXRBdHRyaWJ1dGUoImRhdGEtYWkiKSkpOyJ1bmRlZmluZWQiIT09dHlwZW9mIGgmJmguY29uc3RydWN0b3I9PT1BcnJheSYmTnVtYmVyLmlzSW50ZWdlcihoWzFdKSYmcihoLCJmb2N1c0NhbGxiYWNrIElOTkVSIik7Yz1jLnF1ZXJ5U2VsZWN0b3IoImRpdltkYXRhLWFpXSIpfX0sd3JhcHBlcjpudWxsLGFpX2RhdGE6bnVsbCxibG9jazpudWxsLHZlcnNpb246bnVsbH0sZCl9KX1haV9pbnN0YWxsX3N0YW5kYXJkX2NsaWNrX3RyYWNrZXJzKGIpfTt2YXIgeT1bXTthaV9wcm9jZXNzX2ltcHJlc3Npb25zPWZ1bmN0aW9uKGIpeyJ1bmRlZmluZWQiPT10eXBlb2YgYiYmKGI9ZG9jdW1lbnQucXVlcnlTZWxlY3RvcigiYm9keSIpKTt2YXIgbT1bXSxuPVtdLGY9W10sZD1bXSxhPVtdOzAhPXkubGVuZ3RoJiYobS5wdXNoKHlbMF0pLApuLnB1c2goeVsxXSksZi5wdXNoKCJQYWdldmlld3MiKSxhLnB1c2goMCksZC5wdXNoKCIiKSk7dmFyIGM9Yi5xdWVyeVNlbGVjdG9yQWxsKCJkaXYuYWktdHJhY2tbZGF0YS1haV0sIGRpdi5haS1yb3RhdGVbZGF0YS1pbmZvXSBkaXYuYWktdHJhY2tbZGF0YS1haV0iKSxoPVtdO2MuZm9yRWFjaCgoZSxwKT0+eyhlLm9mZnNldFdpZHRofHxlLm9mZnNldEhlaWdodHx8ZS5nZXRDbGllbnRSZWN0cygpLmxlbmd0aCkmJiFlLmNsYXNzTGlzdC5jb250YWlucygiYWktbm8tcGFnZXZpZXciKSYmaC5wdXNoKGUpfSk7bnVsbCE9PWImJmIuaGFzQXR0cmlidXRlKCJkYXRhLWFpIikmJmIuY2xhc3NMaXN0LmNvbnRhaW5zKCJhaS10cmFjayIpJiYhYi5jbGFzc0xpc3QuY29udGFpbnMoImFpLW5vLXBhZ2V2aWV3IikmJihiLm9mZnNldFdpZHRofHxiLm9mZnNldEhlaWdodHx8Yi5nZXRDbGllbnRSZWN0cygpLmxlbmd0aCkmJmgucHVzaChiKTtjPWg7MCE9Yy5sZW5ndGgmJmMuZm9yRWFjaCgoZSwKcCk9PntpZihlLmhhc0F0dHJpYnV0ZSgiZGF0YS1haSIpKXtwPSIiO2Zvcih2YXIgdj0xOzk+PXY7disrKWlmKGUuaGFzQXR0cmlidXRlKCJkYXRhLWFpLSIrdikpcD1lLmdldEF0dHJpYnV0ZSgiZGF0YS1haS0iK3YpO2Vsc2UgYnJlYWs7IiIhPXAmJmUuc2V0QXR0cmlidXRlKCJkYXRhLWFpIixwKTtwPUpTT04ucGFyc2UoYjY0ZChlLmdldEF0dHJpYnV0ZSgiZGF0YS1haSIpKSk7aWYoInVuZGVmaW5lZCIhPT10eXBlb2YgcCYmcC5jb25zdHJ1Y3Rvcj09PUFycmF5KXt2PTA7dmFyIHo9ZS5xdWVyeVNlbGVjdG9yQWxsKCJkaXYuYWktcm90YXRlW2RhdGEtaW5mb10iKTsxPT16Lmxlbmd0aCYmKHY9SlNPTi5wYXJzZShiNjRkKHpbMF0uZGF0YXNldC5pbmZvKSlbMV0pO2lmKE51bWJlci5pc0ludGVnZXIocFswXSkmJjAhPXBbMF0mJk51bWJlci5pc0ludGVnZXIocFsxXSkpe3o9MDt2YXIgQz1lLmNsYXNzTGlzdC5jb250YWlucygiYWktbm8tdHJhY2tpbmciKSxBPWRvY3VtZW50LnF1ZXJ5U2VsZWN0b3IoYjY0ZCgiWW05a2VRPT0iKSkuZ2V0QXR0cmlidXRlKGI2NGQoYWlfYWRiX2F0dHJpYnV0ZSkpOwppZigic3RyaW5nIj09PXR5cGVvZiBBKXZhciBEPUE9PWI2NGQoImJXRnphdz09Iik7aWYoInN0cmluZyI9PT10eXBlb2YgQSYmImJvb2xlYW4iPT09dHlwZW9mIEQpe3ZhciBFPWUub2Zmc2V0SGVpZ2h0O0E9ZS5xdWVyeVNlbGVjdG9yQWxsKCIuYWktYXR0cmlidXRlcyIpO0EubGVuZ3RoJiZBLmZvckVhY2goKEgsSik9PntFPj1lLm9mZnNldEhlaWdodCYmKEUtPWUub2Zmc2V0SGVpZ2h0KX0pO0E9ZS5xdWVyeVNlbGVjdG9yQWxsKCIuYWktY29kZSIpO0U9MDtBLmxlbmd0aCYmQS5mb3JFYWNoKChILEopPT57RSs9SC5vZmZzZXRIZWlnaHR9KTtEJiYwPT09RSYmKHo9MTI4KX0wIT1lLnF1ZXJ5U2VsZWN0b3JBbGwoImRpdi5haS1sYXp5LCBkaXYuYWktd2FpdC1mb3ItaW50ZXJhY3Rpb24sIGRpdi5haS1tYW51YWwsIGRpdi5haS1saXN0LW1hbnVhbCwgZGl2LmFpLW1hbnVhbC1hdXRvLCBkaXYuYWktZGVsYXllZCIpLmxlbmd0aCYmKEM9ITApO2lmKCFDKWlmKDA9PXYpbS5wdXNoKHBbMF0pLApuLnB1c2gocFsxXXx6KSxmLnB1c2gocFsyXSksZC5wdXNoKHBbM10pLGEucHVzaChwWzRdKTtlbHNlIGZvcihEPTE7RDw9djtEKyspbS5wdXNoKHBbMF0pLG4ucHVzaChEfHopLGYucHVzaChwWzJdKSxkLnB1c2gocFszXSksYS5wdXNoKHBbNF0pfX19fSk7YWlfY29va2llPWFpX2xvYWRfY29va2llKCk7Zm9yKHZhciBnIGluIGFpX2Nvb2tpZSlpZihtLmluY2x1ZGVzKHBhcnNlSW50KGcpKSlmb3IodmFyIHEgaW4gYWlfY29va2llW2ddKSJpIj09cT8oYj1haV9jb29raWVbZ11bcV0sMDxiJiYoMT09Yj8oYj1uZXcgRGF0ZSxiPU1hdGgucm91bmQoYi5nZXRUaW1lKCkvMUUzKSs2MDQ4MDAsYWlfc2V0X2Nvb2tpZShnLCJpIiwtYikpOmFpX3NldF9jb29raWUoZywiaSIsYi0xKSkpOiJpcHQiPT1xJiYoYj1haV9jb29raWVbZ11bcV0sMDxiP2FpX3NldF9jb29raWUoZywiaXB0IixiLTEpOmFpX2NoZWNrX2RhdGEuaGFzT3duUHJvcGVydHkoZykmJmFpX2NoZWNrX2RhdGFbZ10uaGFzT3duUHJvcGVydHkoImlwdCIpJiYKYWlfY2hlY2tfZGF0YVtnXS5oYXNPd25Qcm9wZXJ0eSgiaXQiKT9haV9jb29raWUuaGFzT3duUHJvcGVydHkoZykmJmFpX2Nvb2tpZVtnXS5oYXNPd25Qcm9wZXJ0eSgiaXQiKSYmKGI9bmV3IERhdGUsMD49YWlfY29va2llW2ddLml0LU1hdGgucm91bmQoYi5nZXRUaW1lKCkvMUUzKSYmKGI9TWF0aC5yb3VuZChiLmdldFRpbWUoKS8xRTMpLGFpX3NldF9jb29raWUoZywiaXB0IixhaV9jaGVja19kYXRhW2ddLmlwdCksYWlfc2V0X2Nvb2tpZShnLCJpdCIsTWF0aC5yb3VuZChiKzg2NDAwKmFpX2NoZWNrX2RhdGFbZ10uaXQpKSkpOihhaV9jb29raWUuaGFzT3duUHJvcGVydHkoZykmJmFpX2Nvb2tpZVtnXS5oYXNPd25Qcm9wZXJ0eSgiaXB0IikmJmFpX3NldF9jb29raWUoZywiaXB0IiwiIiksYWlfY29va2llLmhhc093blByb3BlcnR5KGcpJiZhaV9jb29raWVbZ10uaGFzT3duUHJvcGVydHkoIml0IikmJmFpX3NldF9jb29raWUoZywiaXQiLCIiKSkpO2lmKG0ubGVuZ3RoKXtpZihhaV9pbnRlcm5hbF90cmFja2luZyYmCiJ1bmRlZmluZWQiPT09dHlwZW9mIGFpX2ludGVybmFsX3RyYWNraW5nX25vX2ltcHJlc3Npb25zKXt5PVtdO2c9e2FjdGlvbjoiYWlfYWpheCIsYWlfY2hlY2s6YWlfZGF0YV9pZH07dmFyIHU9W10sdDtmb3IodCBpbiBnKXE9ZW5jb2RlVVJJQ29tcG9uZW50KHQpLGI9ZW5jb2RlVVJJQ29tcG9uZW50KGdbdF0pLHUucHVzaChxKyI9IitiKTtmb3IodmFyIHcgaW4gbSlxPWVuY29kZVVSSUNvbXBvbmVudCgidmlld3NbXSIpLGI9ZW5jb2RlVVJJQ29tcG9uZW50KG1bd10pLHUucHVzaChxKyI9IitiKTtmb3IodyBpbiBuKXE9ZW5jb2RlVVJJQ29tcG9uZW50KCJ2ZXJzaW9uc1tdIiksYj1lbmNvZGVVUklDb21wb25lbnQoblt3XSksdS5wdXNoKHErIj0iK2IpO3U9dS5qb2luKCImIik7KGFzeW5jIGZ1bmN0aW9uKCl7cmV0dXJuIGF3YWl0IChhd2FpdCBmZXRjaChhaV9hamF4X3VybCx7bWV0aG9kOiJQT1NUIixoZWFkZXJzOnsiQ29udGVudC1UeXBlIjoiYXBwbGljYXRpb24veC13d3ctZm9ybS11cmxlbmNvZGVkOyBjaGFyc2V0PVVURi04In0sCmJvZHk6dX0pKS50ZXh0KCl9KSgpLnRoZW4oZT0+e2U9ZS50cmltKCk7aWYoIiIhPWUmJihlPUpTT04ucGFyc2UoZSksInVuZGVmaW5lZCIhPXR5cGVvZiBlWyIjIl0pKXthaV9jb29raWU9YWlfbG9hZF9jb29raWUoKTt2YXIgcD1NYXRoLnJvdW5kKChuZXcgRGF0ZSkuZ2V0VGltZSgpLzFFMykrNDMyMDAsdj1bXSx6O2Zvcih6IGluIGVbIiMiXSlhaV9jb29raWUuaGFzT3duUHJvcGVydHkoZVsiIyJdW3pdKSYmYWlfY29va2llW2VbIiMiXVt6XV0uaGFzT3duUHJvcGVydHkoIngiKXx8YWlfc2V0X2Nvb2tpZShlWyIjIl1bel0sIngiLHApO3NldFRpbWVvdXQoZnVuY3Rpb24oKXtmb3Iodz0wO3c8di5sZW5ndGg7Kyt3KWRvY3VtZW50LnF1ZXJ5U2VsZWN0b3JBbGwoJ3NwYW5bZGF0YS1haS1ibG9jaz0iJyt2W3ddKyciXScpLmZvckVhY2goKEMsQSk9PnsoQz1DLmNsb3Nlc3QoImRpdltkYXRhLWFpXSIpKSYmQy5yZW1vdmUoKX0pfSw1MCl9fSl9aWYoYWlfZXh0ZXJuYWxfdHJhY2tpbmcmJgoidW5kZWZpbmVkIj09PXR5cGVvZiBhaV9leHRlcm5hbF90cmFja2luZ19ub19pbXByZXNzaW9ucylmb3IodD0wO3Q8bS5sZW5ndGg7dCsrKTAhPW1bdF0mJmwoImltcHJlc3Npb24iLG1bdF0sZlt0XSxhW3RdLG5bdF0sZFt0XSwhMCl9fTt3aW5kb3cuYWRkRXZlbnRMaXN0ZW5lcigibG9hZCIsYj0+eyJ1bmRlZmluZWQiPT10eXBlb2YgYWlfZGVsYXlfdHJhY2tpbmcmJihhaV9kZWxheV90cmFja2luZz0wKTtzZXRUaW1lb3V0KEIsYWlfZGVsYXlfdHJhY2tpbmcrMTQwMCk7c2V0VGltZW91dChhaV9pbnN0YWxsX2NsaWNrX3RyYWNrZXJzLGFpX2RlbGF5X3RyYWNraW5nKzE1MDApfSl9KX07CmFpX3J1bl8xMzkzNjg2MzgwMjYgPSBmdW5jdGlvbigpewphaV9kb2N1bWVudF93cml0ZT1kb2N1bWVudC53cml0ZTtkb2N1bWVudC53cml0ZT1mdW5jdGlvbihhKXsiaW50ZXJhY3RpdmUiPT1kb2N1bWVudC5yZWFkeVN0YXRlPyhjb25zb2xlLmVycm9yKCJkb2N1bWVudC53cml0ZSBjYWxsZWQgYWZ0ZXIgcGFnZSBsb2FkOiAiLGEpLCJ1bmRlZmluZWQiIT10eXBlb2YgYWlfanNfZXJyb3JzJiZhaV9qc19lcnJvcnMucHVzaChbImRvY3VtZW50LndyaXRlIGNhbGxlZCBhZnRlciBwYWdlIGxvYWQiLGEsMF0pKTphaV9kb2N1bWVudF93cml0ZS5jYWxsKGRvY3VtZW50LGEpfTsNCmFpX2luc2VydF92aWV3cG9ydF9jb2RlICgnYWktaW5zZXJ0LTUtMzQ5MTE1MjMnKTsKYWlfaW5zZXJ0X3ZpZXdwb3J0X2NvZGUgKCdhaS1pbnNlcnQtNC02ODM4NjcyNicpOwphaV9pbnNlcnRfdmlld3BvcnRfY29kZSAoJ2FpLWluc2VydC00LTk4NzI4NDgxJyk7Cn07CmlmIChkb2N1bWVudC5yZWFkeVN0YXRlID09PSAnY29tcGxldGUnIHx8IChkb2N1bWVudC5yZWFkeVN0YXRlICE9PSAnbG9hZGluZycgJiYgIWRvY3VtZW50LmRvY3VtZW50RWxlbWVudC5kb1Njcm9sbCkpIGFpX3J1bl8xMzkzNjg2MzgwMjYgKCk7IGVsc2UgZG9jdW1lbnQuYWRkRXZlbnRMaXN0ZW5lciAoJ0RPTUNvbnRlbnRMb2FkZWQnLCBhaV9ydW5fMTM5MzY4NjM4MDI2KTsKYWlfanNfY29kZSA9IHRydWU7Cg==' ></script> </body> </html> <!-- This website is like a Rocket, isn't it? Performance optimized by WP Rocket. Learn more: https://wp-rocket.me -->