CV (Curriculum Vitae), or known as a resume in the US and Canada, is a conclusion of your education, skills and experience history, which is often the first stage in getting yourself noticed by potential employers. That’s why we created this easy-to-follow Adobe Illustrator tutorial for you!
Your resume is the starting point or end of your application, so it can be a little daunting, because not only the qualified information is required, but also the beautiful design is important. It can make the employer see the difference between your resume and others. The excellent CV can increase the chances of being selected for a position. There are many other tools you can use to create your resume, but we prefer to do it in AI.
Reading: How to create a resume on adobe illustrator
![]() Download the finished AI Download files for this tutorial here.
Download the finished AI Download files for this tutorial here.

01. Adobe Illustrator Tutorial – Prepare your information
Before you begin, it’s a good idea to prepare all of your information so you know how to present your priority. The information that a CV should contain is:
- Full Name
- Birthday
- Contact Information
- Education
- Key skills related to the role you want to be
- Your experience, awards, the activity you participated in
- Hobby
After you have prepared your information, you can start with a rough sketch. Don’t know where to start? There are many websites to inspire you, e.g. B. Pinterest and Behance.
However, a good resume should tell the employer exactly about you in a few sentences, if you have an attractive design, it will easily remind them of you.
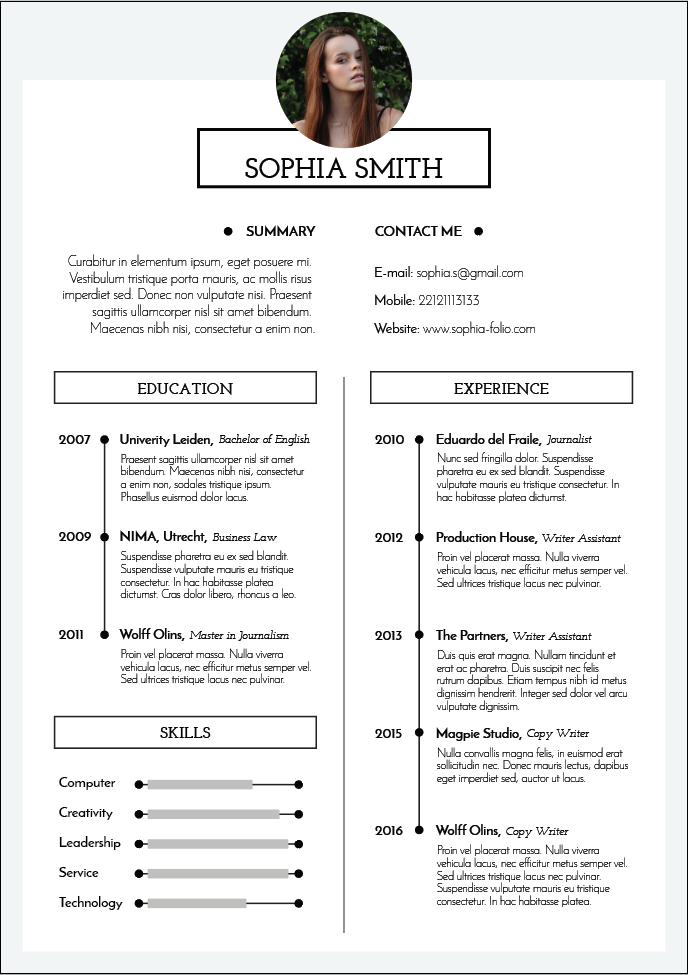
A minimalist aesthetic is totally refreshing these days, and that’s a good thing because it’s easy to craft the content to only place the important information, which then leaves a lot of white space to make it clear and easy to read . This is a minimalist style resume tutorial, here is a rough sketch.

Next you should choose the fonts to use in your resume, they should be easy to read and don’t use more than 3 fonts on one page because it makes your resume look messy. You can choose a creative beautiful one for the headline, a simple one for the subheader, and an easy-to-read one for the content.
02. Adobe Illustrator Tutorial – Pick the Perfect Font Pair
Before we begin, if you have no idea which font to use, you need to choose the font that suits the nature of your information and the tone of your resume , these are the font pairing tools at your disposal, and it’s free!
Font Pair is an essential tool for designers to help you find the perfect font pairing. There are many free Google fonts available, and Femmebot provides inspiration for using the Google font library.
In this tutorial, I chose Josefin Slab for a headline and Josefin Sans for the body.
03. Adobe Illustrator Tutorial – Create the Template
Open Adobe Illustrator program and create a new document, prepare your information and set as follows:
- Name: You can put whatever you like or name it later when you save the file
- Profile: Print
- Size : A4 (standard size for printing)
- Orientation: vertical (you can use horizontal. It depends on your design)
- Color mode: CMYK (the color system for printing)
- Halftone effects: 300 ppi (the highest quality for printing)
- Then click [OK]

You can customize this template to create your own resume.

04. Adobe Illustrator Tutorial – Applying a Color Theme
To create a color theme, use the Rectangle Tool (M)> drag your mouse to draw a rectangle.

Repeat the same step, then create a smaller one with a white background. You can also use the alignment tool to align the template.


Rename the background layer to “BG”, then create a new layer and name it “content . Lock the BG layer to disable it. This layer behaves correctly and cannot be selected when you move other layers.

05. Adobe Illustrator Tutorial – Place your Profile Picture
Add some personality to your resume by adding a profile picture Click or press Ellipse Tool (L) to create the circle while holding the [ Hold Shift] > Press [ Ctrl/Cmd+Shift+P] to place your image inside the circle Select your image and drag it around to place it.

Right click on your image > Arrange > Send Backward

See also: Get started with WordPress
Then move your image behind the circle, select two of them by clicking on one image and press [Shift] and click on the circle > right click > create clipping mask.
 You get your picture in circle shape. If you want to move or resize an image without resizing the circle, double click and you will see the tab above appear.

You are now in group mode. Click on an image to move or resize it. Double-click an empty space to exit group mode.
[text-blocks id=”59336″]
06. Adobe Illustrator Tutorial – Add your information and style your text
By typing in your name and information, press T (Text Tool) and click on any block of text to start adding your information to start.

For more information, you can split it into two columns. Create a horizontal line as a guide by holding the Line Segment Tool > [Shift]-KeyDrag to create the longer line, then align everything in the middle
 Now create a timeline to show the work experience.

Enter your first name, company, role, year of entry and a few details as in the image.
To make repositioning easier, group all objects by selecting all objects > Press [ctrl/cmd + G] or right click > Click on group.
To copy this group, click left-click on the object > hold [Alt/Option] >drag the mouse down and then hold [Shift] to snap to the first one.

As you can see, the spacing is not the same between object groups, so we select 5 groups and click Vertical Distribute Center.
Next, ungroup, i By right-clicking the object and choosing Ungroup, you change your information.

07. Adobe Illustrator Tutorial – Create the timeline
Then create a line and a small circle as the point in time by using the Ellipse Tool (L) > [Shift] pressed hold while dragging the mouse. Sophia changed her work 5 times, so create 5 points in time by copying them just like the work details. You will get other circles that look similar. Do this three more times.


To center all points on the line, drag all points and lines to select them and click on the line. You’ll notice the line looks thicker. This means that the line is a main object that other objects snap to.

Click “Align Center”.

To make each point equidistant, move the last point to the bottom of the line , select all points and change the alignment to : Align to Selection and click the Vertical Distribution Center button.


Then group them and place them with the content.
See also: How to make a logo in Illustrator

As with the work experience, I use the timeline to present the content for education.

Next topic is skills. I represent my skills and present them using the power tube. To make it look harmonious I use the timeline shape to create the tube.

Then use the rectangle tool to create the power tube. You canthe tube with the same method I told you and resize it later.

08. Adobe Illustrator Tutorial – Add your contact information
The contact details should be easy to see as they are an important part, so it’s better to put them at the top of the page. Resize the summary text box by half, then enter contact information.

09. Adobe Illustrator Tutorial – Configure something more stylish
If you don’t like the compost, you can move and change the theme as often as you like. Starting with creating the frame for each topic to make it stand out.
 To create the frame use the Rectangle Tool to draw it and you can customize how you want the stroke to look by changing the color, the thickness increase and change shape. For me, my stroke is black, the thickness is 0.75pt and I use the basic shape.

10. Adobe Illustrator Tutorial – Change the background color
Don’t you think the color looks too faded? I want to change the background color. To make it look harmonious, I use the color from the profile picture. Click Unlock BG Layer and Background. Then use the eyedropper to select the color from the image. Change it until you like it. I choose the color of her skin.

I am also changing the timeline spot and skill power tube.

Also, the heading is not pronounced, so I also set the background color of the heading.

And that’s it! You’re done
Now you have your own CV. You can save it as a PDF for printing or share it online directly.


Basically, the style of the CV should match your field of work. This tutorial is an example for people who want to work in a creative field, so their design could have an informal style. Here is a sample resume for business job application.

For a specific position, you can create your CV that will present your skills more clearly.

If you like this tutorial or you want to create something a little more about Adobe Illustrator but you felt intimidated or unsure of where to start. You are always welcome to join our Adobe Illustrator course!
VIEW COURSE DETAILS
[text-blocks id=”course-ad -online-marketing-article-3″]
See also: How to Create HTML Email and Send it with the Mac Mail App
.