Chatbots have been experiencing a renaissance since the pandemic brought them back into the limelight. Therefore, this article will not only show you how to create a chatbot, but also how to do it quickly, efficiently and without complicating established workflows.
Every day buzzes the world a little louder from the hype of conversational marketing. For a number of years, tech and business publications alike have been challenging brands to build a chatbot to bring their communications up to the personalization and immediacy standards of today’s audience.
Reading: How to create a bot for my company website
With the global pandemic locking most of the world home, the call for smooth customer-business communication is even louder and more urgent.
Sure, but it’s easier No sooner said than done… right?
A few years ago, the answer to the question of how to build a chatbot was riddled with software development terminology and tons of code. Therefore, the task of creating a chatbot fell heavily on the shoulders of the few experienced bot developers.
But times have changed.
Thanks to the rise of no-code Platforms, chatbot development became more intuitive and consequently more accessible to a wider range of brands and businesses. If you’re not convinced, you can always check out some cool chatbot examples made with Landbot for yourself!
Not only can you make a chatbot these days, you can do this too in just a few minutes. Better yet, for more than one channel!
No kidding.
We don’t joke about bots!
What is a chatbot?
A chatbot is conversational software that allows companies to communicate with their audience instantly and in a personalized way without having to limit automation – imagine , get user input in real time ! Most people associate intelligent chatbots with AI. However, AI is not strictly required to create an intelligent, functional bot.
There are two main types of chatbots:
- Natural Language Processing (NLP) chatbots (aka artificial intelligence). chatbots)
- Rule-based bots (choose-your-own-adventure-type)
- Conversational apps (rich UI elements + may combine NLP with rule-based elements)
What kind of chatbot are you going to learn in this article?
At the moment you might be wondering what kind of chatbot are you going to learn here. The answer is simple . The tutorial will show you how to create the rules-based chatbot for a website with some basic conversational app elements like these types of bots:
- Provides the most consistent and reliable experiences/results
- Are quick to create and easy to control
- Are applicable in most business use cases
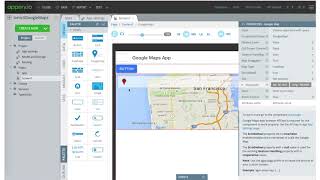
Here’s a little taste of the end result:
< However, if you are determined to create an NLP chatbot, you can also do it without coding by using the Landbot Integration Dialogflow (API.AI). Just click the link to go to the tutorial! (NLP driven by machine learning may be a better choice if you're trying to build an assistant for WhatsApp, text only, or any other messaging platform with a more limited user interface.)
Ready? Let’s learn how to create a chatbot quickly and without coding.
How do you create a chatbot for my website?
This bot won’t cost you an arm or a leg It requires hiring a developer to get this done. With this chatbot tutorial, anyone, be it a marketer, sales rep, or customer service rep, can create a sophisticated conversational assistant worthy of representing your brand.
Landbot makes creating one Chatbots simple, pretty and (without a hint of exaggeration or bias) funny!
Let me show you…
1. Set up your Chatbot Builder account (quick and free) and get started
Before anything else, you need to create an account with Landbot. The Signing up is free and requires no credit card information.
To get an idea of how the builder works, watch this video:
For the purposes of this tutorial, I chose to build a website chatbot, although the builder is the same whichever option you choose.
NOTE: Interested more in WhatsApp solution for your business? If you decide to create a WhatsApp bot, you won’t be able to use all the features of Landbot because this messaging service has a limited interface. Visit our guide on designing WhatsApp dialogs for rule-based chatbots to learn how to go about it.
After channel selection, you land in Landbot’s chatbot template library, which comes with ready-made, use-case-specific templates is filled… But to make this tutorial at least a little bit more challenging, we’re going to start building a chatbot from scratch. 😉
3.Tweak the welcome message
Creating a chatbot from scratch with Landbot is extremely easy. It’s all about optimizing the conversation blocks of your choice.
The first message to personalize is the welcome message, which is a fairly flexible block that gives you this allows embed text messages, media messages like images, gifs, videos or files and buttons.
In this bot building exercise, we will create a subscription bot for a fictional online gaming magazine “GameWorld.”
So I decided to personalize my welcome block like this:
My bot introduces itself and the user can start the chatbot conversation by clicking the “Hi” button clicks Given that this is a welcome sequence, keeping it simple with a single reply helps boost engagement.
4. Add your first sequence
To add a new sequence to your welcome message, simply drag the green arrow from a given reply.
NOTE : Each button option sequence ends with a purple “STANDARD” button. This button is only visible to you in the chatbot builder. If there are multiple buttons to choose from, but the flow stays the same regardless of that choice, simply drag an arrow from the default option to create the next sequence (rather than dragging one from each individual response).
Since our welcome message only has a button choice (so not really a choice 😁), it doesn’t matter if you drag an arrow from the “Hi” button or by default. After you draw an arrow, you’ll see a menu of questions and integration blocks.
Choose “Simple Message” as your new block type and just type it in to edit your message . And this is your first sequence!
5. Ask a Question (Name)
The key to creating a simple interactive chatbot is real-time personalization. It would be a shame if you didn’t take advantage of this right at the start by asking for the user’s name, for example.
As you may have noticed, Landbot Builder offers a wide range of question types. This is intended to speed up bot setup as they come pre-formatted for the data they are designed to collect. (e.g. the URL question only accepts an answer with a correct URL format and the phone number question only accepts digits).
So to add the name block to the bot flow, drag an arrow from the last block and select “NAME”.
As the name block visualizes, its side settings window also appears on the left:
Here you can personalize the default question text “What’s your name?” with something that better fits the tone of your bot/brand.
The benefit of using the name block is that it comes with the preset @name variable, so You don’t have to waste precious seconds setting it up yourself.
NOTE: In the Landbot chatbot app, variables in the format “@” + “variable name” are used for categorization and store data collected by the bot. You can use this data for personalization within the conversation flow or export it to an external database. You can use default variables or create your own.
By storing the username under the variable, you can personalize the interaction in the next step:
6. Ask Questions (Button Chooser)
As you may have noticed in the image above, our next step is to set up a first real button chooser. If you haven’t already done so, drag an arrow from the name block and select “BUTTONS”.
The button block works the same as the welcome/message block.
You can break your bot’s speech into different speech bubbles or add visual media before presenting a button choice to the user.
See also: How to create a family blog and family blogging safety tips
We couldn’t resist adding another GIF!
p>
The key point this time is that the buttons take our prospects down different paths:
- Learn more about GameWorld
- Subscribe
If the user is not yet ready to register, they are free to learn more about the platform and clear any doubts they may have. To split the flow based on the user’s response, drag an arrow from the Learn More About GameWorld button and design the following flow:
We’ve set up another news block, this time with a short video , which we figured would be a more fun way to learn more about the magazine and meet the founders! Still, our main goal is subscription, so after this little introduction we wanted the bot to ask again:
This time the options are driving subscription or just Forehead them. Use the magazine to give them a way out (and not cause any kind of frustration).
If the user decides to go to the magazine, you can just add a special “goodbye” block :
The goodbye block has some advantages.Besides a goodbye message, you can:
- Offer social media share buttons
- Offer option to restart the conversation
- Automatic URL Enable and personalize redirection Redirection message
Thanks to the message, even if the user does not log in, they can check your social accounts or go straight to your website without having to click anything. What if they click subscribe?
In that case, we’ll direct them to the subscription flow…let’s build it!
7. Ask a Question (Email)
Of course, the most important piece of data when you get a subscription is an email address.
So, our first subscription question will be just that be.
Return to our first button (Learn More vs. Subscribe) and drag an arrow from the Subscribe option.
Luckily, the Landbot chatbot app has a dedicated one “E-MAIL” question block that not only contains a preset @email variable but also validates the email format. This means that the bot will only accept the user’s response if the common format ” xxx@xxxx.xx” is met.
After you set up email blocking, drag an arrow from the “Subscribe 🚀” option in the “Learn more” branch of the conversation. This way, whether the user decides to subscribe immediately or after they learned a little more about the magazine through the same subscription funnel.
8.Export data to Google Spreadsheets
Another secret to knowing how to build a chatbot that makes your life easier are Integrations!
So now that we have the most important data, we want to integrate Google Sheets in the bot and in export our database. These types of integrations make a powerful virtual assistant! Set up a table in your Google Drive:
When you’re done, go back to Landbot Chatbot Building Platform,drag a green arrow from the email block and select You “GOOGLE SPREADSHEETS” from the menu:
First you need to connect your Google Drive to Landbot.
Click on “ADD ACCOUNT” and pair the two tools. Next, from a drop-down menu, enter:
- Account (email address) you want to pair your bot with. (If you have paired your Landbot account with more than one account, you will see all previously added accounts in this drop-down list)
- The table you want to send the information to
- The sheet within the spreadsheet to which you want to send the information
Next you will be prompted to choose an action to perform:
- Create new row (export)
- Update existing row (export)
- Retrieve data from the table and bring it into the conversation (import)
Since you are creating a new row for each new subscriber at this point, choose Insert New Row.
After that, all you have to do is associate the column names with the variables you want to store in those columns:
Click SAVE and the integration setup is complete, a real piece of cake !
9. Ask a Question (Buttons with Images)
The Button Block has more to offer! After we get the user’s email address, we want to know more about their preferences in order to be able to offer them a more personalized subscriber experience.
Below is our next question. However, we’d like the button dialing to be a bit more fun to break up the routine. To do this, click on the three dots in the top right corner of the block:
A visual button block editor will appear on the left side of the screen. There you can spice up your button selection questions with rich media:
When you’re done uploading the images, scroll down in the editor and create a variable to store this answer:
Click on “SAVE”. This is what the image button picker can look like in the frontend:
Isn’t interactive chatbot creation fun?
10 . Ask a Question (Picture Choice AKA Carrousel)
Another great question type within the Landbot chatbot development platform is the picture choice block, which allows you to offer picture choice in the form of a carousel instead of buttons.
Draw an arrow from the “Default” button of your last block and choose “PICTURE SELECTION” from the menu.
To set it up, you need to configure the three main fields:
- The question
- Answers (images)
- The variable to store the answer
We decided to use this question type to ask about the type of games the user prefers to play.
Because there are quite a lot of main game types, the carousel seemed like a much better choice since the normal buttons would have taken up the whole screen.Set up the image picker in the same way as for button images – define the description and upload a corresponding image.
Last but not least, don’t forget to update the variable to save user responses in a way that makes them easy to identify:
This is how your effort will be reflected in the frontend:
Who would have thought of learning how to create a custom chatbot ? with a carousel wheel would be so easy?
11. Ask a Question (Multiple Choice)
Our adventure with question variations isn’t quite over yet… The Buttons block hides another key feature, and that’s Multiple Choice for times when where only one choice is possible is not possible. For example, in our magazine subscription bot, we wanted to see what type of content the new subscriber liked best without limiting them to a single answer.
To configure a multiple choice question:
- Create another button block and button responses
- Click on the three dots in the top right corner
- Scroll down in the editor and enable ” Multiple choices!
- Remember to set up the response variable
And that’s it. Your bot can now offer multiple choices to users:
12. Ask a question (open-ended)
Sometimes buttons can’t cover everything and you need to give your users space to freely express their opinions.
To give space for writing and unrestricted user input you can use the “TEXT” question block, which simply offers the user an empty field to fill in.
For example, one of our last subscription questions was “Where did you hear about us?” We wanted to be sure to collect all the answers, so we created a button with an “Other” option and connected it to an open-ended question block to find out what the other means.
Only thing to specify here is is the question and of course the variable, which should be the same as the variable for the main question so that the new open-ended answer overrides “other”. p>
13. Have the user rate the experience
Want Know how you are?
For this, Landbot provides “RATING” and “SCALE” blocks, the two main ingredients in an amazing survey bot.
Drag an arrow from the last Buttons question and sub-question and select the “RATING” block from the menu.
Once again, setup is pretty simple:
- Write your rating questions
- Choose the rating format (number of stars, emo…)
- Create the variable to store the answer
- Equal to
- Not equal to
- Contains
- Greater than
- Less than
- Is set
- Yellow: Email associated with the account
- Green: mailing list to which you want to add the email group
- Pink: within this mailing list (if applicable – in our case the group “Device”)
- Dark blue: @variable where you save the user email
- Light Blue: Other values you want to upload (e.g. name, birthday, etc.)
- Theme Templates: Allow you to choose a theme from already created attractive Landbot templates. These come in handy when you need to get the bot out into the world relatively quickly.
- Colors & Background: give you total control over your bot’s color scheme; Therefore, you can customize it here
- Logo & Avatar: Allow you to change the logo and text that appear in the chat header, as well as customize the bot avatar.
- Fonts: Of course, this is where you customize your bot’s font, which is great, especially if a specific font is part of your branding.
- Intermediate: Well, if you’re lucky enough to know a bit of CSS or have a programmer on board, this is the area where you can make the most important changes – the only limit is your creativity (and your coding skills 🙈)
- Full Page: Let the bot address the user and take up the entire screen
- Popup: Make the bot appear on your website upon landing (or after a specified number of seconds)
- Embed: Show Include your bot as an embedded function in a section of your website.
- Live chat: Have your bot appear as a live chat message in the corner of the user’s screen .
- Copy the code and paste it in the section of any page on your website where you want the bot to work
- Email the embed instructions to your developer
</ul
14. Update Google Spreadsheet with new data
See also: 2 Killer Examples of Successful Health and Fitness E-Commerce Marketing
Remember how we sent the user’s name and email address to our Google Drive? Well, now it’s time to update the rest of the information.
So drag a green arrow from the Default button of the last block and use the Google Sheets integration block again.
The setup here is pretty much the same, except you need to set the action to “Update a row” since we want the bot to update a previously created row.
If you choose this option, the builder will prompt you to select a “reference column” to find the row that needs to be updated. Since a name isn’t very reliable as a reference, we’ll set our reference column to “email” and associate it with the email variable.
After the reference column, specify the fields you’re updating by selecting Column and the variable corresponding to that column as before.
This means the bot will go into the sheet, check the “Email” column, find a match for the user and fill in the rest of the information.
15. Create segmented mailing lists on Mailchimp
When building the bot, make sure that the bot does everything in its power to make your life easier.
For example, if you Collect Emails The bot exports these emails and other user data directly to Mailchimp (or another mailing service that uses Zapier).
We didn’t want our GameWorld subscription bot to collect the data exported only to Mailchimp, but also to the right group within the mailing list to simplify the segmentation process.
So before we integrate Mailchimp into the bot, let’s set up a few conditional blocks a. With these blocks you can set up conversational logic mechanisms in the style of “IF THIS THEN THAT”.
In the Landbot chatbot app you can use the following conditions:
Since we wanted the bot to segment the subscribers based on their gaming device, we set up the condition as follows:
We set up the repeatedly for each of the possible devices.
If the bot believes the condition is correct, it forwards the information to Mailchimp via the green output. If not, it follows to check the next condition and the next with the pink colored output.Now the Mailchimp integration!
Drag an arrow from the first condition and click “MAILCHIMP” in the menu. Pair your account with Landbot.
And set up the following according to the color codes in the image::
This way you can instantly and just segment into the right group. Repeat the setup for each group and you’re done!
NOTE: This Conversation Assistant only uses the Google Spreadsheets and Mailchimp integrations. However, Landbot Builder offers a variety of similar, easy-to-setup integrations to power up your bots, including Slack and email notifications, Stripe, Calendly, Airtable, Zoom, Salesforce, and Zapier. strong> that connects to hundreds of other apps!
16. How to test your chatbot?
During the step-by-step process of creating your chatbot, you can previewthe user experience and quality of connections at any time.
To do this, click on the “PREVIEW” button in the top right corner of the interface.
From here you can directly interact with the new bot you just created, as if you were a real customer your website. Just follow the different response strings and queries to see how you fared during the build process and identify any errors.
You can even test the bot in a mobile view!
We just created a working conversation subscription in less than half an hour! The “hard” part is behind us 😉
17. Customize your chatbot branding for a better experience
Ok, so we created a chatbot in minutes.
Now what?
Well, the next step in perfecting your homemade conversational chatbot is to give it a consistent LOOK for a better customer experience.
Since you went to all the trouble of creating a bot from scratch, it better suits your website branding and color scheme!
Landbot gives you many options to let your brand personality shine through .
To access design elements, click “Design” in the top menu.
It will open up a whole new world of options for you! On the left you will see a large list of customization features:
With just a few clicks, you can choose a theme you like, customize the brand, message and logo in the header, and customize your avatar.
NOTE: Be sure to click APPLY to save the changes in each design section. And when you are satisfied, remember to press SAVE in the upper right corner to update the bot.
18. How to add a chatbot on your website? (or create a bot landing page!)
Now that our Landbot has had the necessary “brand lift” makeover, we’re ready to introduce it to the world and start accumulating subscribers and leads begin. Sorry for the repetition, but (once again) the Landbot chatbot platform makes this process super easy!
Go back to the Landbot app. Click SHARE in the navigation bar at the top. Here you will find four different embed options:
Clicking on any of the icons will bring you a slightly different set of easy-to-understand instructions.
When you are ready to place your new Landbot on your website, you have two options:
On, on the other hand, if you just want to create a temporary landing page and don’t care too much about the URL, select “Share with a Link” from the left-hand menu . Here’s an auto-generated Landbot chatbot URL that you can link anywhere on your website, in an email, or on social media.
Note: Do you have a WordPress website? Then be sure to check out our tailor-made tutorial on how to install your custom chatbot for your WordPress site!
Have you learned how to create a chatbot?
Well, we hope so es !
Perhaps you imagined the art of creating interactive chatbots to be much more difficult. But that’s the trick. Efficient doesn’t always have to be complicated.
What now? Once you know how to create a custom chatbot, one thing is for sure, your life will never be the same.
Every time you create a form, generate leads, answer FAQs, rate prospects, design Whether you want to create surveys, post resumes, or empower your customer service team, the thrill of creating a bot will take over.
That’s not a bad thing!
Conversational assistants are extremely popular and effective marketing tool… In fact, the benefits of chatbots are endless. And what’s even better, they are no longer out of your reach!
With Landbot, for example, you can build and create and a series of bots in a very short time a relatively low price. The visual interface allows you to master even “coder” skills like integrating webhooks. And while there are multiple platforms, few offer such an intuitive interface that serves multiple channels, including the Web as well as messaging platforms like WhatsApp and Facebook Messenger.
Simple chatbots shouldn’t be difficult to build or control.
No-code chatbot tools like Landbot make this possible .
See also: Making a dependent (cascading) drop down list in Excel
.