There are many reasons you might consider starting a WordPress blog. However, it’s not the decision to start blogging that upsets many people; it’s all about figuring out exactly how.
The good news is that you don’t need to be a WordPress expert or particularly tech-savvy to start a blog. In fact, WordPress makes it relatively straightforward, quick and easy. By following a few basic steps, you can have your blog up and running in a matter of hours.
Reading: How to create a blog with wordpress step by step
In this post, we explain the benefits of using WordPress for blogging. Then we’ll guide you through the first steps in 10 easy steps. We also answer some common questions you may have. Let’s get to work!
In this article 🔭
- Why you should use WordPress for blogging
- What you need to build a WordPress How to start a blog
- How to start a WordPress blog (in 10 steps)
- Frequently asked questions about starting a WordPress blog
- What’s next?
- Wrapping Top
Why you should blog with WordPress 🤔
WordPress is one of the most popular content management systems ( CMS) available today. In fact, WordPress powers a third of the entire internet.
Also, almost 42 million new posts are published through the platform every month. In addition, the latest version has been downloaded almost 30 million times so far (trend). These are just a few stats that speak to the ease of use and versatility of WordPress.
You can build all kinds of websites with WordPress, but it’s particularly good for blogs. Among the many benefits of using WordPress for blogging is its user-friendly interface. The backend has an intuitive setup that is straightforward and easy to navigate.
This platform also offers a responsive web design and easy integration for social media and content syndication. It’s also inexpensive, flexible and Search Engine Optimization (SEO) ready. If you need help starting or running your blog, there is a large support community that is always available and ready to help.
Finally, WordPress is a great tool for people at all technical levels and in many industries. It can be used to build anything from enterprise-level websites to simple personal blogs, and you don’t need to have any development or design experience.
What you need to start a WordPress blog 🧰
Once you’ve decided that WordPress is the platform you want to use, the next step is to learn how to start a WordPress blog. First, it helps to know what things you need to complete the process.
Two of the most important items you need are a domain name and a hosting plan. The domain name is the main URL for your blog (e.g. mywordpressblog.com). This is how people get to your website. Web hosting is what powers your WordPress blog and makes it available to everyone online.
As we’ve discussed in the past, there are many different hosting providers to choose from, and some of them are important Factors to consider when making your selection. If you spend time learning about the options, you’ll be better able to choose the plan that’s right for you.
If you’re building a starter site, you probably don’t need a solid hosting plan . “Shared hosting” is inexpensive (often less than $5 per month) and a great way to get started. If your blog grows later in size, scale and scope, you can always upgrade your hosting plan if needed.
Before you start, it’s also helpful to collect Resources you can refer to if you need assistance. For example, if you’re unfamiliar with using WordPress, both the platform’s website and your hosting provider’s website are important resources to have on hand when trying to navigate the setup process.
How to Start a WordPress Blogging (In 10 Steps) 💻
Now that you know a little more about the benefits of using WordPress for blogging and what you need to get started, here is it’s time to start the process. Let’s take a look at how to start a WordPress blog by following these ten steps:
- Choose a hosting plan
- Choose and register a domain name
- Install WordPress
- Access your WordPress admin dashboard
- Choose a blog title
- Add a logo and favicon
- Install and customize your WordPress theme
- Add a header and background image
- Customize your blog with plugins
- Write your first blog post
Step 1: Choose a hosting plan
Um To create a WordPress blog, you can use either WordPress.com or WordPress.org. We recommend WordPress.org, also known as self-hosted WordPress:
This open-source platform offers many more customization options and Features , including the option to use plugins. WordPress.com, on the other hand, gives you fewer customization options, less control over your site and domain, and overall less flexibility.
If you choose self-hosted WordPress, you need to choose a web host. Your hosting provider stores your website’s files on their server, allowing users to visit your pages with their web browsers. web hosts do more than that – they can also help with everything from maintaining your blog’s security and speed to managing updates and backups.
Although there are a variety of hosting types, we recommend starting with Managed WordPress hos ting A managed host handles many of the technical tasks for you, such as B. making updates and monitoring att acks so you can focus on the content of your blog. Fortunately, there are many great companies to choose from.
Some of the most popular and reliable options include:
- SiteGround*
- Squeezable*
- Kinsta*
- Liquid Web*
- WP Engine*
If you’re deciding between plans and Providers should not only consider the costs, but also the additional functions. For example, many hosting plans include a free domain name, FTP (File Transfer Protocol) access, and email accounts that use your website’s domain. We also recommend considering maintenance packages, which will do almost all of the work for you to keep your website running.
Step 2: Choose and register a domain name
Your The domain name is crucial because people will visit your website with it. It can help improve your branding and even boost your website’s SEO.
When deciding on a domain name, try to keep it as simple as possible . Ideally, it is descriptive and representative of your brand. If you are creating a personal blog, consider using your own name. Alternatively, you can choose a name that reflects the blog’s focus (e.g. “sarahscookingtips.com”).
📛 A strong domain name for your blog is short, relevant and memorable. #WordPress Click To Tweet
When you sign up for a hosting plan, you may be prompted to register a domain through the same company. However, you can also use an existing domain. It is not necessary to register your domain with the same company you use for hosting, although this is an option.
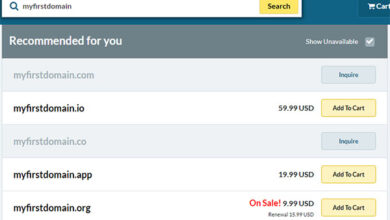
If you want to look elsewhere for domains, there is there many of “registrars” who can do the job. For example, you could register a domain through GoDaddy or Bluehost but use SiteGround for hosting. Domain.com is another popular option.
Regardless of which registrar you choose, the process is largely the same. You start by searching for the domain name you want. The registrar will let you know if it’s available or not and how much it costs. Usually, if the name you tried is already taken, you’ll be presented with other available versions and variations:

Once you’ve found a domain you like, you can add it to your shopping cart. You will also likely be offered the option to add a Privacy and Protection Plan. While not mandatory, it is an add-on worth considering.
Then you can simply follow the steps to complete the purchase. Then look in your inbox for the email address you used to register your domain. There will likely be instructions for the next step and helpful links you can use to ensure the domain is connected to your site.
Step 3: Install WordPress
Once you have a hosting account and a registered domain, you are ready to create your WordPress blog. The easiest way to install WordPress is through your web host.
Many hosting providers offer one-click installation options, which simplifies the process. For this demonstration, we’ll use SiteGround to illustrate what the setup might look like. However, the process is similar on most platforms.
If you use SiteGround to sign in to your hosting account, you can click Set up site and then click Start new website. Then under Select Application, click the Select button under WordPress:
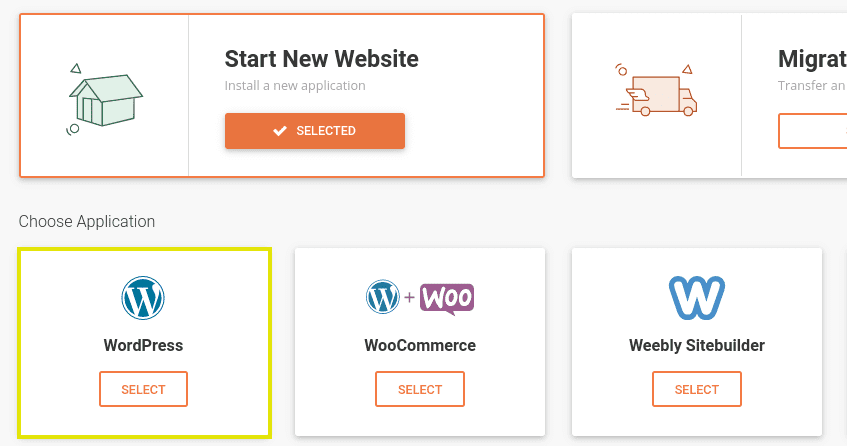
After you choose Select, you will be prompted to Create credentials.If you registered your domain with a company other than your web host, you will likely need to point the domain to the hosting provider as well. If you need further guidance on this process, the Website Wizard provides a helpful guide.
It will take only a minute or two to create your new website. Once it’s done, you’ll have the option to access your WordPress admin dashboard.
Note that this isn’t the only way to install WordPress. If your hosting provider doesn’t offer a simple, one-click setup, you can always install WordPress manually – a process that takes only about five minutes.
Step 4: Go for it to your WordPress admin dashboard
At this point, if you are using SiteGround, you will be redirected to the SiteGround setup wizard. It will generate a series of prompts that you can follow to view the dashboard and learn more about the setup process. Instead, you can go directly to your WordPress Admin Dashboard by clicking the exit button at the bottom of the screen.
In some cases, you may need to access your dashboard by You first go through the login screen. Usually this is located at your domain URL with /admin or /wp-login.php appended.
In any case, enter your username and password here. We recommend reading our WordPress login screen guide to learn everything you need to know about accessing, securing, and customizing your login page.
Once you enter your credentials entered, you will be redirected to the admin dashboard:

The left navigation menu contains the main sections you need to set up, modify, and update your WordPress blog. Some of the most important tabs are Pages, Posts, and Settings.
At this point, it’s a good idea to get some important settings configurations out of the way. For example, we recommend choosing a permalink structure for your blog. You can do this by going to Settings > Permalinks.
See also: Blog
It is also highly recommended to ensure that your blog is visible to search engines. If for some reason you don’t want search engines to index your site, you can prevent this by going to Settings > Reading and ticking the appropriate box next to Search Engine Visibility.
Step 5: Choose a Blog Title
Now it’s time to choose a title for your website. This is the name of your blog and will generally appear at the top of every page. You can also choose a slogan for your blog, although it’s not required. You can always go back and change both if needed.
The title you choose for your WordPress site is entirely dependent on the type of blog you are creating. For example, you can opt for a “brand name” or just use your first and last name. As a general rule, it’s best to choose a short, memorable, and related name to your website’s domain.
Then you can use the tagline to create a quick to provide a summary of what your blog is about. This is also an opportunity to grab readers’ attention and demonstrate creativity:

By default, WordPress sets the title of a new page to “My WordPress” and includes the basic tagline “Just another WordPress site”. To change the blog title and tagline from the admin dashboard, navigate to Settings > General:

You can replace the auto-generated text in the Site Title and Tagline fields. When you’re done, click the Save Changes button at the bottom of the page. Exactly how the title and tagline are displayed on your WordPress blog depends on the theme you choose (more on that in a moment).
Step 6: Add a logo and add a favicon
Next it’s time to add some branding elements to your website. The “favicon”, also known as the “website icon,” is the tiny image that appears in the browser tab next to the website’s title. Many brands use their logos as favicons.
Adding a custom favicon can help increase brand awareness and make your blog appear more professional. It also makes it easier for users to recognize your website, especially when they have multiple tabs open. On mobile devices, favicons are also used as application icons. The recommended size for favicons is 512 x 512 pixels.
Tochange the favicon on your WordPress blog, go to Appearance > Customize > Website Identity:

You’ll find that this is the same page you can go to if you want to upload a logo, which is also a good idea. You can easily use the same image as your logo and favicon. For more detailed instructions on adding both elements, see the WordPress guide to creating and using favicons.
Step 7: Install and customize your WordPress theme
If it’s When designing the look of your blog, your theme is one of the most important elements. A theme is an add-on that you can install on your WordPress site. It greatly affects the look and feel of your blog, and in some cases even affects the navigation.
The default look and feel of your WordPress blog is going to be a bit boring as your website will almost always start with a simple, default theme Installed. Luckily, you can choose from numerous themes to make your blog more aesthetically pleasing and customize its look to suit your branding and niche.
To change your theme strong> strong>, in your WordPress dashboard you can navigate to Appearance > Themes > Add New:

You can browse thousands of free WordPress themes on this page. You can also use the sorting and filtering features to search for topics based on popularity, industry, layout, etc.
You can also click the Preview button to get a better idea of how the topic works would check your blog. Once you find a theme you like, just click the Install button and then click Activate:

Remember that you can further customize the theme after installation and activation. This includes changing the colors and typography. You can do this by going to Appearance > Customize. Next, let’s look at some of the settings you can change there.
First, though, it’s important to note that there are premium themes available alongside free WordPress themes. These can come with more features and special support, and often cost between $30 and $70. If you think you want a premium theme for your blog, the ThemeForest directory is a good place to start.
Step 8: Add a header and background image
One way Customize your WordPress blog and improve its appearance by adding a header and background image. A header image is sometimes referred to as a “hero image”. They are popular on certain types of image-heavy sites, such as B. Photoblogs.
Not all WordPress themes allow you to add a header image. However, if your theme includes this option, you can find it by going to Appearance > Header. From there you can upload the image of your choice. Note that it is important to keep the image dimensions and aspect ratios recommended by the theme developer:

If you want to spice up the WordPress theme you are using, you can also add a background image. You can do this by going to Appearance > Customize. The Background Image section is on the left:

Once you’ve uploaded an image, you can crop it to the appropriate dimensions as needed. It’s important to choose a high quality image that translates to all screen sizes to make your site look good on both desktop and mobile.
To a To preview how your image will appear on different devices, you can toggle the device icons located at the bottom of the Wallpaper page. When you’re done, click the “Save & Publish” button in the top-right corner.
While you’re here, you might want to try the other customization options available. What you can change and how many choices you have depends on your theme. If in doubt, visit the theme developer’s website for documentation and tutorials that explain how to personalize the look of your blog.
Step 9: Customize your blog with plugins
One of the benefits of using WordPress for blogging is the thousands of plugins that come with it To be available. WordPress plugins can help improve both the design and functionality of your blog. They are add-ons that you install on your site, similar to themes, but they focus on adding new functionality rather than changing the look or layout of your site.
🔌 Plugins are the best way to add new flair to your blog add new features. easy and cheap. #WordPress Click To Tweet
Although the specific plugins you add will largely depend on the nature of your blog and the features you want, there are a handful that we recommend for all websites. For example, security plugins like Jetpack and Sucuri can help protect your blog and notify you if there are vulnerabilities or suspicious activity.
Another plug -in we recommend Use Yoast SEO for your WordPress blog:

This plugin makes optimizing your blog content for search engines much easier. It adds a section at the bottom of your posts that includes recommendations on how to optimize the content so that it adheres to SEO best practices:

To search for and install plugins on your WordPress blog, you have two options. First, go to Plugins > Add New in your WordPress dashboard:

You can search for plugins here or click the Upload Plugin button to install one that you have already downloaded to your computer. You can also browse and download plugins directly from the WordPress plugin.
Similar to themes, there are also thousands of premium plugins available in directories like CodeCanyon are available. Luckily, there are many plugins in both a free and premium form. This means you can try the free version first and upgrade to the paid version if you decide you need additional features.
Step 10: Write your first blog post
Now that you’ve got your WordPress blog set up and customized to your liking, you can move on to the fun part: using WordPress for blogging! To write your first blog post, click the Posts menu item in the left menu of your WordPress dashboard, followed by Add New:

You can add a blog post title and include different “blocks” for different types of content. For example, there are dedicated content blocks for text, images, headings, lists, etc.
To the right are options for assigning categories and tags to your blog post. You can also change the URL slug here. If you want to save your changes, you can click the Save Draft button at the top right. You can also preview the post to see what it will look like:
See also: How to Design a Newsletter in Word: Top Tips for Success

Once you are happy with the post, you can click the publish button to publish it to your blog. If you want to schedule it for a later time, you can select the Immediately link next to Publish, and then select a date and time.
Finally, it’s a good idea to use the default “Hello world! “ post that comes with a basic WordPress install. To do this, go to Posts > All Posts and then click the Trash link under the post title.
That’s it! At this point, you are ready to start creating and publishing content on your new WordPress blog.
FAQ for starting a WordPress blog 🙋
If you are new to WordPress, you probably have many questions beyond simply installing and setting up a WordPress blog. Let’s take a look at some of the Common FAQs for newbies.
How much does it cost to start a WordPress blog?
One of the many benefits of the Using WordPress for blogging is how cost effective it is. Technically, you can start a WordPress blog for free through WordPress.com. However, as we have already mentioned, this option is very limiting. If you choose to host your blog yourself, which we recommend, you will have to pay for your domain and hosting.
Hosting costs vary widely. strong> based on the company you sign up with and the nature of your blog.You can pay anywhere from a few dollars a month to a few hundred dollars. However, for a basic blog you should be able to find hosting for less than $10 a month, and a .com domain is generally $10-15 a year.

In addition, the cost of starting a WordPress blog depends on what (if any) premium features and add-ons you use. For example, if you want to use a premium theme or some paid plugins, these are expenses you might want to factor into the overall cost of your blog. The good news is that it is entirely possible to create a functional and elegant blog using only free plugins and themes.
Another important factor to consider is website maintenance. WordPress maintenance packages help keep your blog running at its best and keep all your files and data safe. That’s why investing in a maintenance plan is one of the best uses of your blog budget, especially if you’re a first-time website owner.
Can I make money from my WordPress blog?
If you’re looking to start a WordPress blog that can be used as a source of income, there are a variety of popular monetization methods. One of the most common is affiliate marketing. When you join an affiliate marketing program, you’re promoting a retailer’s products on your blog and earning a commission based on each sale from your readers. To learn more, read our post on affiliate marketing plugins.
💵 Affiliate marketing is a smart way to monetize your new blog or website. #WordPress Click to Tweet
Another way to monetize your WordPress blog is advertising. For example, Google AdSense is an advertising network that allows you to make money through your WordPress blog by displaying ads. You don’t have to deal with advertisers directly; Google acts as a middleman. Every time someone clicks on an ad on your site, you make money.
Finally, if you have an e-commerce business, you can leverage your blog to promote your business products. WordPress can also be easily integrated with platforms like WooCommerce to quickly and easily create an online store.
How do I edit my WordPress menu?
If you are creating a WordPress blog it is important to keep the user experience (UX) in mind. Part of providing a user-friendly UX is making sure your website is easy to navigate. Ideally, this means you have a clean and uncluttered menu.
There are certain menu items that most WordPress sites include by default, including About, Contact, and of course Blog. If you want to edit your WordPress menu, there are a few ways to do it. For example, some WordPress themes allow you to create new menus from the customizer page.
However, this is the easiest way to create your WordPress menu or to edit go to Appearance > Menus:
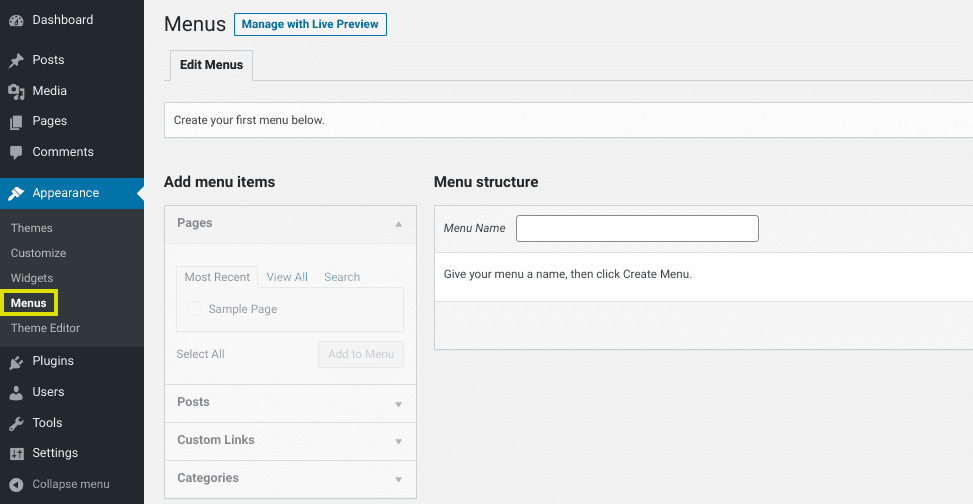
From there you can give your menu a name, e.g. B. “Blog Menu”. You can also configure the Menu Display Settings to choose where on the blog it appears (the options available depend on your topic).
The items you can select Add to your menu will appear on the left below Pages, Posts, Custom Links and Categories. For more detailed instructions, I recommend reading through the WordPress menu creation tutorial.
How do I get more traffic to my blog?
When you create a new blog, one of the biggest Concerns you may have is figuring out how to generate traffic. Unfortunately, this doesn’t happen overnight.
However, there are strategies you can use to significantly improve your position in search engine rankings and increase the likelihood that your target readers will find your blog. The key lies in a solid, multi-faceted SEO approach. As we mentioned before, it’s a good idea to use a plugin like Yoast SEO. This can help you align your blog content with your SEO goals.
Another strategy you can use to get more traffic to your blog is sharing your posts on social media. There are many social sharing plugins that you can use to integrate your WordPress blog with your social media accounts. To increase your reach, it helps to use relevant hashtags as well.
You can also start an email newsletter to raise awareness of your blog. Finally, make sure to include a link to your blog in your email signature and social media bios.
How often should I publish blog posts?
There is no easy answer to how often you should publish blog posts. It all depends on what your goals are for your WordPress blog. For example, if you’re trying to get more visitors and improve search engine optimization, it’s a good idea to regularly publish unique and relevant posts.

The key is to write posts that are engaging and valuable no matter how often you post them. You might also want to create a content calendar and set up a release schedule so readers know when to expect something new.
If your WordPress blog isn’t the focus of your business, and something you do as a part-time job, it might not be realistic to post every day. However, aiming to produce at least one or two high-quality, engaging posts per week is a solid starting point.
As you become more experienced with WordPress and blogging, the easier it should be be to post more frequently. You might consider looking at other blogs in your niche for inspiration. Reading through similar blogs can be an effective way to generate ideas for topics.
When it comes to WordPress blogging, quality is just as (if not more) important than quantity . It is better to post well thought out and carefully crafted posts once a week than to post short, sloppy and uninformative posts every day.
Do I need WordPress maintenance services?
The Importance of WordPress maintenance cannot be overstated. The problem is that there are many maintenance tasks to consider.
🔨 WordPress maintenance involves a variety of tasks that are critical to site performance. #WordPress Click To Tweet
The main tasks include:
- Backups
- Updates (WordPress core as well as themes and plugins)
- Database Optimization
- Security Auditing and Monitoring
- Comment Moderation
Some people make the mistake of forgoing maintenance services because they like it assume that the likelihood of anything bad happening to their blog is slim. In our opinion, it is not worth taking this risk. Aside from hackers and spammers, neglecting to maintain your blog can lead to performance issues.
Of course, thorough maintenance can be time-consuming. While plugins can certainly help streamline some of the critical blog maintenance tasks, they can also be limited and lack critical functionality.
That’s why it makes sense to purchase a WordPress maintenance plan for your blog. Depending on the hosting provider you choose, some maintenance services may be included. If not, Third Party Maintenance Packages are definitely worth a look for most blog owners.
What’s Next? 📝
It may take some time before you feel comfortable using your WordPress blog. However, once you’ve done that, you can focus on how to reach your blogging goals.
Once you’ve learned how to start a WordPress blog, it is helpful to research some tips and best practices to improve it. For example, to improve both SEO and UX, it’s a good idea to develop a linking strategy. Linking to relevant blog content in your posts is an effective way to drive traffic to other sites and show readers more content.
It’s also a good idea to track and Set up analysis tools
. strong> to monitor the performance of your WordPress blog. Over time, this can give you meaningful insight into the types of content that are performing best. We recommend using Google Analytics, which is both powerful and beginner-friendly.
Depending on what you use your WordPress blog for, you might also want to create a contact form . Not only does this help readers connect with you, but it’s also a great way to collect contact information for subscriber lists. To learn more, read our post on contact form makers.
Finally, one of the biggest challenges new bloggers face sometimes is keeping the momentum. Writing and posting regularly is a lot easier when you have a pool of topic inspiration and resources to draw from. With that in mind, tools like BuzzSumo can be very useful for learning which topics and content types are performing well.
Closing☑️
At first glance, it might seem like starting a WordPress blog intimidating. However, you’ll probably be surprised how quick and easy the process is, regardless of your level of technical experience.
After choosing a hosting provider, register a domain name and install WordPress, you can set up your blog.You can choose and customize your blog’s theme, add plugins to extend your site’s functionality, sign up for a maintenance plan, and write your first blog post in just a few simple steps. As you become more comfortable with using WordPress for blogging, you can experiment with different features and even monetize your content.
And if you want an eBook on the same topic, read this eBook on how you start a WordPress blog.
Want to provide feedback or join the conversation? Add your comments 🐦 on Twitter.
Photo credit: Caleb Woods.
See also: Stay at Home Mom Resume Example & Job Description Tips
.