Notifications give you brief, timely information about what’s happening in your app while it’s not in use. On this page you will learn how to create a notification with various functions for Android 4.0 (API level 14) and higher. For an introduction to how notifications are presented on Android, see the notification overview. For sample code that uses notifications, see the People sample.
Note that the code on this page uses the NotificationCompat APIs from the Android Support Library. These APIs allow you to add features that are only available in newer versions of Android while maintaining compatibility with Android 4.0 (API level 14). However, some new features like the inline reply action result in a no-op on older versions.
Reading: How to create an alert app
Add the support library
Although most projects built with Android Studio contain the necessary dependencies To use NotificationCompat, you should ensure that your module-level build.gradle file includes the following dependency:
Note: Other libraries in the androidx group also include core as a transitive dependency. So if you’re already using other Jetpack APIs, you might have access to NotificationCompat without requiring the exact dependency shown above.
Create a simple notification
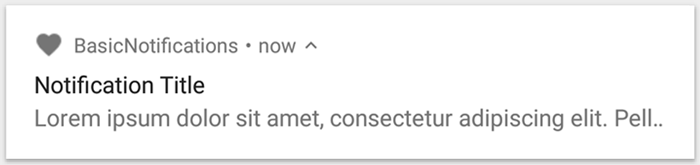
A notification in its most basic and compact form ( also known as a collapsed form) displays an icon, a title, and a small amount of body text. In this section, you will learn how to create a notification that the user can click to start an activity in your app.

Figure 1. A notification with title and body
For more details on each part of a notification, see Notification structure.
Set notification content
To get started, you need to set the notification content and channel using a NotificationCompat .Builder- Object. The following example shows how to create a notification with:
- A small icon set by setSmallIcon(). This is the only user-visible content that is required.
- A title, set by setContentTitle().
- The body text, set by setContentText().
- The notification priority set by setPriority(). The priority determines how intrusive the notification should be on Android 7.1 and below. (For Android 8.0+, you must set the channel importance instead, as shown in the next section.)
Note that the NotificationCompat.Builder constructor requires that you specify a channel specify ID. This is required for compatibility with Android 8.0 (API level 26) and higher, but is ignored by older versions.
By default, the text content of the notification is truncated to one line. If you want your notification to be longer, you can enable an extensible notification by adding a style sheet with setStyle(). For example, the following code creates a larger text area:
For information about other large notification styles, including adding an image and media playback controls, see Creating a notification with expandable details.
Create a channel and set the importance
Before you can deliver the notification on Android 8.0+, you must register your app’s notification channel with the system by providing an instance of NotificationChannel pass createNotificationChannel(). . Therefore, the following code is blocked by a condition in the SDK_INT version:
Since you need to create the notification channel before posting notifications on Android 8.0+, you should run this code as soon as your app starts. It is safe to call this repeatedly since creating an existing notification channel does not perform any operation.
Note that the NotificationChannel constructor requires importance using one of the constants from the NotificationManager class. This parameter determines how the user will be interrupted for notifications belonging to this channel – although you also need to set the priority with setPriority() to support Android 7.1 and below (as shown above).
Although you must set the notification importance/priority as shown here, the system does not guarantee the notification behavior you will receive. In some cases, the system can change the importance level based on other factors, and the user can redefine the importance level for a particular channel at any time.
For more information on what the different levels mean, see Notifications importance levels .
Set the notification’s tap action
Each notification should respond to taps, typically to open an activity in your app that corresponds to the notification. To do this, you must provide a content intent defined with a PendingIntent object and pass it to setContentIntent().
The following snippet shows how to create a basic intent to open an activity when the user taps the notification:
Note that this code calls setAutoCancel() , which automatically removes the notification when the user taps it.
The setFlags() method shown above helps maintain the user’s expected navigation experience after opening your app from the notification . But whether you want to use that depends on what kind of activity you start, which can be one of the following:
- An activity that exists solely for replies to the notification. There is no reason why the user would navigate to this activity during normal app usage so that the activity starts a new task instead of being added to your app’s existing task and backstack. This is the type of intent created in the example above.
- An activity that exists in your app’s regular app flow. In this case, when the activity starts, a backstack should be created so that the user’s expectations of the Back and Up buttons are preserved.
Learn more about the different ways to For configuring the intent of your notification, see Start an activity from a notification.
Display the notification
To display the notification, call NotificationManagerCompat.notify() and pass in one unique ID for the notification and the result of NotificationCompat .Builder.build(). Example:
See also: 5 Best Microsoft Teams Agenda Apps (In-Depth Look)
Remember to save the notification ID you pass to NotificationManagerCompat.notify(), as you will need it later if you want to update or remove the notification.
Note : Starting with Android 8.1 (API level 27), apps can only emit a notification sound once per second. If your app posts multiple notifications in a second, they all appear as expected, but only the first notification per second plays a sound.
Add action buttons
A notification can offer up to three action buttons Enable the user to react quickly, e.g. B. to snooze a reminder or even reply to a text message. But these action buttons should not duplicate the action performed when the user taps the notification.

Figure 2. A notification with an action button
To add an action button, pass You add a PendingIntent to the addAction() method. This is just like setting up the notification’s default tap action, except instead of starting an activity, you can do a variety of other things, such as: B. start a BroadcastReceiver that runs a job in the background so that the action doesn’t interrupt the already open app.
For example, the following code shows how to send a broadcast to a specific receiver:
See the Broadcasts Guide for more information on creating a BroadcastReceiver to perform background work.
If instead you are trying to create a notification with media playback buttons (e.g. to pause and skipping tracks), see how to create a notification with media controls.
Note: In Android 10 (API level 29) and above, the platform automatically generates action buttons for notifications, if an app does not provide its own. If you don’t want your app’s notifications to show suggested replies or actions, you can disable system-generated replies and actions by using setAllowGeneratedReplies() and setAllowSystemGeneratedContextualActions().
Add a direct reply action
The Direct Reply action, introduced in Android 7.0 (API level 24), allows users to enter text directly into the notification sent to your app without opening an activity. For example, you can use a direct reply action to allow users to reply to text messages or update to-do lists from within the notification.

Figure 3. Tapping the “Reply” button opens the text input
The direct reply action appears as an additional button in the notification that opens a text input. When the user finishes typing, the system attaches the text response to the intent you specified for the notify action and sends the intent to your app.
Add the reply button
To create a notification action that supports a direct reply:
- Create an instance of RemoteInput.Builder that you can add to your notification action. The constructor of this class accepts a string, which the system uses as a key for text input. Later, your handheld app will use this key to get the text of the input.
- Create a PendingIntent for the response action.
Caution: If you reuse a PendingIntent, a user might reply to a different conversation than they thought. You must either provide a request code that is different for each conversation, or provide an intent that does not return true when you call equals() on another conversation’s reply intent.The conversation ID is often passed as part of the intent’s extra packet, but is ignored when you call equals() .
- Attach the RemoteInput object to an action with addRemoteInput().
- Apply the action to a notification and issue the notification.
The system prompts the user to provide a response when triggering the notification action, as shown in Figure 3.
Get user input from the response
To get user input from the notification response UI, call RemoteInput.getResultsFromIntent() and pass the intent received from your BroadcastReceiver:
After processing the body, you must update the notification by calling NotificationManagerCompat.notify() with the same ID and tag (if used). This is required to hide the direct reply UI and to confirm to the user that their reply was received and processed correctly.
When working with this new notification, use the context attached to the onReceive () method of the recipient.
You should also append the response to the end of the notification by calling setRemoteInputHistory(). However, if you are creating a messaging app, you should create a messaging-style notification and attach the new message to the conversation.
For more advice on messaging app notifications, see Messaging app best practices .
Add a progress bar
Notifications can contain an animated progress bar that shows users the status of an ongoing process.
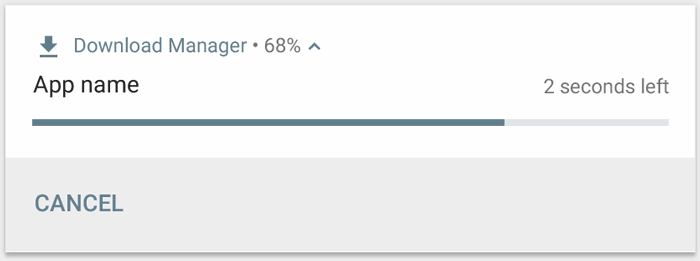
Figure 4. The progress bar during and after the operation.
See also: How to Build a Subscription Website (Step by Step Tutorial)
If you can always estimate how far the operation is completed, use the “definite” form of the indicator ( as shown in Figure 4) by calling setProgress(max, progress, false). The first parameter is the “full” value (e.g. 100); the second indicates how much is currently completed, and the last indicates that this is a specific progress bar.
As your operation progresses, continuously call setProgress(max, progress, false) with an updated one Value for progress and re to -print the notification.
At the end of the operation, the progress should be max. You can either show the progress bar when the operation is complete or remove it. In any case, remember to update the notification text to indicate that the process is complete. To remove the progress bar, call setProgress(0, 0, false).
Note: Because the progress bar requires your app to continually update the notification, this code should normally run in the background service.
To show an indeterminate progress bar (a bar that doesn’t show percentage complete), call setProgress(0, 0, true). The result is an indicator that has the same style as the progress bar above, except the progress bar is a continuous animation showing no completion. The progress animation runs until you call setProgress(0, 0, false) and then update the notification to remove the activity indicator.
Remember to change the notification text to indicate that the process is complete is.
Note: If you do need to download a file, consider the DownloadManager, which provides its own notification to track your download progress.
A system-wide Set Category
Android uses some predefined system-wide categories to determine whether to bother the user with a specific notification when the user has Do Not Disturb mode enabled.
If your notification falls into one of the pre-defined notification categories in NotificationCompat – such as CATEGORY_ALARM, CATEGORY_REMINDER, CATEGORY_EVENT or CATEGORY_CALL – you should declare it as such by using di Pass the appropriate category to setCategory().
This information about your notification category is used by the system to make decisions about displaying your notification when the device is in Do Not Disturb mode.
You do not have to set a system-wide category, however, and should only do so if your notifications match one of the categories defined in NotificationCompat.
Display an urgent message
Your App may need to display an urgent, time-sensitive message, e.g. B. an incoming call or a ringing alarm clock. In these situations, you can assign a full-screen intent to your notification. When the notification is invoked, users will see one of the following depending on the device’s lock status:
- When the user’s device is locked, full-screen activity is displayed, obscuring the lock screen.
li >
- If the user’s device is unlocked, the notification will be shown in expanded form, which includes options to edit or dismiss the notification.
Caution: Notifications with full-screen intents are very intrusive, so it’s important to only use this type of notification for the most urgent and time-sensitive messages. Note: If your app targets Android 10 (API level 29) or higher, you must request the USE_FULL_SCREEN_INTENT permission in your app’s manifest file to allow the system to launch the full-screen activity associated with the time-sensitive notification.
The the following code snippet shows how to associate your notification with a fullscreen intent:
Set lock screen visibility
To control the level of detail visible in the notification To open the lock screen, call Call setVisibility() and specify one of the following values:
- VISIBILITY_PUBLIC shows the full content of the notification.
- VISIBILITY_SECRET does not show any part of this user notification on the lock screen.
- VISIBILITY_PRIVATE shows basic information such as e.g. the ID of the notification icon and the title of the content, but hides the full content of the notification.
When VISIBILITY_PRIVATE is set, you can also provide an alternative version of the notification content that contains specific hides details. For example, an SMS app can display a notification that shows you have 3 new text messages, but hides the message content and senders. To deploy this alternate notification, first create the alternate notification using NotificationCompat.Builder as usual. Then append the alternative notification to the normal notification using setPublicVersion().
However, the user always has ultimate control over whether their notifications are visible on the lock screen, and can even do so based on the notification channels Control your app.
Update a notification
To update this notification after you have issued it, call NotificationManagerCompat.notify() again and pass in a notification with the same ID that you used previously. If the previous notification has been dismissed, a new notification will be created instead.
You can optionally call setOnlyAlertOnce() to have your notification interrupt the user only the first time (with sound, vibration, or visual cues). Notification displayed and not for later updates.
Warning: Android applies a rate limit when a notification is updated. If you post updates to a notification too frequently (many in less than a second), the system may discard some updates.
Removing a notification
Notifications remain visible until one of the following occurs:
- The user dismisses the notification.
- The user clicks the notification and you called setAutoCancel() when you created the notification.
- You call cancel() for a specific notification ID. This method also clears ongoing notifications.
- You call cancelAll(), which removes all previously issued notifications.
- If you set a timeout with setTimeoutAfter() when creating a notification, the system cancels the notification after the specified duration has elapsed. If necessary, you can cancel a notification before the specified timeout period has elapsed.
Best practices for messaging apps
Use the best practices listed here as a quick guide on what to consider when creating notifications for your messaging and chat apps .
Use MessagingStyle
Starting with Android 7.0 (API level 24), Android provides a notification style template specifically for messaging content. Using the NotificationCompat.MessagingStyle class, you can change several of the labels displayed in the notification, including the conversation title, additional messages, and the content view for the notification.
The following code snippet shows how to customize the style of a notification using the MessagingStyle class.
Starting with Android 8.0 (API level 26), notifications using the NotificationCompat.MessagingStyle class display more content in their collapsed form. You can also use the addHistoricMessage() method to provide context about a conversation by adding historical messages to messaging-related notifications.
When using NotificationCompat.MessagingStyle:
- MessagingStyle Call .setConversationTitle() to set a title for group chats with more than two people. A good conversation title could be the name of the group chat, or if it doesn’t have a specific name, a list of the conversation participants. Otherwise, the message could be mistaken for belonging to a one-to-one conversation with the sender of the last message in the conversation.
- Use the MessagingStyle.setData() method to set media messages such as Pictures. Currently MIME types of pattern image/* are supported.
Use direct reply
Direct reply allows a user to reply to a message inline.
See also: How to create a live.com email address? Follow this step by step guide with images!
- Use MessagingStyle after a user has replied with the inline reply action.addMessage() to update the MessagingStyle notification and not retract or cancel the notification. If the notification is not canceled, a user can send multiple responses from the notification.
- To make the inline response action compatible with Wear OS, call Action.WearableExtender.setHintDisplayInlineAction(true).
- Use the addHistoricMessage() method to provide context about a direct reply conversation by adding historical messages to the notification.
Enable Smart Reply
- To enable Smart Reply, call setAllowGeneratedResponses(true) on the reply action. This causes Smart Reply replies to be available to users when the notification is pushed to a Wear OS device. Smart Reply replies are generated by an entirely on-watch machine learning model using the context provided by the NotificationCompat.MessagingStyle notification and no data is uploaded to the internet to generate the replies.
Add notification metadata
- Assign notification metadata to tell the system how to handle your app notifications when the device is in Do Not Disturb mode “ is located. For example, use the addPerson() or setCategory(Notification.CATEGORY_MESSAGE) method to override Do Not Disturb mode.
.