FullStack – How to create a working blogging website with pure HTML, CSS and JS in 2021
Hello, today we are going to see how we can easily create a blogging website using just HTML, CSS and JS. No other library. We will also use Firebase Firestore to store/retrieve blog data.
This is a very good project to practice full stack development. When I started web development, I always thought how can I create my own blogging website. And today I’m proud that I tried to create a blogging site. Our website is very simple and has features like
Reading: How to create a blog site using html
- Dynamic blog pages.
- Have a special editor for blogs.
- You can add/create as many blogs you want.
- You can add headings, paragraphs and images to the blog post.
- Read more blogs too.
To see a demo or would you like a full coding tutorial video. You can watch the tutorial below.
I appreciate if you can support me by subscribing to my YouTube channel.
So, without wasting any more time, let’s see how to code this.
Since this is a node.js web app. We need NPM and Node.js to start with, so make sure you have them installed in your system.
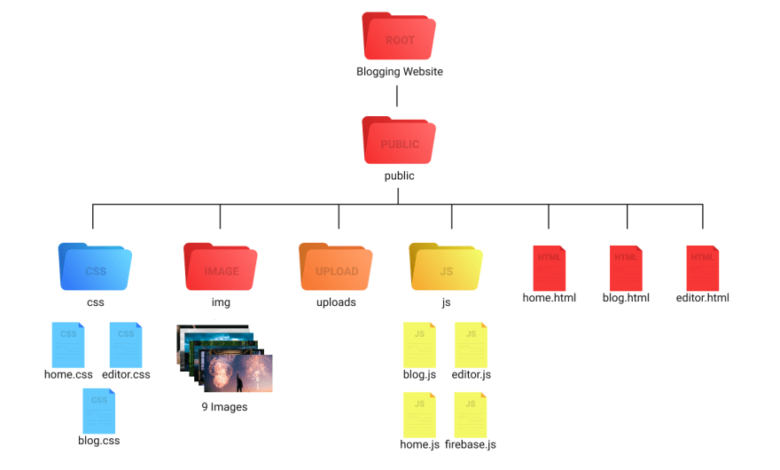
So let’s start with the folder structure.
Folder structure .
This is our folder structure.

So let’s make our server .
Server
Open the project file (root directory) in your code editor. Open Terminal and run
npm init
. This will initialize NPM for our project. Then install some packages with it.
npm i express.js express-fileupload nodemon
-express.js – should create a server -express-fileupload – should handle uploads -nodemon – should run the server continuously
once the package is installed. You should see a package.json file in your root directory. Open it.
And change the scripts in
Now we can create a server. Create a new file in your root directory called server.js. And open it.
First import all the packages we need.
And then save your public folder path in a variable.
After that create an ExpressJS server. And set the path of the public folder to the static path. Also use app.use(fileupload()) to enable file uploads.
After that create a home route and send the home.html file in response. And run your server on port 3000.
See also: How to make a website: Learn web design and development
Run your server with npm start. And our server is ready for now. Now let’s create a homepage.
Homepage
Write the basic HTML structure and link the home.css file. Then start creating a navigation bar.
Home.html
Home.css
Output
Now create the header .
Output

Now the final element for our home page. Create a section for blog cards and create a card as we will later create these cards using JS.
Output
 Now you can comment on the blog card element. Our homepage is ready. Go into the server and create /editor route.
Server.js
After that we create our editor.
Editor.
In editor.html, link both the home.css and editor.css files. And inside the body tag, start creating banner div.
Output

And then create text boxes for blog title, article.
Output

And finally make the “Publish” button with the “Upload Image” button.
Output
 We’re done styling our editor. Now let’s make it work. Associate editor.js with the HTML file. And open it.
First select all the items we need.
After selecting all the items. Add change events to our upload inputs and process the upload.
Now create the uploadImage function.
So that’s how we can get our upload to work. But it won’t work now because we didn’t create our /upload route. To do this, open server.js and create /upload route.
Server.js
We’re done with that.You can check whether your upload works or not. As you may have noticed, we call addImage() but we haven’t done that yet. So let’s do it.
editor.js
With this function you can insert a text format of your image, for example if I upload 1.png then this function will insert something like that ! [1.png](image path) in our article field.
So far we’re done with our uploads too. Now go to your firebase and create a blogging project. And set up your Firebase. You can refer to this video for setup.
After setting up Firebase variables in firebase.js, link this file in editor.html above editor.js as follows.
Then go back into editor.js. And make the publish button work.
See also: How to add a co-host to a Facebook event in 3 simple steps
This is how we create a document in Firebase Firestore. After that, our editor is fully functional. If you test it, you will see that you will be redirected to the blog route. But we didn’t do that route. For the last time, open server.js. And create blog route and also 404 route.
server.js
Now you should see blog.html file. So for the last time, let’s create a blog page first. this time link all 3 css files to blog.html and copy the navigation bar from home.html to this page.
Output
 This page has all the elements structure. We dynamically render its content using JS.
Link Firebase scripts, firebase.js and blog.js to it. And open blog.js
First, extract the blog ID from the URL. and retrieve data from Firestore
Once we receive the blog data. Create setupBlog().
In the above function, we’ve selected all the elements we need and set their content. And last. We call the addArticle function because we need to format our article.
Create the addArticle function and format the article text we got from the first one.
After that let’s compare what we will type in our editor and what we will see in our blog.
Editor

Blog

So our blog is finished too. Now we want a recommendation or Read More element on our blog page.
So open blog.html and create one.
After that, copy the blog-section- Element from home.html to blog.html
And as you can see, we use the same elements for “Read More” and “Blogs”. So we will use the same JavaScript function to create these two elements. So for this file, link home.js to blog.html via blog.js.
And last thing, open home.js and code that.
This is how we make our blog cards. We’re done.
Output – Home.html

Output – blog .html

So that’s it. I hope you understand everything. If you have any doubts or I missed something, let me know in the comments.
- Infinite CSS Loader
- Best CSS Effect
- Wave Button Hover Effect
- Youtube API – Youtube Clone
- TMDB – Netflix Clone
I would be very happy if you subscribe to my YouTube channel can. I create great web content.
Source Code
Thanks for reading.
See also: How To Create A Samsung Account And Set Up Gear VR
.