- Import Data
- Sample DB
How to connect a website to a MySQL database.
That’s all very good Use MySQL Workbench for all of our examples, but you may be wondering how to build a website with MySQL? After all, more websites use MySQL than any other database management system.
Reading: How to create a website makes mysql queries
Querying a MySQL database from your website isn’t much different than querying MySQL Workbench—they use the same SQL statements for both. But of course I’m sure you don’t have a little goblin in your website just waiting for an SQL query to be entered every time someone visits your website? Eventually you would need to find a gremline with good SQL skills – not easy to find these days!
A better solution would be to do what most other websites do – use a server-side programming language to interface between the website and the MySQL server.
The server-side script connects to MySQL first and can then execute any necessary queries.
MySQL Workbench PHP Generator
MySQL Workbench includes a PHP generator. Well, it’s not a full blown PHP generator, but it will generate enough PHP code for you to paste into your website so that it can connect to MySQL and run your queries.
You can use the on it access tools | Utilities menu:
Copy as PHP code (connect to server)
This option generates PHP code that connects with the parameters for the connection you are currently using use. You can always replace the parameters with a different connection if needed.
Clicking this option simply copies the code to your clipboard.
Here is an example of the code , which this option generates:
Just paste this code into the PHP document that needs to connect to MySQL and update all required fields.
This code uses the MySQLi driver, which driver is used by PHP to provide an interface to MySQL databases.
See also: Creating a drop-down list in a cell
The code also provides an error message if the connection fails.
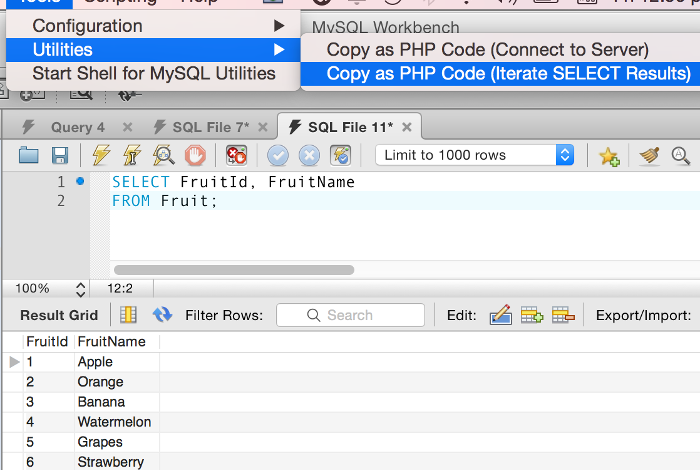
Copy as PHP code (Iterate SELECT Results)
This option allows you to generate PHP code that embeds the SQL statement in a PHP script. It also generates the PHP code to iterate through the result set (so the results can be displayed to the website user).
Even if you click this option, the code will be copied to your clipboard.
Here is an example of using this option.
-
Run the query
Run the query you got from of the website.
-
Copy the PHP code

Select Tools | Utilities | Copy as PHP code (iterate SELECT results)
-
Paste code
The code will be pasted to your clipboard. Open your PHP document and paste the code. This is what the query above looked like after being converted to PHP
So you would need to combine this code with the first code. The first code opens the connection, the second code runs the query. It is beyond the scope of this MySQL tutorial to go into the details of building PHP websites. However, if you’re interested, I’ve written a PHP tutorial that covers the basics of PHP (including database-driven websites).
ColdFusion Database Connections
ColdFusion is another server-side -Programming environment that allows you to connect to a MySQL server. ColdFusion makes it extremely easy to query a database and return the results.
ColdFusion query and output
Here is an example of using CFML to query a database and then to loop through and print out the results of this query:
ColdFusion data source connection
The code above assumes that a data source connection named dsnFruitShop has been previously set up. This establishes the connection to the database.
ColdFusion allows you to connect to a database through its administration interface (ColdFusion Administrator). This is where you create a “data source” connection that you can reference in your code (like we did in the example above). After you set up the data source, it can be used in any ColdFusion page on that ColdFusion server.
Here are the steps to configure a data source in ColdFusion:
-
Open ColdFusion Administrator
See also: How to Make Your WordPress Website Attractive With Better Design
Log in to the ColdFusion Administrator (usually located at /cfide/administrator/) with your username and password.
-
Open the Data Sources option
In the left menu (under DATA & SERVICES), click Data Sources.
-
Add New Configuration
h3>
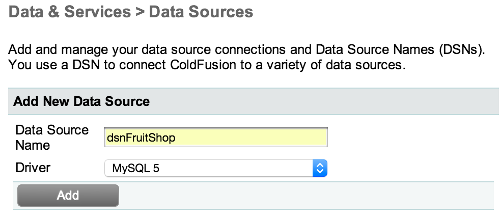
Under Add New data source, enter the name you want to give your data source and the driver.
In this case I choose MySQL 5.
Click Add.
-
Configure and create the data source
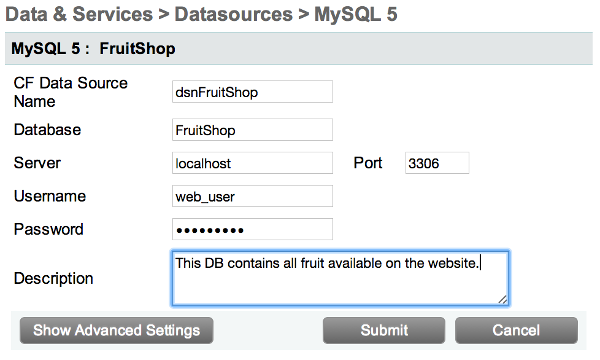
Enter the details of your MySQL server and the name of the database this connection will be used for.
This is the name of the database on the MySQL server. In our case this FruitShop.
Click Submit.
Data source error?
When trying to add your data source, you may have received the following error message:
This is because the driver was not included when ColdFusion shipped.
If you get this error, do the following:
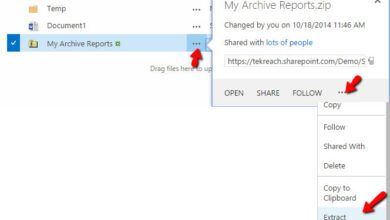
- Download the driver from MySQL website
- Extract the file (eg. .zip file or .tar.gz )
- Move the .jar file to your cf_root/lib folder. Here cf_root is your ColdFusion root directory. For example, on my Mac I placed the file in /Applications/ColdFusion11/cfusion/lib/.
- Restart ColdFusion
Now you should be able to use the Add file driver through the ColdFusion Administrator as shown in the previous steps.
The steps listed on this page assume that you at least know how to create a basic website using the scripting language in question. If you want to learn more about ColdFusion, check out my ColdFusion tutorial, which explains how to use ColdFusion (starting with the basics) and covers database connections and more.
See also: How To Create A YouTube Channel Right From Your iPad
- Importing data
- Sample DB
.