This article will show you how to create a full blog using PHP and a My SQL database. You can create, edit, update and publish PHP and MySQL database. Your audience can browse the blog article catalog and click on any article they want to read. Follow this process. You can quickly learn how to create a blog in PHP and a MySQL database.
Functions
- Two types of users such as – Admin and Normal users are managed by a user registration system.
- The admin area and the public area are separated in the blog.
- The admin user can only log in the admin area and the General login The normal user can only login in the public area.
- There are two types of admins in the admin area –
- Admin:
- Each post can be created, updated , published or delete
- Topic can also create, delete, update or publish
- Admin can also delete, update or view other admin users.
- Author
- Author can only create, update and delete his posts.
- A specific topic is chosen for each post.
- Each public post rag lists with author, picture and date and so on.
Implementation
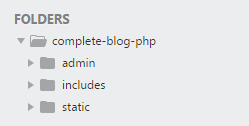
Let’s start programming. Project name complete-blog-php. In our server directory (htdocs or www) create a folder called complete-blog-php. Open this folder in a text editor of your choice, such as Sublime Text. Create a subfolder in it: admin, include and static.
Reading: How to create a blog page in php
In the root folder of this application, create a file called index.php :

Open this folder and paste the following code:
Current articles
We add some Google Fonts links between the tags. We also provide the link of our style file public_styling.css. Our entire application is wrapped in the
To view these go to: http://localhost/complete-blog-php/index. php.
Static folders are used for styling the page. In the static folder create 3 folders: css, images, js. In the CSS subfolder just create the file: public_styling.css.
Open public_styling.css and paste the following code:
/*********** **** * *** DEFAULTS *****************/ * { border: 0px; Padding: 0px; } html { height: 100%; Box Size: Border Box; } body { position: relative; border: 0; padding below: 6rem; Minimum height: 100%; } /* HEADINGS STANDARD */ h1, h2, h3, h4, h5, h6 { color: #444; Font Family: ‘Averia Serif Libre’, Italic; } a { text decoration: none; } ul, ol { margin left: 40px; } hr {border: 10px 0px; Opacity: 0.25; } /* FORM DEFAULTS */ form h2 { margin: 25px auto; text alignment: center; Font Family: ‘Averia Serif Libre’, Italic; } form input { width: 100%; screen lock; Padding: 13px 13px; Font size: 1em; border: 5px automatically 10px; border radius: 3px; Box Size: Border Box; Background: transparent; border: 1px solid #3E606F; } form input:focus { outline:none; } /* BUTTON DEFAULT */ .btn { color: white; Background: #4E6166; text alignment: center; limit: none; border radius: 5px; screen lock; Letter Spacing: .1em; border: 10px 0px; Padding: 13px 20px; text decoration: none; } .container { width: 80%; border: 0px automatic; } /* NAVBAR */ .navbar { border: 0 auto; overflow hidden; Background Color: #3E606F; border radius: 0px 0px 6px 6px; } .navbar ul { list type: none; hover right; } .navbar ul li { float: left; Font family: ‘Noto Serif’, serif; } .navbar ul li a { display: block; Color white; text alignment: center; padding: 20px 28px; text decoration: none; } .navbar ul li a:hover { color: #B9E6F2; Background color: #334F5C; } /* LOGO */ .navbar .logo_div { float: left; padding top: 5px; padding left: 40px; } .navbar .logo_div h1 { color: #B9E6F2; font size: 3em; letter spacing: 5px; font weight: 100; Font family: ‘Tangerine’, italics; } /* FOOTER */ .footer { position: absolute; right: 0; below: 0; left: 0; Color white; Background color: #73707D; text alignment: center; Width: 80%; border: 20px automatically 0px; Padding: 20px 0px; }
See also: How to Make a Data Flow Diagram
This code starts with the default style, which is followed by the navigation bar style. We create the include folder by starting to repeat the header sections, footer and navigation bar. We create a folder called “includes” at the beginning. Now we create three sections in these three folders head section.php, navbar.php and footer.php.
Go to index.php file and add tag directly into
Current articles
These are mainly the basic steps to set up in the public Area. In this process. You can quickly learn how to create a blog in PHP and a MySQL database. I hope you enjoy the tutorial session.
See also: How to create a QR code and direct people to a website, document, or other media
.