So you want to create a WordPress blog. Congratulations! WordPress is a great solution for starting a blog, and we absolutely love blogs!
Better yet, it’s surprisingly easy to create a free blog, too. That’s why we say You can do it in under 15 minutes.
Reading: How to create a blog from scratch using.wordpress
But as easy as it is to get started with a WordPress blog once you know what you need to do and however, how you must do it is important so you don’t waste time on your journey to becoming a successful blogger. That’s why we created this step-by-step guide.
We’ll walk you through every single step you need to take to start a blog using self-hosted WordPress. And we will do it with tons of screenshots and beginner-friendly instructions. Start a blog today!
How to create a blog: what you need
If you want to create a blog, here is the whole step-by-step process:
- Sign up for web hosting (we recommend Bluehost).
- Choose a domain name for your blog.
- Install free WordPress blog software.
- Sign up and write your first blog post.
- Change your blog design by choosing a theme.
- Install a few important plugins.
- Add Google Analytics.
- Don’t forget about Marketing.
We will detail each of these steps below treat, but for what you need to know now is that none of these steps require deep technical knowledge. Yes, you really can figure out how to set up a blog yourself!
Once you’ve got your free WordPress blog up and running, you probably want to start writing and probably tweaking its appearance/functionality (eg. change the header completely or revise the homepage). To help you with that, we also show you how to:
- Write your first blog post with the WordPress editor
- The look and feel of your free WordPress blog with a change “theme”
- Add features to your blog using tools called “plugins”
As long as you know how to social media sites like Facebook or Tumblr, and if you have a general confidence when it comes to “web stuff” you can follow this guide. I promise!
Step 1: Buy hosting and your domain name
Have you already decided on your blogging niche? Great, because in order to make your free WordPress blog accessible to people all over the world or to prepare it for search engine optimization, two things are required:
- ✅ Hosting – the is the engine that powers your site. Even if you don’t “see” it, every single website on the internet has a hosting provider running it.
- ✅ Domain – this is your blog’s permanent address. For example, ours is themeisle.com. Check out this post if you need help finding a good name and how custom domains work.
You can buy your blog hosting and domain at the same time – that is don’t worry too much about the nitty gritty details right now. But before you can do that, you need to choose a WordPress host. Due to the popularity of WordPress, there are a large number of WordPress hosts.
We have personally tested the performance and reliability of many hosting companies. Considering the results of all these experiments we can recommend Bluehost to new bloggers in the WordPress world.
Here’s why:
- It’s affordable. You can host your website for the price of a small latte every month – for the first 12 months it’s only $2.75 per month.
- You get one free domain name when you sign up. This has to do with affordability – your own domain would otherwise cost $10.
- You can easily install WordPress. With just a few clicks, you can launch the WordPress software and work blogging. No technical knowledge required!
- It has enough power to get you started. If you’re just starting out, Bluehost offers plenty of power to keep your site loading.
All in all, it will cost you around $33 to host your blog at Bluehost all year, including your free domain name. It also offers a 30-day money-back guarantee.
This is about as cheap as it gets if you want to create a WordPress blog.
How to sign up with Bluehost for WordPress hosting
To get started, click here to go to Bluehost and unlock their special offer for Themeisle users ($2.75/month). Then click the Start Now button. You will be taken to the Bluehost plans.
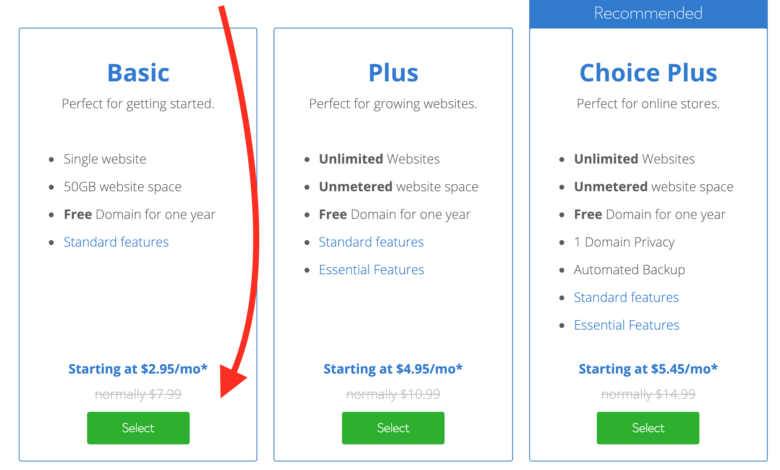
For beginners, we recommend the cheap Basic plan as it offers plenty of power for your fledgling blog. Click the SELECT button to start the process:
On the next screen, enter the domain name you want for your blog in the new domain and click Next. Your blog name should really reflect the scope of your interest and be fairly simple.If you’re not entirely sure, Bluehost has an FAQ on this topic. Remember – you get this for free:
One click and you’ll land on the final screen where you’ll need to enter basic account and billing information at the top:

If you scroll down, you will see a Package Information section at the bottom, this is where you can select , how many years hosting service Si e want to purchase, as well as any desired add-ons. While Bluehost does review some of these add-ons by default, feel free to opt-out:
All in all, you should be paying around $35 for your domain name and a one-year hosting plan.
Once you have filled out all the information, click SEND below to complete your purchase.
Fine! Now you can install everything you need for your new blogging platform.
Step 2: Install the free WordPress software
If you want to create a WordPress blog, go Not surprisingly, you’ll need to install the WordPress software.
See also: How to Start a Christian Blog That Reaches More People for the Kingdom
We know this may sound a little intimidating – but we think you’ll be surprised at how easy it is, Install WordPress.
If you completed the signup process in the previous step, you should have received an email from Bluehost with details on how to sign up for the Bluehost Members Area.
Go ahead and sign in to Bluehost.
Once you sign up for the first time, Bluehost will give you a simple wizard to guide you through the process of installing WordPress on your new website.
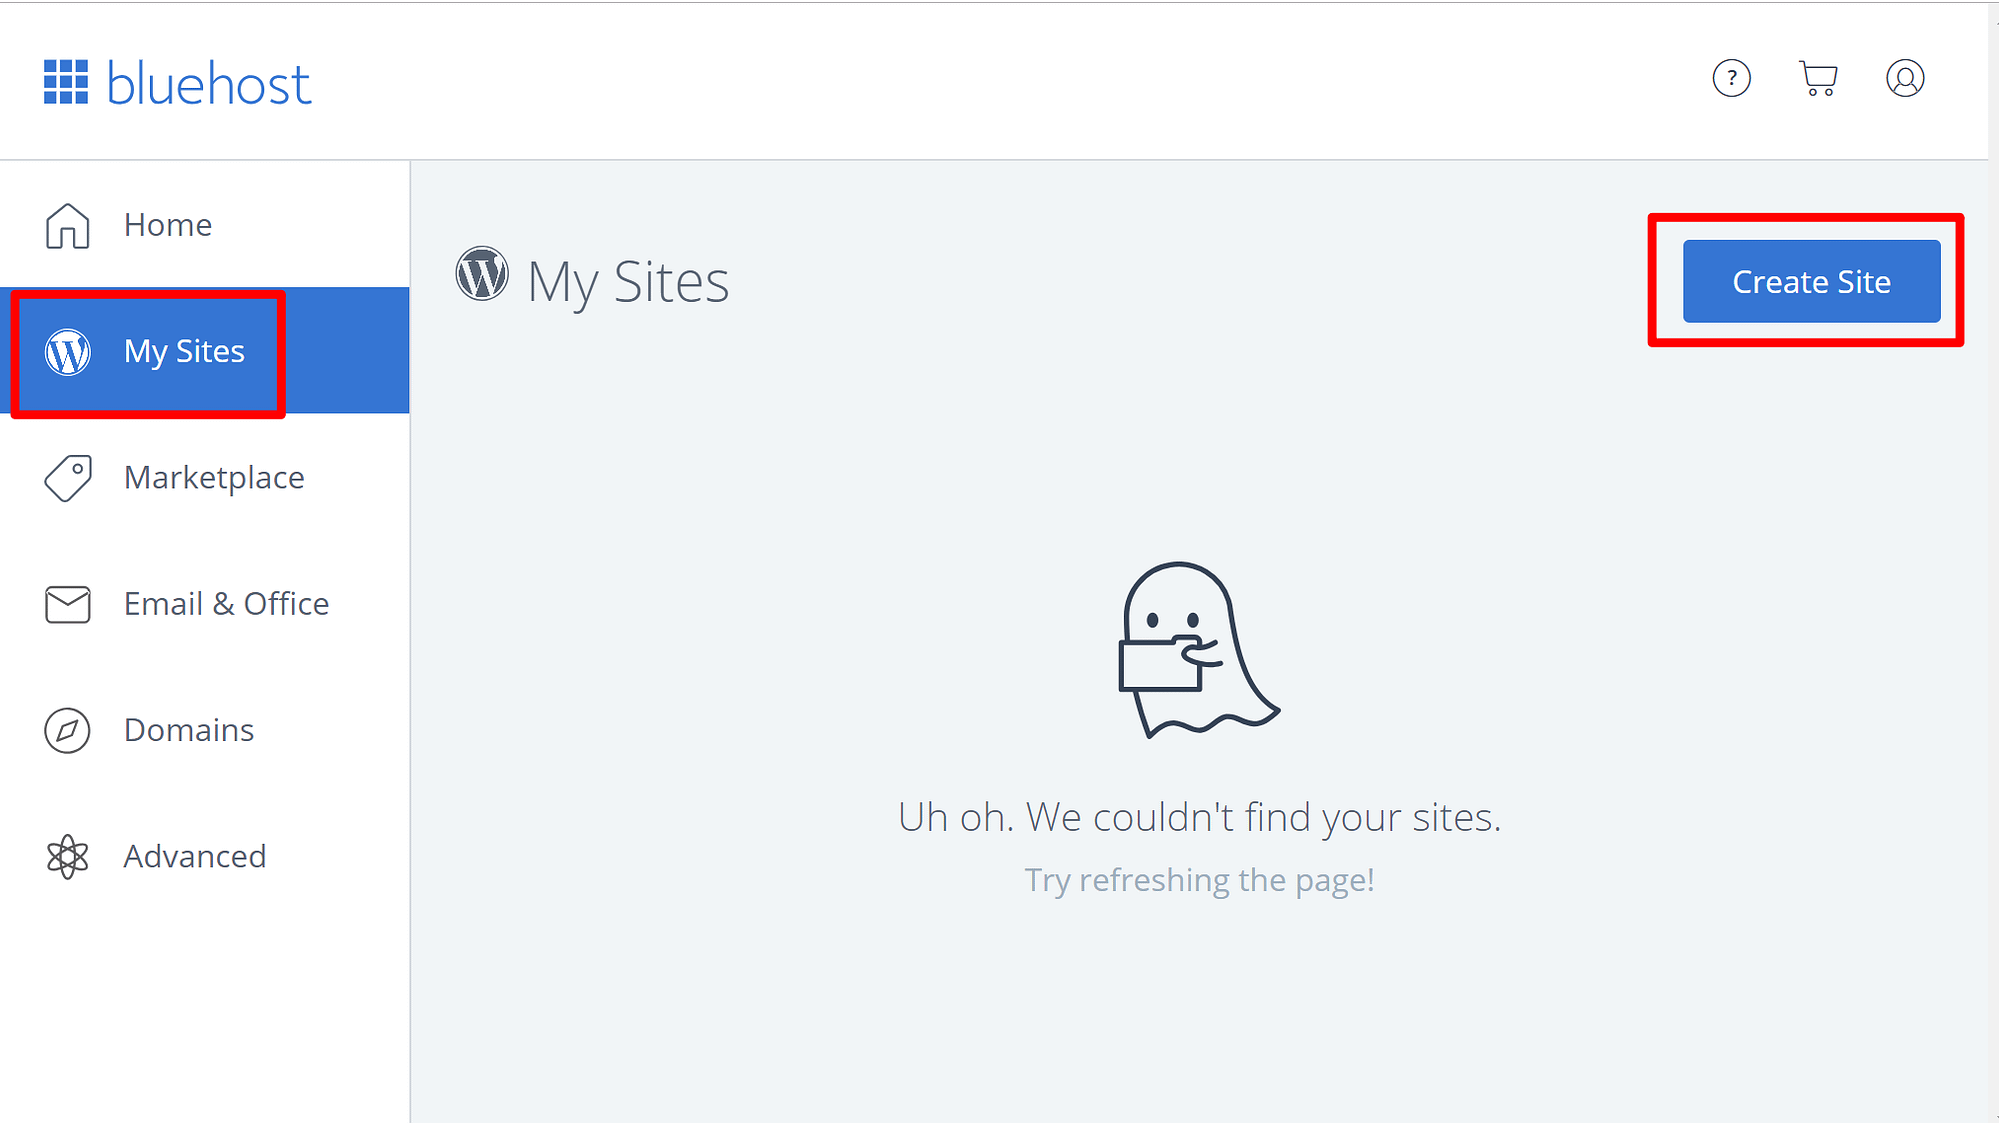
Don’t see the setup wizard? Don’t worry, it’s still very easy to install WordPress with Bluehost. Just go to the My Websites section and click the Create Website button to start the wizard:

Then you can use to fill in all the important details for your website name and the username/password you are using to manage your WordPress blog:
Once you have completed the installation process, you can access your new blog’s dashboard by going to yourdomain.com/wp-admin.
Step 3 : Get started and write your first blog post – you deserve it!
Now that you’ve learned how to create a WordPress blog, you’re probably excited to to start blogging!
We We z tells you in a second how to change the look and functions of your blog. But first, let’s see how easy it is to start blogging on your new site.
When this is your first time logging into your blog’s WordPress dashboard, you should see a screen like this :

Write like this a blog post:
- Hover over Posts
- Click Add New
This will launch the WordPress editor, which will allow you to write your blog posts using a really intuitive block system.
To add text, just click and type. For other content – like an image or an embedded YouTube video – you can add new “blocks”. To help you use the editor you can follow our detailed guide here or our more general guide here.
Step 4: How to change the look of your blog
When you create a WordPress blog, one of the main benefits you get is access on WordPress ‘ Huge collection of themes and plugins. Here’s a quick overview of the two:
We’ll cover the former in this section.
Once you create a WordPress blog, you already have an active theme. This is either the default WordPress theme or the theme you selected during the Bluehost setup wizard.
But there are actually thousands of blog themes available for WordPress sites are available (many of which are open source like WordPress itself), so you’re by no means limited to the small selection that Bluehost initially shows you.
Where to find WordPress themes for your blog
When you go to choose a WordPress theme, you have to choose between free and premium themes.There is no inherent difference between the two, but premium themes often have more detailed designs and features.
To find free themes, the best place to search is the official WordPress .org theme directory.
To find premium themes, you need a broader approach. Some good options are:
If you want to skip the search, we’ve also compiled a list of the most popular and best free WordPress themes.
How to Install a WordPress Theme
How to Install a WordPress Theme
h3>
Once you’ve found a theme you like, WordPress makes it easy to add that theme to your site.
See also: How Do I Create an Email List From Excel?
Here’s how:
- Hover over Appearance
- Select Themes
- Click the Add New
button
- If you selected a free theme on WordPress.org, search for the theme name and click Install.
- If you purchased a premium theme, click the Upload Theme button and upload the ZIP file that you will receive when you purchase the theme should have.

After installing your theme, be sure to click the Activate button to activate it on your website.
How to further customize your WordPress theme
You can treat your theme as a kind of template and further customize it using the WordPress Customizer (which resembles a website builder). This interface allows you to make certain changes to your theme to improve your web design without having to know any code or HTML.
You can access it by going to Appearance → Customize go:
Depending on the theme you choose, you may have a different selection of options in the left sidebar. But in general you can:
- Make changes using the options on the left
- See a real-time preview on the site preview on the right
- Make your changes live by clicking Savecom/blog/wp-content/uploads/2017/10/how-to-create-a-wordpress-blog-9.png” alt=”Manage WordPress Plugins” />
Step 6: Adding Google Analytics to WordPress
If you are creating a WordPress blog, you should also consider the concept of growth, because what is the use of writing publicly on the Internet if no one will read your writings ?
Developing an audience is important, but it’s difficult to grow it if you don’t understand how your blog visitors interact with your pages and posts.
The idea is:
How can you improve something if you don’t even know what needs improvement?
This is where Google Analytics comes in.
Advantages of Google Analytics for WordPress
Adding Google Analytics to your new blog comes with a number of benefits.
For example, you can track your blog’s growth (or lack of it). Although wic You need to be patient, if your blog has been stagnant for more than a year – and assuming you’re posting regularly – then using Google Analytics could help you re-evaluate your strategy.
If you To better manage your blog, you can set up sales funnels to try and sell an e-book or promote an affiliate product. Google Analytics can help you by identifying the leaks in your funnel. More bluntly, it shows you from which pages website visitors are exiting your website.
For example, suppose you have a four-page funnel and Google Analytics tells you the exit rate on the third page of that funnel funnel is astronomically high. With this information you can take a closer look at the page and make adjustments. If you “stop the leak,” more potential buyers will make it to the last page and hopefully buy everything you offer. In such a scenario, without Google Analytics, you would never be able to identify the leak.
This is just an example, but the fundamental benefit of Google Analytics is that it shows you how visitors to your website interact with it. You can then take action based on this information to improve the performance of your WordPress blog.
Google Analytics Tutorials for WordPress
Most of the tutorials you will find on the web about Find out how to add Google Analytics here Your WordPress blog can do it in two ways:
- By manually pasting the code for Google Analytics.
- Use a WordPress plugin to install Google Analytics for you.
li>
👉 We have tutorials explaining both options.
Video version of this tutorial
Here is a video guide of the steps to create a blog on WordPress. You can think of it as a summary of most of the steps covered above.
What to do after you’ve created a WordPress blog
Ok, so you’ve made it, a WordPress blog, install your own theme and add some features with plugins.
Well, the world is yours! But if you’re like most people, you probably want to look into ways to:
- Get more traffic to your blog
- Monetize your blog (monetization how-to)
And if you’re a beginner, you might be interested in the 45 Things Our Blogger Team Wish You Knew Before You Start A Good Blog. You can read all of these blogging tips here.
You also probably want to create a blog content strategy and figure out how to come up with new blog post ideas. If you’re not interested in running a personal blog sharing random thoughts, then populating your site with quality blog topics and doing keyword research is one of the most important responsibilities of a full-time professional blogger.
Once your website allows you to make money blogging, you can even create your own newsletter and delve into email marketing, email list collecting or forums to reach your audience even more to involve more. A great blog is also a perfect complement to selling products (even if that’s done through e-commerce marketplaces like Amazon or eBay).
At this stage, you’re already equipped with everything you need to so get going , put some hard work into new content and turn your new WordPress site into a thriving blog!
* This post contains affiliate links, which means that if you click on one of the product links and then we receive a small fee for the product. But don’t worry, you’ll still pay the standard amount, so you won’t incur any additional costs.
See also: How to create a color palette for your website
.