Today I’m going to show you how to create an HTML grab button widget for your blog — and do it right. This works on Blogger, WordPress, and any other blogging platform that allows you to add custom HTML gadgets/widgets to your sidebar or footer.
This is a thoroughly modern blog button that current, valid HTML used. No tables, no tags, nothing outdated. This button will work well into the HTML5 future. Don’t accept old-fashioned replacements!
Reading: How to create html code for a blog hop button
Here’s an example of what your grab button will look like, although you should use your own logo 😉
You can also download a working demo from see Click this button on my test and demo page in the left sidebar.
Difficulty Level: Absolute Beginner This is a simple tutorial for bloggers of all skill levels, even bloggers with no HTML experience.
Requirements
To start this tutorial you will need:
- A blog.
- A button image. An image size under 200 x 200 pixels is best. Smaller buttons are more likely to be captured.
That’s it!
Step One: Upload your button image
See also: How Hard Is It To Build A Successful App Startup?
If you’re using Blogger, upload it upload your button picture to the Picasa web album for your blog. If you use WordPress, upload your button image to your media library. You can also host the image using an image hosting service such as Photobucket.
Note: If you are using Picasa, after uploading your image you will need to right click on your image and select “Copy Image Location” or “Copy Image URL” to get the correct URL for your image.
Step Two: Get the button code
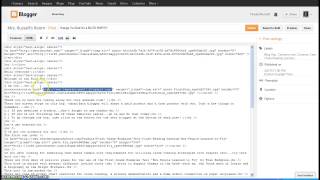
Here is it Button Code :
If you are on Blogger, copy and paste this into a new HTML/JavaScript Gadget. If you’re using WordPress, copy and paste it into a text widget.
This code includes a demo image so you can test it on your blog to see how a grab button works would look like. But to make it your own, you need to edit it a bit.
Step Three: Edit the button code
The button consists of two parts: the header image and the text field with the “Grab” code. The two sections are marked with HTML comments to help you tell them apart.
See also: How to Build a Personal Finance App like Mint in 2023
I’ll walk you through the grab button code and show you where to make changes.
Let’s work on the header first:
Get button header
- In row 2, change the width from 150px to the width of your button image.
- In line 3, change the url img src from the example url to the direct url of your image in Picasa, your WordPress library or your image hosting account.
- Change in line as well 3 “YOUR BLOGNAME” in the alt text to your actual blog name.
- Also in line 3, change the width and height to match the dimensions of your button image.
That’s it for the image header! Now let’s get the button code box ready for your readers.
Button code box
- In line 8 you can set the width and color of the border of the code Change box if you want.
- In line 9, change the width to match the width of your button image.
- In line 10, you can change the height of the code box if you want would like. Increasing makes the box taller, decreasing makes the box shorter.
- On line 12, change the “YOUR-BLOG-NAME-button” to include your actual blog name. If your blog name is more than one word, be sure to replace spaces with dashes like I did in the example.
- Also on line 12, change the width to match the width of your button.
- On line 13, change the example URL after an href= to your blog’s URL.
- On line 14, change the img src URL from the Example URL to the URL of your blog button image.
- Also on line 14, change the alt text to the name of your blog.
- Also on line 14, change the Width and Height to match the dimensions of your button image.
Step Four: Test the Grab Button
Save your gadget or widget and check out the Grab Button on your blog. Looks pretty good, right?
Now you need to test the “tangible” code to make sure your readers get a working button. To do this, simply copy and paste the code from your grab button box into a new gadget or widget on your blog. Click the image. It should just refresh your page (if you’re on your home page) or take you to your home page (if you’re testing from another page).
If something looks weird, or your image link doesn’t work, go through the steps again and make sure you didn’t miss anything.
Chalkboard background in title card CC-BY Karen Dalziel.
Note about comments: This tutorial was updated on April 12, 2013. Questions & Answers in the comment thread from before this date refer to the old version of the code. If you have trouble with the tutorial, feel free to post a new question, even if it has been asked before.
See also: Create a contact group or distribution list in Outlook for PC
.