Using Tables in Your Document
Tables are a convenient way to display data in a columnar format, and can also be used for a variety of projects, including creating flyers, resumes, and company letterheads. Tables in Word are made up of cells and are displayed in a grid of horizontal rows and vertical columns.
Tables can be easily created in Word using the Insert tab, Table Group on the ribbon. In addition to creating a table from scratch on the ribbon, you can also convert existing text into a table or even draw a table. Once created, you can select the cells, rows, and columns, and then edit them just like any other text in a document.
Reading: How to create a resume in table form in word
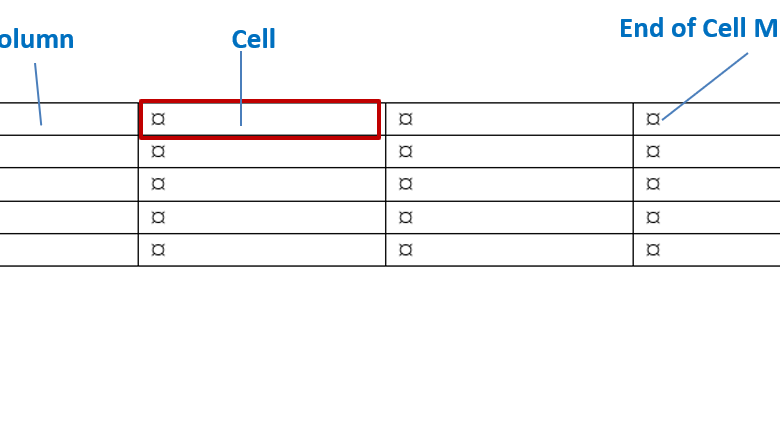
- Once you insert a table in Word, it appears in your document as a set of cells containing an end-of-cell marker.
- The table also contains an end-of-row marker
- You can also resize a table by pointing to its borders and dragging them handle appears
 Create a table for a resume
- Tap ENTER four times to position the table vertically on the page.
- Click on Insert Tab > Table Group and click on the Table command. (You will see a drop down menu containing a grid of squares. Hover your mouse over the grid and draw a 2×7 table and then click your mouse. (You will see the table on the Page will be drawn as you hover over it. Click your mouse when it’s how you want it. The table will then be inserted into your document. Your table should look like this):
See also: 7 Online Platforms to Build Apps without Coding

Entering text in a spreadsheet
Now that you have created your spreadsheet, you can start working on your spreadsheet.You can:
- Text in enter the cells, tabbing will take you from cell to cell.
- You can merge the cells to create column headings.
- Select the entire table, one or me Your rows and columns or one or more cells from
- Insert or delete rows at any time by using the Table > Layout contextual tab
- You can format your table using the Table > Design
Curriculum Vitae Table Setup – Merge Cells contextual tab
- Select the first row in the table by moving your mouse to the white area and pointing to the first row and clicking. (The Table Tools contextual tab appears.)
- Click the Layout tab and then click the Merge Cell command. (The 2 cells will be merged into one as shown below 🙂

Enter text in a table
- Click on Table Tools > Layout > Alignment Group and click Align Center.
- Click the insertion point in the merged cell and Freya Bunter and tap ENTER. Enter the rest of the contact information as shown below, tapping ENTER at the end of each line.

- Tap the Tab key on your keyboard to go to the Go to the first cell in the first row and type destination: Note: While typing the text, you can also move from cell to cell using the arrow keys, the tab key on your keyboard, or simply click in a cell.
- Tap the Tab key on your keyboard to move to the next cell and type: I am looking for a position as a receptionist where I can use my keyboard, telephone etiquette and Microsoft Word skills.
- Click with the mouse in the third th line and enter Qualifications. Tap here to move to the next cell.
- Click Home > Paragraph Group > Bullets command, to insert a bullet into the cell and type the following three bullets. A. Type Excellent communication and problem-solving skills, then tap ENTER to go to the next item b. Over the phone, email, and in personenter professional, positive attitude, and friendly demeanor, then tap ENTER to move to the next point. c. Type Excellent customer service and telephone etiquette. Your table should look like this:

- Triple-tap the Tab key on your keyboard and type Education, then type the rest of the resume as shown below, using the techniques explained above to move between cells with the Tab key and tap Enter to create a new bullet point as desired. Your final resume should look like this:
See also: How To Create Fake Email Address Within Seconds

Selecting a table
- If you After clicking in the table, the Table Tools contextual tab appears with two tabs, Design and Layout. Click on the Layout tab St rong> > Select Groupp.
- Click the Select command and then click Select Table.

Remove table borders
- Select the table and click the Table Tools > contextual tab Design> tab Frame > Frame
- Select No border from the menu. Her full resume looks like this:
menu button

See also: Making a dependent (cascading) drop down list in Excel
.