# Project Setup
Before you start the setup, make sure you’ve visited and gone through our Getting Started Guide
Make sure you have the following :
Reading: How to create a website like metamask.io
- Downloaded the MetaMask extension(opens new window).
- Downloaded and installed Node.js(opens new window)
- Clone the project files /download(opens new window) from GitHub .
- Your favorite text editor or IDE is installed. I personally like Visual Studio Code(opens new window)
# Open project folder
Open project folder. Navigate to start->index.html and look at the comment on Part 1. This is the user interface for the simple dapp with all the layout and buttons that will help us learn the basics of connecting with our MetaMask extension. We will use/build from this entire section for the first part of the tutorial.
# Install dependencies
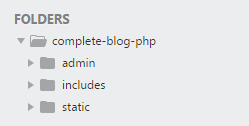
Open a terminal and make sure your terminal is in the home directory of located the start/ folder. Inside the folder, the files should look like this:
You will still have some files, but don’t worry!
Open your terminal and navigate to the startup folder. In this folder, run:
This will install all the necessary dependencies that we need for our project. This creates a node_modules/ folder where all dependencies are stored.
Next run:
Browse to http://localhost:9011(opens new window)
# Basic Action (Part 1)
Now let’s navigate to the contract.js file in your startup folder.
Your file should look something like this. Don’t worry about lines 1-31.
Once the content is loaded into the DOM, we call our initialization function. Now, before we start writing any code, let’s take a look at our task list for the first part of this app.
See also: Best Practices for Creating HTML Email Links With Advantages and Disadvantages
What we’ll cover in part one:
- Connection with the MetaMask wallet
- See our eth_accounts result
- View our network number
- View our ChainId
- View our accounts
# Connect to MetaMask wallet
The first thing we have to do in our dapp is to connect to our MetaMask wallet.
- We need to create a function to see if the MetaMask Chrome extension is installed
- If MetaMask is not installed:
- Change our ConnectButton to Click here to use MetaMask to install
- If you click this button it should take us to a page that allows us to install the extension
- Disable button
- If MetaMask is installed, w ir:
- Change our ConnectButton to Connect
- Clicking this button should allow us to connect to our MetaMask wallet
- Disable the button
Let’s get down to business!!
# Checking the MetaMask extension
In our code we need to connect to our button from our index.html
Next we create a checker function called isMetaMaskInstalled to see if the MetaMask extension is installed
Next we need to create a MetaMaskClientCheck function to see if we need to change the button text based on whether the MetaMask extension is installed or not.
# MetaMask “Not Installed” Dapp Flow
In our code block where MetaMask is not installed and we ask the user ‘Click here to install MetaMask!’, we need to make sure that when we click on our re button is clicked:
- redirect the user to the correct page to install the extension
- disable the button
We have created a function that will be called when we click the button and disable it. Let’s dive into the onClickInstall function and create the logic inside it.
Inside this function we want to:
- Change the button text to Onboarding in progress
- Disable the button
- Start the onboarding process
Write/paste this code above your MetaMaskClientCheck function.
TOP! If our end user doesn’t have the MetaMask extension now, they can install it. When they refresh the page, the Ethereum widget will be there and we can connect their MetaMask wallet to our dapp!
# MetaMask “installed” dapp flow
Need next Let’s revisit our MetaMaskClientCheck function and create similar functionality that we created in our “MetaMask not installed” block in our “MetaMask is installed” code block.
See also: Comprehensive Dreamweaver Tutorial
Now we have one Created function that is always called We click on the button to trigger a connection to our wallet and disable the button. Next, let’s dive into the onClickConnect function and build the logic we need inside it.
Inside this function, we want to:
- Create an asynchronous function that attempts to call this the RPC method ‘eth_requestAccounts’
- Catch any errors and log them to the console
Write/paste this code under your onClickInstall function .
Great! Once you click the button, the MetaMask extension will appear and your wallet will be connected.
# Get Ethereum Accounts
Next, every time we click the eth_accounts button, the next thing we want to do is get and display our Ethereum account. Replace the existing const onboardButton at the top of the initialize() function with the following three buttons:
Now that we’ve grabbed our eth_accounts button and paragraph box to display them in it, now we need to grab it Data.
Let’s write/paste the following code under our MetaMaskClientCheck() function.
If you already connected to your wallet in the previous section of the tutorial, you can Go to MetaMask’s Connected Sites menu and remove the localhost connection. This allows us to test both buttons again. If we refresh our page and click on the “ETH_ACCOUNTS” button, we should see the result “eth_accounts”: Unable to get accounts.
Let’s go ahead and press the “Connect” button again and confirm this prompt “Connect to MetaMask” and “Connect”. Now we can click the “ETH_ACCOUNTS” button again and we should see the public address of our MetaMask account.
CONGRATULATIONS!
We just got ours Build complete Basic actions functionality. You know how to connect to MetaMask, see and remove your connected apps, and get accounts.
Now to our next step, which shows our status.
Preview the full code to to this point of the tutorial:
See also: How To Build an Email List: 12 Winning Strategies for 2022
.