Trying to figure out how to create a WordPress membership site?
Membership sites allow you to charge users for access to restricted content, allowing you to skyrocket your site’s revenue.
Reading: How to create a membership website in wordpress
In this article we will show you exactly how to easily create a membership site with WordPress.
What are the advantages of creating a WordPress membership site?
Of these there are There are many reasons why you might want to consider a dedicated members-only section on your site. Here are some of the most popular benefits of creating a membership site:
- More income. Membership sites use a recurring billing model, which means you get a steady stream of Income that grows every month as more and more visitors register. This can help increase your income, especially if you’re already using affiliate sales and advertising.
- Less work. Make your content work for you. Membership sites are a fantastic way to increase your passive income by creating premium content once and then only adding to it when you choose. Once you create a great membership site, there isn’t much else you need to do to grow it, unless you decide to update your content or interact with your members.
- Establish authority. When you restrict content to a membership plan, visitors will easily understand that your premium content is valuable and that you are a master at it.
- Expand Your email list. When you add registered users to your email list, you fill it with engaged visitors who already know your site and are more likely to interact with your emails. This will help boost your email marketing efforts.
How to Create a Membership Site Using WordPress
Creating a membership site in WordPress is fairly easy and can be done without touching a single line of code. Just follow the steps below to get started.
Step 1: Set up a WordPress membership site
First things first, you need a website that you have full control over have. For that you need a powerful CMS like the self-hosted WordPress.org.
But before you can launch your WordPress membership site on the web, you need a WordPress hosting service. We recommend using Bluehost.

It’s the cheapest WordPress hosting solution because you get a free domain name and a massive discount on their hosting plans, which are exclusive to WPForms users.
Get Bluehost Exclusive Discount
What makes Bluehost really convenient is that it comes pre-installed with WordPress. Just log in to Bluehost and your new WordPress site is ready!
All we have to do now is turn your new site into a full-fledged membership site, as we’ll show in the next few steps.
Step 2: Install a membership plugin
There are many great membership plugins for WordPress. If you are looking for a simple membership site that allows users to register from the frontend, WPForms User Registration addon is the best option.
This addon allows you to allow visitors to register on to register with your WordPress site. Plus, you can automatically add them to your email list, send them welcome emails, and even activate their accounts.

However, if you are looking for a more comprehensive membership site plugin, you should consider MemberPress.
We recommend it because it’s easy to use and has all the features you need to run a full-fledged membership site.
Download MemberPress
After purchasing one appropriate MemberPress License , make sure to install it on your website. If you don’t know how, check out this guide to installing a WordPress plugin.
Step 3: Configure MemberPress
Once MemberPress is installed on your WordPress site, you can do it Start configuring.
In your WordPress dashboard, navigate to MemberPress » Settings.
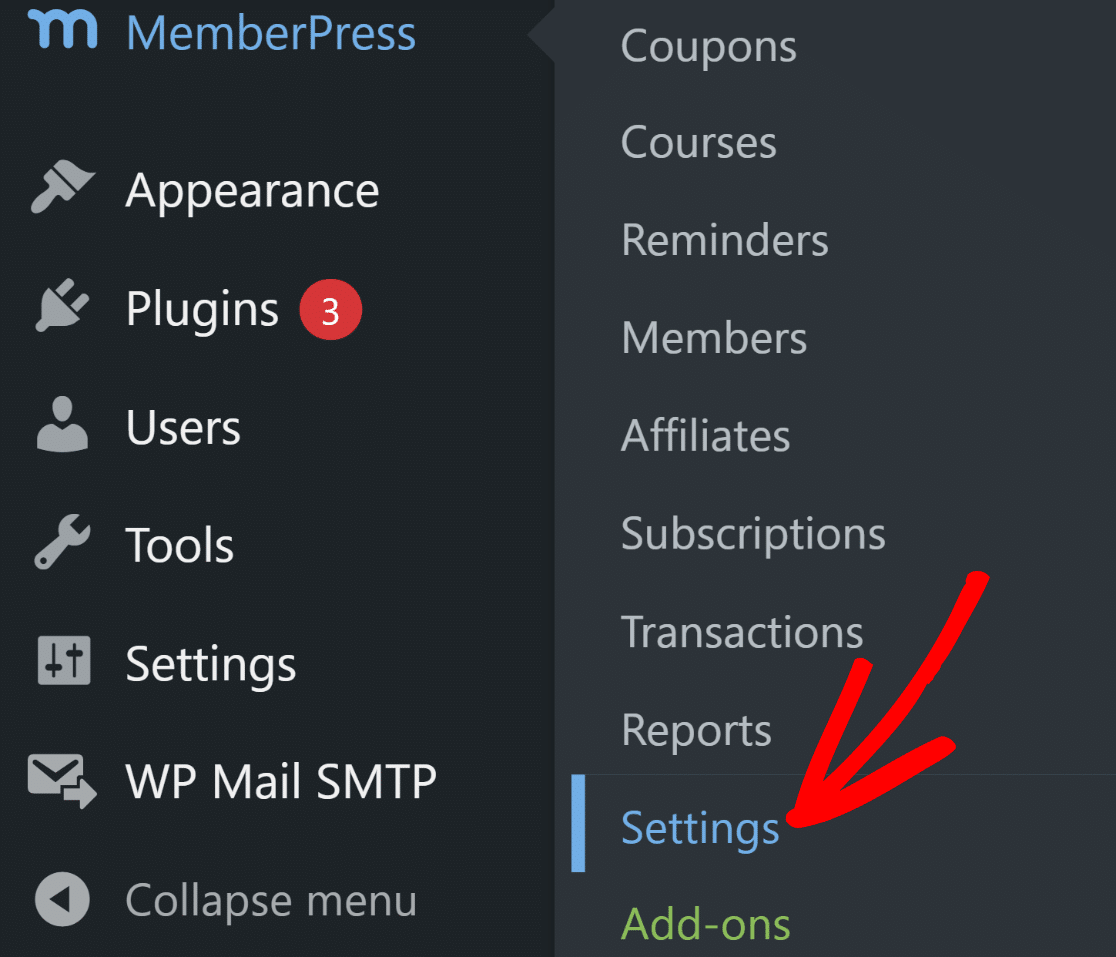
By default, this will take you to the license settings where you can enter the license key you received after purchasing MemberPress.

Once your license is activated, you get full access to all MemberPress features.
Next we set up payment methods.
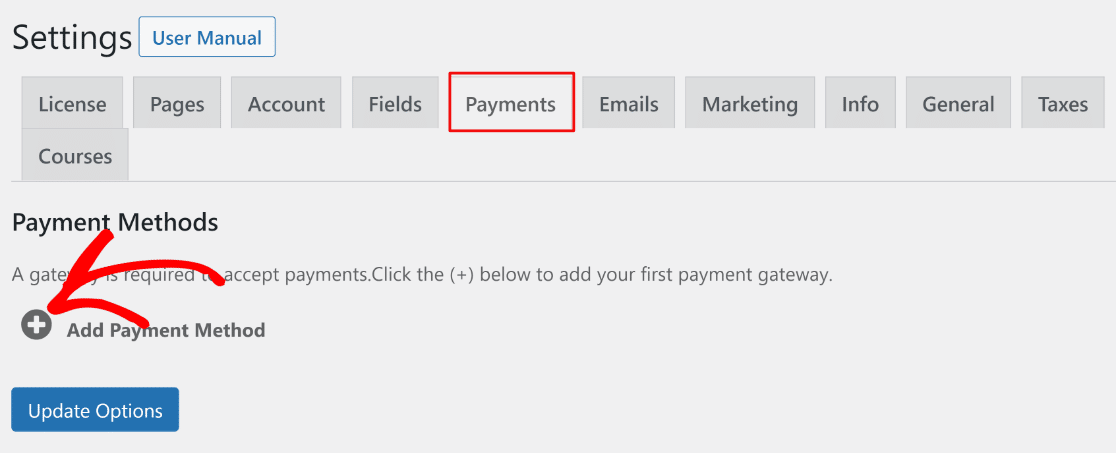
Step 4: Set up your payment methods
A membership site needs an efficient payment system so that new users can become paying members of your site.
To add a To add a payment method, visit the Settings page as before and click the Payments tab on the horizontal bar.
Then click Add payment method.
See also: 7 Steps To Building An Online Community (With Examples)
MemberPress allows you to accept payments using Stripe, PayPal, and Authorize.net as a payment gateway.

Feel free to set up multiple payment gateways or just stick with one. After adding your payment methods, be sure to click the Update Options button to save your settings.
For an in-depth comparison of the 2 most popular options, read our article Stripe vs .Paypal.
Step 5: Set Membership Tiers
Now that your MemberPress settings are fully configured, the next step is to create membership tiers that visitors can purchase.
Each level may have different prices, features and content. Luckily, you can create unlimited membership levels with MemberPress.
To do this, go to MemberPress » Memberships in the left dashboard menu and then click Add New .

Next, in Notepad, enter a title and description for your membership tier. Then set the price, billing type and access time in the Membership Terms section on the right.

After that, you should scroll down to the Membership Options section to find it adapt to your wishes. And don’t forget to click the other tabs to configure the Permissions and Price field as well.

Next, publish your membership level.
Step 6 : Set up access rules
Make sure you define where and for whom you want to restrict access to your members’ website. So you have to set rules for that. Go to MemberPress » Rules in the left pane and select Add New.

Now on the screen that appears, create a new rule to link your Content on the membership levels you already created.
For example, you can choose that all content in a certain category is only accessible to users with the 2 most expensive membership plans. In this example we have selected the Advanced WordPress Guide category.

Next, go to the Drip/Expiration settings.
If you enable the Drip option, you can gradually release content.
On the other hand, the Drip option allows you to release the Select time when content is no longer available.

Once everything looks how you want it, save your rule. Now you can repeat this step to create more rules.
Step 7: Create members-only content
Next, you should create members-only content so that you can actually use premium Have content to offer people after they register on your member site.
You can add content with a post or page. So in this example we will create content associated with the access rule we created in the last step.
Create a new post and add the desired content. Next, select the Advanced WordPress Guide category.

Next, scroll down to MemberPress Unauthorized Access section. Here you can control what non-members (unregistered users) see when they try to access this content.

See also: How to Create a Retro Website Design in Adobe Illustrator
And when everything is configured the way you want, publish your page. Then you can go to Posts » All Posts go. strong> to see what content is restricted to specific membership levels.

You can also create online courses with the built-in course add-on. Creating your course schedule is included It’s easy to use with the visual course builder. It’s built on top of the WordPress block editor, so it’s a similar process to the steps above.
Step 8: Create a pricing page
In this next one Step do you want to create a pricing page so your site visitors can see your different membership plans and sign up, MemberPress makes it easy for you do it through Group Settings.
Go to the left pane and select MemberPress » Groups. Then click the Add New button.

Name your group, for example, “Price Plans” so people know what the site is about. Then scroll down to the Group Options section. Here you can add the memberships you want to show on your pricing page. You can also change the pricing page design on this page.
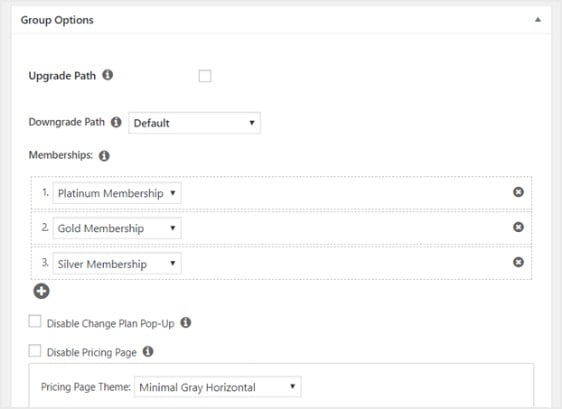
Publish this page now when you’re ready and preview it to try it out.
Here’s an example for how a pricing page will look like Check out the default WordPress Twenty Nineteen theme:

To ensure your pricing page is seen, you should set MemberPress to direct non-registered users to this page when they try to access members-only content. In other words, if someone who hasn’t paid to access your premium content tries to do so, they will be taken to a sales page.
To do this, go back to MemberPress » Groups and copy the group URL.

Next, go to MemberPress » Options and scroll down to the Unauthorized Access. After that, check the box next to Redirect unauthorized visitors to a specific URL and paste the URL into the box below.

Finally, select Update Options Button to complete this step so that unregistered users are redirected.
Step 9: Add registration and login forms
Now almost everything is set up. So the final step is to add registration and login forms to your member page for people to access.
Let’s do this with a widget. Go to Appearance » Widgets in the left pane and drag the MemberPress Login widget to a widget-ready area of your choice.

Next you need to Add your pricing page URL to the navigation menu so people can actually log in.
So go to Appearance » Menus and create a new menu or select an existing one.
p>
Then, under Groups on the left, select Price Plans and click the Add to Menu button.
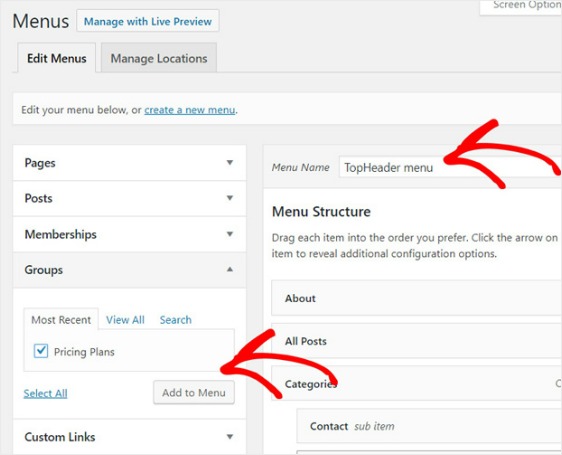
And if your prices page appears under the Menu Structure, drag it to tighten it place it where you want it, then click Save.
And that’s it! You have successfully created your WordPress membership site.
Next, grow your online forms business
Want to read about even more ways to increase your online income can? Read this article about WPForms power hacks to grow your business online. You might also be interested in our roundup of the best PayPal plugins for WordPress.
So what are you waiting for? Get started today with the most powerful WordPress form plugin.
Create your WordPress form now
If you like this article, please follow us on Facebook and Twitter to Get more free WordPress tutorials.
See also: 2 Killer Examples of Successful Health and Fitness E-Commerce Marketing
.