If you’re already a developer, building your first virtual reality app can be relatively easy if you get the right tools. This article will give you a quick start on creating a VR app that runs on an Android phone.
Before creating your own VR first person shooter or racing game, you need to so begin something less complex. In this article, we’ll help you take the first step in creating a basic VR environment.
Reading: How to create an vr app android
Step 1: Get tools
There are a variety of tools that can be created used to create VR worlds. Although you can use any tool you like, Unity3D is one of the most popular tools for creating virtual reality solutions, so it’s used here. It’s also free to use until you start making money from your solutions; that’s another good reason to pick it!
By using a tool like Unity, not only can you create a VR app for Android, but with a few tweaks to the build settings, you can too address a variety of other devices. Another key selling point for many developers is the option to integrate Unity with Visual Studio for scripting solutions.
You can find and download Unity3D from this link.
Running Unity3D
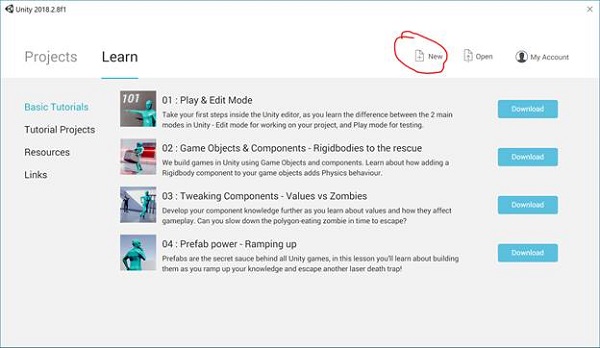
After installation, you should be running Unity3D. When you do this, you will be greeted with the introductory page, similar to that shown in Figure 1.
 Figure 1: The Unity3D introductory screen
On the introductory screen, you can click the New icon , which is marked in Figure 1. This will bring up a dialog for naming and saving your project, as shown in Figure 2.
 Figure 2: Naming your project in Unity
You should give your project a name and set the location where you want to save the files. In Figure 2 you can see that I named the project as VR Android style. I save my project in a Unity project folder. When the project is created, a subfolder is created in ProjectUnity using the project name.
You should make sure that the template setting shows 3D. Unity can also be used for 2D and other style projects. For the Android VR solution you create from this article, you will obviously aim for 3D.
Once your settings are entered, click the Create Project button, to create your empty project. Depending on the performance of your system, loading may take a few seconds or minutes. Once loaded, you should see the default Unity layout similar to Figure 3. A lot is displayed in the editor; However, you only need to work with a few of them first!
 Figure 3: The default Unity layout for your project
As targeting Android with Unity
From Default Unity will aim for a desktop solution. Therefore, you need to tweak some build settings to target Android. In the editor, select File -> Build Settings…. This brings up the Build Settings dialog.
 Figure 4: The Unity Build Settings
In the Build Settings dialog, you can see a list of platforms to target. The PC, Mac & Linux Standalone setting will likely be highlighted. To target Android, click Android in the platform list and then click the Switch platform button. The result should look like Figure 4. If you want to target iPhone, click iOS.
You can then close the Build Settings dialog, or get it out of the way for now.
Adding to your VR Project
If you look at your Unity editor, it should still look like Figure 3. In the top-middle section of the screen, you can see the working area, which we’ll call the scene, just like the tab shows. The scene area contains a sunburst and a camera icon. The camera provides the location for the view of your VR world. Sunburst is simply a light that helps things be seen. Without a default light, your resulting application would look like you were standing in a dark room with no window or light – you wouldn’t see anything!
You create your VR world by adding game objects to this scene.
See also: How Much Does it Cost to Develop an Android App?
To add a game object, click the GameObject menu item in the Unity navigation. From there, click on the 3D Object submenu since you are creating a 3D solution. This will list several 3D GameObjects that you can add to your project by selecting one.
 Figure 5: Unity 3D GameObjects
To keep things simple, select the sphere, this will give your scene a simple one Added sphere as shown in Figure 6.
 Figure 6: Adding a sphere to your virtual world
Congratulations! You have now created a virtual world with a sphere in the middle. p>
If you look at the top left of the Unity screen, you will see that the sphere is also listed in the SampleScene. The properties (settings) for the sphere can be seen on the right side of the page in the inspector dialog.
You probably want to move or adjust your sphere, at the top left of the Unity editor you can select a set of icons that allow you to do this can do Edit your object in the Sceneline. By default the move icon is probably highlighted 7 shows the list of tools.
 Figure 7: Unity tools for manipulating objects
When the move tool is highlighted, you can use the arrows in of the Scene View to move the sphere in one of the three axes using your input device (e.g. a mouse). If you look closely you will see a box inside the sphere. You can click and drag the sides of the box to move the sphere around two axes. If you switch to the scale tool, you can use one of the three colored boxes to stretch or compress the object in that direction, or you can click and move the center box to proportionally scale the entire game object.
If you move or scale the object, you will also see the changes in the inspector window on the right. In Figure 6, the sphere has been placed at position 0,0,0 and scaled to 1,1,1. In Figure 8, you can see that I’ve moved the object up 1 unit and scaled the entire sphere by 2. (Note that the image shows that I’ve moved it up 0.99 units, so almost 1!)
 Figure 8: A rigged sphere in Unity
You can add an object manipulate via the scene or in the inspector. Changing the values in the inspector gives you better control over the values; however, adjusting in one place automatically changes the other.
You can add additional objects to the scene. If you want to group objects, you can do so using the hierarchy pane on the left. In Figure 8 you can see that the sphere is listed in the scene. If you add additional game objects, they will be added as well. Figure 9 shows my scene with three cubes added.
 Figure 9: Adding more objects to a scene
The second cube named Cube(1) had its Changed the y-position to 2 in the inspector window, which made it move across the sphere. The third cube – Cube(2) – had its position values changed so that x was 2 and z was -2. You can view these values by selecting the objects and examining the Inspector values listed. You can select the objects by clicking them in the scene or in the hierarchy list on the left.
Even though this scene would make a horrible overall virtual world, it’s enough to get a feel for adding it of objects to get them to see in VR. Whether your virtual world is as simple as the one shown in Figure 9 or more complex, the next step is to create the project.
Creating the Android VR App
To build the Android VR app, return to the Build Settings screen you saw in Figure 4. To do this, select File -> Build Settings….
In the Build Settings screen, make sure your scene is included in the box above where it says “Scenes In Build”. In Figure 4 you can see that the SampleScene is included (this is the name of the Scene, also shown in the Hierarchy menu. If you are using an older version of Unity, your default Scene name may be different.
If in the If there are no scenes listed in the dialog, click the Add Open Scenes button to add the scene you created. Once added, make sure the box is checked so it will be included in the build.
Since you are targeting Android you will need to have both the Android SDK and JDK installed before compiling. You can confirm in Unity that you have these installed. Start by clicking Edit in Unity and then Click on Settings Navigation menus at the top This will bring up the Unity Preferences dialog Select External Tools and scroll down to the Android section This will bring up the paths to the Andro id SDK and JDK listed as shown in Figure 10. If you don’t have these, there should be a Download button you can use in the dialog to get them.
See also: How to find out when someones Gmail account was created
 Image 10: The Unity Settings dialog
Once you have confirmed the paths, you can return to the Build Settings dialog.
See the bottom right of the Build Settings dialog two buttons. The Create button generates a file for the platform you selected. In the case of Android, clicking Build will attempt to create an .apk file that can be used to install on an Android device (and an .apk file is an Android executable, similar to an .exe on Windows) . Clicking Build and Run will build the app and if your phone is connected, the app will download and run on your phone.
Additional Android Settings
Before Create , there are a few additional settings you should check to avoid errors. For example, if you are creating for the first time, you will probably be asked to provide a name for the APK file. After you’ve entered a name for your app, you’ll likely see a dialog box asking you to enter a bundle ID. If you get this message, your build process will be terminated. You must click OK to close the message.
You can add this required identifier by clicking the Player Settings… button in the Build Settings dialog box. click . This will bring up the Player Settings dialog. In the Player Settings dialog, click Other Settings, which expands to show the identification settings, including the package name, as shown in Figure 11. These are the bundle ID settings. Note that you may have to scroll down in the player settings to find the Other Settings section.
 Figure 11: The Unity Player Settings…
You must specify a value for the package name. Generally, this would be “com” followed by your company name, followed by the product name. For my example, I entered “com.DeveloperCom.VR_Android_Style” where DeveloperCom is the company and VR_Android_Style is the product name. You should enter something more relevant for you, although the same values I entered will work for your tests!
In addition to changing the package name, you should also check the minimum API level value that is set You can also change the player settings under Other options. The API settings are a few lines below the package name setting we just changed. In Figure 11 you can see that the value set on my system is Android 4.1, “Jelly Bean”. This value will actually also cause an error because VR requires you to change the minimum API level to at least 19.
The third setting you need to change to avoid errors is also in the player settings dialog, but at the bottom. Click on the XR settings to expand this section of the dialog box. This shows the VR settings. You should check the value for “Virtual Reality Supported”. This will expand the virtual reality options to show the virtual reality SDKs assigned to your projects. The list is probably empty, as shown in Figure 12.
 Figure 12: XR Settings in Unity
If you click the plus sign under the area that says the list is empty is, you should see several available SDKs. Most Android phone VR devices are compatible with Cardboard, so select it.
 Figure 13: The VR SDK Options
With the three updates to the player settings should Be prepared Click Build or Build and Run. Remember, once you click create you will need to copy the .apk file to your device to install the app. If you’re using Build and Run, you’ll need to connect an Android device to your computer in order to download the app.
If you’re building for Android for the first time, the process generally takes a long time than future builds. Once the build is complete, you should be able to run the app on an Android phone. Figure 14 shows two screenshots of the running app. In the screenshot below, the phone is clearly tilted!
 Figure 14: The Android Running App
If you have a Google Cardboard or similar device for your phone, you will see the two images on the screen are merged into a 3D view. Also, you’ll see that you can move your head to tilt the environment as well.
One thing you’ll notice is that the view doesn’t happen unless you change your location and don’t move. To do this, the camera must be aligned in the scene.That’s a topic for the next article though – which will be much shorter!
Conclusion
This introductory article covered a large part of developing an Android VR app. You’ve been thrown into the Unity development environment and shown the basics of adding an object. From there, you learned the critical settings that needed to be adjusted to create a basic Android VR app.
In the next article, I’ll build on what you’ve done here to give you to show how you can move the view. This allows you to move around the objects you create!
See also: 7 Ways to Write Better Recipes as a Food Blogger
.