Your business email address has a huge impact on how customers see your brand. While Gmail-based email addresses like [email protected] are very popular with users, they’re usually better suited for personal use. As a business, it’s better to get an email alias with your custom domain.
Imagine receiving an email from [email protected] Despite the name, it’s hard tell if the email came from an actual, professional company. The email sent by [email protected] or [email protected] deserves more attention and respect.
Reading: How to create an email with your own name
With online services, you can now create these custom email ids powered by Gmail what means you can make it more convenient to use the widely popular Gmail, while also owing a better, more professional account name.
How to create a custom email address with your own domain name
To create a custom email account, you must subscribe to a web hosting service. In simple terms, a web hosting service is a service that allows you to own “space” on the internet in the form of custom domain names (which you use for your email), WordPress websites, and even completely custom websites for your business.
Custom email requires you to purchase a hosting plan with email marketing plans that allow you to register a custom domain name such as XYZ.com or XYZ.org for your business. Once done, you can easily link/connect this domain to your Gmail account using the POP3 settings that we explain below for various recommended web hosting services.
So create your own email address using your own domain name and Gmail
Here is a step-by-step guide on how to create your custom email addresses with different web hosting providers services:
- Get a custom domain name and subscribe to a hosting plan that offers email hosting services.
- Sign up to Go to your web hosting account and locate the Email Services tab in your CPanel.
- Connect your Gmail Services hosting account. Make sure all your information is correct.
- Verify your custom email address by forwarding and replying to a dummy email.
You can now promote your new custom email address on your website and other social media accounts. To achieve a high level of conversions, use your new custom email address for email retargeting purposes.
How to set up your custom email address with your Host on
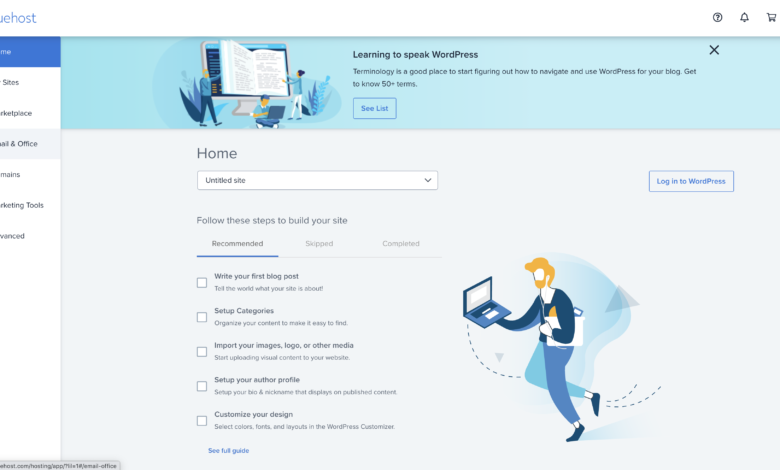
Set up a custom email at Bluehost
- Log in to your Bluehost. From the side navigation of the Bluehost dashboard, click the Email & Office tab.

- Choose Google Workspace as email provider

- You have the freedom to choose your desired business email account based on your own domain.

- Fill in the necessary information about your company.

- Set the number of users and click “Add to cart”.

- Now go to Mail & Office.
- On the Mail & Office tab, locate the Forwarders section.
- Click the ▼ icon below Manage and then select the preferred domain from the drop-down menu that appears.
- Click the Add domain forwarding button and choose from the List of options.
Now all emails to [email protected] will be forwarded to your Gmail account.
The sections “How to get email” and “How to send email” come after the remaining sections for alternatives, i. H. between the Hostinger and Summary sections of the page.
Using Hostinger to create a custom email
For Hostinger, all web hosting includes -Plans email accounts by default. It also offers email hosting services like its Business and Enterprise plan, which comes with a one-click import feature for migrating your old email hosting account to Hostinger.
With these services, you get dedicated resources to create and manage professional email accounts.
This is where you start your business email service plan with Hostinger.
How to create Your custom email address and use Hostinger’s various email services:
- Start from the hPanel dashboard.

- Go to “Emails” and then click ” Email Accounts”.

- Click on Add New Email Account.

- Enter the username and password and click the “Create” button.
See also: Accomplishments for a Resume: Key Achievements & Awards

- Your new email address will automatically appear in the “E -Manage Mail Accounts” is displayed once it’s successfully created.
- Repeat the same steps to add another work email address.
J Any email address you create through Hostinger is accessible through Webmail, which allows you to read, compose, send and receive emails using your desktop or mobile device.
Create a Custom Email with DreamHost
With DreamHost, the custom panel is easily navigable to help you access using your work email address relative to your domain name . If your plan includes email hosting, you are eligible to sign up for email.
How to get started:
- On the left side of your DreamHost control panel you will see a tab called Email.
- Click on it and select Manage Email.

- Look on the next one Screen after Create New Email Address button.

- Fill in the fields with your personal or business information and choose your email address and select the domain you want to use with it.

Take some time to customize yours en email account in DreamHost’s control panel.
All Dreamhost email plans support mailboxes up to 25 GB, so you can adjust if you need more space. DreamHost sets the default storage at 200MB, which is more than enough if you clean out your inbox from time to time.
The DreamHost shared hosting plan does not offer email marketing services. To create your custom email address, they offer affordable email plans starting at $1.67 per mailbox monthly.
cPanel Email Settings
Once you’ve set up your account, go to cPanel and find your email settings.
- Return to the home page and click the on the side navigation menu Click the Advanced tab on the left.
- In the Email section, click the Email Accounts icon.
![]()
- Click the Create button.

- Under Domain, select the specific domain where you want to create an email account.
- In the Username text box, type the Enter the username you want to use.
- In the Enter Password text box, type the desired password for this email account.
- The Password Strength meter shows whether the entered password is strong enough. We strongly recommend that you use a strong password.
- The Mailbox Quota (optional) text box is used to specify the amount of your total hosting storage allocated to this specific email account. The default value that should be listed is 500 MB. You can increase or decrease this number as you wish depending on the hosting plan you currently have.
- Once the username, password and quota are correct, click the “Create” button.
You must have these settings handy to configure Gmail to send and receive email (later step)
**Expert Note: cPanel is the most common control panel, but some hosting companies customize the layout/design of their cPanel to make it unique. These instructions may or may not be 100% accurate in these cases.
How to create your custom email address and domain on Google yourself
Google Workspaces allows you to purchase a web hosting service and choose a domain name that links directly to your Gmail.com. The most basic plan is $6 per month/account.
- Visit the Google Workspaces page

- Navigate to the Pricing page.
- Choose the web hosting plan you want (choose the $4.20 Starter plan if you just need a custom email address).

- Click on “Get Started”.
- Enter the required information about your company.

- You will be asked “Does your company have a domain?”
- Click “No, I need one” and register.
- Set up your account!
How to create E -Mails with your custom email address in Gmail
strong>
Gmail (Gmail) is great and free Gmail gives you 15 GB of storage space and access to Google Drive, the cloud storage for your photos and files, plus access to Google Docs, Sheets, Slides, and more.
Use these tools to share documents, spreadsheets, Create and share ations and presentations. All of these tools fully integrate with Gmail and can be used with your own email.
See also: Postgres.app
So you can sign in to multiple Gmail accounts at the same time (i.e. you can easily switch between switch your personal and work email inboxes). Sign up here to create your Google account.
**Professional Note: Not all hosting companies offer, or may only offer, email hosting add-on or premium service.
How to add email forwarding
You don’t have to add a forwarding from your domain email Set up mail address to your Gmail address, but it should allow for faster delivery of new email to Gmail. Before configuring Gmail, you should create an email forwarding.
Return to cPanel and create an email forwarding from your custom domain email address to your Google Mail Address.
- Under the Email & Office tab, look for the Forwarding section.
- Click the ▼ icon under Manage ‘ and then select the preferred domain from the drop-down menu that appears.
- Click ‘Add’. Domain forwarder button.

Now all emails to [email protected] will be forwarded to your Gmail account.
Note that Google also offers Google Workspace – a Paid workspace suite of business tools, including Gmail. Google Workspace offers several business benefits – most notably collaboration and organization. We discuss this below in the FAQ.
Receive emails in Gmail
- Log in to your Gmail account.

- Open the settings in the top right corner by clicking the gear icon in the top left corner, then click See all settings.
- Click Accounts and Import
- Scroll down and under the Get email from other accounts section click Add an email account.

- Enter your email address, e.g. [email protected]

- Click the Next button.
- Choose the one that best suits your needs from.

You may need to refer to the cPanel email settings you made a note of earlier:
- Enter your full email Enter email address as username
- Enter the password for your email account
- Enter the incoming POP server. Select the “Always use a secure connection (SSL)” option. Make sure the port is changed to 995
- Select any additional options you want
- Click the Add Account button.
How To send emails in Gmail
- Select “Yes, I want to be able to send emails, e.g. [email protected]”
- In general, you should leave “Treat as alias” checked. This is the setting if all your emails go to the same Gmail inbox.
- If you want to send emails on behalf of another account, turn it off. This would be the case if you have multiple accounts that you log into separately. Unchecking this box will allow you to reply to emails from an account you are not currently signed in to.

- Click Click the Next Step button.

Refer to the cPanel email settings you are using made a note of before
- enter the outgoing SMTP server
- Enter your full email address as the username
- Enter the password for your e-mail account
- Choose a secure connection with SSL.Make sure the port is changed to 465
- Click Add Account

- Confirm your email address
- Since we set up email forwarding earlier, a confirmation email will be sent to your Gmail account

- Click or copy the confirmation link in the email PIN and paste
- Done! You can now send and receive email using Gmail.
Summary: Using Gmail to create an email with your domain
Create professional-looking email addresses using Gmail and your domain. We recommend BlueHost to help you easily set up your new Gmail and create an email with your domain.
By following the steps above, you can create a custom email address create with your own domain name. They guide you through navigating the BlueHost dashboard to create a custom email address for your business.
Remember that by clicking Email and Office in the left navigation bar easily find the right options to set Set up your custom email address.
The Advanced tab takes you to the email settings to help you set up your custom email Mail address to connect to your Gmail account and allows you to customize your email settings to suit your business needs.
You can also follow the steps above to connect this email address to a free Gmail account so that you can send and receive emails from Google’s email solution.
See also: The best strategies to grow your live talk show
Related Resources
- Best Email Marketing Services
- Do you want a retargeting email run campaign? We’ll show you how to do it. – Digital.com
- Constant Contact Email Verification: “Effective Email Marketing”. We find out the truth. – Digital.com
- MailChimp Review: Simple Email Marketing. But will it get customers to read your email? – Digital.com
.