Drupal is a free, powerful content management system that you can use to build custom websites, blogs, portals, and more. It has all the features you need to create a fully functional website, is highly customizable, scalable and free to use.
In this Drupal tutorial we will show you step by step how to create a website, which uses the latest version of the Drupal CMS, at the time of writing this article Drupal 9.
Reading: How to create a website using drupal cms
However, using Drupal is not as easy as building a website with WordPress or website builders. While it’s not that difficult to understand, to really customize your site, some knowledge of HTML and CSS would be helpful.
Here’s what this Drupal 9 tutorial for beginners will cover:
Are you okay? Then let’s get started.
What kind of websites can you build with Drupal?
Before we start the tutorial part of this post, let’s take a quick look at what Drupal does can you. If this is your first time using this CMS, you might be wondering what exactly Drupal is for. It turns out that Drupal can be used to build almost any type of website:
- Personal or business websites
- Blogs and news websites
- Portfolio, Art, Music and Multimedia Sites
- Forums
- E-Commerce Sites and Online Shops
- Social Networking Sites
See the Drupal Showcase section for more examples.
To sum up, no matter what website you want to build, Drupal allows you to do it. And as a Drupal user, you’re in good company.
Now let’s take a look at how the CMS can help you.
1. Find web hosting for your Drupal site
Before you can create a website, you need a place where it will be located and reachable, also known as web hosting.
Already have hosting? Proceed to step 2 of the Drupal tutorial.
There are four main factors to consider when hosting:
- Uptime – Uptime percentage is displayed how much time your website will be up and running. We recommend you choose something that meets or exceeds the industry standard of 99.9%.
- Page Load Speed – You should choose a host that loads faster than 850ms eh the current average.
- Customer Support – At some point you will need to resolve issues with support. Consequently, it makes sense to choose a host that has quality and responsive customer support.
- Price – Hosting services vary widely in price. Choose the one that you can afford and that also has satisfactory ratings on the first three factors.
Most vendors should have the correct system requirements for Drupal (see documentation). The best of them (e.g. Bluehost) also have “one-click install” for CMS like Drupal and Joomla, so you don’t have to bother with manual installation.
2. Complete the Drupal Installation
There are two ways to install and set up a Drupal website: One is to use a web hosting company with a “quick install” option. The other is to download and install Drupal manually. We explain both options below.
2a. Install Drupal Automatically on Bluehost.com (Quick Install)
Let’s start with a tutorial on installing Drupal automatically. Once you’ve signed up and purchased a domain from Bluehost, log into your account and click Advanced.
Then scroll down and click Portals/CMS.
From there, use the search box in the top left corner to search for Drupal and click on the result when you find it. Then click Install Now.
This will bring you to this screen:
Select Quick Install in the top right corner. This will take you here:
You’ll find that your Bluehost domain is already set up by default. It’s best to leave everything as is unless you know what you’re doing.
Enter your admin username, password, and email address. After that, just click Install. Before the installation can continue, you’ll likely get a message like this:
This is normal, so don’t worry. It’s all about the default files that come with your Bluehost installation. Just check the box and click Install again. The installation then begins.
Once complete, you have successfully installed Drupal on your Bluehost domain and can use the links provided to verify your new website and get to the login screen. Well done!
2b. How to Install Drupal Manually (Any Web Host)
If you’re not using Bluehost or a web host that can install Drupal automatically, you can also set it up manually. It’s very simple.
Download the files
The first step is to go to the download section of the official Drupal website and click on the big blue button.
Unzip the file you just downloaded onto your hard drive.Then connect to your server via FTP (e.g. using FileZilla) and start uploading its contents to the server location pointed to by your domain (usually the root directory). This will take a while.
Create a database for Drupal
Meanwhile, navigate to your host’s MySQL database management area. Here, make sure to create a dedicated database for your Drupal installation. Although the process will vary slightly by vendor, you should end up with the following:
- Database Name
- A username with full rights to that database
- The user’s password
- A database host address
Have all this information ready, you will need it soon.
Run the installation
Once the files are uploaded, navigate to your site domain. This will start the Drupal installation process.
The first step is to choose the language you want your website to operate in. Make your choice and click on save and continue.
After that you have to select your so-called installation profile. This determines whether or not some of your site features will be preconfigured. The choices here may differ depending on the Drupal distribution you’re using. Make your choice again and continue.
For this tutorial we will use the default Drupal profile. If you are more experienced, you can also use a minimal option.
In the next step, the installation will check if your environment is sufficient to run the software. All problems are shown as warnings so that you can fix them. Continue when satisfied.
Now it’s time to use the database information you collected earlier. Enter the database name, username and password. If your MySQL host address is not localhost, you can change it under Advanced options. In the same place you can also assign a database prefix if needed (e.g. if you have multiple sites in one database). Save and continue once you’re done.
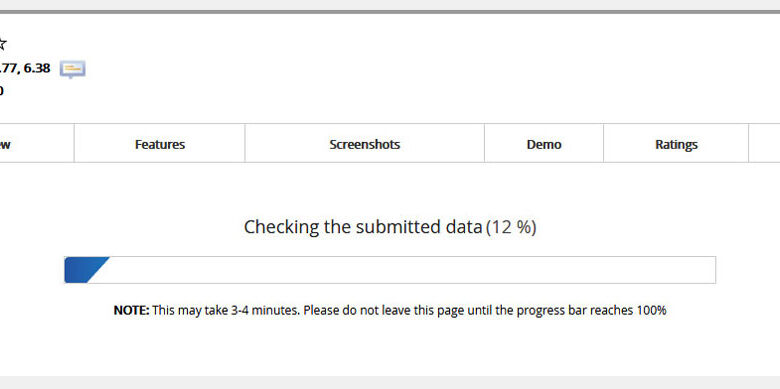
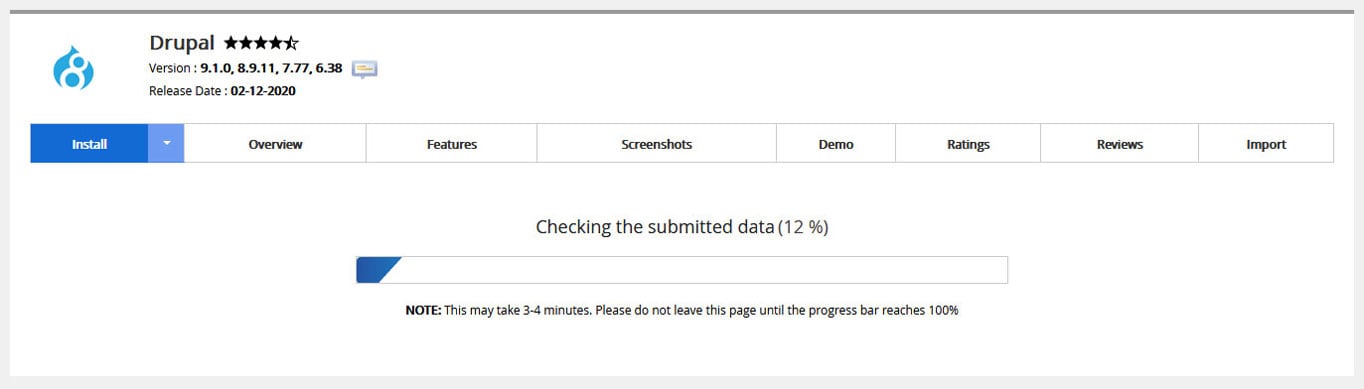
After that, the actual installation will begin.
Finish
The final step is to gather some basic information about Your site.
Fill it in.
- Site Name – The name of your website. You can change this later, so don’t be too busy getting it right.
- Website Email Address – The email address from of users will receive website notifications.
- Username – The username of the main administrator account of your website.
- Password – Choose a strong one Password to keep your account safe and don’t forget to confirm it again.
- Email Address – The email address associated with your primary user. Drupal will automatically fill in the website email address and change it as needed.
- Default Country – The default country for your website.
- Default time zone – The time zone your website uses to display dates and similar information.
In the end, you need to decide whether you want your website to automatically check for and notify you of updates you, if any. If you are satisfied, save again and you are finished with the installation.
3. Get to know the interface
After you complete the installation process, your newly created Drupal site will look like this:
If you are logged in (you can always access the login screen via http: //yourdomain.com/user/login), at the top of the screen you will see links to all parts of the backend where you can make changes to your website. We’ll be using a number of them throughout this Drupal tutorial, but for better understanding, let’s briefly highlight what each of them contains:
- Content – Here you can create basic content such as posts and pages. This is also where you manage comments and find your website’s media library.
- Structure – This is where you manage all the structural elements of your website, including blocks, forms and content types, menus and taxonomies.
- Appearance – Contains the settings for themes and other appearance-related options, as well as website updates.
- Expand – In this menu, you can You install, update, and uninstall Drupal modules.
- Configuration – allows you to access your site settings.
- People – Contains options for users, roles, and permission levels.
- Reports – Find logs, update information, status reports, errors, search terms, and other information about your site.
- Help – The one-stop shop for helpful information about r basic website administration as well as to all modules installed on your website.
- li>
By the way, under Shortcuts you can define your own links to parts of the admin interface that you use frequently .
This way you can improve and speed up your workflow.Understood? Then let us put this new knowledge to good use.
4. Change the design of your Drupal website
Below is the frontend of your website, what your visitors will see. It’s still a bit boring right now, so the first thing you should do is change your site’s default theme to something else. You can find an option for this under Appearance > Install new theme.
Find theme in directory
In contrast to other content management systems, however, it is not possible to add themes from within find the Drupal backend. To do this, you need to go to the official Drupal theme directory, for which you can also find a link at the top of the theme installation page.
At the time of this writing, you have over 2,900 themes to choose from. The directory gives you multiple ways to filter them so you can find what you’re looking for.
However, you might still be overwhelmed by the sheer number. In that case, it’s good to start with one of the many best-of lists out there. Reviewing themes goes a bit beyond a beginner’s Drupal tutorial.
- The 23 Best Drupal Themes
- 20 Best Drupal 8 & 9 CMS Themes for 2022 (with responsive designs)
When choosing a theme, make sure that it suits your technical skills, allows you to create the design vision you have in mind, and that it is mobile responsive (a must these days). All themes in the directory also have their own page where you can read their details and watch a live demo.
Install the theme on your Drupal site
If you Once you have found the right one, installing it on your website is easy. Either download the theme from the directory (see options below) or right click on the download link and copy its location.
See also: Creating a drop-down list in a cell
After that you can either use the file or the URL to upload the theme to your site.

You still need to install and enable it from the Appearance tab (called “Set as default” in Drupal).
Once you have done this and you go back to your website (there is a button in the top left corner) you can see the new design in action.
5. Configure your theme
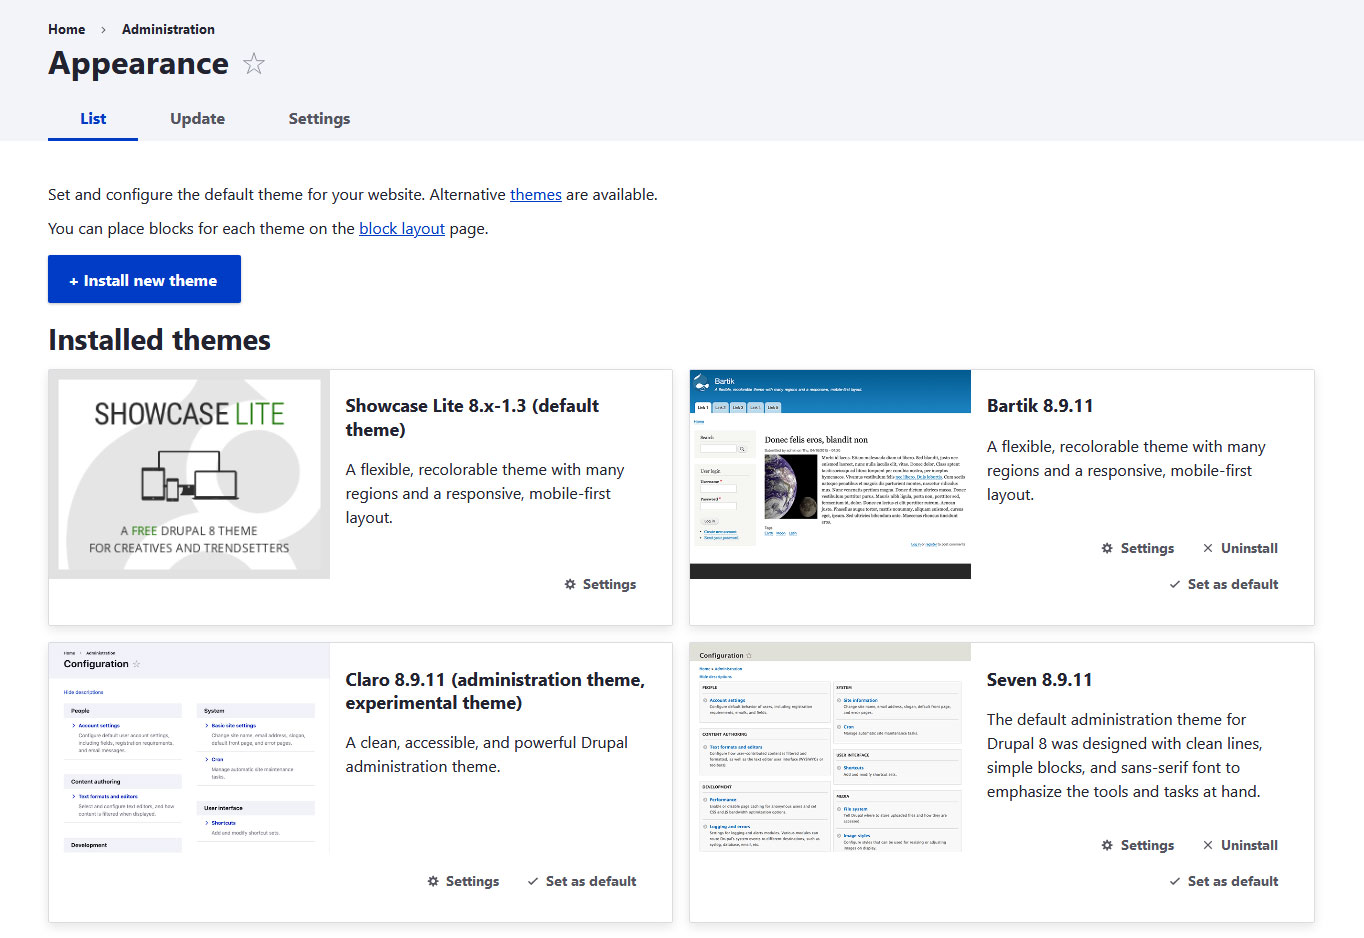
Once you’ve installed and activated a new site theme, you’ll find it at the top of the list in the Appearance menu. Most themes have configuration options, which you can access by clicking the Settings link next to it. Alternatively, you can use the Settings tab above and then select the theme you wish to edit.
Both will take you to this screen.
This is where you can make any changes to your theme offerings and, depending on the topic, even display a preview at the same time. This can be changing the color scheme, enabling/disabling user pictures, uploading logos and favicons, setting backgrounds, filters and much more. If you’re building a website with Drupal, be sure to stop by here to take advantage of everything your theme has to offer.
Change your admin theme along the way
Drupal not only allows you to change the frontend of your site with themes, but also offers the same possibility for the backend. One thing you can try is the experimental new default backend theme called Claro that Drupal 9 ships with. You can find it under Uninstalled Themes in the Appearance menu.

To use it, click on the Install link to put it on your website (you must save your selection confirm as it is currently experimental) and wait for the installation to complete. After that you can select the new backend theme from the dropdown menu under Management theme.

Now if you save the configuration, the backend will look much more modern and elegant.
There are other admin themes, see more examples here. Some of them also come with their own modules to add additional functionality.
6. Set up a new homepage
Now your website looks better, but it’s still pretty much empty. Changing that is the next step in our Drupal tutorial.
Create a page and fill it with content
First we want to create a home page so visitors can see something when they swing by. To do this, go to Content > Add Content > Base Page. You will get to this screen:
Here you can create content with a simple editor.At the top you have the option to set a page title that will also be displayed on your website.
Below this is a link that says Edit Summary. Clicking on this gives you the option to provide a synopsis for your post or page. This is something like an excerpt that appears in certain parts of your website.
Below this is an option to enter and format the main text. For example, you can bold and italicize the text, add and remove links, create lists, define block quotes, insert images, and use the dropdown menu to define headings. Additional options such as entering tables or horizontal separators are available by switching to Full HTML below.
If you have used a word processor or other content management system before, you should quickly and be able to assemble the content you want.
When you’re done, make sure you add a slug or url suffix to your .url alias on the right-hand side define page. This is easily done by typing something like /front-page in the field.
After that, save the post below and make sure the box in front of Published is checked.
So far so good.
Set as start page
To use your new page as your start page, you now need to go to Configuration > System > Basic page settings. Here, under the default home page, enter the same slug you just defined for your new page.
Once you’ve done this and saved the configuration, your content should appear on the home page of your Drupal site.
7. Create another page and add it to the menu
The next step is to create an about page and add it as a menu item. The first few steps are the same as before. Create a simple page, fill it with content (if you want to know how to create a killer about page, read this post) and set a slug (e.g. /about).
But this time before that, make sure you click Menu Settings and check the box that says Provide menu link.
To fill in the settings that appear:
- Menu link title – This is the text of the link that users will see in the navigation menu. Make it something instantly recognizable. In this case, “About Me” is a good choice.
- Description – An optional description that will be displayed when someone mouses over the menu link. It can say something like “Learn more about what I offer.”
- Parent Item – If you already have other menu items, you can use this setting to create sub-items.
- Weight — With this setting you can determine the order of your menu items. The higher the number, the closer they appear.
Once you’re happy with your settings, save the page (with Published checked). Drupal should automatically take you back to your frontend, where you will see both your new page and menu item.
Configure the navigation menu
But wait, what if that Menu is in the wrong order? No problem, just hover over it and then click on the pencil icon that appears. This should give you the option to select the Edit menu.
Doing so will take you to the following screen.
Here you can simply drag and drop the menu items into the menu pull Order what you want using the icon on the left. Save when you’re done to translate the changes to your website.

Last Tip: You can also use the “Add Link” button above to manually add more pages to the navigation menu and you can also access this menu from Structure > Menus.
8. Create a blog and start posting
Of course, many people who want to create a website also want to start a blog. Of course, as a proper CMS, Drupal also has features for what this tutorial is about next.
Write your first article
To set up a blog, we’re going to create some content first. After all, what is a blog without content? A blank page.
Creating blog content in Drupal is not that difficult. When we used to assemble pages, you may have seen that there is a second content type called Articles alongside the base page.

This is intended to create less static content such as press releases, updates and – you guessed it – blog posts. It works much the same as Pages: just create a new article, enter a title, summary and content, add the URL suffix and publish.
There are some differences though .Unlike plain pages, articles also have comment settings on the right (comments are enabled by default) and the ability to add tags and a featured image below (browse, upload, and add an alternative text).
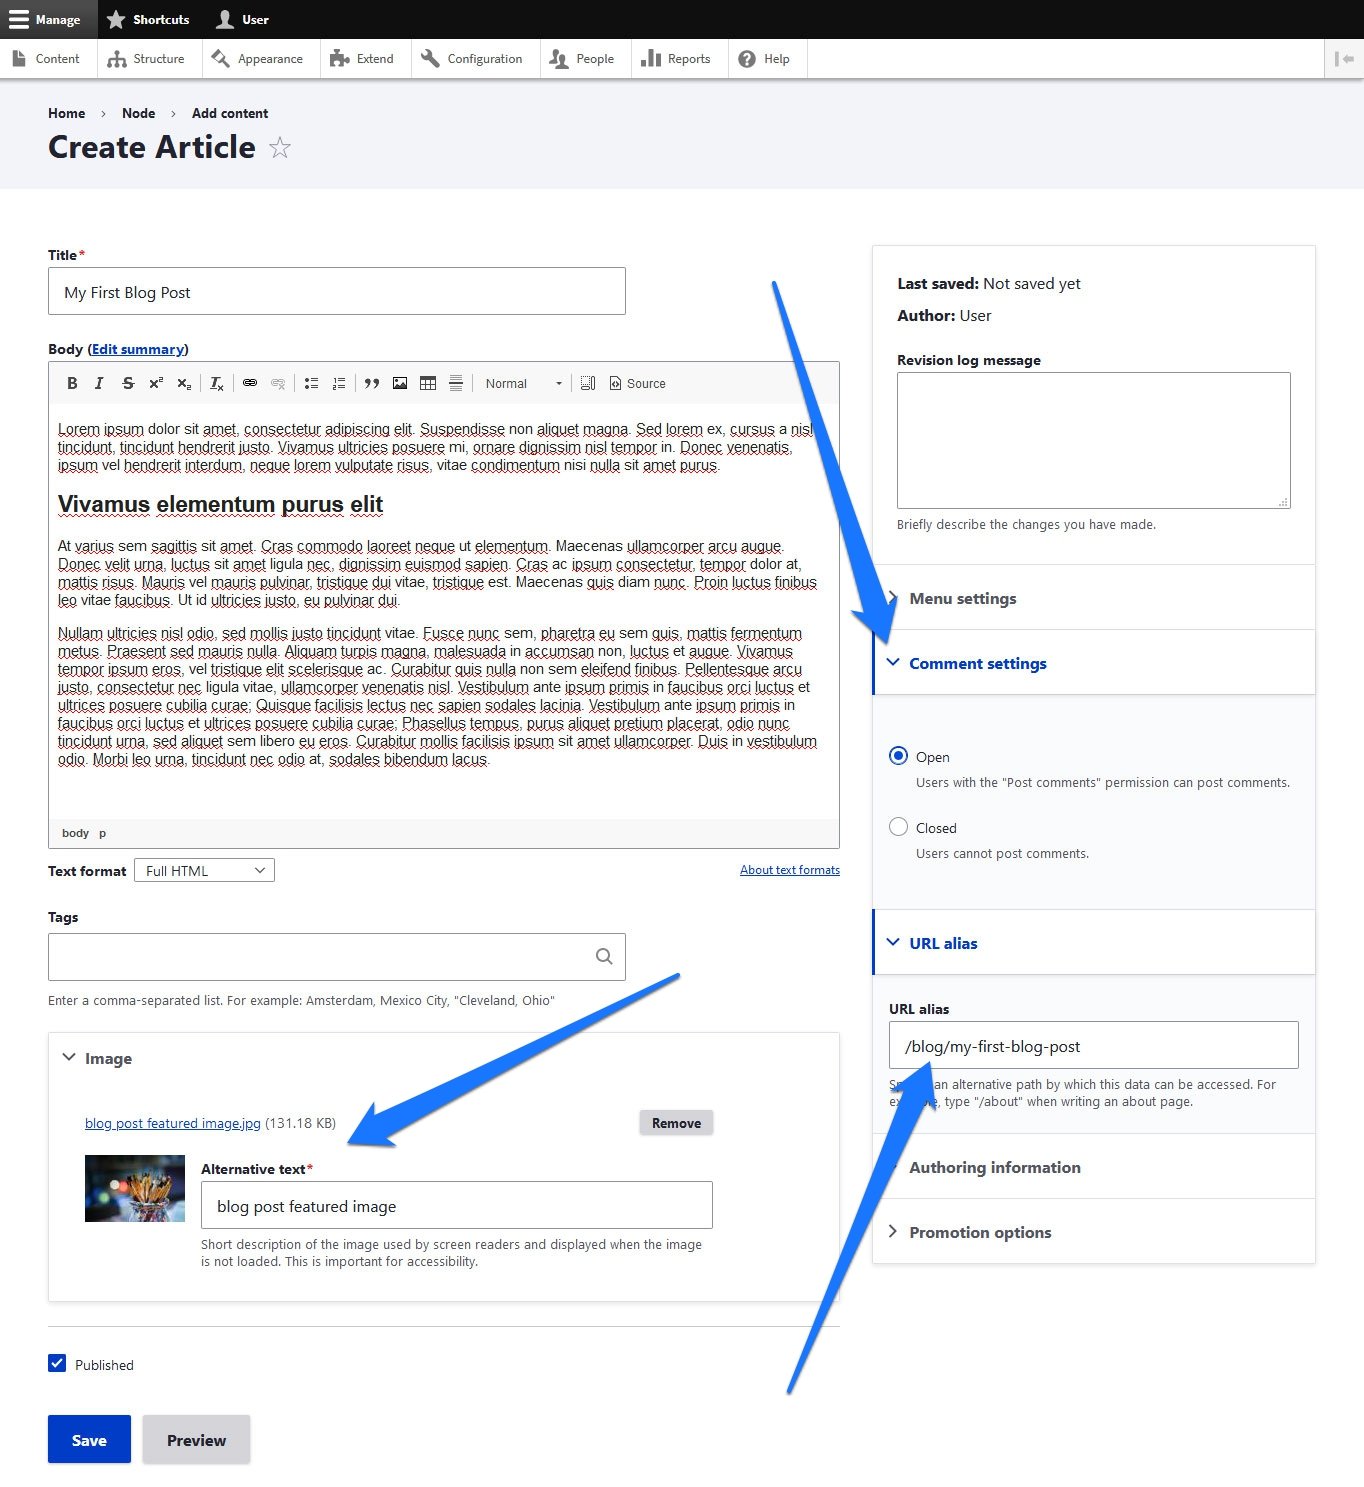
Also, under URL Alias, consider including the blog address in the URL, something like /blog/post-title if that’s how you want to organize your content. Otherwise, your blog articles will simply appear at http://yourdomain.com/post-title. Under Author Information you can also change the publication date and time if that becomes relevant.
Here is the finished result:

Set up a blog page
Once you’ve created a blog post, it’s now a matter of displaying it on the page. So far anyone who knows the link can see it, but wouldn’t it be nice if all the blog posts were in one place and sorted chronologically? Exactly.
To do this, we need to create a so-called view. This is what Drupal calls content lists and creating them is not that difficult. You can find the option for this under Structure > Views.

Configure View
Click Add View here to go to this screen:
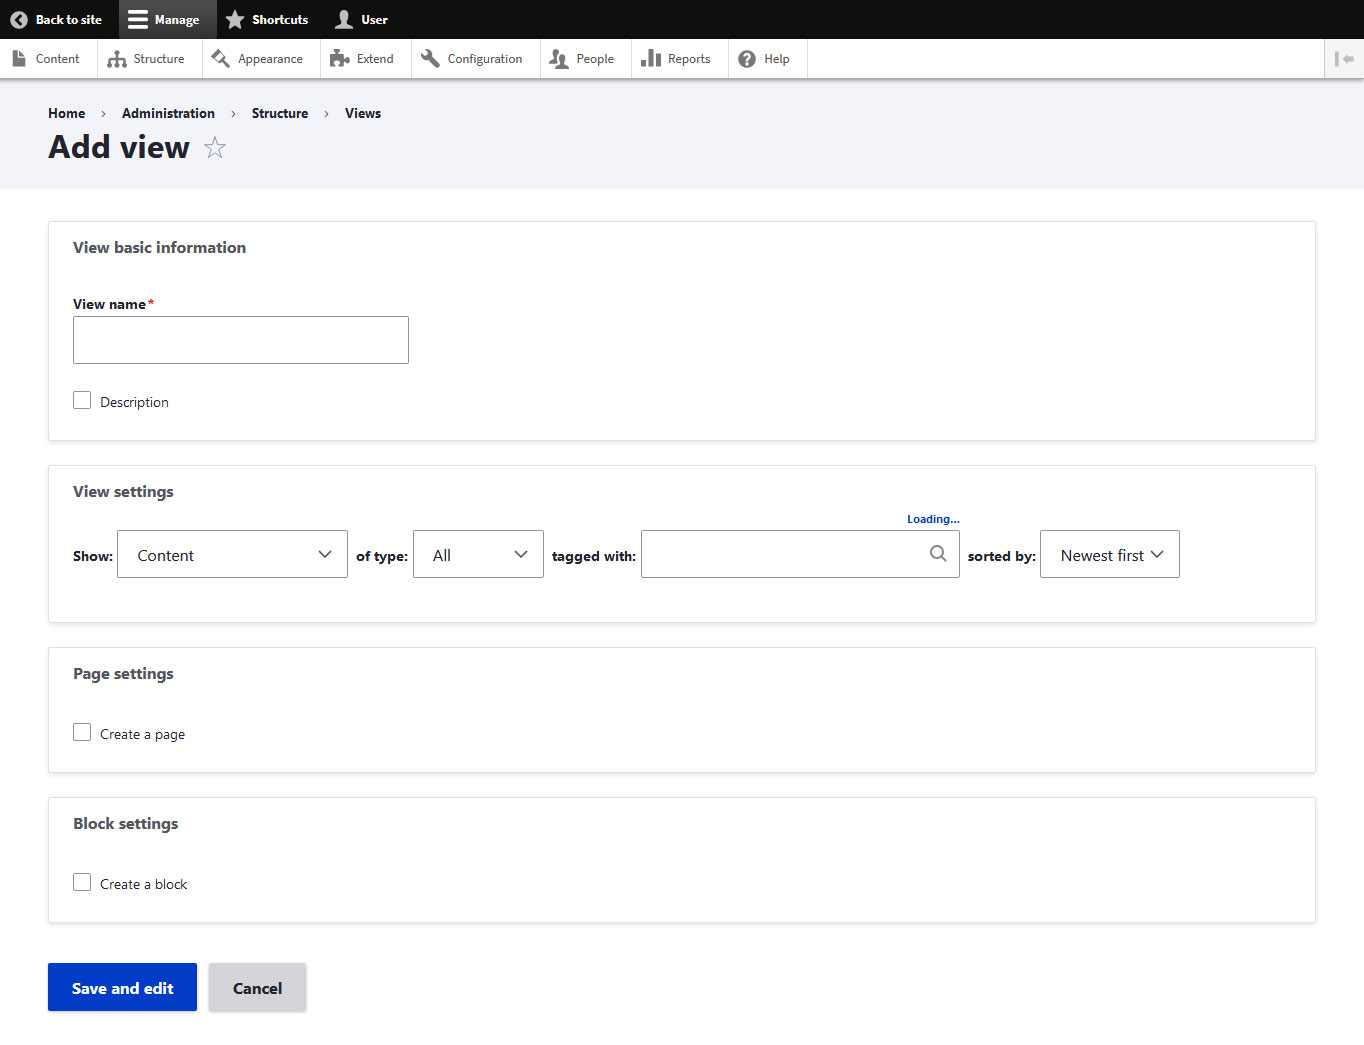
Here’s how to enter the basic information of the view:
- View Name – This is the name that will appear in the Views menu so you can find it easier to identify.
- Description – Again, this is shown in the Views menu as an explanation of what the view does. Filling in is optional.
Under View Settings, you want to specify that Article type content is displayed first, sorted by Newest. That way, your latest blog post is always at the top.
After that, it’s time to go to the page settings:
- Create page – Check this to have Drupal create a custom page for this view.
- Page Title – The title of the page. In this case, a blog is probably appropriate.
- Path – The URL suffix of the page. Again, a blog is an obvious choice. If you typed anything there, make sure it’s the same as what you selected in the post.
- Page Display Settings – Choose what format the posts are in should be displayed (grid, HTML list, table, raw list) and which part should be displayed (teaser, title, linked title or fields). In this case, we’ve opted for a raw list and teasers.
- Items to display – How many posts you want to display on the page.
- Use a pager – Whether to include pagination for this view.
- Create a menu link – We covered this earlier in the Drupal Menus part of the tutorial . Just don’t forget to select your main navigation and configure a link title (may we suggest a blog?).
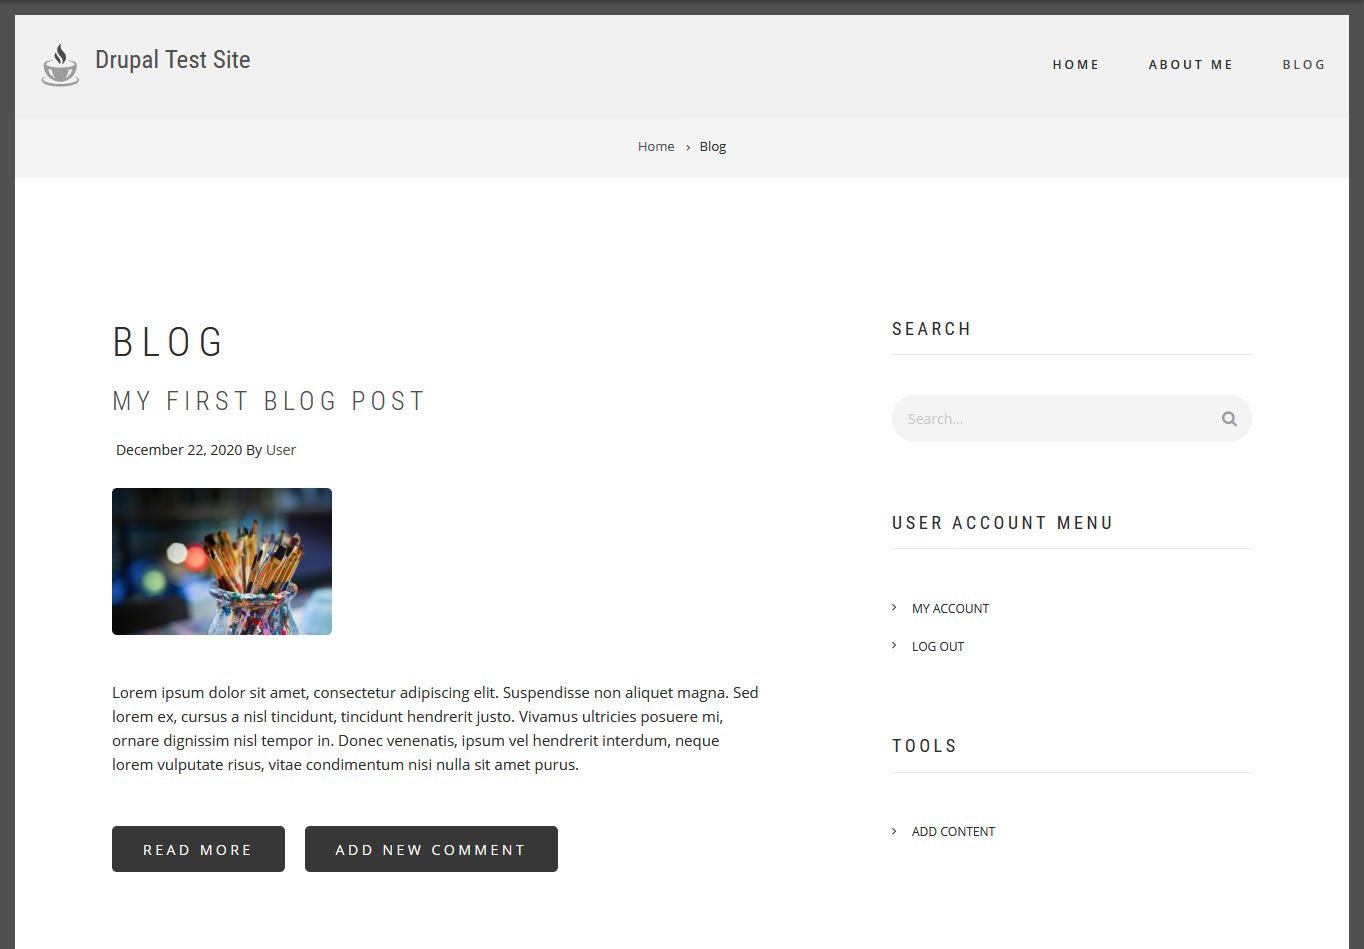
Click save and edit and then you should find your newly created blog frontend yours Page.
9. Learn how to delete and change content
If you ever want to make changes to or remove the pages or articles you have created, there’s nothing easier than that. Just go to the content menu to view a list of all content on your website.

If you have a lot of this, use the filter options above to filter by title , content type, release status, or language you are looking for.
Click the Edit button on the right to return to the editing screen for an individual piece of content. Alternatively, click the drop-down button to access the Delete option.

You can also make changes to multiple items at once by checking the small boxes on the left and selecting an action from the Select drop down menu above.

Besides publishing, unpublishing and deleting content, you can also make it sticky, make it non-sticky, put it on the front page or from remove it there save as content to update its timestamp Don’t forget to click the Apply to selected items button to actually implement your changes.
10. Enabling and disabling default modules
Okay, so by this point in the tutorial, you should have a basic understanding of how to interact with Drupal. If you’ve worked with any content management system or website builder before, it should be fairly familiar .However, the system can be extended much more and for any purpose.
See also: How To Make Money Blogging in 2022: The Ultimate Guide
For this you will most likely use modules, as mentioned before, these are small programs built into your Drupal site add all kinds of features and functions. The core software comes bundled with a number of which can be found under Extending.
Not all modules are installed by d and enable errors. To change this, simply tick the box in front and then scroll down and click Install. The CMS then takes care of the rest.
Conversely, you can remove all modules that you no longer need under the Uninstall tab.
In principle, it works the same as Install only in reverse order. Disable any unwanted extensions, then scroll down to click Uninstall.
11. Add Contributed Modules
Besides the standard modules, there are also many options from third-party developers. Adding it to your site works similarly to installing Drupal themes, which we covered earlier in the guide.
First, you need to find modules you like in the official directory. Once you’ve decided on one, either download it or copy its location. You can then add it to your website via Expand > Install New Module.
There are many more modules to choose from than themes, over 46,000. If you’re not sure which of them makes sense to install, here are some great options:
- Tokens — Tokens are small pieces of text placed using a placeholder system. Most of the functionality of the Token module has now been written into the Drupal core, but some modules still require it, like the Pathauto module.
- With the Chaos Tools Suite – also known as Ctools – you can You create your own modules, as well as forms, dialog boxes, swappable content types, and more.
- Pathauto — Drupal’s built-in Path module lets you create URLs by hand. It’s tedious to do this manually for each post, and Pathauto does the chore for you. You can assign custom substitution patterns and user account page paths to make the URLs meet your SEO and usability standards. Remember: Pathauto requires the Token and Ctools module.
- Gutenberg – If you’re moving from WordPress to Drupal, you might be pleased (or shocked, depending on your opinion) to hear that the new Gutenberg block editor that is also available for Drupal. It allows you to edit your website using blocks and is freely available.
- Google Analytics — For those who want to use Google Analytics to get information about how their website is being used, this module facilitates the Integration.
You can find more useful Drupal modules in this article.
12. Familiarize yourself with blocks
Once you have set up the main contributed modules, you may want to add a sidebar with various functions. Such content comes in the form of blocks in Drupal, which we’ll talk a little more about at the end of the tutorial. You can place them in different areas, customize their look, shape, size, position and pages of your website.
Check your block regions
Depending on the theme , modules and other components You have access to different types of blocks on your website. All options for managing them can be found under Structure > Block layout.
Blocks are stored by theme, so above is a list of themes installed on your site. Below is a list of all the places where you can add blocks, called regions. If you’re not sure where everyone is, click Demonstrate Block Regions above. You will then see a view of your site with highlights and labels for each block region.
Add Blocks to Regions
To add one anywhere, just scroll to the desired region and click place block. This will bring you a list of available options.
Clicking Place block next to the block you want on your site will take you to the configuration options.
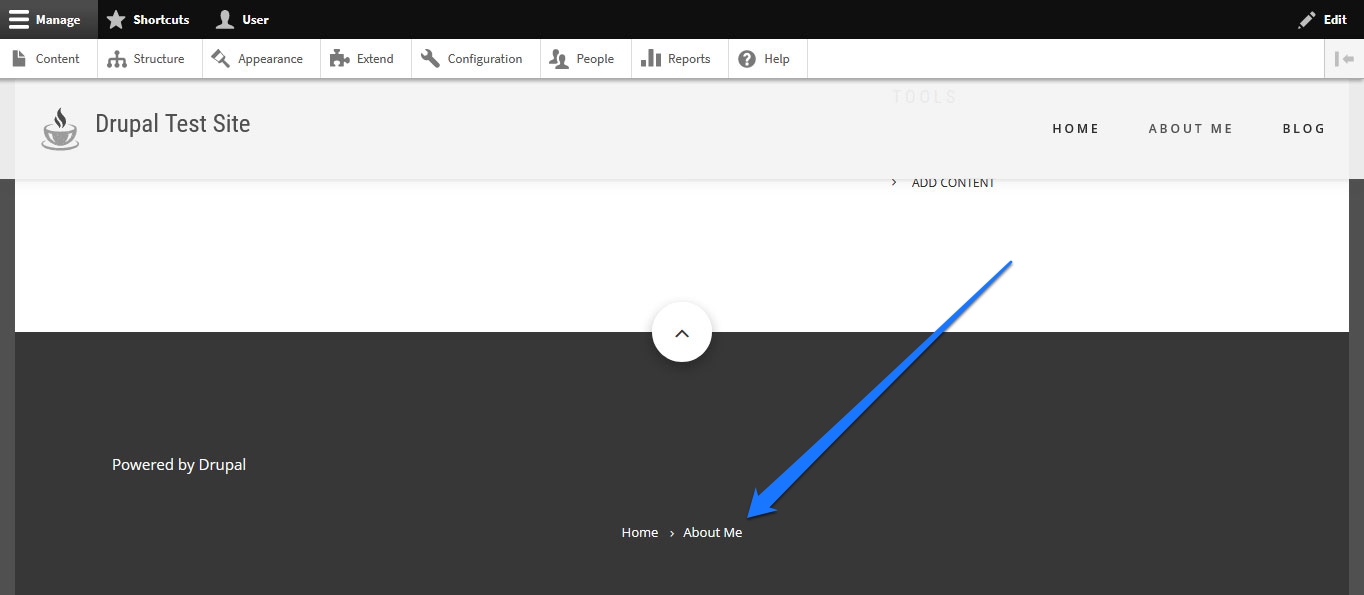
These are slightly different, depending on the site what you place. For example, with breadcrumbs, you can add a title (and choose whether to show it) and configure the block’s visibility. Below you can also change the region you want it to appear in (in case you picked the wrong one).
Once you’re happy, Block Save will add it to your site.
13. Manage Existing Blocks
Of course, you can also change whatever you want to blocks that are already displayed on your site.Use the drop-down menu under Region to move them to a different location, or simply drag them with Drag and drop from one block region to another.

On the right, you can access the block settings by clicking on Configure to change them. If you click on the arrow icon instead, you will be given the option to Disable or remove blocks entirely.

If you made any changes, don’t forget to save them at the bottom of the screen.
Config ure blocks on the frontend
You can also edit specific blocks from the frontend of your website. Hover over one of them so that the pencil icon appears, click on it, and then click Configure Block a second time.
This takes you to the same menu as before.
Here , you can change any settings, assign them to a new region and also remove blocks.
By the way, clicking on the edit link in the top right corner illuminates all editable elements on the page with icons, to help you find where to make changes.

14. Creating Custom Blocks
The final point about Drupal Blocks in this tutorial is that you can also create your own custom blocks. This can be useful, for example, if you have information that you want to display in different areas of your website. This could be your company’s opening times or a specific message you want visitors to see.
If you want this, go to Structure > Block Layout > Custom Block Library (the tab above). .
Click Add Custom Block here to get to this screen:
Enter a block description so you and other admins know what you’re talking about. Then, in the editor below, type the content you want the block to display.
When you’re done, save your custom block. If you do, you can then assign it to different regions on your site in the same way as other blocks.

15. Check out the latest Drupal feature: Layout Builder
Like WordPress, Drupal recently introduced a sort of block editor for content layout. Because this is such a big new feature, no Drupal tutorial would be complete without mentioning it.
In the case of Drupal, the new editor is called Layout Builder and is one of the core modules, but it isn’t by default Installed. To fix this, look for Layout Builder and Layout Discovery in the list of modules under Extend.

Check both boxes, scroll down and click Install.
Once the layout builder is active, you still need to configure what content you want to use it for. To do this, go to Structure > Content Types.

Here is a list of all the content types on your Drupal site (currently it should be the article and base pages). Use the drop-down menu at the end to select the Manage screen for the content type you want to change. Another option is to click Edit or manage fields and then click the Manage display tab at the top of the next screen.

Both should take you to the same place. Once there, scroll all the way down to enable Use Layout Builder and save.

Get to know the Drupal layout editor
Since this is a Drupal beginner tutorial, we’ll just give you a quick overview of what the Layout Builder can do here. Basically, you can change the structure of your content types via a drag-and-drop editor.
In the Manage Display menu with the Layout Builder enabled, you will now see a Manage Layout button that was not there before.

Clicking on it takes you to an example page for this content type with the ability to edit the layout.

The editor basically consists of sections and blocks. When you click on the “Add” section, you have the option to choose between different layouts, such as: B. a different number of columns and their dimensions /uploads/2020/12/add-section-in-drupal-layout-builder-december-2020.jpg” alt=”Add section in Drupal Layout Builder” />
Select one, enter a name for the section and click Add Section to add it to the page layout.
After that, you can add blocks to the section by clicking the Click the button of the same name.When you do this, you’ll get another slide-in menu with a list of the available blocks on your site, as well as the ability to create custom blocks.

Click on a block to configure it, then click Add to bring it to the page.

You can also drag and drop existing blocks to place them in different locations. Other options include the ability to remove entire sections, configure block settings, and more.
When you’re done and click Save Layout, the changes will apply to all content of that type. Seems pretty handy, doesn’t it?
Use the layout builder for individual pages
Besides making global changes for specific types of content, you can also use the layout builder to make changes to individual content elements .
To do this, make sure you enable the option Allow the layout of each piece of content to be customized under Manage Display.

If you try to edit an existing piece of this type of content, you now get a new “Layout” tab at the top, which takes you to the same editor.

Here you can make changes for individual overriding content Change the global settings so that they have their own layout.
The layout builder’s capabilities can be extended through modules and there are additional options. See the documentation for more information.
Final Thoughts: Drupal Tutorial for Beginners
Although the above tutorial is enough to give you a solid foundation for building a website with Drupal , remember that it takes some patience to fully unleash its power. The learning process takes time and is one of the best ways to get more experienced s to play around with the tools and system and figure out how to implement the things you want on your site.
Additionally: If you want a more systematic approach to learning Drupal, the following resources are really helpful:
- Drupal.org User Guide
- Drupal.org Documentation
- Drupal 8 Theming (Video)
- Drupal 8 Beginner Tutorials by OSTraining (Video)
- Drupalize.me (paid)
Whatever You want to learn, the information is probably already out there. So don’t hesitate to google it until you find it. We hope this Drupal tutorial for beginners helped you to take the first step.
See also: How to Write an Action Required Email Making People Take Action Right Away
.