You can create a group to store a list of people you want to email. Use this group to send messages to multiple contacts without having to type each contact separately in the message.
Groups you create in your Contacts folder are not available to other users in the university.
Reading: How to create an email list on office 365
How to create a contact group in Office 365
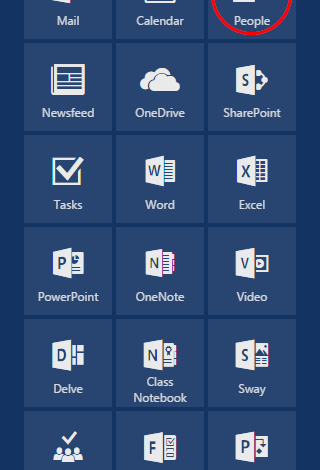
- Click the menu icon in Office 365 and then select People
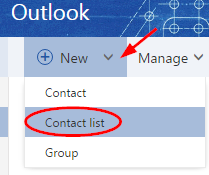
- Expand New and select Contact List

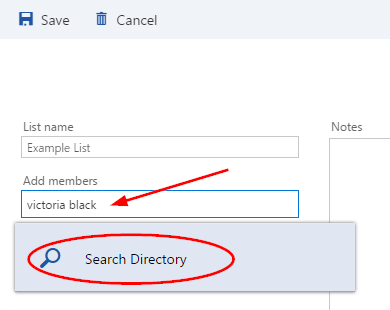
- Enter a name for the list Think privacy…, when naming your contact group, make sure it has a name that is obviously different from any other contact list or resource account you use. This is important to avoid accidentally sending information to the wrong person/group. The most important thing is that the first letters do not match those of other email addresses or groups that you use. For example, instead of having the groups “Childhood Yr1” and “Childhood Yr2”, you might name them “1. year of childhood” and “2. Year Childhood” so that the first few letters are different. The autocomplete feature in Outlook can be very helpful, but only if it autocompletes with the correct address.
- In the Add members field, start typing the person’s name that you want to add to the list. If the person is not already one of your contacts, you can search the university directory
- Once you click on the person’s name, they will be added to the list
- Add all the people you want in the list to the same Wise.
- When you are finished, click on Save
Note: To edit your list afterwards, click on the Office 365 Popup Click People in the menu icon. Find the name of your list, check the box next to the name, then click Edit in the menu bar.
Use your contact group in an email
- In Office 365 email, click the To: button in the To field of a new email

- Select the double arrow to expand the side panel
- Select Your Contacts
- Depending on how many contacts you have, you may be able to see the group name. Otherwise you can search for it.
- Once you find it, click the plus sign to the right of the group name and you will see it appear in the To field

- Select Save and you will be redirected back to the email address.
See also: How to Design an Outstanding Blog with best examples and templates
Please note: if you regularly email this group, you may be able to start typing the group name in the To field and select it from the suggested  Please see the above Privacy notice when naming the group.
Learn more about contact lists for Office 365 from Microsoft.
See also: Hybrid Resume: Template and Examples for Any Job in 2023
.